Chapter 9. Design Patterns
Throughout the book, we have covered various async concepts and how to implement async code in multiple ways to solve problems. However, we know that software engineering does not exist in a vacuum. When applying your newfound knowledge of async programming in the wild, you will not be able to apply isolated async code in a perfect environment. You might be applying async code to an existing codebase that is not async. You might be interacting with a third-party service like a server, where you will need to handle variances in the response to the server. In this chapter, we cover design patterns that help you implement async code when solving a range of problems.
By the end of this chapter, you will be able to implement async code in an existing codebase that previously did not support async programming. You will also be able to implement the waterfall design pattern to enable the building of pathways with reusable async components. Instead of altering the code of our async tasks to add features, you will be able to implement the decorator pattern so you can easily slot in extra functionality such as logging by just adding a compilation flag when running or building your program. Finally, you will be able to get the entire async system to adapt to errors by implementing the retry and circuit-breaker patterns.
First of all, we need to be able to implement async code in our system before implementing design patterns. So we should start with building an isolated module.
Building an Isolated Module
Let’s imagine that we have a Rust codebase that does not have any async code, and we would like to integrate some async Rust into this existing codebase. Instead of rewriting the entire codebase to incorporate async Rust, we advise keeping the blast radius of the interactions small. Massive rewrites rarely keep to deadlines, and as the rewrite is delayed, more features get added to the existing codebase, threatening the completion of the rewrite. We can thus start small by writing our async code in its own module and then offering synchronous entry points into it. The synchronous entry points enable our async module to be implemented anywhere in the existing codebase. The synchronous entry points also enable other developers to use our async module without having to read up on async programming. This eases the integration, and other developers can get to grips with async programming in their own time.
But how can we offer the benefits of async programming with synchronous entry points? Figure 9-1 depicts a high-level flow for offering async benefits to the non-async codebase.

Figure 9-1. Overview of our isolated async module
As Figure 9-1 lays out, we send an async task to the runtime, put the handle in a map for those async tasks, and return a key that corresponds to the handle in the map. The developer using the module calls a normal blocking function and receives a unique ID back. The task is being progressed in the async runtime, and the developer can write some more synchronous code. When the developer needs the result, they pass the unique ID through the get_add function, which will block the synchronous code until the result is yielded. The developer is treating the unique ID like an async handle but does not have to directly interact with any async code. Before we can implement this approach, we need the following dependencies:
tokio={version="1.33.0",features=["full"]}uuid={version="1.5.0",features=["v4"]}
With these dependencies, we can create our async_mod.rs file next to our main.rs. Our async_mod.rs file is going to house our async module code. Inside this file, we need these imports:
usestd::sync::LazyLock;usetokio::runtime::{Runtime,Builder};usetokio::task::JoinHandle;usestd::collections::HashMap;usestd::sync::{Arc,Mutex};pubtypeAddFutMap=LazyLock<Arc<Mutex<HashMap<String,JoinHandle<i32>>>>>;
For our runtime, we are going to use the following:
staticTOKIO_RUNTIME:LazyLock<Runtime>=LazyLock::new(||{Builder::new_multi_thread().enable_all().build().expect("Failed to create Tokio runtime")});
We define our trivial async_add function with a sleep to represent an async task:
asyncfnasync_add(a:i32,b:i32)->i32{println!("starting async_add");tokio::time::sleep(tokio::time::Duration::from_secs(3)).await;println!("finished async_add");a+b}
This is the core async task that we are going to expose to the async runtime but not outside the module, which is why the runtime and the async_add function are not public.
Now that we have defined our async runtime and async_add task, we can build our handler. As shown in Figure 9-2, our handler is essentially a router for our entry points to interact with the runtime and map.
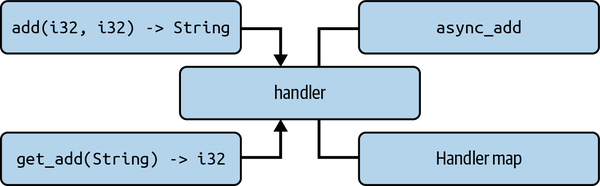
Figure 9-2. Links to our async handle map
Our handler needs to be a function that accepts either the numbers to be added or the unique ID to get the result:
fnadd_handler(a:Option<i32>,b:Option<i32>,id:Option<String>)->Result<(Option<i32>,Option<String>),String>{staticMAP:AddFutMap=LazyLock::new(||Arc::new(Mutex::new(HashMap::new())));match(a,b,id){(Some(a),Some(b),None)=>{...},(None,None,Some(id))=>{...},_=>Err("either a or b need to be provided or ahandle_id".to_string())}}
Note
For our example, the Option<i32> input works for the add_handler function because the users will not be directly interacting with it. However, if you plan for add_handler to support more operations such as subtraction or multiplication, it is better to pass in an enum to the add_handler function list:
enumOperation{Add{a:i32,b:i32},Multiply{a:i32,b:i32},Subtract{a:i32,b:i32},}fnperform_operation(op:Operation)->i32{matchop{Operation::Add{a,b}=>a+b,Operation::Multiply{a,b}=>a*b,Operation::Subtract{a,b}=>a-b,}}
Our future map is lazily evaluated, as in Chapter 3 when we defined the queue in the spawn_task function as a lazy evaluation. If we call the handler function and update the MAP, the next time we call the handler, we will have the updated MAP within the handler function. Even though we are going to be calling the handler function only from the main thread in synchronous code, we cannot guarantee that another developer won’t spin up a thread and call this function.
If you are 100% certain that the handler will be called only in the main thread, you can get rid of the Arc and Mutex, make the MAP mutable, and access the MAP in the rest of the function with unsafe code. However, as you have probably guessed, it is unsafe. You could also use thread_local to get rid of the Arc and Mutex. This can be safe as long as the developer gets the result in the same thread that the task was spawned. A developer does not need access to the entire map of the program. The developer needs access only to the map that holds their async handle for their task.
In our first match branch of our handler function, we are providing the numbers to be added, so we spawn a task, tether it to a unique ID in our MAP, and return the unique ID:
lethandle=TOKIO_RUNTIME.spawn(async_add(a,b));letid=uuid::Uuid::new_v4().to_string();MAP.lock().unwrap().insert(id.clone(),handle);Ok((None,Some(id)))
We can now define our branch that handles the unique ID for getting the result of the task. Here, we get the task handle from the MAP, pass the handle into the async runtime to block the current thread until the result has been yielded, and return the result:
lethandle=matchMAP.lock().unwrap().remove(&id){Some(handle)=>handle,None=>returnErr("No handle found".to_string())};letresult:i32=matchTOKIO_RUNTIME.block_on(async{handle.await}){Ok(result)=>result,Err(e)=>returnErr(e.to_string())};Ok((Some(result),None))
Our handler now works. However, note that our handler is not public. This is because the interface is not ergonomic. A developer using our module could pass in the wrong combination of inputs. We can start with our first public interface:
pubfnsend_add(a:i32,b:i32)->Result<String,String>{matchadd_handler(Some(a),Some(b),None){Ok((None,Some(id)))=>Ok(id),Ok(_)=>Err("Something went wrong, please contact author".to_string()),Err(e)=>Err(e)}}
We give the developer no option but to provide two integers that are passed into our handler. We then return the ID. However, if we return any other variant that is not an error, something is seriously wrong with our implementation. To help the developer using our module save time trying to debug what they did wrong, we tell them to contact us because it is our issue to solve.
The get-result interface is similar to our send interface, just inverted, taking the following form:
pubfnget_add(id:String)->Result<i32,String>{matchadd_handler(None,None,Some(id)){Ok((Some(result),None))=>Ok(result),Ok(_)=>Err("Something went wrong, please contact author".to_string()),Err(e)=>Err(e)}}
Now that our async module is complete, we can use it in our main.rs:
modasync_mod;fnmain(){println!("Hello, world!");letid=async_mod::send_add(1,2).unwrap();println!("id: {}",id);std::thread::sleep(std::time::Duration::from_secs(4));println!("main sleep done");letresult=async_mod::get_add(id).unwrap();println!("result: {}",result);}
Running the code gives us output similar to the following printout:
Hello, world!
starting async_add
id: e2a2f3e1-2a77-432c-b0b8-923483ae637f
finished async_add
main sleep done
result: 3
Your ID will be different, but the order should be the same. Here, we can see that our async task is being processed as our main thread continues, and we can get the result. We can see how isolated our async code is. We now have the freedom to experiment. For instance, you will be able to experiment with different runtimes and runtime configurations. Recall in Chapter 7 we could switch over to local sets and start using local thread states to cache recently calculated values if the computational needs increase for our calculations. However, our interface is completely decoupled from async primitives, so other developers using our module will not notice the difference, and thus their implementations of our interface will not break.
Now that we have covered how to implement an async module with a minimal footprint on the rest of the codebase, we can implement other design patterns in our codebases. We can start with the waterfall design pattern.
Waterfall Design Pattern
The waterfall design pattern (also known as the chain of responsibility pattern) is a chain of async tasks that feed values directly into one another, as laid out in Figure 9-3.
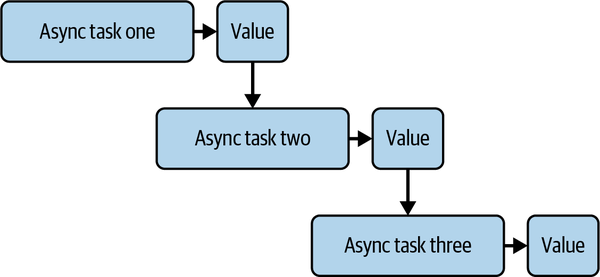
Figure 9-3. Waterfall async design pattern
Implementing a basic waterfall design pattern is straightforward. With Rust, we can exploit the error-handling system for safe and concise code. We can demonstrate this with the following three async tasks:
typeWaterFallResult=Result<String,Box<dynstd::error::Error>>;asyncfntask1()->WaterFallResult{Ok("Task 1 completed".to_string())}asyncfntask2(input:String)->WaterFallResult{Ok(format!("{} then Task 2 completed",input))}asyncfntask3(input:String)->WaterFallResult{Ok(format!("{} and finally Task 3 completed",input))}
Because they all return the same error type, they all lock into one another, with the ? operator:
#[tokio::main]asyncfnmain()->Result<(),Box<dynstd::error::Error>>{letoutput1=task1().await?;letoutput2=task2(output1).await?;letresult=task3(output2).await?;println!("{}",result);Ok(())}
The waterfall approach is simple and predictable. It also enables us to reuse our async tasks for building blocks. For instance, our three async tasks could be accepting i32 data types. We could add logic around these async tasks as follows:
#[tokio::main]asyncfnmain()->Result<(),Box<dynstd::error::Error>>{letoutput1=task1().await?;letoutput2:i32;ifoutput1>10{output2=task2(output1).await?;}else{output2=task3(output1).await?;}println!("{}",output2);Ok(())}
Considering how we can use logic to direct the flow of the waterfall, we can see where the waterfall implementation might be useful for building pathways that differ slightly but use the same core components. We can also easily slot metrics into these workflows between the components as needed. Although inserting metrics/logging between the components can be useful, we can also use the decorator pattern to add functionality to our tasks.
The Decorator Pattern
The decorator pattern is a wrapper around a functionality that either adds to that functionality or executes logic before or after the main execution. Classic examples of decorators are fixtures: a unit test sets up the state of some data storage before the test and then destroys the state after the test. The setup and destroying of state between tests ensures that tests are atomic, and a failed test will not alter the outcome of other tests. This state management can be wrapped around code that we are testing. Logging is also a classic use because we can easily switch off the logging without having to change our core logic. Decorators are also used for session management.
Before we look at implementing the decorator pattern in an async context, let’s look at how to implement a basic decorator for a struct. Our decorator will add to a string. The functionality that we are going to decorate will yield a string with the following code:
traitGreeting{fngreet(&self)->String;}
We then define a struct that implements our trait:
structHelloWorld;implGreetingforHelloWorld{fngreet(&self)->String{"Hello, World!".to_string()}}
We can define a decorator struct that implements our trait, and it contains an inner component that similarly embodies our trait:
structExcitedGreeting<T>{inner:T,}impl<T>ExcitedGreeting<T>{fngreet(&self)->StringwhereT:Greeting,{letmutgreeting=self.inner.greet();greeting.push_str(" I'm so excited to be in Rust!");greeting}}
Here, we are calling the trait from the inner struct and adding to the string, returning the altered string. We can test our decorator pattern easily:
fnmain(){letraw_one=HelloWorld;letraw_two=HelloWorld;letdecorated=ExcitedGreeting{inner:raw_two};println!("{}",raw_one.greet());println!("{}",decorated.greet());}
We can easily wrap functionality around our struct. Because we are implementing the same trait for the wrapper, we can also pass our wrapped struct into functions that expect structs that have implemented our trait. Therefore, we don’t need to change any code in our codebase if we are expecting traits as opposed to structs.
We can even make our implementation of the decorator pattern dependent on the compilation features. For example, we can add a feature in our Cargo.toml:
[features]logging_decorator=[]
We can then rewrite our main function to compile with the decorated logic (or not), depending on the feature flags:
fnmain(){#[cfg(feature ="logging_decorator")]lethello=ExcitedGreeting{inner:HelloWorld};#[cfg(not(feature ="logging_decorator"))]lethello=HelloWorld;println!("{}",hello.greet());}
To run our decorator, we need to call the following terminal command:
cargorun--features"logging_decorator"
We can set this feature to be the default if needed and can also add extra dependencies to the feature if it relies on any dependencies.
Now that you understand the basics of a decorator, we can implement the same functionality in a future. Instead of a struct, we have an inner future. Before we build our future, we need these imports:
usestd::future::Future;usestd::pin::Pin;usestd::task::{Context,Poll};
For this decorator, we are going to implement a logging trait, and our example is going to call a log function before we poll the inner future. Our logging trait takes the following form:
traitLogging{fnlog(&self);}
We then define our logging struct that contains an inner future:
structLoggingFuture<F:Future+Logging>{inner:F,}impl<F:Future+Logging>FutureforLoggingFuture<F>{typeOutput=F::Output;fnpoll(self:Pin<&mutSelf>,cx:&mutContext<'_>)->Poll<Self::Output>{letinner=unsafe{self.map_unchecked_mut(|s|&muts.inner)};inner.log();inner.poll(cx)}}
Although we are using unsafe code in our poll, our code is safe. We have to use the unsafe block because the Rust compiler cannot check projections of the pin. We are not moving the value out of the pin.
Tip
While the unsafe block is safe, we can negate the need for the unsafe tag by pinning our inner future with the following code:
structLoggingFuture<F:Future+Logging>{inner:Pin<Box<F>>,}impl<F:Future+Logging>FutureforLoggingFuture<F>{typeOutput=F::Output;fnpoll(self:Pin<&mutSelf>,cx:&mutContext<'_>)->Poll<Self::Output>{letthis=self.get_mut();letinner=this.inner.as_mut();inner.log();inner.poll(cx)}}
We now need to implement the Logging trait for any type that also implements the future:
impl<F:Future>LoggingforF{fnlog(&self){println!("Polling the future!");}}
This means that whatever future is held by our decorator, we can call the log function. We could get creative with combining other traits so that our futures being passed into the decorator can yield specific values about the future, but for this example, we are merely demonstrating how to implement an async decorator. We can now define a simple future, wrap it, and call it:
asyncfnmy_async_function()->String{"Result of async computation".to_string()}#[tokio::main]asyncfnmain(){letlogged_future=LoggingFuture{inner:my_async_function()};letresult=logged_future.await;println!("{}",result);}
Running our code results in the following printout:
Polling the future!
Result of async computation
Here, we can see that our logging decorator works. We can use the same compilation feature approaches for our decorator.
Because decorators are designed to be slotted in with minimal friction and have the same type signature, they should not affect the logic of the program too much. If we want to alter the flow of our program based on certain conditions, we can consider using the state machine pattern.
The State Machine Pattern
State machines hold a particular state as well as logic around how that state is changed. Other processes can reference that state to inform the way they act; this is the state machine pattern. A simple real-world example of a state machine is a set of traffic lights. Depending on the country, traffic lights can vary, but they all have at least two states: red and green. Depending on the system, a range of inputs and hardcoded logic can change the state of each traffic light through time. What is important to note is that drivers directly observe the state of the traffic lights and act accordingly. We can have as many or as few drivers as we want, but the contract stays the same. The lights focus on maintaining the state and changing it depending on inputs, and the drivers merely observe and react to that state.
With this analogy, it is not surprising that state machines can be used for scheduling tasks and managing job queues, networking, creating workflows and pipelines, and controlling machinery/systems with distinct states that respond to a combination of async inputs and timed events.
In fact, to drive it home further, the concept of state machines isn’t just limited to specific examples like traffic lights. Rust’s async/await model also relies on the idea of futures being state machines. A future represents a value that may not be available yet, and as it progresses, it transitions through different states (e.g., Pending, Ready) until it produces a result or error.
For our example, we can build a basic switch state that is either on or off. Enums are great for managing states because we have the match pattern, and enum variants can also house data. Our simple state takes the following form:
enumState{On,Off,}
We define the event state that our state machine consumes to change the state:
enumEvent{SwitchOn,SwitchOff,}
We now have events and the state. The interface between the events and state can be defined with the following code:
implState{asyncfntransition(self,event:Event)->Self{match(&self,event){(State::On,Event::SwitchOff)=>{println!("Transitioning to the Off state");State::Off},(State::Off,Event::SwitchOn)=>{println!("Transitioning to the On state");State::On},_=>{println!("No transition possible,staying in the current state");self},}}}
Here, we can see that if the state of the switch is on, the event of turning off our switch would turn the state to off, and vice versa. We can test our state machine:
#[tokio::main]asyncfnmain(){letmutstate=State::On;state=state.transition(Event::SwitchOff).await;state=state.transition(Event::SwitchOn).await;state=state.transition(Event::SwitchOn).await;matchstate{State::On=>println!("State machine is in the On state"),_=>println!("State machine is not in the expected state"),}}
Running this code gives the following printout:
Transitioning to the Off state
Transitioning to the On state
No transition possible, staying in the current state
State machine is in the On state
In our example, async code is not essential, but this is because our example is simple. We could use async code, for example, to access a state through a mutex or to listen to events through an async channel. As in our traffic light example, our state machine decouples the logic behind the state, with the async tasks being processed in the runtime. For instance, our state machine would be a struct with a count and enum of on or off. Other tasks when starting could send an event to our state machine via a channel to increase the count. When the count is over a certain threshold, the state machine could switch the state to off. If new tasks are required to check the state machine for the switch to be on before starting, we have implemented a simple signal system that throttles the progression of new async tasks if the task count is too high. However, we could replace this switch with a counter by using an AtomicUsize, as opposed to an AtomicBool, if we wanted. But our state machine example sets us up to implement more complex logic if needed.
Our state machine can also poll different futures depending on its state. The following code is an example of how we can poll different futures based on the state of our switch:
structStateFuture<F:Future,X:Future>{pubstate:State,pubon_future:F,puboff_future:X,}
Now that the state machine has the state and the two futures to poll, we can implement the polling logic:
impl<F:Future,X:Future>FutureforStateFuture<F,X>{typeOutput=State;fnpoll(mutself:Pin<&mutSelf>,cx:&mutContext<'_>)->Poll<Self::Output>{matchself.state{State::On=>{letinner=unsafe{self.map_unchecked_mut(|s|&muts.on_future)};let_=inner.poll(cx);cx.waker().wake_by_ref();Poll::Pending},State::Off=>{letinner=unsafe{self.map_unchecked_mut(|s|&muts.off_future)};let_=inner.poll(cx);cx.waker().wake_by_ref();Poll::Pending},}}}
In this example, the future will constantly poll in the background. This enables our state machine to switch its continuous operations based on the state. Adding extra functionality such as listening to events through a channel to potentially change the state before polling the futures can easily be done.
Going back to our example of our state machine throttling the progression of new tasks if the count is too high, how should the async tasks checking the state machine handle the off state? This is where the retry pattern comes in.
The Retry Pattern
We might be in a situation where our async tasks are blocked when trying to access something. This could be our state machine saying that there are too many tasks or a server could be overloaded. We do not want our async task to give up, so a retry might yield the result we want. However, we also do not want to hammer our target relentlessly. If a server, mutex, or database is overloaded, the last thing we want to do is flood the overloaded target with back-to-back requests.
The retry pattern allows the async task to retry the request. However, within each retry, there is a delay, and this delay doubles every attempt. This backing off will allow our target to get a drop in the frequency of requests to catch up on tasks that the target is processing.
To explore the retry pattern, we initially define a get_data function that will always return an error:
asyncfnget_data()->Result<String,Box<dynstd::error::Error>>{Err("Error".into())}
We then define an async task that implements the retry function:
asyncfndo_something()->Result<(),Box<dynstd::error::Error>>{letmutmiliseconds=1000;lettotal_count=5;letmutcount=0;letresult:String;loop{matchget_data().await{Ok(data)=>{result=data;break;},Err(err)=>{println!("Error: {}",err);count+=1;ifcount==total_count{returnErr(err);}}}tokio::time::sleep(tokio::time::Duration::from_millis(miliseconds)).await;miliseconds*=2;}Ok(())}
We run our retry pattern:
#[tokio::main]asyncfnmain(){letoutcome=do_something().await;println!("Outcome: {:?}",outcome);}
And we get the following printout:
Error: Error
Error: Error
Error: Error
Error: Error
Error: Error
Outcome: Err("Error")
Our retry works. Retry patterns are more of a utility than a design choice for an entire application. Sprinkling the retry pattern throughout the application when an async task needs to access a target will give your system more flexibility if the system handles spikes in traffic due to reducing pressure on the targets.
However, what if we keep getting errors? Surely, if a threshold is passed, continuing to spawn tasks doesn’t make sense. For instance, if a server has completely crashed, there has to be a state where we no longer waste CPU resources by sending further requests. This is where the circuit-breaker pattern helps us.
The Circuit-Breaker Pattern
The circuit-breaker pattern stops tasks from being spawned if the number of errors exceeds the threshold. Instead of defining our own state machine that is either on or off, we can replicate the same effect with two simple atomic values that are defined here:
usestd::sync::atomic::{AtomicBool,AtomicUsize,Ordering};usestd::future::Future;usetokio::task::JoinHandle;staticOPEN:AtomicBool=AtomicBool::new(false);staticCOUNT:AtomicUsize=AtomicUsize::new(0);
The premise is fairly simple. If OPEN is true, we state that the circuit is open, and we can no longer spawn new tasks. If an error occurs, we increase COUNT by one and set OPEN to true if COUNT exceeds the threshold. We also need to write our own spawn_task function that checks OPEN before spawning a task. Our spawn_task function takes the following form:
fnspawn_task<F,T>(future:F)->Result<JoinHandle<T>,String>whereF:Future<Output=T>+Send+'static,T:Send+'static,{letopen=OPEN.load(Ordering::SeqCst);ifopen==false{returnOk(tokio::task::spawn(future))}Err("Circuit Open".to_string())}
We can now define two simple async tasks—one task to throw an error and another to just pass:
asyncfnerror_task(){println!("error task running");letcount=COUNT.fetch_add(1,Ordering::SeqCst);ifcount==2{println!("opening circuit");OPEN.store(true,Ordering::SeqCst);}}asyncfnpassing_task(){println!("passing task running");}
With these tasks, we can determine when our system is going to break. We can test that our system breaks when it reaches three errors:
#[tokio::main]asyncfnmain()->Result<(),String>{let_=spawn_task(passing_task())?.await;let_=spawn_task(error_task())?.await;let_=spawn_task(error_task())?.await;let_=spawn_task(error_task())?.await;let_=spawn_task(passing_task())?.await;Ok(())}
This gives us the following printout:
passing task running
error task running
error task running
error task running
opening circuit
Error: "Circuit Open"
We can no longer spawn tasks after the threshold is reached. We can get creative with what we do when the threshold is reached. Maybe we keep track of all tasks and block only certain types of tasks if their own individual thresholds were broken. We could stop the program altogether with a graceful shutdown and trigger an alert system so developers and IT staff are informed of the shutdown. We could also take time snapshots and close the circuit after a certain amount of time has passed. These variances all depend on the problem you are solving and the solution that’s needed. And with this circuit-breaker pattern, we have covered enough design patterns to aid your implementation of async code into a codebase.
Summary
In this chapter, we covered a range of design patterns to enable you to implement the async code that you learned throughout the book. Thinking about the codebase as a whole is key. If you are integrating into an existing codebase with no async code, the isolated module is the obvious first step. All the design patterns in this chapter were chosen with simple code examples. Small, simple steps are best for implementing async code. This approach makes testing easier and enables you to roll back if the recent implementation is no longer needed or is breaking something else in the code.
While it can be tempting to preemptively apply design patterns, overengineering seems to be the number one criticism of design patterns in general. Write your code as you would, and consider implementing a design pattern when it presents itself. Setting out to force a design pattern increases the risk of your implementation, resulting in overengineering. Understanding your design patterns is crucial to knowing when and where to implement them.
In Chapter 10, we cover async approaches to networking by using just the standard library and no external dependencies to build our own async TCP server.