Chapter 5. Connecting to Services
React, unlike frameworks such as Angular, does not include everything you might need for an application. In particular, it does not provide a standard way to get data from network services into your application. That freedom is excellent because it means that React applications can use the latest technology. The downside is that developers just starting with React are left to struggle on their own.
In this chapter, we will look at a few ways to attach network services to your application. We will see some common themes through each of these recipes, and we’ll try to keep the network code separate from the components that use it. That way, when a new web service technology comes along, we can switch to it without changing a lot of code.
Convert Network Calls to Hooks
Problem
One of the advantages of component-based development is that it breaks the code down into small manageable chunks, each of which performs a distinct, identifiable action. In some ways, the best kind of component is one that you can see on a large screen without scrolling. One of the great features of React is that it has, in many ways, gotten simpler over time. React hooks and the move away from class-based components have removed boilerplate and reduced the amount of code.
However, one way to inflate the size of a component is by filling it with networking code. If you aim to create simple code, you should try to strip out networking code from your components. The components will become smaller, and the network code will be more reusable.
But how should we split out the networking code?
Solution
In this recipe, we will look at a way of moving your network requests into React hooks to track whether a network request is still underway or if there has been some error that prevented it from succeeding.
Before we look at the details, we need to think about what is important to us when making an asynchronous network request. There are three things that we need to track:
-
The data returned by the request
-
Whether the request is still loading the data from the server
-
Any errors that might have occurred when running the request
You will see these three things appearing in each of the recipes in this chapter. It doesn’t matter whether we are making the
requests with fetch or axios commands, via Redux middleware, or through an API query layer like GraphQL; our component will
always care about data, loading state, and errors.
As an example, let’s build a simple message board that contains several forums. The messages on each forum contain an author field and a
text field. Figure 5-1 shows a screenshot of the example application, which you can download from the GitHub site.
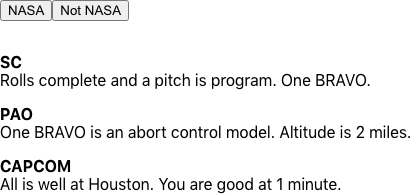
Figure 5-1. The buttons select the NASA or Not NASA forums
The buttons at the top of the page select the “NASA” or “Not NASA” forums. A small Node server provides the backend for our example application, which has pre-populated some messages into the NASA forum. Once you have downloaded the source code, you can run the backend server by running the server.js script in the application’s main directory:
$ node ./server.jsThe backend server runs at http://localhost:5000. We can start the React application itself in the usual way:
$ npm run startThe React application will run on port 3000.
When in development mode, we proxy all backend requests through the React server. If you’re using create-react-app, you can
do this by adding a proxy property to package.json and setting it to http://localhost:5000. The React server will pass
API calls to our server.js backend. For example, http://localhost:3000/messages/nasa (which returns an array of messages for the
NASA forum) will be proxied to http://localhost:5000/messages/nasa.
We’ll make the network request to read the messages using a simple fetch command:
constresponse=awaitfetch(`/messages/${forum}`)if(!response.ok){consttext=awaitresponse.text()thrownewError(`Unabletoreadmessagesfor${forum}:${text}`)}constbody=awaitresponse.json()
Here, the forum value will contain the string ID of the forum. The fetch command is asynchronous and returns a promise, so we
will await it. Then we can check whether the call failed with any bad HTTP status, and if so, we will throw an error. We will
extract the JSON object out of the response and store it in the body variable. If the response body is not a correctly formatted
JSON object, we will also throw an error.
We need to keep track of three things in this call: the data, the loading state, and any errors. We’re going to bundle this whole
thing up inside a custom hook, so let’s have three states called data, loading, and error:
constuseMessages=(forum)=>{const[data,setData]=useState([])const[loading,setLoading]=useState(false)const[error,setError]=useState()....return{data,loading,error}}
We’ll pass in the forum name as a parameter to the useMessages hook, which will return an object containing the data, loading,
and error states. We can use object destructuring to extract and rename the values in any component that uses the hook, like this:
const{data:messages,loading:messagesLoading,error:messagesError,}=useMessages('nasa')
Renaming the variables in a spread operator helps avoid naming conflicts. For example, if you want to read messages from more
than one forum, you could make a second call to the useMessages hook and choose a variable other than messages for the second
hook response.
Let’s get back to the useMessages hook. The network request depends upon the forum value that we pass in, so we need to make
sure that we run the fetch request inside a useEffect:
useEffect(()=>{setError(null)if(forum){....}else{setData([])setLoading(false)}},[forum])
We’re omitting for the moment the code that makes the actual request. The code inside the useEffect will run the first time the hook
is called. If the client component is re-rendered and passes in the same value for forum, the useEffect will not run because the
[forum] dependency will not have changed. It will run again only if the forum value changes.
Now let’s look at how we can drop in the fetch request to this hook:
import{useEffect,useState}from'react'constuseMessages=(forum)=>{const[data,setData]=useState([])const[loading,setLoading]=useState(false)const[error,setError]=useState()useEffect(()=>{letdidCancel=falsesetError(null)if(forum){;(async()=>{try{setLoading(true)constresponse=awaitfetch(`/messages/${forum}`)if(!response.ok){consttext=awaitresponse.text()thrownewError(`Unabletoreadmessagesfor${forum}:${text}`)}constbody=awaitresponse.json()if(!didCancel){setData(body)}}catch(err){setError(err)}finally{setLoading(false)}})()}else{setData([])setLoading(false)}return()=>{didCancel=true}},[forum])return{data,loading,error}}exportdefaultuseMessages
Because we’re using await to handle the promises correctly, we need to wrap the code in a rather ugly (async () => {...})
call. Inside there, we’re able to set values for data, loading, and error as the request runs, finishes, and (possibly) fails.
All of this will happen asynchronously after the call to the hook has been completed. When the data, loading, and error states
change, the hook will cause the component to be re-rendered with the new values.
A consequence of having asynchronous code inside a hook is that the hook will return before the network response has been
received. This means there’s a chance that the hook might be called again, before the previous network response has been received.
To avoid the network responses being resolved in the wrong order, the example code tracks if the current request was overridden by a
later request using the didCancel variable. This variable will control whether the hook returns the data from the hook. It won’t
cancel the network request itself. To do that, see “Cancel Network Requests with Tokens”.
Let’s take a look at App.js in the example application to see what it looks like to use this hook:
import'./App.css'import{useState}from'react'importuseMessagesfrom'./useMessages'functionApp(){const[forum,setForum]=useState('nasa')const{data:messages,loading:messagesLoading,error:messagesError,}=useMessages(forum)return(<divclassName="App"><buttononClick={()=>setForum('nasa')}>NASA</button><buttononClick={()=>setForum('notNasa')}>NotNASA</button>{messagesError?(<divclassName="error">Somethingwentwrong:<divclassName="error-contents">{messagesError.message}</div></div>):messagesLoading?(<divclassName="loading">Loading...</div>):messages&&messages.length?(<dl>{messages.map((m)=>(<><dt>{m.author}</dt><dd>{m.text}</dd></>))}</dl>):('No messages')}</div>)}exportdefaultApp
Our example application changes which forum is loaded when you click either the NASA or Not NASA button. The example server returns a 404-status for the “Not NASA” forum, which causes an error to appear on-screen. In Figure 5-2, we can see the example application showing the loading state, the messages from the NASA forum, and an error when we try to load data from the missing “Not NASA” forum.
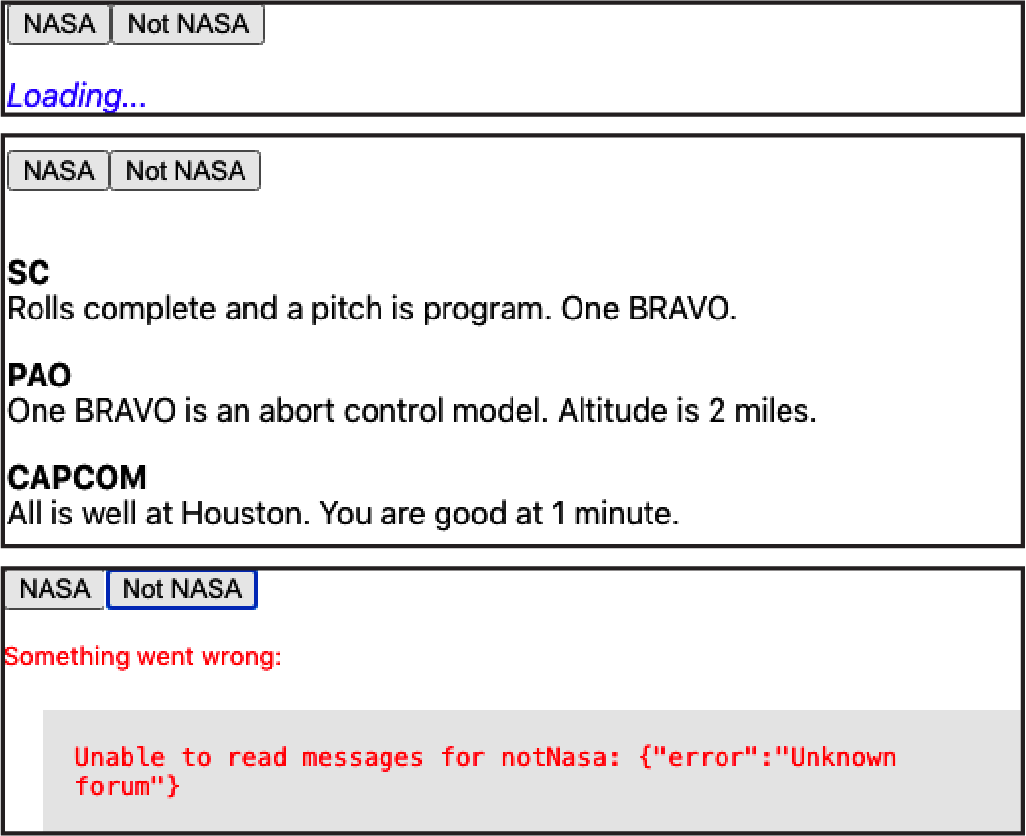
Figure 5-2. The application showing loading, messages, and errors
The useMessages hook will also cope if the server throws an error, as shown in Figure 5-3.
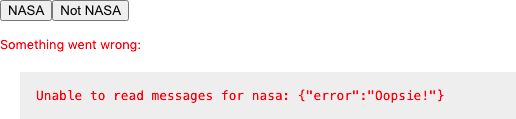
Figure 5-3. The component can display errors from the server
Discussion
When you’re creating an application, it’s tempting to spend your time building features that assume everything works. But it is worth investing the time to handle errors and make an effort to show when data is still loading. Your application will be pleasant to use, and you will have an easier time tracking down slow services and errors.
You might also consider combining this recipe with “Build a Centralized Error Handler”, which will make it easier for users to describe what happened.
You can download the source for this recipe from the GitHub site.
Refresh Automatically with State Counters
Problem
Network services often need to interact with each other. Take, for example, the forum application we used in the previous recipe. If we add a form to post a new message, we want the message list to update automatically every time a person posts something.
In the previous version of this application, we created a custom hook called
useMessages, which contained all of the code needed
to read a forum’s messages.
We’ll add a form to the application to post new messages to the server:
const{data:messages,loading:messagesLoading,error:messagesError,}=useMessages('nasa')const[text,setText]=useState()const[author,setAuthor]=useState()const[createMessageError,setCreateMessageError]=useState()// Other code here...<inputtype="text"value={author}placeholder="Author"onChange={(evt)=>setAuthor(evt.target.value)}/><textareavalue={text}placeholder="Message"onChange={(evt)=>setText(evt.target.value)}/><buttononClick={async()=>{try{await[codetopostmessagehere]setText('')setAuthor('')}catch(err){setCreateMessageError(err)}}}>Post</button>
Here’s the problem: when you post a new message, it doesn’t appear on the list unless you refresh the page manually (see Figure 5-4).
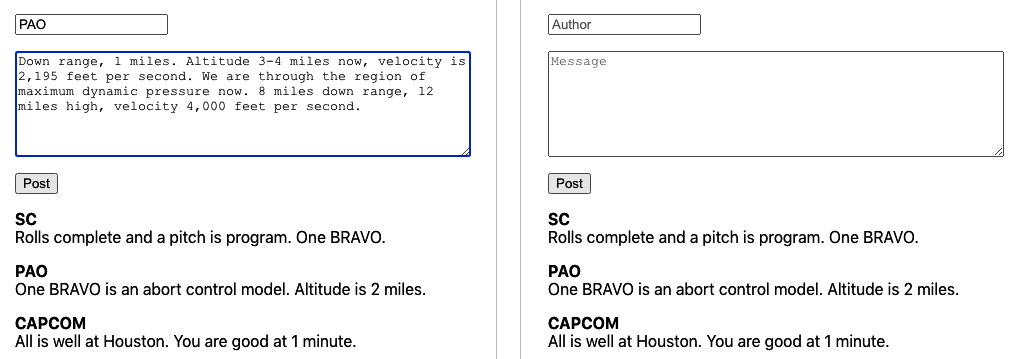
Figure 5-4. Posting a message does not refresh the message list
How do we automatically reload the messages from the server each time we post a new one?
Solution
We’re going to trigger data refreshes by using a thing called a state counter. A state counter is just an increasing number. It doesn’t matter what the counter’s current value is; it just matters that we change it every time we want to reload the data:
const[stateVersion,setStateVersion]=useState(0)
You can think of a state counter as representing our perceived version of the data on the server. When we do something that we suspect will change the server state, we update the state counter to reflect the change:
// code to post a new message heresetStateVersion((v)=>v+1)
Notice that we’re increasing the stateVersion value using a function, rather than saying
setStateVersion(stateVersion + 1). You should always use a function to update a state value if the new value depends upon the old
value. That’s because React sets states asynchronously. If we ran setStateVersion(stateVersion + 1) twice in rapid succession, the
value of stateVersion might not change in between the two calls, and we would miss an increment.
The code that reads the current set of messages is wrapped inside a useEffect, which we can force to rerun by making it dependent
upon the stateVersion value:
useEffect(()=>{setError(null)if(forum){// Code to read /messages/:forum}else{setData([])setLoading(false)}},[forum,stateVersion])
If the value of the forum variable changes or if the stateVersion changes, it will automatically reload the messages (see
Figure 5-5).
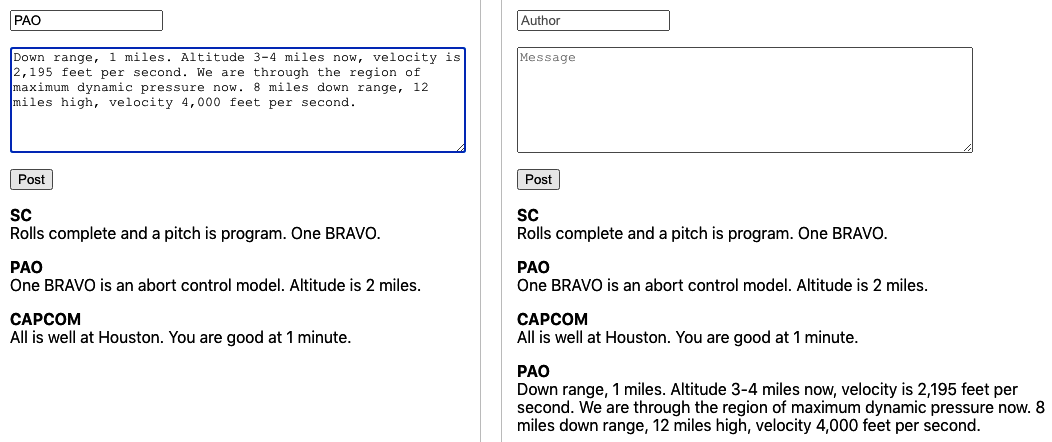
Figure 5-5. Posting a new message causes the message list to reload
So that’s our approach. Now we need to look at where we’re going to put the code. Here is the previous version of the component, which is only reading messages:
import'./App.css'import{useState}from'react'importuseMessagesfrom'./useMessages'functionApp(){const[forum,setForum]=useState('nasa')const{data:messages,loading:messagesLoading,error:messagesError,}=useMessages(forum)return(<divclassName="App"><buttononClick={()=>setForum('nasa')}>NASA</button><buttononClick={()=>setForum('notNasa')}>NotNASA</button>{messagesError?(<divclassName="error">Somethingwentwrong:<divclassName="error-contents">{messagesError.message}</div></div>):messagesLoading?(<divclassName="loading">Loading...</div>):messages&&messages.length?(<dl>{messages.map((m)=>(<><dt>{m.author}</dt><dd>{m.text}</dd></>))}</dl>):('No messages')}</div>)}exportdefaultApp
We’re going to add the new form to this component. We could also include the networking code and the state counter code right here,
inside the component. However, that would put the posting code in the component and the reading code in the
useMessages hook. It’s
better to keep all the networking code together in the hook. Not only will the component be cleaner, but the networking code will be
more
reusable.
This is code we’ll use for a new version of the useMessages hook, which we will rename useForum:1
import{useCallback,useEffect,useState}from'react'constuseForum=(forum)=>{const[data,setData]=useState([])const[loading,setLoading]=useState(false)const[error,setError]=useState()const[creating,setCreating]=useState(false)const[stateVersion,setStateVersion]=useState(0)constcreate=useCallback(async(message)=>{try{setCreating(true)constresponse=awaitfetch(`/messages/${forum}`,{method:'POST',body:JSON.stringify(message),headers:{'Content-type':'application/json; charset=UTF-8',},})if(!response.ok){consttext=awaitresponse.text()thrownewError(`Unabletocreatea${forum}message:${text}`)}setStateVersion((v)=>v+1)}finally{setCreating(false)}},[forum])useEffect(()=>{letdidCancel=falsesetError(null)if(forum){;(async()=>{try{setLoading(true)constresponse=awaitfetch(`/messages/${forum}`)if(!response.ok){consttext=awaitresponse.text()thrownewError(`Unabletoreadmessagesfor${forum}:${text}`)}constbody=awaitresponse.json()if(!didCancel){setData(body)}}catch(err){setError(err)}finally{setLoading(false)}})()}else{setData([])setLoading(false)}return()=>{didCancel=true}},[forum,stateVersion])return{data,loading,error,create,creating}}exportdefaultuseForum
We now construct a create function inside the useForum hook and then return it with various other pieces of state to the
component. Notice that we are wrapping the create function inside a useCallback, which means that we won’t create a new version
of the function unless we need to do it to create data for a different forum value.
Be careful when creating functions inside hooks and components. React will often trigger a re-render if a new function object is created, even if that function does the same thing as the previous version.
When we call the create function, it posts a new message to the forum and then updates the stateVersion value, which will
automatically cause the hook to re-read the messages from the server. Notice that we also have a creating value, which is true
when the network code is sending the message to the server. We can use the creating value to disable the POST button.
However, we don’t track any errors inside the create. Why don’t we? After all, we do when we’re reading data from the server.
It’s because you often want more control over exception handling when changing data on the server than you do when you are simply
reading it. In the example application, we clear out the message form when sending a message to the server. If there’s an error, we
want to leave the text in the message form.
Now let’s look at the code that calls the hook:
import'./App.css'import{useState}from'react'importuseForumfrom'./useForum'functionApp(){const{data:messages,loading:messagesLoading,error:messagesError,create:createMessage,creating:creatingMessage,}=useForum('nasa')const[text,setText]=useState()const[author,setAuthor]=useState()const[createMessageError,setCreateMessageError]=useState()return(<divclassName="App"><inputtype="text"value={author}placeholder="Author"onChange={(evt)=>setAuthor(evt.target.value)}/><textareavalue={text}placeholder="Message"onChange={(evt)=>setText(evt.target.value)}/><buttononClick={async()=>{try{awaitcreateMessage({author,text})setText('')setAuthor('')}catch(err){setCreateMessageError(err)}}}disabled={creatingMessage}>Post</button>{createMessageError?(<divclassName="error">Unabletocreatemessage<divclassName="error-contents">{createMessageError.message}</div></div>):null}{messagesError?(<divclassName="error">Somethingwentwrong:<divclassName="error-contents">{messagesError.message}</div></div>):messagesLoading?(<divclassName="loading">Loading...</div>):messages&&messages.length?(<dl>{messages.map((m)=>(<><dt>{m.author}</dt><dd>{m.text}</dd></>))}</dl>):('No messages')}</div>)}exportdefaultApp
The details of how we read and write messages are hidden inside the useForum hook. We use object destructuring to assign the
create function to the createMessage variable. If we call createMessage, it will not only post the message but also
automatically re-read the new messages from the forum and update the screen (see Figure 5-6).
Figure 5-6. Posting a new message and automatically reloading
Our hook is no longer just a way to read data from the server. It’s becoming a service for managing the forum itself.
Discussion
Be careful using this approach if you intend to post data to the server in one component and then read data in a different component. Separate hook instances will have separate state counters, and posting data from one component will not automatically re-read the data in another component. If you want to split code to post and read across separate components, call the custom hook in some common parent component, pass the data, and post functions to the child components that need them.
If you want to make your code poll a network service at a regular interval, then consider creating a clock and making your network code depend upon the current clock value, much as the preceding code depends upon the state counter.2
You can download the source for this recipe from the GitHub site.
Cancel Network Requests with Tokens
Problem
Let’s consider a buggy application that can search for cities. When a user starts to type a name in the search field, a list of matching cities appears. As the user types “C… H… I… G…” the matching cities appear in the table of results. But then, after a moment, a longer list of cities appears, which includes erroneous results, such as Wichita Falls (see Figure 5-7).
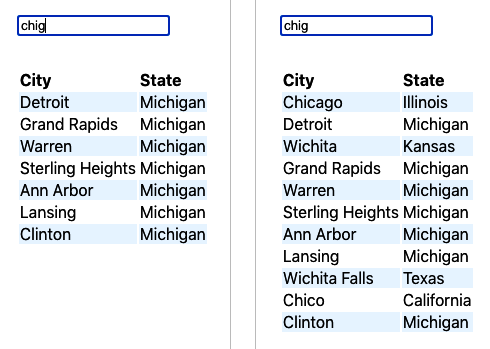
Figure 5-7. The search works initially; then the wrong cities appear
The problem is that the application is sending a new network request each time the user types a character. But not all network requests take the same amount of time. In the example you can see here, the network request searching for “CHI” took a couple of seconds longer than the search for “CHIG.” That meant that the “CHI” results returned after the results for “CHIG.”
How can you prevent a series of asynchronous network calls from returning out of sequence?
Solution
If you are making multiple GET calls to a network server, you can cancel old calls before sending new ones, which means that you will never get results back out of order because you will have only one network request calling the service at a time.
For this recipe, we are going to use the Axios network library. That means that we have to install it:
$ npm install axiosThe Axios library is a wrapper for the native fetch function and allows you to cancel network requests using tokens. The Axios
implementation is based on the cancelable promises proposal from ECMA.
Let’s begin by looking at our problem code. The network code is wrapped in a custom hook:3
import{useEffect,useState}from'react'importaxiosfrom'axios'constuseSearch=(terms)=>{const[data,setData]=useState([])const[loading,setLoading]=useState(false)const[error,setError]=useState()useEffect(()=>{setError(null)if(terms){;(async()=>{try{setLoading(true)constresponse=awaitaxios.get('/search',{params:{terms},})setData(response.data)}catch(err){setError(err)}finally{setLoading(false)}})()}else{setData([])setLoading(false)}},[terms])return{data,loading,error}}exportdefaultuseSearch
The terms parameter contains the search string. The problem occurred because the code made a network request to /search for
the string "CHI".
While that was in progress, we made another call with the string "CHIG". The earlier request took longer, which caused the bug.
We’re going to avoid this problem by using an Axios cancel token. If we attach a token to a request, we can then later use the token to cancel the request. The browser will terminate the request, and we’ll never hear back from it.
To use the token, we need to first create a source for it:
constsource=axios.CancelToken.source()
The source is like a remote control for the network request. Once a network request is connected to a source, we can tell the
source to cancel it. We associate a source with a request using source.token:
constresponse=awaitaxios.get('/search',{params:{terms},cancelToken:source.token,})
Axios will remember which token is attached to which network request. If we want to cancel the request, we can call this:
source.cancel('axios request canceled')
We need to make sure that we cancel a request only when we make a new request. Fortunately, our network call is inside a
useEffect, which has a handy feature. If we return a function that cancels the current request, this function will be run just
before the useEffect runs again. So if we return a function that cancels the current network request, we will automatically
cancel the old network request each time we run a new one.4 Here is the updated version of the custom hook:
import{useEffect,useState}from'react'importaxiosfrom'axios'constuseCancelableSearch=(terms)=>{const[data,setData]=useState([])const[loading,setLoading]=useState(false)const[error,setError]=useState()useEffect(()=>{setError(null)if(terms){constsource=axios.CancelToken.source();(async()=>{try{setLoading(true)constresponse=awaitaxios.get('/search',{params:{terms},cancelToken:source.token,})setData(response.data)}catch(err){setError(err)}finally{setLoading(false)}})()return()=>{source.cancel('axios request cancelled')}}else{setData([])setLoading(false)}},[terms])return{data,loading,error}}exportdefaultuseCancelableSearch
Discussion
You should use this approach only if you are accessing idempotent services. In practice, this means that you should use it for GET
requests where you are interested only in the latest results.
You can download the source for this recipe from the GitHub site.
Make Network Calls with Redux Middleware
Problem
Redux is a library that allows you to manage application state centrally.5 When you want to change the application state, you do it by dispatching commands (called actions) that are captured and processed by JavaScript functions called reducers. Redux is popular with React developers because it provides a way to separate state-management logic from component code. Redux performs actions asynchronously but in strict order. So, you can create large, complex applications in Redux that are both efficient and stable.
It would be great if we could leverage the power of Redux to orchestrate all of our network requests. We could dispatch actions that say things like “Go and read the latest search results,” and Redux could make the network request and then update the central state.
However, to ensure that Redux code is stable, reducer functions have to meet several quite strict criteria: and one of them is that no reducer function can have side effects. That means that you should never make network requests inside a reducer.
But if we cannot make network requests inside reducer functions, how can we configure Redux to talk to the network for us?
Solution
In a React Redux application, components publish (dispatch) actions, and reducers respond to actions by updating the central state (see Figure 5-8).
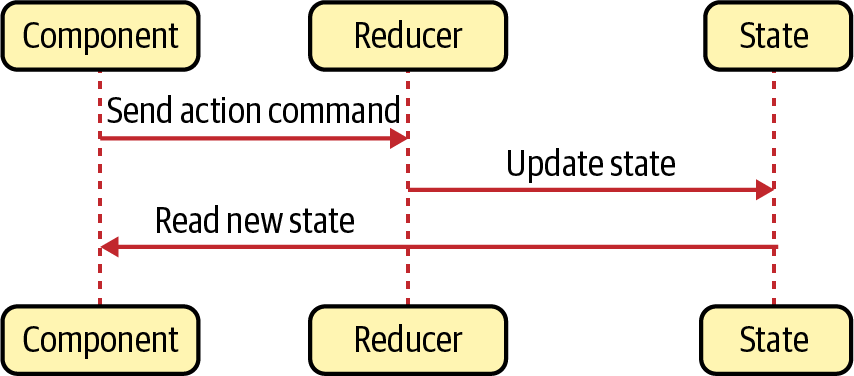
Figure 5-8. Using Redux reducers to update central state
If we want to create actions with side effects, we will have to use Redux middleware. Middleware receives actions before Redux sends them to the reducers, and middleware can transform actions, cancel them, or create new actions. Most importantly, Redux middleware code is allowed to have side effects. That means that if a component dispatches an action that says “Go and search for this string,” we can write middleware that receives that action, generates a network call, and then converts the response into a new “Store these search results” action. You can see how Redux middleware works in Figure 5-9.
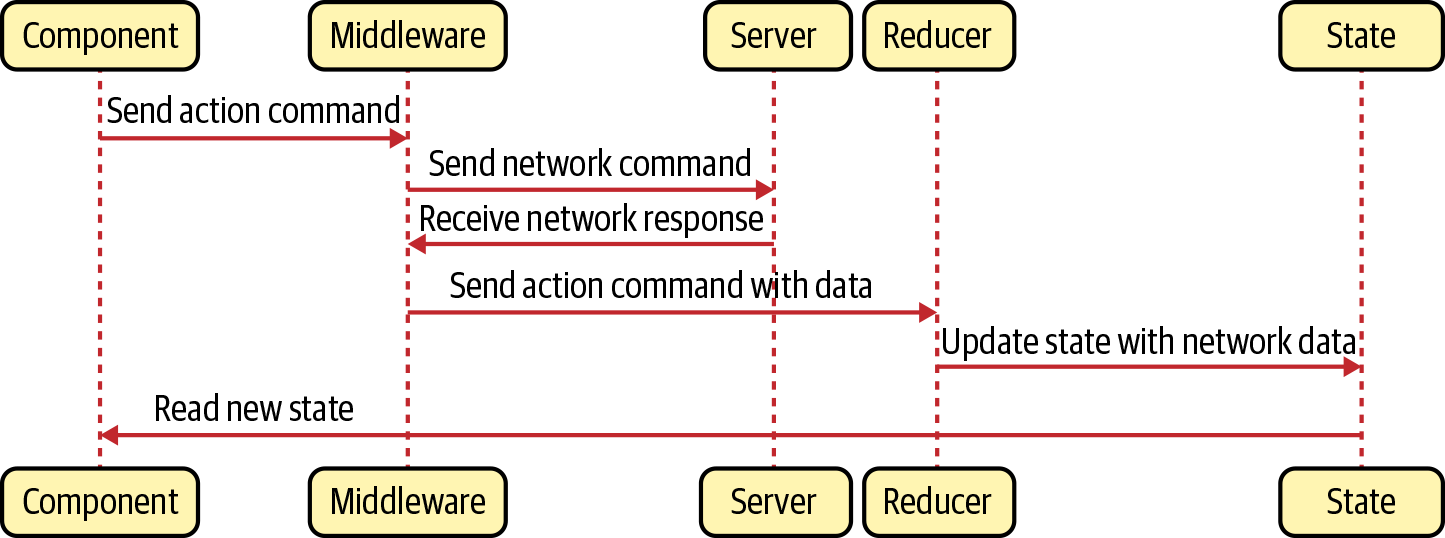
Figure 5-9. Middleware can make network calls
Let’s create some middleware that intercepts an action of type "SEARCH" and uses it to generate a network service.
When we get the results back from the network, we will then create a new action of type "SEARCH_RESULTS", which we can then use to
store the search results in the central Redux state. Our action object will look something like this:
{"type":"SEARCH","payload":"Some search text"}
This is the axiosMiddleware.js code that we’ll use to intercept SEARCH actions:
importaxiosfrom'axios'constaxiosMiddleware=(store)=>(next)=>(action)=>{if(action.type==='SEARCH'){constterms=action.payloadif(terms){;(async()=>{try{store.dispatch({type:'SEARCH_RESULTS',payload:{loading:true,data:null,error:null,},})constresponse=awaitaxios.get('/search',{params:{terms},})store.dispatch({type:'SEARCH_RESULTS',payload:{loading:false,error:null,data:response.data,},})}catch(err){store.dispatch({type:'SEARCH_RESULTS',payload:{loading:false,error:err,data:null,},})}})()}}returnnext(action)}exportdefaultaxiosMiddleware
The function signature for Redux middleware can be confusing. You can think of it as a function that receives a store, an action,
and another function called next that can forward actions on to the rest of Redux.
In the preceding code, we check to see if the action is of type SEARCH. If it is, we will make a network call. If it isn’t, we run
next(action), which will pass it on to any other code interested in it.
When we start the network call, receive data, or capture any errors, then we can generate a new SEARCH_RESULTS action:
store.dispatch({type:'SEARCH_RESULTS',payload:{loading:...,error:...,data:...},})
The payload for our new action has the following:
-
A Boolean flag called
loading, which istruewhile the network request is running -
A
dataobject that contains the response from the server -
An
errorobject containing the details of any error that has occurred6
We can then create a reducer that will store SEARCH_RESULTS in the central state:
constreducer=(state,action)=>{if(action.type==='SEARCH_RESULTS'){return{...state,searchResults:{...action.payload},}}return{...state}}exportdefaultreducer
We also need to register our middleware using the Redux applyMiddleware function when we create the Redux store. In the example
code, we do this in the App.js file:
import{Provider}from'react-redux'import{createStore,applyMiddleware}from'redux'import'./App.css'importreducerfrom'./reducer'importSearchfrom'./Search'importaxiosMiddlewarefrom'./axiosMiddleware'conststore=createStore(reducer,applyMiddleware(axiosMiddleware))functionApp(){return(<divclassName="App"><Providerstore={store}><Search/></Provider></div>)}exportdefaultApp
Finally, we can wire everything up in a Search component, which will dispatch a search request, and then read the results through
a Redux selector:
import'./App.css'import{useState}from'react'import{useDispatch,useSelector}from'react-redux'constSearch=()=>{const[terms,setTerms]=useState()const{data:results,error,loading,}=useSelector((state)=>state.searchResults||{})constdispatch=useDispatch()return(<divclassName="App"><inputplaceholder="Search..."type="text"value={terms}onChange={(e)=>{setTerms(e.target.value)dispatch({type:'SEARCH',payload:e.target.value,})}}/>{error?(<p>Error:{error.message}</p>):loading?(<p>Loading...</p>):results&&results.length?(<table><thead><tr><th>City</th><th>State</th></tr></thead>{results.map((r)=>(<tr><td>{r.name}</td><td>{r.state}</td></tr>))}</table>):(<p>Noresults</p>)}</div>)}exportdefaultSearch
You can see the demo application running in Figure 5-10.
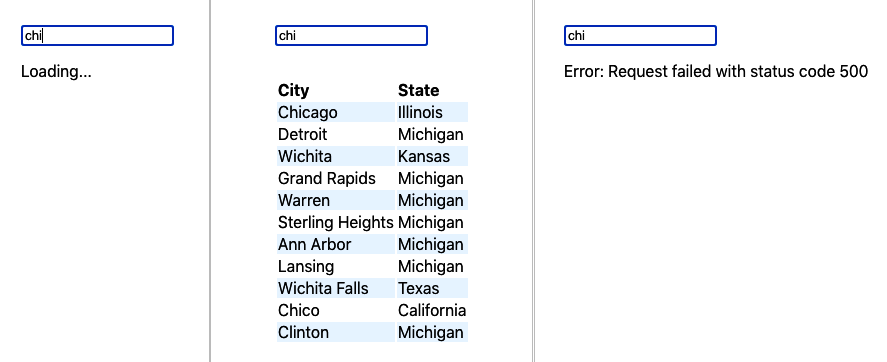
Figure 5-10. The application when data is loading, loaded, or errored
Discussion
Redux reducers always process actions in strict dispatch order. The same is not true for network requests generated by middleware. If you are making many network requests in quick succession, you might find that responses return in a different order. If this is likely to lead to bugs, then consider using cancellation tokens.7
You might also consider moving all Redux useDispatch()/useSelector() code out of components and into custom hooks, which will give
you a more flexible architecture by separating your service layer from your component code.
You can download the source for this recipe from the GitHub site.
Connect to GraphQL
Problem
GraphQL is an excellent way of creating APIs. If you’ve used REST services for a while, then some features of GraphQL will seem odd (or even heretical), but having worked on a few GraphQL projects, we would certainly recommend that you consider it for your next development project.
When people refer to GraphQL, they can mean several things. They might be referring to the GraphQL language, which is managed and maintained by the GraphQL Foundation. GraphQL allows you to specify APIs and to create queries to access and mutate the data stored behind those APIs. They might be referring to a GraphQL server, which stitches together multiple low-level data access methods into a rich web service. Or they might be talking about a GraphQL client, which allows you to rapidly create new client requests with very little code and transfer just the data you need across the network.
But how do you integrate GraphQL with your React application?
Solution
Before we look at how to use GraphQL from React, we will begin by creating a small GraphQL server. The first thing we need is a GraphQL schema. The schema is a formal definition of the data and services that our GraphQL server will provide.
Here is the schema.graphql schema we’ll use. It’s a GraphQL specification of the forum message example we’ve used previously in this chapter:
typeQuery{messages:[Message]}typeMessage{id:ID!author:String!text:String!}typeMutation{addMessage(author:String!text:String!):Message}
This schema defines a single query (method for reading data) called messages, which returns an array of Message objects. Each
Message has an id, a non-null string called author, and a non-null string called text. We also have a single mutation
(method for changing data) called addMessage, which will store a message based on an author string and a text string.
Before we create our sample server, we’ll install a few libraries:
$ npm install apollo-server$ npm install graphql$ npm install require-text
The apollo-server is a framework for creating GraphQL servers. The require-text library will allows us to read the
schema.graphql file. This is server.js, our example server:
const{ApolloServer}=require('apollo-server')constrequireText=require('require-text')consttypeDefs=requireText('./schema.graphql',require)constmessages=[{id:0,author:'SC',text:'Rolls complete and a pitch is program. One BRAVO.',},{id:1,author:'PAO',text:'One BRAVO is an abort control model. Altitude is 2 miles.',},{id:2,author:'CAPCOM',text:'All is well at Houston. You are good at 1 minute.',},]constresolvers={Query:{messages:()=>messages,},Mutation:{addMessage:(parent,message)=>{constitem={id:messages.length+1,...message}messages.push(item)returnitem},},}constserver=newApolloServer({typeDefs,resolvers,})server.listen({port:5000}).then(({url})=>{console.log(Launchedat${url}!)})
The server stores messages in an array, which is prepopulated with a few messages. You can start the server with:
$ node ./server.jsThis command will start the server on port 5000. If you open a browser to http://localhost:5000, you will see the GraphQL Playground client. The Playground client is a tool that allows you to try out queries and mutations interactively before adding them to your code (see Figure 5-11).
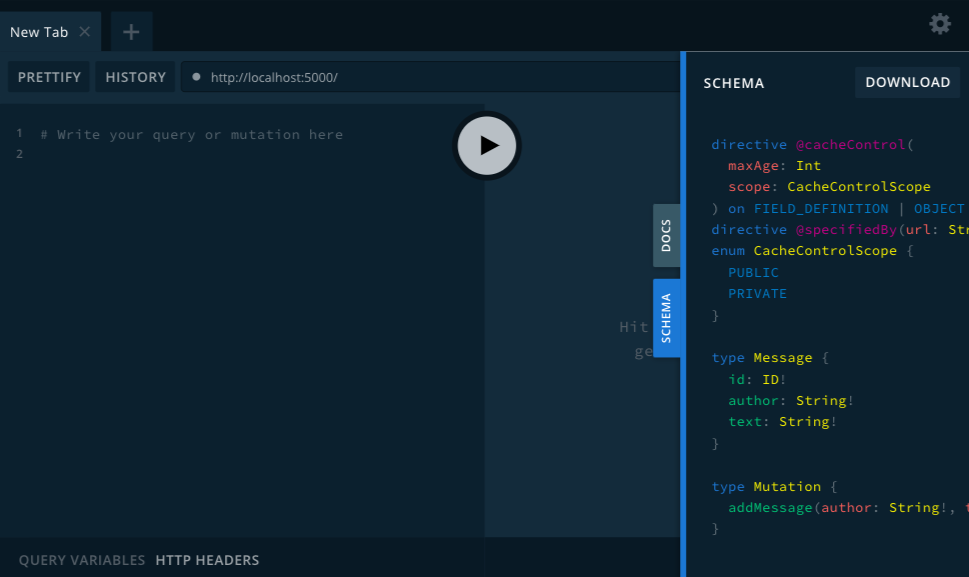
Figure 5-11. The GraphQL Playground should be running at http://localhost:5000
Now we can start to look at the React client code. We’ll install the Apollo client:
$ npm install @apollo/clientGraphQL supports both GET and POST requests, but the Apollo client sends queries and mutations to the GraphQL server as POST
requests, which avoids any cross-domain issues and means you can connect to a third-party GraphQL server without having to proxy. As
a consequence, it means that a GraphQL client has to handle its own caching, so we will need to provide a cache and the address of
the server when we configure the client in App.js:
import'./App.css'import{ApolloClient,ApolloProvider,InMemoryCache,}from'@apollo/client'importForumfrom'./Forum'constclient=newApolloClient({uri:'http://localhost:5000',cache:newInMemoryCache(),})functionApp(){return(<divclassName="App"><ApolloProviderclient={client}><Forum/></ApolloProvider></div>)}exportdefaultApp
The ApolloProvider makes the client available to any child component. If you forget to add the ApolloProvider, you will find
that all of your GraphQL client code will fail.
We’re going to make the calls to GraphQL from inside the Forum component. We’ll be performing two actions:
-
A query called
Messagesthat reads all of the messages -
A mutation called
AddMessagethat will post a new message
The query and the mutation are written in the GraphQL language. Here’s the
Messages query:
queryMessages{messages{authortext}}
This query means that we want to read all of the messages, but we only want to return the author and text strings. Because we’re
not asking for the message id, the GraphQL server won’t return it. This is part of the flexibility of GraphQL: you specify what
you want at query time rather than by crafting a particular API call for each
variation.
The AddMessage mutation is a little more complex, because it needs to be parameterized so that we can specify the author and
text values each time we call it:
mutationAddMessage($author:String!$text:String!){addMessage(author:$authortext:$text){authortext}}
We’re going to use the useQuery and useMutation hooks provided by the Apollo GraphQL client. The useQuery hook returns an
object with data, loading, and error attributes.8 The useMutation hook returns an array with two values: a function and an object
representing the result.
In “Refresh Automatically with State Counters”, we looked at how to automatically reload data after some mutation has changed it on the server. Thankfully, the Apollo client has a ready-made solution. When you call a mutation, you can specify an array of other queries that should be rerun if the mutation is successful:
awaitaddMessage({variables:{author,text},refetchQueries:['Messages'],})
The 'Messages' string refers to the name of the GraphQL query, which means we can be running multiple queries against the GraphQL
service and specify which of them are likely to need refreshing after a change.
Finally, here is the complete Forum component:
import{gql,useMutation,useQuery}from'@apollo/client'import{useState}from'react'constMESSAGES=gql`queryMessages{messages{authortext}}`constADD_MESSAGE=gql`mutationAddMessage($author:String!,$text:String!){addMessage(author:$author,text:$text){authortext}}`constForum=()=>{const{loading:messagesLoading,error:messagesError,data,}=useQuery(MESSAGES)const[addMessage]=useMutation(ADD_MESSAGE)const[text,setText]=useState()const[author,setAuthor]=useState()constmessages=data&&data.messagesreturn(<divclassName="App"><inputtype="text"value={author}placeholder="Author"onChange={(evt)=>setAuthor(evt.target.value)}/><textareavalue={text}placeholder="Message"onChange={(evt)=>setText(evt.target.value)}/><buttononClick={async()=>{try{awaitaddMessage({variables:{author,text},refetchQueries:['Messages'],})setText('')setAuthor('')}catch(err){}}}>Post</button>{messagesError?(<divclassName="error">Somethingwentwrong:<divclassName="error-contents">{messagesError.message}</div></div>):messagesLoading?(<divclassName="loading">Loading...</div>):messages&&messages.length?(<dl>{messages.map((m)=>(<><dt>{m.author}</dt><dd>{m.text}</dd></>))}</dl>):('No messages')}</div>)}exportdefaultForum
When you run the application and post a new message, the messages list automatically updates with the new message added to the end, as shown in Figure 5-12.

Figure 5-12. After we post a message, it appears on the list
Discussion
GraphQL is particularly useful if you have a team split between frontend and backend developers. Unlike REST, a GraphQL system does not require the backend developers to handcraft every API call made by the client. Instead, the backend team can provide a solid and consistent API structure and leave it to the frontend team to decide precisely how they will use it.
If you are creating a React application using GraphQL, you might consider extracting all of the useQuery and useMutation calls
into a custom hooks.9 In this way, you will create a
more flexible architecture in which the components are less bound to the details of the service layer.
You can download the source for this recipe from the GitHub site.
Reduce Network Load with Debounced Requests
Problem
It is easy to forget about performance when you’re working in a development system. That’s probably a good thing because it’s more important that code does the right thing rather than do the wrong thing quickly.
But when your application gets deployed to its first realistic environment—such as one used for user acceptance testing—then performance will become more important. The kind of dynamic interfaces associated with React often make a lot of network calls, and the cost of these calls will be noticeable only once the server has to cope with lots of concurrent clients.
We’ve used an example search application a few times in this chapter. In the search app, a user can look for a city by name or state. The search happens immediately—while they are typing. If you open the developer tools and look at the network requests (see Figure 5-13), you will see that it generates network requests for each character typed.
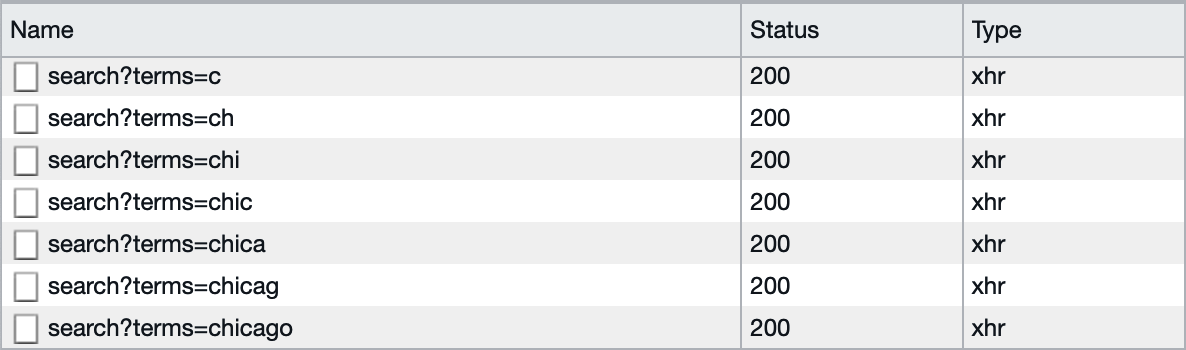
Figure 5-13. The demo search application runs a network request for each character
Most of these network requests will provide almost no value. The average typist will probably hit a key every half-second, and if they are looking at their keyboard, they probably won’t even see the results for each of those searches. Of the seven requests they send to the server, they will likely read the results from only one of them: the last. That means the server is doing seven times more work than was needed.
What can we do to avoid sending so many wasted requests?
Solution
We’re going to debounce the network requests for the search calls. Debouncing means that we will delay sending a network request for a very short period, say a half-second. If another request comes in while we’re waiting, we’ll forget about the first request and then create another delayed request. In this way, we defer sending any request until we receive no new requests for half a second.
To see how to do this, look at our example search hook, useSearch.js:
import{useEffect,useState}from'react'importaxiosfrom'axios'constuseSearch=(terms)=>{const[data,setData]=useState([])const[loading,setLoading]=useState(false)const[error,setError]=useState()useEffect(()=>{letdidCancel=falsesetError(null)if(terms){;(async()=>{try{setLoading(true)constresponse=awaitaxios.get('/search',{params:{terms},})if(!didCancel){setData(response.data)}}catch(err){setError(err)}finally{setLoading(false)}})()}else{setData([])setLoading(false)}return()=>{didCancel=true}},[terms])return{data,loading,error}}exportdefaultuseSearch
The code that sends the network request is inside the (async ()....)() block of code. We need to delay this code until we get a
half-second to spare.
The JavaScript function setTimeout will run the code after a delay. This will be key to how we implement the debounce feature:
constnewTimer=setTimeout(SOMEFUNCTION,500)
We can use the newTimer value to clear the timeout, which might mean that our function never gets called if we do it quickly
enough. To see how we can use this to debounce the network requests, look at useDebouncedSearch.js, a debounced version of
useSearch.js:
import{useEffect,useState}from'react'importaxiosfrom'axios'constuseDebouncedSearch=(terms)=>{const[data,setData]=useState([])const[loading,setLoading]=useState(false)const[error,setError]=useState()useEffect(()=>{setError(null)if(terms){constnewTimer=setTimeout(()=>{;(async()=>{try{setLoading(true)constresponse=awaitaxios.get('/search',{params:{terms},})setData(response.data)}catch(err){setError(err)}finally{setLoading(false)}})()},500)return()=>clearTimeout(newTimer)}else{setData([])setLoading(false)}},[terms])return{data,loading,error}}exportdefaultuseDebouncedSearch
We pass the network code into the setTimeout function and then return the
following:
()=>clearTimeout(newTimer)
If you return a function from useEffect, this code is called just before the next time useEffect triggers, which means if the
user keeps typing quickly, we will keep deferring the network request. Only when the user stops typing for half a second will the
code submit a network request.
The original version of the useSearch hook ran a network request for every single character. With the debounced version of the
hook, typing at an average speed will result in just a single network request (see Figure 5-14).

Figure 5-14. The debounced search hook will send fewer requests
Discussion
Debouncing requests will reduce your network traffic and the load on the server. It’s important to remember that debouncing reduces the number of unnecessary network requests. It does not avoid the problem of network responses returning in a different order. For more details on how to avoid the response order problem, see “Cancel Network Requests with Tokens”.
You can download the source for this recipe from the GitHub site.
1 We’re renaming it because it is no longer just a way to read a list of messages but the forum as a whole. We could eventually add functions to delete, edit, or flag messages.
2 See “Measure Time with a Clock”.
3 Compare this code with “Convert Network Calls to Hooks”, which uses fetch.
4 If the previous network request has completed, canceling it will have no effect.
5 It can also be quite confusing when you first use it. See Chapter 3 for more Redux recipes.
6 To simplify things, we are simply storing the entire object. In reality, you would want to ensure that the error contained only serializable text.
7 See “Cancel Network Requests with Tokens”.
8 This is a standard set of values for an asynchronous service. We’ve used them in other recipes in this chapter.
9 Much as we do with HTTP network calls in “Refresh Automatically with State Counters”.