Chapter 3. Managing State
When we manage state in React, we have to store data, but we also record data dependencies. Dependencies are intrinsic to the way that React works. They allow React to update the page efficiently and only when necessary.
Managing data dependencies, then, is the key to managing state in React. You will see throughout this chapter that most of the tools and techniques we use are to ensure that we manage dependencies efficiently.
A key concept in the following recipes is a data reducer. A reducer is simply a function that receives a single object or an array and then returns a modified copy. This simple concept is what lies behind much of the state management in React. We’ll look at how React uses reducer functions natively and how we can use the Redux library to manage data application-wide with reducers.
We’ll also look at selector functions. These allow us to drill into the state returned by reducers. Selectors help us ignore the irrelevant data, and in doing so, they significantly improve the performance of our code.
Along the way, we’ll look at simple ways of checking whether you’re online, how to manage form data, and various other tips and tricks to keep your application ticking along.
Use Reducers to Manage Complex State
Problem
Many React components are straightforward. They do little more than render a section of HTML and perhaps show a few properties.
However, some components can be more complicated. They might need to manage several pieces of internal state. For example, consider the simple number game you can see in Figure 3-1.
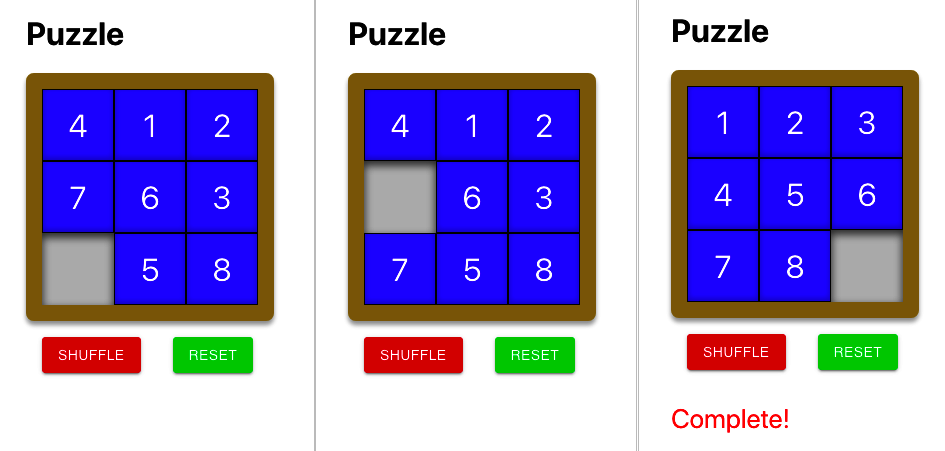
Figure 3-1. A simple number puzzle
The component displays a series of numeric tiles, in a grid, with a single space. If the user clicks a tile next to the space, they can move it. In this way, the user can rearrange the tiles until they are in the correct order from 1 to 8.
This component renders a small amount of HTML, but it will require some fairly complex logic and data. It will record the positions of the tiles. It will need to know whether a user can move a given tile. It will need to know how to move the tile. It will need to know whether the game is complete. It will also need to do other things, such as reset the game by shuffling the tiles.
It’s entirely possible to write all this code inside the component, but it will be harder to test it. You could use the React Testing Library, but that is probably overkill, given that most of the code will have very little to do with rendering HTML.
Solution
If you have a component with some complex internal state or that needs to manipulate its state in complex ways, consider using a reducer.
A reducer is a function that accepts two parameters:
-
An object or array that represents a given state
-
An action that describes how you want to modify the state
The function returns a new copy of the state we pass to it.
The action parameter can be whatever you want, but typically it is an object with a string type attribute and a payload with
additional information. You can think of the type as a command name and the payload as parameters to the command.
For example, if we number our tile positions from 0 (top-left) to 8 (bottom-right), we might tell the reducer to move whatever tile is in the top-left corner with:
{type:'move',payload:0}
We need an object or array that completely defines our game’s internal state. We could use a simple array of strings:
['1','2','3',null,'5','6','7','8','4']
That would represent the tiles laid out like this:
1 |
2 |
3 |
5 |
6 |
|
7 |
8 |
4 |
However, a slightly more flexible approach uses an object for our state and gives it an items attribute containing the current
tile layout:
{items:['1','2','3',null,'5','6','7','8','4']}
Why would we do this? Because it will allow our reducer to return other state values, such as whether or not the game is complete:
{items:['1','2','3','4','5','6','7','8',null],complete:true}
We’ve decided on an action (move) and know how the state will be structured, which means we’ve done enough design to create a
test:
importreducerfrom'./reducer'describe('reducer',()=>{it('should be able to move 1 down if gap below',()=>{letstate={items:['1','2','3',null,'5','6','7','8','4'],}state=reducer(state,{type:'move',payload:0})expect(state.items).toEqual([null,'2','3','1','5','6','7','8','4',])})it('should say when it is complete',()=>{letstate={items:['1','2','3','4','5','6','7',null,'8'],}state=reducer(state,{type:'move',payload:8})expect(state.complete).toBe(true)state=reducer(state,{type:'move',payload:5})expect(state.complete).toBe(false)})})
In our first test scenario, we pass in the tiles’ locations in one state. Then we check that the reducer returns the tiles in a new state.
In our second test, we perform two tile moves and then look for a complete attribute to tell us the game has ended.
OK, we’ve delayed looking at the actual reducer code long enough:
functiontrySwap(newItems,position,t){if(newItems[t]===null){consttemp=newItems[position]newItems[position]=newItems[t]newItems[t]=temp}}functionarraysEqual(a,b){for(leti=0;i<a.length;i++){if(a[i]!==b[i]){returnfalse}}returntrue}constCORRECT=['1','2','3','4','5','6','7','8',null]functionreducer(state,action){switch(action.type){case'move':{constposition=action.payloadconstnewItems=[...state.items]constcol=position%3if(position<6){trySwap(newItems,position,position+3)}if(position>2){trySwap(newItems,position,position-3)}if(col<2){trySwap(newItems,position,position+1)}if(col>0){trySwap(newItems,position,position-1)}return{...state,items:newItems,complete:arraysEqual(newItems,CORRECT),}}default:{thrownewError('Unknown action: '+action.type)}}}exportdefaultreducer
Our reducer currently recognizes a single action: move. The code in our GitHub repository also includes actions for shuffle and reset. The repository also has a more exhaustive set of tests that we used to create the previous code.
But none of this code includes any React components. It’s pure JavaScript and so can be created and tested in isolation from the outside world.
Be careful to generate a new object in the reducer to represent the new state. Doing so ensures each new state completely independent of those that came before it.
Now it’s time to wire up our reducer into a React component, with the useReducer hook:
import{useReducer}from'react'importreducerfrom'./reducer'import'./Puzzle.css'constPuzzle=()=>{const[state,dispatch]=useReducer(reducer,{items:['4','1','2','7','6','3',null,'5','8'],})return(<divclassName="Puzzle"><divclassName="Puzzle-squares">{state.items.map((s,i)=>(<divclassName={`Puzzle-square${s?'':'Puzzle-square-empty'}`}key={`square-${i}`}onClick={()=>dispatch({type:'move',payload:i})}>{s}</div>))}</div><divclassName="Puzzle-controls"><buttonclassName="Puzzle-shuffle"onClick={()=>dispatch({type:'shuffle'})}>Shuffle</button><buttonclassName="Puzzle-reset"onClick={()=>dispatch({type:'reset'})}>Reset</button></div>{state.complete&&(<divclassName="Puzzle-complete">Complete!</div>)}</div>)}exportdefaultPuzzle
Even though our puzzle component is doing something quite complicated, that actual React code is relatively short.
The useReducer accepts a reducer function and a starting state, and it returns a two-element array:
-
The first element in the array is the current state from the reducer
-
The second element is a
dispatchfunction that allows us to send actions to the reducer.
We display the tiles by looping through the strings in the array given by state.items.
If someone clicks a tile at position i, we send a move command to the reducer:
onClick={()=>dispatch({type:'move',payload:i})}
The React component has no idea what it takes to move the tile. It doesn’t even know if it can move the tile at all. The component sends the action to the reducer.
If the move action moves a tile, the component will automatically re-render the component with the tiles in their new positions.
If the game is complete, the component will know by the value of state.complete:
state.complete&&<divclassName='Puzzle-complete'>Complete!</div>
We also added two buttons to run the shuffle and reset actions, which we omitted earlier but is in the GitHub repository.
Now that we’ve created our component, let’s try it. When we first load the component, we see it in its initial state, as shown in Figure 3-2.
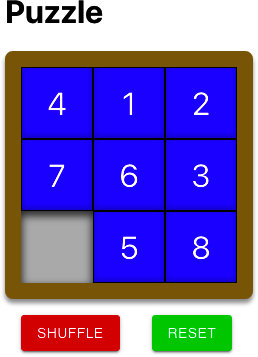
Figure 3-2. The starting state of the game
If we click the tile labeled 7, it moves into the gap (see Figure 3-3).
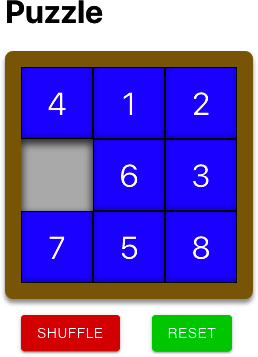
Figure 3-3. After moving tile 7
If we click the Shuffle button, the reducer rearranges tiles randomly, as shown in Figure 3-4.

Figure 3-4. The Shuffle button moves tiles to random positions
And if we click Reset, the puzzle changes to the completed position, and the “Complete!” text appears (see Figure 3-5).
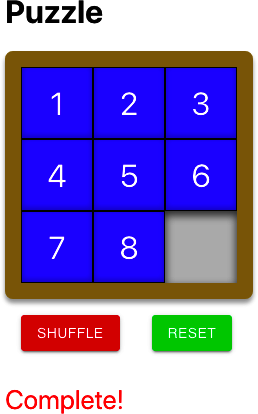
Figure 3-5. The Reset button moves the tiles to their correct positions
We bury all of the complexity inside the reducer function, where we can test it, and the component is simple and easy to maintain.
Discussion
Reducers are a way of managing complexity. You will typically use a reducer in either of these cases:
-
You have a large amount of internal state to manage.
-
You need complex logic to manage the internal state of your component.
If either of these things is correct, then a reducer can make your code significantly easier to manage.
However, be wary of using reducers for very small components. If your component has a simple state and little logic, you probably don’t need the added complexity of a reducer.
Sometimes, even if you do have a complex state, there are alternative approaches. For example, if you are capturing and validating data in a form, it might be better to create a validating form component (see “Create and Validate Forms”).
You need to ensure that your reducer does not have any side effects. Avoid, say, making network calls that update a server. If your reducer has side effects, there is every chance that it might break. React (sneakily) might sometimes make additional calls to your reducer in development mode to make sure that no side effects are happening. If you’re using a reducer and notice that React calls your code twice when rendering a component, it means React is checking for bad behavior.
With all of those provisos, reducers are an excellent tool at fighting complexity. They are integral to libraries such as Redux, can easily be reused and combined, simplify components, and make your React code significantly easier to test.
You can download the source for this recipe from the GitHub site.
Create an Undo Feature
Problem
Part of the promise of JavaScript-rich frameworks like React is that web applications can closely resemble desktop applications. One common feature in desktop applications is the ability to undo an action. Some native components within React applications automatically support an undo function. If you edit some text in a text area, and then press Cmd/Ctrl-Z, it will undo your edit. But what about extending undo into custom components? How is it possible to track state changes without a large amount of code?
Solution
If a reducer function manages the state in your component, you can implement a quite general undo function using an undo-reducer.
Consider this piece of code from the Puzzle example from “Use Reducers to Manage Complex State”:
const[state,dispatch]=useReducer(reducer,{items:['4','1','2','7','6','3',null,'5','8'],})
This code uses a reducer function (called reducer) and an initial state to manage the tiles in a number-puzzle game (see Figure 3-6).
Figure 3-6. A simple number puzzle game
If the user clicks the Shuffle button, the component updates the tile state by sending a shuffle action to the reducer:
<buttonclassName='Puzzle-shuffle'onClick={()=>dispatch({type:'shuffle'})}>Shuffle</button>
(For more details on what reducers are and when you should use them, see “Use Reducers to Manage Complex State”.)
We will create a new hook called useUndoReducer, which is a drop-in replacement for useReducer:
const[state,dispatch]=useUndoReducer(reducer,{items:['4','1','2','7','6','3',null,'5','8'],})
The useUndoReducer hook will magically give our component the ability to go back in time:
<buttonclassName="Puzzle-undo"onClick={()=>dispatch({type:'undo'})}>Undo</button>
If we add this button to the component, it undoes the last action the user performed, as shown in Figure 3-7.
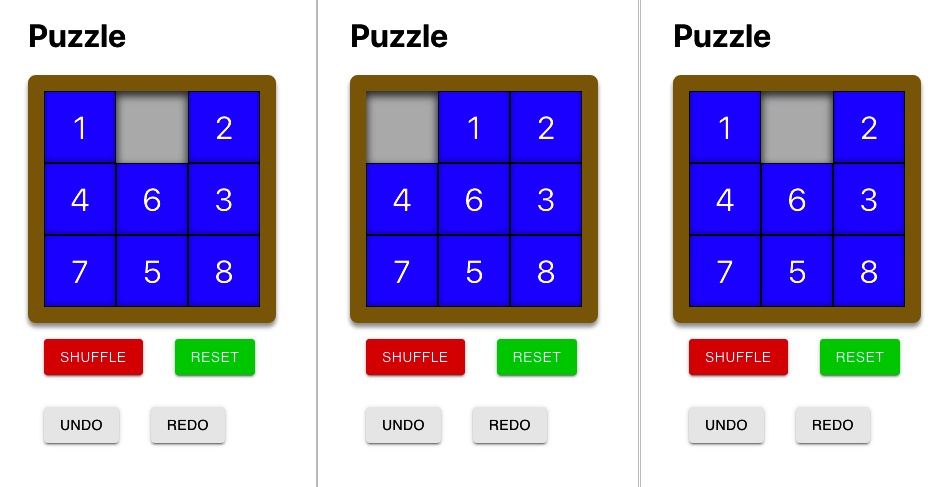
Figure 3-7. (1) Game in progress; (2) Make a move; (3) Click Undo to undo move
But how do we perform this magic? Although useUndoReducer is relatively easy to use, it’s somewhat harder to understand. But it’s
worth doing so that you can adjust the recipe to your requirements.
We can take advantage of the fact that all reducers work in the same way:
-
The action defines what you want to do.
-
The reducer returns a fresh state after each action.
-
No side effects are allowed when calling the reducer.
Also, reducers are just simple JavaScript functions that accept a state object and an action object.
Because reducers work in such a well-defined way, we can create a new reducer (an undo-reducer) that wraps around another reducer function. Our undo-reducer will work as an intermediary. It will pass most actions through to the underlying reducer while keeping a history of all previous states. If someone wants to undo an action, it will find the last state from its history and then return that without calling the underlying reducer.
We’ll begin by creating a higher-order function that accepts one reducer and returns another:
importlodashfrom'lodash'constundo=(reducer)=>(state,action)=>{let{undoHistory=[],undoActions=[],...innerState}=lodash.cloneDeep(state)switch(action.type){case'undo':{if(undoActions.length>0){undoActions.pop()innerState=undoHistory.pop()}break}case'redo':{if(undoActions.length>0){undoHistory=[...undoHistory,{...innerState}]undoActions=[...undoActions,undoActions[undoActions.length-1],]innerState=reducer(innerState,undoActions[undoActions.length-1])}break}default:{undoHistory=[...undoHistory,{...innerState}]undoActions=[...undoActions,action]innerState=reducer(innerState,action)}}return{...innerState,undoHistory,undoActions}}exportdefaultundo
This reducer is quite a complex function, so it’s worth taking some time to understand what it does.
It creates a reducer function that keeps track of the actions and states we pass to it. Let’s say our game component sends an action
to shuffle the tiles in the game. Our reducer will first check if the action has the type undo or redo. It doesn’t. So it passes
the shuffle action to the underlying reducer that manages the tiles in our game (see Figure 3-8).
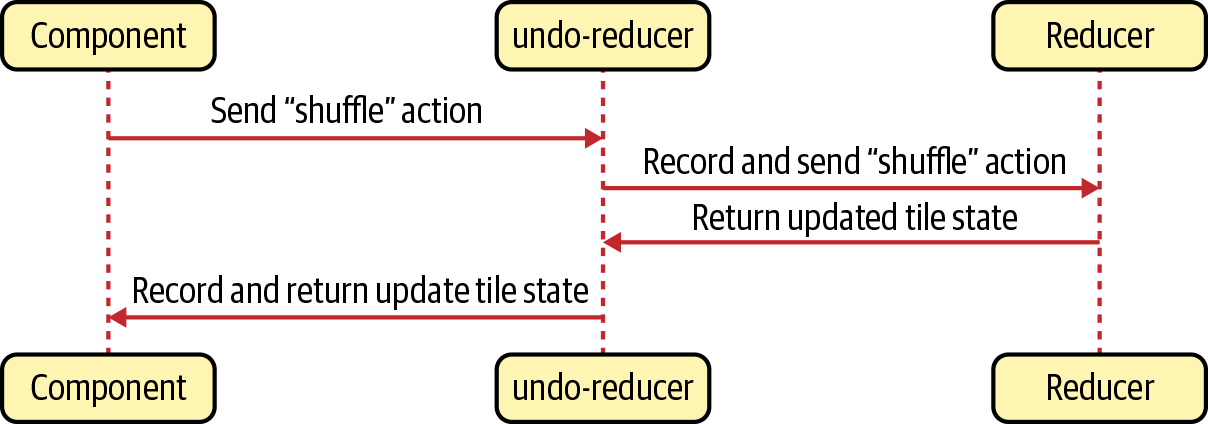
Figure 3-8. The undo-reducer passes most actions to the underlying reducer
As it passes the shuffle action through to the underlying reducer, the undo code keeps track of the existing state and the
shuffle action by adding them to the undoHistory and undoActions. It then returns the state of the underlying game reducer and
the undoHistory and undoActions.
If our puzzle component sends in an undo action, the undo-reducer returns the previous state from the undoHistory, completely
bypassing the game’s own reducer function (see Figure 3-9).
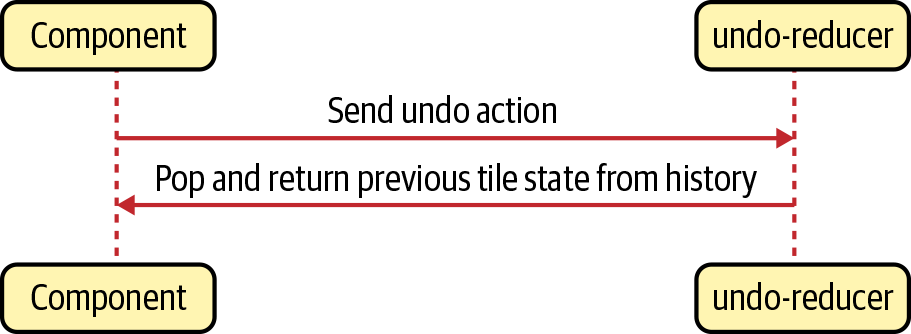
Figure 3-9. For undo actions, the undo-reducer returns the latest historic state
Now let’s look at the useUndoReducer hook itself:
import{useReducer}from'react'importundofrom'./undo'constuseUndoReducer=(reducer,initialState)=>useReducer(undo(reducer),initialState)exportdefaultuseUndoReducer
This useUndoReducer hook is a concise piece of code. It’s simply a call to the built-in useReducer hook, but instead of passing
the reducer straight through, it passes undo(reducer). The result is that your component uses an enhanced version of the reducer
you provide: one that can undo and redo actions.
Here is our updated Puzzle component (see “Use Reducers to Manage Complex State” for the original version):
importreducerfrom'./reducer'importuseUndoReducerfrom'./useUndoReducer'import'./Puzzle.css'constPuzzle=()=>{const[state,dispatch]=useUndoReducer(reducer,{items:['4','1','2','7','6','3',null,'5','8'],})return(<divclassName="Puzzle"><divclassName="Puzzle-squares">{state.items.map((s,i)=>(<divclassName={`Puzzle-square${s?'':'Puzzle-square-empty'}`}key={`square-${i}`}onClick={()=>dispatch({type:'move',payload:i})}>{s}</div>))}</div><divclassName="Puzzle-controls"><buttonclassName="Puzzle-shuffle"onClick={()=>dispatch({type:'shuffle'})}>Shuffle</button><buttonclassName="Puzzle-reset"onClick={()=>dispatch({type:'reset'})}>Reset</button></div><divclassName="Puzzle-controls"><buttonclassName="Puzzle-undo"onClick={()=>dispatch({type:'undo'})}>Undo</button><buttonclassName="Puzzle-redo"onClick={()=>dispatch({type:'redo'})}>Redo</button></div>{state.complete&&(<divclassName="Puzzle-complete">Complete!</div>)}</div>)}exportdefaultPuzzle
The only changes are that we use useUndoReducer instead of useReducer, and we’ve added a couple of buttons to call the “undo”
and “redo” actions.
If you now load the component and makes some changes, you can undo the changes one at a time, as shown in Figure 3-10.
Figure 3-10. With useUndoReducer, you can now send undo and redo actions
Discussion
The undo-reducer shown here will work with reducers that accept and return state objects. If your reducer manages state using
arrays, you will have to modify the undo function.
Because it keeps a history of all previous states, you probably want to avoid using it if your state data is extensive or if you’re using it in circumstances where it might make a huge number of changes. Otherwise, you might want to limit the maximum size of the history.
Also, bear in mind that it maintains its history in memory. If a user reloads the entire page, then the history will disappear. It should be possible to resolve this issue by persisting the global state in local storage whenever it changes.
You can download the source for this recipe from the GitHub site.
Create and Validate Forms
Problem
Most React applications use forms to some degree, and most applications take an ad-hoc approach to creating them. If a team is building your application, you might find that some developers manage individual fields in separate state variables. Others will choose to record form state in a single-value object, which is simpler to pass into and out of the form but can be tricky for each field to update. Field validation often leads to spaghetti code, with some forms validating at submit time and others validating dynamically as the user types. Some forms might show validation messages when the form first loads. In other forms, the messages might appear only after the user has touched the fields.
These variations in design can lead to poor user experience and an inconsistent approach to writing code. In our experience working with React teams, forms and form validation are common stumbling blocks for developers.
Solution
To apply some consistency to form development, we will create a SimpleForm component that we will wrap around one or more
InputField components. This is an example of the use of SimpleForm and InputField:
import{useEffect,useState}from'react'import'./App.css'importSimpleFormfrom'./SimpleForm'importInputFieldfrom'./InputField'constFormExample0=({onSubmit,onChange,initialValue={}})=>{const[formFields,setFormFields]=useState(initialValue)const[valid,setValid]=useState(true)const[errors,setErrors]=useState({})useEffect(()=>{if(onChange){onChange(formFields,valid,errors)}},[onChange,formFields,valid,errors])return(<divclassName="TheForm"><h1>Singlefield</h1><SimpleFormvalue={formFields}onChange={setFormFields}onValid={(v,errs)=>{setValid(v)setErrors(errs)}}><InputFieldname="field1"onValidate={(v)=>!v||v.length<3?'Too short!':null}/><buttononClick={()=>onSubmit&&onSubmit(formFields)}disabled={!valid}>Submit!</button></SimpleForm></div>)}exportdefaultFormExample0
We track the state of the form in a single object, formFields. Whenever we change a field in the form, the field will call
onChange on the SimpleForm. The field1 field is validated using the onValidate method, and whenever the validation state
changes, the field calls the onValid method on the SimpleForm. Validation will occur only if the user has interacted with a
field: making it dirty.
You can see the form running in Figure 3-11.
There is no need to track individual field values. The form value object records individual field values with attributes derived
from the name of the field. The InputField handles the details of when to run the validation: it will update the form value and
decide when to display errors.
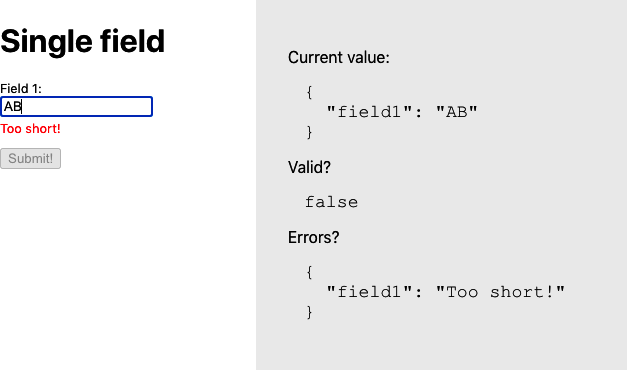
Figure 3-11. A simple form with field validation
Figure 3-12 shows a slightly more complex example that uses the SimpleForm with several fields.
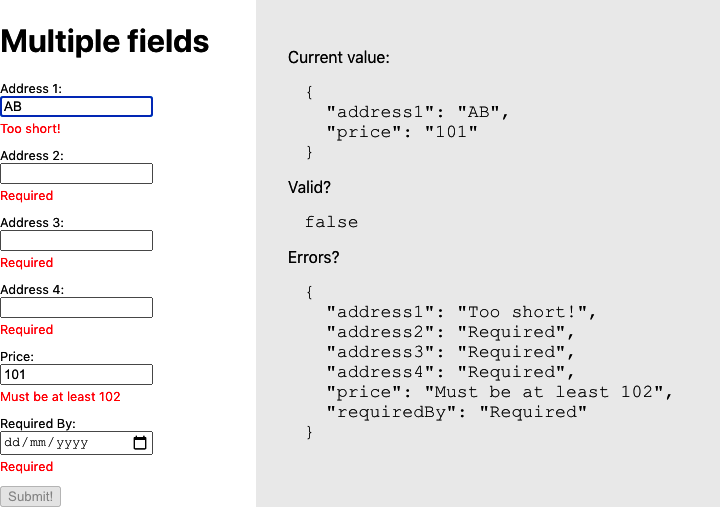
Figure 3-12. A more complex form
To create the SimpleForm and InputField components, we must first look at how they will communicate with each other. An
InputField component will need to tell the SimpleForm when its value has changed and whether or not the new value is valid. It
will do this with a context.
A context is a storage scope. When a component stores values in a context, that value is visible to its subcomponents. The
SimpleForm will create a context called FormContext and use it to store a set of callback functions that any child component can
use to communicate with the form:
import{createContext}from'react'constFormContext=createContext({})exportdefaultFormContext
To see how SimpleForm works, let’s begin with a simplified version, which tracks only its subcomponents’ values, without worrying
about validation just yet:
importReact,{useCallback,useEffect,useState}from'react'import'./SimpleForm.css'importFormContextfrom'./FormContext'functionupdateWith(oldValue,field,value){constnewValue={...oldValue}newValue[field]=valuereturnnewValue}constSimpleForm=({children,value,onChange,onValid})=>{const[values,setValues]=useState(value||{})useEffect(()=>{setValues(value||{})},[value])useEffect(()=>{if(onChange){onChange(values)}},[onChange,values])letsetValue=useCallback((field,v)=>setValues((vs)=>updateWith(vs,field,v)),[setValues])letgetValue=useCallback((field)=>values[field],[values])letform={setValue:setValue,value:getValue,}return(<divclassName="SimpleForm-container"><FormContext.Providervalue={form}>{children}</FormContext.Provider></div>)}exportdefaultSimpleForm
The final version of SimpleForm will have additional code for tracking validation and errors, but this cut-down form is easier to
understand.
The form is going to track all of its field values in the values object. The form creates two callback functions called getValue
and setValue and puts them into the context (as the form object), where subcomponents will find them. We put the form into
the context by wrapping a <FormContext.Provider> around the child components.
Notice that we have wrapped the getValue and setValue callbacks in useCallback, which prevents the component from creating a
new version of each function every time we render the SimpleForm.
Whenever a child component calls the form.value() function, it will receive the current value of the specified field. If a child
component calls form.setValue(), it will update that value.
Now let’s look at a simplified version of the InputField component, again with any validation code removed to make it easier to
understand:
importReact,{useContext}from'react'importFormContextfrom'./FormContext'import'./InputField.css'constInputField=(props)=>{constform=useContext(FormContext)if(!form.value){return'InputField should be wrapped in a form'}const{name,label,...otherProps}=propsconstvalue=form.value(name)return(<divclassName="InputField"><labelhtmlFor={name}>{label||name}:</label><inputid={name}value={value||''}onChange={(event)=>{form.setValue(name,event.target.value)}}{...otherProps}/>{' '}{}</div>)}exportdefaultInputField
The InputField extracts the form object from the FormContext. If it cannot find a form object, it knows that we have not
wrapped it in a SimpleForm component. The InputField then renders an input field, setting its value to whatever is returned by
form.value(name). If the user changes the field’s value, the InputField component sends the new value to
form.setValue(name, event.target.value).
If you need a form field other than an input, you can wrap it in some component similar to the InputField shown here.
The validation code is just more of the same. In the same way that the form tracks its current value in the values state, it also
needs to track which fields are dirty and which are invalid. It then needs to pass callbacks for setDirty, isDirty, and
setInvalid. These callbacks are used by the child fields when running their
onValidate code.
Here is the final version of the SimpleForm component, including validation:
import{useCallback,useEffect,useState}from'react'importFormContextfrom'./FormContext'import'./SimpleForm.css'constSimpleForm=({children,value,onChange,onValid})=>{const[values,setValues]=useState(value||{})const[dirtyFields,setDirtyFields]=useState({})const[invalidFields,setInvalidFields]=useState({})useEffect(()=>{setValues(value||{})},[value])useEffect(()=>{if(onChange){onChange(values)}},[onChange,values])useEffect(()=>{if(onValid){onValid(Object.keys(invalidFields).every((i)=>!invalidFields[i]),invalidFields)}},[onValid,invalidFields])constsetValue=useCallback((field,v)=>setValues((vs)=>({...vs,[field]:v})),[setValues])constgetValue=useCallback((field)=>values[field],[values])constsetDirty=useCallback((field)=>setDirtyFields((df)=>({...df,[field]:true})),[setDirtyFields])constgetDirty=useCallback((field)=>Object.keys(dirtyFields).includes(field),[dirtyFields])constsetInvalid=useCallback((field,error)=>{setInvalidFields((i)=>({...i,[field]:error?error:undefined,}))},[setInvalidFields])constform={setValue:setValue,value:getValue,setDirty:setDirty,isDirty:getDirty,setInvalid:setInvalid,}return(<divclassName="SimpleForm-container"><FormContext.Providervalue={form}>{children}</FormContext.Provider></div>)}exportdefaultSimpleForm
And this is the final version of the InputField component. Notice that the field is counted as dirty once it loses focus or its
value changes:
import{useContext,useEffect,useState}from'react'importFormContextfrom'./FormContext'import'./InputField.css'constsplitCamelCase=(s)=>s.replace(/([a-z0-9])([A-Z0-9])/g,'$1 $2').replace(/^([a-z])/,(x)=>x.toUpperCase())constInputField=(props)=>{constform=useContext(FormContext)const[error,setError]=useState('')const{onValidate,name,label,...otherProps}=propsletvalue=form.value&&form.value(name)useEffect(()=>{if(onValidate){setError(onValidate(value))}},[onValidate,value])constsetInvalid=form.setInvaliduseEffect(()=>{if(setInvalid){setInvalid(name,error)}},[setInvalid,name,error])if(!form.value){return'InputField should be wrapped in a form'}return(<divclassName="InputField"><labelhtmlFor={name}>{label||splitCamelCase(name)}:</label><inputid={name}onBlur={()=>form.setDirty(name)}value={value||''}onChange={(event)=>{form.setDirty(name)form.setValue(name,event.target.value)}}{...otherProps}/>{' '}{<divclassName="InputField-error">{form.isDirty(name)&&error?error:<> </>}</div>}</div>)}exportdefaultInputField
Discussion
You can use this recipe to create many simple forms, and you can extend it for use with any React component. For example, if you are
using a third-party calendar or date picker, you would only need to wrap it in a component similar to InputField to use it inside
a SimpleForm.
This recipe doesn’t support forms within forms or arrays of forms. It should be possible to modify the SimpleForm component to
behave like an InputField to place one form inside another.
You can download the source for this recipe from the GitHub site.
Measure Time with a Clock
Problem
Sometimes a React application needs to respond to the time of day. It might only need to display the current time, or it might need to poll a server at regular intervals or change its interface as day turns to night. But how do you cause your code to re-render as the result of a time change? How do you avoid rendering components too often? And how do you do all that without overcomplicating your code?
Solution
We’re going to create a useClock hook. The useClock hook will give us access to a formatted version of the current date and time
and automatically update the interface when the time changes. Here’s an example of the code in use, and Figure 3-13 shows it
running:
import{useEffect,useState}from'react'importuseClockfrom'./useClock'importClockFacefrom'./ClockFace'import'./Ticker.css'constSimpleTicker=()=>{const[isTick,setTick]=useState(false)consttime=useClock('HH:mm:ss')useEffect(()=>{setTick((t)=>!t)},[time])return(<divclassName="Ticker"><divclassName="Ticker-clock"><h1>Time{isTick?'Tick!':'Tock!'}</h1>{time}<br/><ClockFacetime={time}/></div></div>)}exportdefaultSimpleTicker
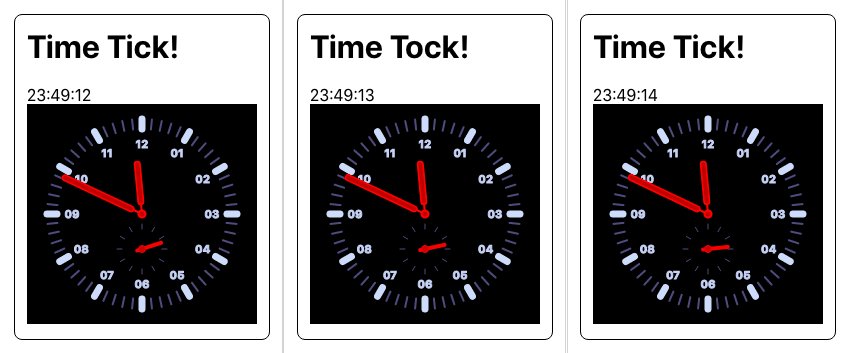
Figure 3-13. The SimpleTicker over three seconds
The time variable contains the current time in the format HH:mm:ss. When the time changes, the value of the isTick state is
toggled between true and false and then used to display the word Tick! or Tock! We show the current time and then also display
the time with a ClockFace component.
As well as accepting a date and time format, useClock can take a number specifying the number of milliseconds between updates
(see Figure 3-14):
import{useEffect,useState}from'react'importuseClockfrom'./useClock'import'./Ticker.css'constIntervalTicker=()=>{const[isTick3,setTick3]=useState(false)consttickThreeSeconds=useClock(3000)useEffect(()=>{setTick3((t)=>!t)},[tickThreeSeconds])return(<divclassName="Ticker"><divclassName="Ticker-clock"><h1>{isTick3?'3 Second Tick!':'3 Second Tock!'}</h1>{tickThreeSeconds}</div></div>)}exportdefaultIntervalTicker
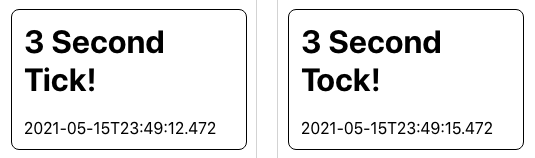
Figure 3-14. The IntervalTicker re-renders the component every three seconds
This version is more useful if you want to perform some task at regular intervals, such as polling a network service.
To poll a network service, consider using a clock with “Convert Network Calls to Hooks”. If the current value of the clock is passed as a dependency to a hook that makes network calls, the network call will be repeated every time the clock changes.
If you pass a numeric parameter to useClock, it will return a time string in ISO format like 2021-06-11T14:50:34.706.
To build this hook, we will use a third-party library called Moment.js to handle date and time formatting. If you would prefer to use another library, such as Day.js, it should be straightforward to convert:
$ npm install momentThis is the code for useClock:
import{useEffect,useState}from'react'importmomentfrom'moment'constuseClock=(formatOrInterval)=>{constformat=typeofformatOrInterval==='string'?formatOrInterval:'YYYY-MM-DDTHH:mm:ss.SSS'constinterval=typeofformatOrInterval==='number'?formatOrInterval:500const[response,setResponse]=useState(moment(newDate()).format(format))useEffect(()=>{constnewTimer=setInterval(()=>{setResponse(moment(newDate()).format(format))},interval)return()=>clearInterval(newTimer)},[format,interval])returnresponse}exportdefaultuseClock
We derive the date and time format and the required ticking interval from the
formatOrInterval parameter passed to the hook. Then we create a timer with
setInterval. This time will set the response value every interval milliseconds. When we set
the response string to a new time, any component that relies on useClock will re-render.
We need to make sure that we cancel any timers that are no longer in use. We can do this using a feature of the useEffect hook. If
we return a function at the end of our useEffect code, then that function will be called the next time useEffect needs to run.
So, we can use it to clear the old timer before creating a new one.
If we pass a new format or interval to useClock, it will cancel its old timer and respond using a new timer.
Discussion
This recipe is an example of how you can use hooks to solve a simple problem simply. React code (the clue is in the name) reacts to
dependency changes. Instead of thinking, “How can I run this piece of code every second?” the useClock hook allows you to write
code that depends on the current time and hides away all of the gnarly details of creating timers, updating state, and clearing
timers.
If you use the useClock hook several times in a component, then a time change can result in multiple renders. For example, if you
have two clocks that format the current time in 12-hour format (04:45) and 24-hour format (16:45), then your component will render
twice when the minute changes. An extra render once a minute is unlikely to have much of a performance impact.
You can also use the useClock hook inside other hooks. If you create a useMessages hook to retrieve messages from a server, you
can call useClock inside it to poll the server at regular intervals.
You can download the source for this recipe from the GitHub site.
Monitor Online Status
Problem
Let’s say someone is using your application on their cell phone, and then they head into a subway with no data connection. How can you check that the network connection has disappeared? What’s a React-friendly way of updating your interface to either tell the user that there’s a problem or disable some features that require network access?
Solution
We will create a hook called useOnline that will tell us whether we’re connected to a network. We need code that runs when the
browser loses or regains a connection to the network. Fortunately, there are window/body-level events called online and
offline that do exactly that. When the online and offline events are triggered, the current network state will be given by
navigator.onLine, which will be set to true or false:
import{useEffect,useState}from'react'constuseOnline=()=>{const[online,setOnline]=useState(navigator.onLine)useEffect(()=>{if(window.addEventListener){window.addEventListener('online',()=>setOnline(true),false)window.addEventListener('offline',()=>setOnline(false),false)}else{document.body.ononline=()=>setOnline(true)document.body.onoffline=()=>setOnline(false)}},[])returnonline}exportdefaultuseOnline
This hook manages its connection state in the online variable. When the hook is first run (notice the empty dependency array), we
register listeners to the browser’s online/offline events. When either of these events occurs, we can set the value of online to
true or false. If this is a change to the current value, then any component using this hook will re-render.
Here’s an example of the hook in action:
importuseOnlinefrom'./useOnline'import'./App.css'functionApp(){constonline=useOnline()return(<divclassName="App"><h1>NetworkChecker</h1><span>Youarenow....{online?(<divclassName="App-indicator-online">ONLINE</div>):(<divclassName="App-indicator-offline">OFFLINE</div>)}</span></div>)}exportdefaultApp
If you run the app, the page will currently show as online. If you disconnect/reconnect your network, the message will switch to OFFLINE and then back to ONLINE (see Figure 3-15).

Figure 3-15. The code re-renders when the network is switched off and back on again
Discussion
It’s important to note that this hook checks your browser’s connection to a network, not whether it connects to the broader Internet or your server. If you would like to check that your server is running and available, you would have to write additional code.
You can download the source for this recipe from the GitHub site.
Manage Global State with Redux
Problem
In other recipes in this chapter, we’ve seen that you can manage complex component state with a pure JavaScript function called a reducer. Reducers simplify components and make business logic more testable.
But what if you have some data, such as a shopping basket, that needs to be accessed everywhere?
Solution
We will use the Redux library to manage the global application state. Redux uses the same reducers we can give to the React
useReducer function, but they are used to manage a single state object for the entire application. Plus, there are many extensions
to Redux that solve common programming problems and develop and manage your application more quickly.
First, we need to install the Redux library:
$ npm install reduxWe will also install the React Redux library, which will make Redux far easier to use with React:
$ npm install react-reduxWe’re going to use Redux to build an application containing a shopping basket (see Figure 3-16).
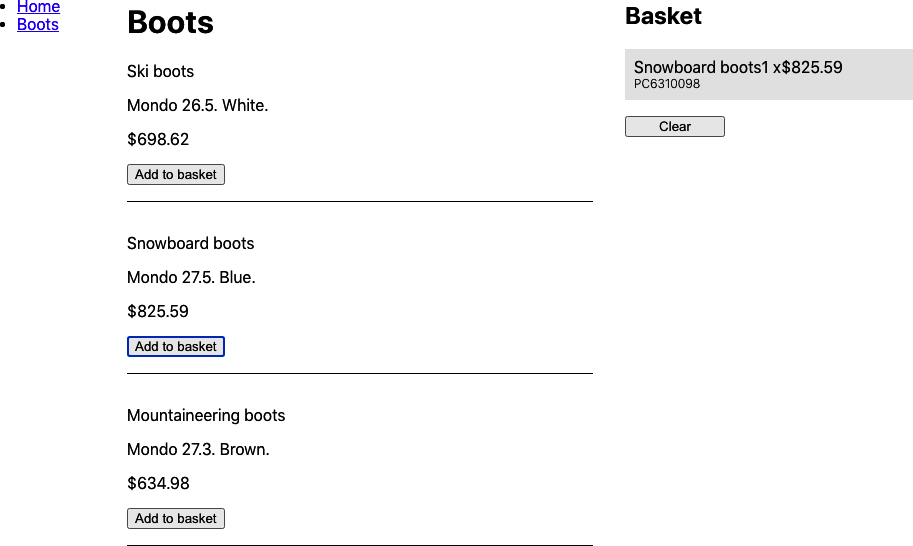
Figure 3-16. When a customer buys a product, the application adds it to the basket
If a customer clicks a Buy button, the application adds the product to the basket. If they click the Buy button again, the quantity in the basket is updated. The basket will appear in several places across the application, so it’s a good candidate for moving to Redux. Here is the reducer function that we will use to manage the basket:
constreducer=(state={},action={})=>{switch(action.type){case'buy':{constbasket=state.basket?[...state.basket]:[]constexisting=basket.findIndex((item)=>item.productId===action.payload.productId)if(existing!==-1){basket[existing].quantity=basket[existing].quantity+1}else{basket.push({quantity:1,...action.payload})}return{...state,basket,}}case'clearBasket':{return{...state,basket:[],}}default:return{...state}}}exportdefaultreducer
We are creating a single reducer here. Once your application grows in size, you will probably want to split your reducer into
smaller reducers, which you can combine with the Redux combineReducers function.
The reducer function responds to buy and clearBasket actions. The buy action will either add a new item to the basket or
update the quantity of an existing item if one has a matching productId. The clearBasket action will set the basket back to an
empty array.
Now that we have a reducer function, we will use it to create a Redux store. The store is going to be our central repository for the shared application state. To create a store, add these two lines to some top-level component such as App.js:
import{createStore}from'redux'importreducerfrom'./reducer'conststore=createStore(reducer)
The store needs to be available globally in the app, and to do that, we need to inject it into the context of the components that
might need it. The React Redux library provides a component to inject the store in a component context called Provider:
<Providerstore={store}>All the components inside here can access the store</Provider>
Here is the reducer.js component from the example application, which you can find in the GitHub repository for this book:
constreducer=(state={},action={})=>{switch(action.type){case'buy':{constbasket=state.basket?[...state.basket]:[]constexisting=basket.findIndex((item)=>item.productId===action.payload.productId)if(existing!==-1){basket[existing].quantity=basket[existing].quantity+1}else{basket.push({quantity:1,...action.payload})}return{...state,basket,}}case'clearBasket':{return{...state,basket:[],}}default:return{...state}}}exportdefaultreducer
Now that the store is available to our components, how do we use it? React Redux allows you to access the store through hooks. If
you want to read the contents of the global state, you can use useSelector:
constbasket=useSelector((state)=>state.basket)
The useSelector hook accepts a function to extract part of the central state. Selectors are pretty efficient and will cause
your component to re-render only if the particular part of the state you are interested in changes.
If you need to submit an action to the central store, you can do it with the
useDispatch hook:
constdispatch=useDispatch()
This returns a dispatch function that you can use to send actions to the store:
dispatch({type:'clearBasket'})
These hooks work by extracting the store from the current context. If you forget to add a Provider to your application or try to
run useSelector or useDispatch outside of a Provider context, you will get an error, as shown in Figure 3-17.
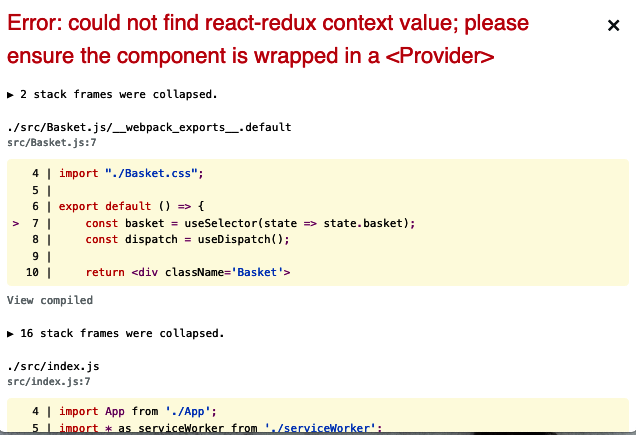
Figure 3-17. If you forget to include a Provider, you will get this error
The completed Basket component reads and clears the app-wide shopping basket:
import{useDispatch,useSelector}from'react-redux'import'./Basket.css'constBasket=()=>{constbasket=useSelector((state)=>state.basket)constdispatch=useDispatch()return(<divclassName="Basket"><h2>Basket</h2>{basket&&basket.length?(<>{basket.map((item)=>(<divclassName="Basket-item"><divclassName="Basket-itemName">{item.name}</div><divclassName="Basket-itemProductId">{item.productId}</div><divclassName="Basket-itemPricing"><divclassName="Basket-itemQuantity">{item.quantity}</div><divclassName="Basket-itemPrice">{item.price}</div></div></div>))}<buttononClick={()=>dispatch({type:'clearBasket'})}>Clear</button></>):('Empty')}</div>)}exportdefaultBasket
To demonstrate some code adding items to the basket, here’s a Boots component that allows a customer to buy a selection of products:
import{useDispatch}from'react-redux'import'./Boots.css'constproducts=[{productId:'BE8290004',name:'Ski boots',description:'Mondo 26.5. White.',price:698.62,},{productId:'PC6310098',name:'Snowboard boots',description:'Mondo 27.5. Blue.',price:825.59,},{productId:'RR5430103',name:'Mountaineering boots',description:'Mondo 27.3. Brown.',price:634.98,},]constBoots=()=>{constdispatch=useDispatch()return(<divclassName="Boots"><h1>Boots</h1><dlclassName="Boots-products">{products.map((product)=>(<><dt>{product.name}</dt><dd><p>{product.description}</p><p>${product.price}</p><buttononClick={()=>dispatch({type:'buy',payload:product})}>Addtobasket</button></dd></>))}</dl></div>)}exportdefaultBoots
These two components may appear at very different locations in the component tree, but they share the same Redux store. As soon as a
customer adds a product to the basket, the Basket component will automatically update with the change (see Figure 3-18).
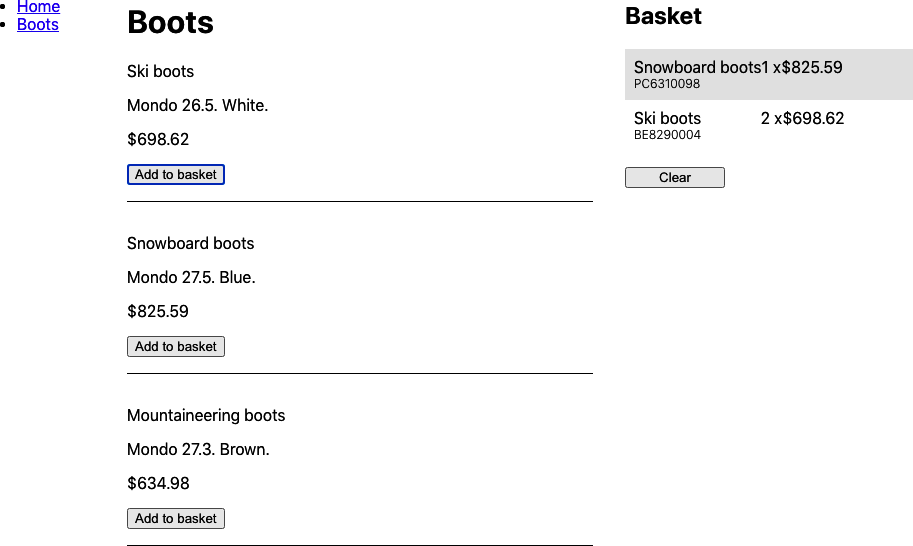
Figure 3-18. The Redux-React hooks make sure that when a user buys a product, the Basket is re-rendered
Discussion
Developers often use the Redux library with the React framework. For a long time, it seemed, almost every React application included Redux by default. It’s probably true that Redux was often overused or used inappropriately. We have seen projects that have even banned local state in favor of using Redux for all state. We believe this approach is a mistake. Redux is intended for central application state management, not for simple component state. If you are storing data that is of concern to only one component, or its subcomponents, you should probably not store it in Redux.
However, if your application manages some global application state, then Redux is still the tool of choice.
You can download the source for this recipe from the GitHub site.
Survive Page Reloads with Redux Persist
Problem
Redux is an excellent way of managing the application state centrally. However, it does have a small problem: when you reload the page, the entire state disappears (see Figure 3-19).
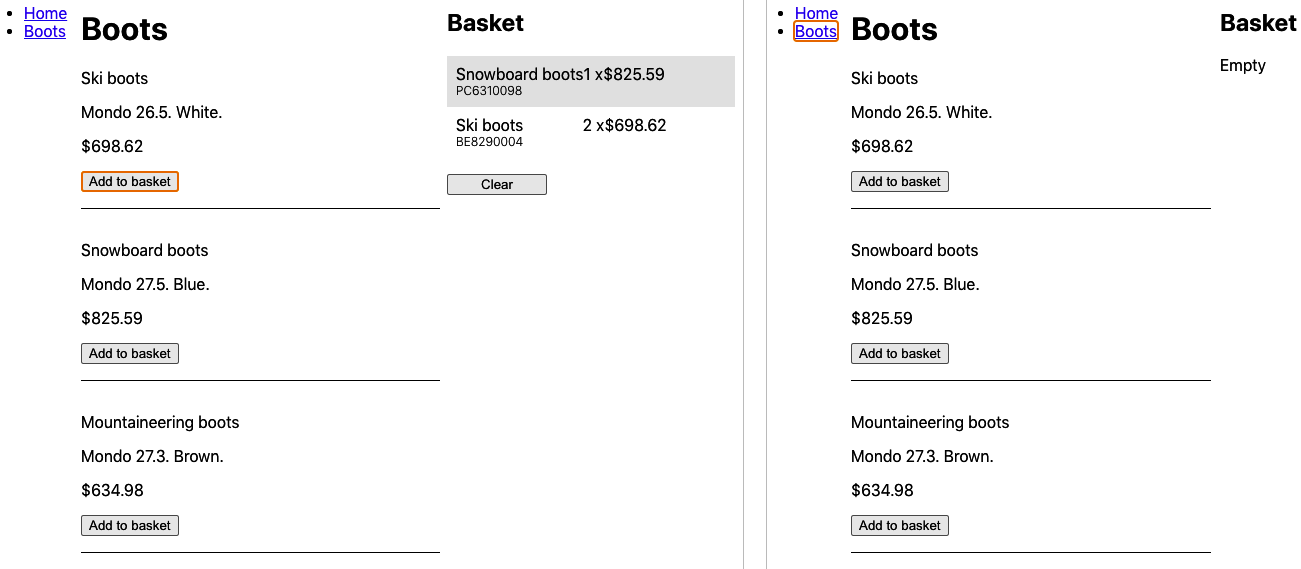
Figure 3-19. Redux state (left) is lost if the page is reloaded (right)
The state disappears because Redux keeps its state in memory. How do we prevent the state from disappearing?
Solution
We will use the Redux Persist library to keep a copy of the Redux state in local storage. To install Redux Persist, type the following:
$ npm install redux-persistThe first thing we need to do is create a persisted reducer, wrapped around our existing reducer:
importstoragefrom'redux-persist/lib/storage'constpersistConfig={key:'root',storage,}constpersistedReducer=persistReducer(persistConfig,reducer)
The storage specifies where we will persist the Redux state: it will be in localStorage by default. The persistConfig says
that we want to keep our state in a
localStorage item called persist:root. When the Redux state changes, the persistedReducer will write a copy with localStorage.setItem('persist:root', ...). We now need to create our Redux store with persistedReducer:
conststore=createStore(persistedReducer)
We need to interject the Redux Persist code between the Redux store and the code that’s accessing the Redux store. We do that with a
component called PersistGate:
import{PersistGate}from'redux-persist/integration/react'import{persistStore}from'redux-persist'constpersistor=persistStore(store)...<Providerstore={store}><PersistGateloading={<div>Loading...</div>}persistor={persistor}>Componentsliveinhere</PersistGate></Provider>
The PersistGate must be inside the Redux Provider and outside the components that are going to use Redux. The PersistGate
will watch for when the Redux state is lost and then reload it from localStorage. It might take a moment to reload the data, and
if you want to show that the UI is briefly busy, you can pass a loading component to the PersistGate: for example, an animated
spinner. The loading component will be displayed in place of its child components when Redux is reloading. If you don’t want a
loading component, you can set it to null.
Here is the final version of the modified App.js from the example app:
import{BrowserRouter,Route,Switch}from'react-router-dom'import{Provider}from'react-redux'import{createStore}from'redux'importMenufrom'./Menu'importHomefrom'./Home'importBootsfrom'./Boots'importBasketfrom'./Basket'import'./App.css'importreducerfrom'./reducer'import{persistStore,persistReducer}from'redux-persist'import{PersistGate}from'redux-persist/integration/react'importstoragefrom'redux-persist/lib/storage'constpersistConfig={key:'root',storage,}constpersistedReducer=persistReducer(persistConfig,reducer)conststore=createStore(persistedReducer)constpersistor=persistStore(store)functionApp(){return(<divclassName="App"><Providerstore={store}><PersistGateloading={<div>Loading...</div>}persistor={persistor}><BrowserRouter><Menu/><Switch><Routeexactpath="/"><Home/></Route><Routepath="/boots"><Boots/></Route></Switch><Basket/></BrowserRouter></PersistGate></Provider></div>)}exportdefaultApp
Now, when the user reloads the page, the Redux state survives, as shown in Figure 3-20.
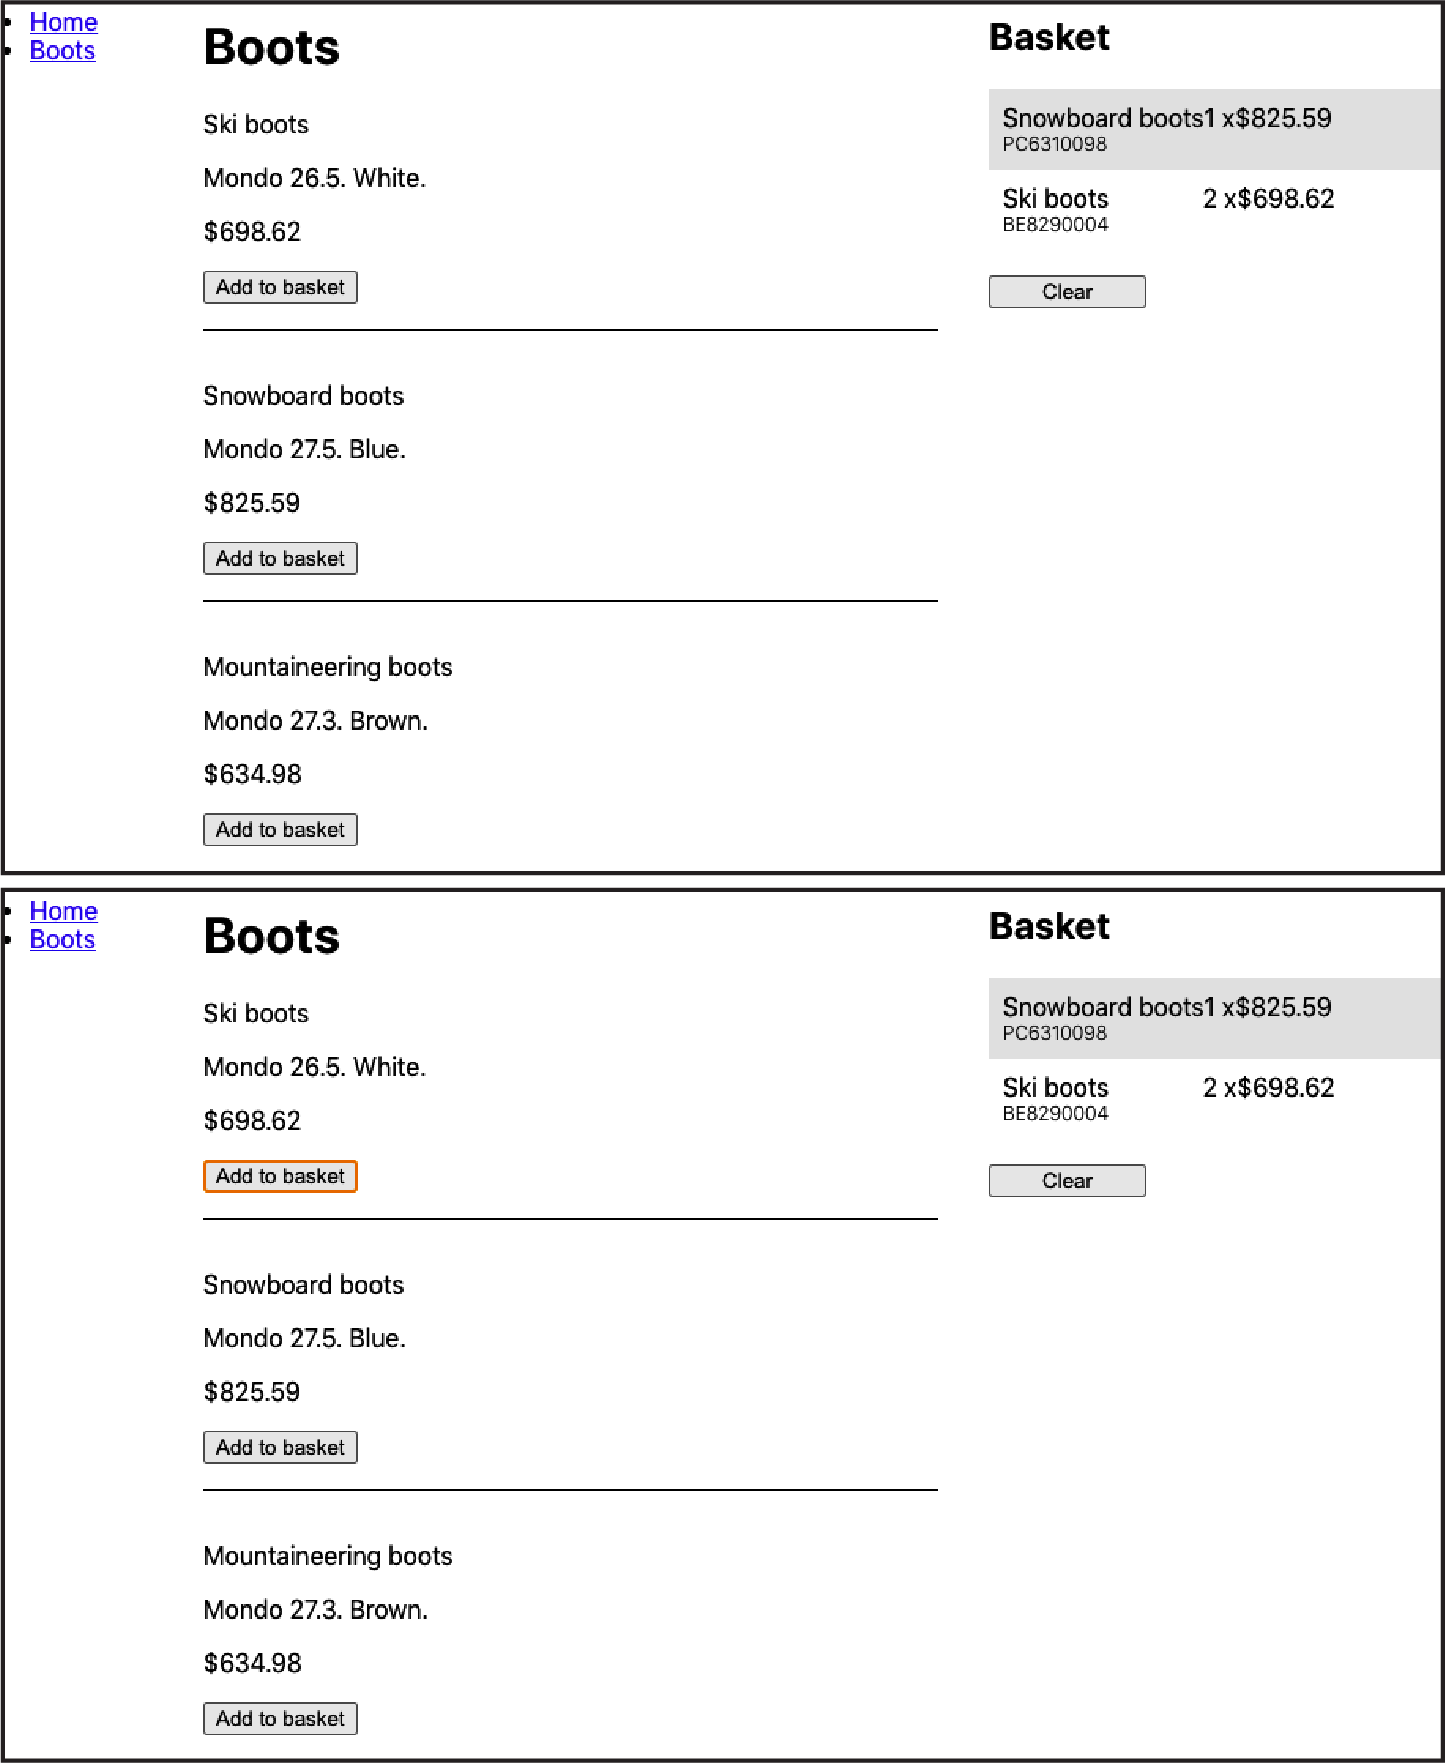
Figure 3-20. Redux state before the reload (top) and after (bottom)
Discussion
The Redux Persist library is a simple way of persisting Redux state through page reloads. If you have a substantial amount of Redux
data, you will need to be careful not to break the localStorage limit, which will vary from browser to browser but is typically
around 10 MB. However, if your Redux data is that size, you should consider offloading some of it to a server.
You can download the source for this recipe from the GitHub site.
Calculate Derived State with Reselect
Problem
When you extract your application state into an external object with a tool like Redux, you often need to process the data in some way before displaying it. For example, Figure 3-21 shows an application we have used in a few recipes in this chapter.
Figure 3-21. What’s the best method for calculating the total cost and tax of the basket?
What if we want to calculate the total cost of the items in the basket and then calculate the amount of sales tax to pay? We could create a JavaScript function that reads through the basket items and calculates both, but that function would have to recalculate the values every time the basket renders. Is there a way of calculating derived values from the state that updates only when the state changes?
Solution
The Redux developers have created a library specifically designed to derive values efficiently from state objects, called
reselect.
The reselect library creates selector functions. A selector function takes a single parameter—a state object—and returns a
processed version.
We’ve already seen one selector in “Manage Global State with Redux”. We used it to return the current basket from the central Redux state:
constbasket=useSelector((state)=>state.basket)
The state => state.basket is a selector function; it derives some value from a state object. The reselect library creates highly
efficient selector functions that can cache their results if the state they depend upon has not changed.
To install reselect, enter this command:
$ npm install reselectLet’s begin by creating a selector function that will do the following:
-
Count the total number of items in a basket
-
Calculate the total cost of all of the items
We’ll call this function summarizer. Before we go into the details of how we’ll write it, we’ll begin by writing a test that will
show what it will need to do:
it('should be able to handle multiple products',()=>{constactual=summarizer({basket:[{productId:'1234',quantity:2,price:1.23},{productId:'5678',quantity:1,price:1.5},],})expect(actual).toEqual({itemCount:3,cost:3.96})})
So if we give it a state object, it will add up the quantities and costs and return an object containing the itemCount and cost.
We can create a selector function called summarizer with the Reselect library like this:
import{createSelector}from'reselect'constsummarizer=createSelector((state)=>state.basket||[],(basket)=>({itemCount:basket.reduce((i,j)=>i+j.quantity,0),cost:basket.reduce((i,j)=>i+j.quantity*j.price,0),}))exportdefaultsummarizer
The createSelector function creates a selector function based on other selector functions. Each of the parameters passed to
it—except the last parameter—should be selector functions. We are passing just one:
(state)=>state.basket||[]
This code extracts the basket from the state.
The final parameter passed to createSelector (the combiner) is a function that derives a new value, based on the results of the
preceding selectors:
(basket)=>({itemCount:basket.reduce((i,j)=>i+j.quantity,0),cost:basket.reduce((i,j)=>i+j.quantity*j.price,0),})
The basket value is the result of running the state through the first selector.
Why on Earth would anyone create functions this way? Isn’t it way more complicated than just creating a JavaScript function manually, without the need to pass all of these functions to functions?
The answer is efficiency. Selectors will recalculate their values only when they need to. State objects can be complex and might
have dozens of attributes. But we are interested only in the contents of the basket attribute, and we don’t want to have to
recalculate our costs if anything else changes.
What reselect does is work out when the value it returns is likely to have changed. Let’s say we call it one time, and it
calculates the itemCount and value like this:
{itemCount:3,cost:3.96}
Then the user runs a bunch of commands that update personal preferences, posts a message to somebody, adds several things to their wish list, and so on.
Each of the events might update the global application state. But the next time we run the summarizer function, it will return the
cached value that it produced before:
{itemCount:3,cost:3.96}
Why? Because it knows that this value is dependent only upon the basket value in the global state. And if that hasn’t changed,
then it doesn’t need to recalculate the return value.
Because reselect allows us to build selector functions from other selector functions, we could build another selector called
taxer to calculate the basket’s sales tax:
import{createSelector}from'reselect'importsummarizerfrom'./summarizer'consttaxer=createSelector(summarizer,(summary)=>summary.cost*0.07)exportdefaulttaxer
The taxer selector uses the value returned by the summarizer function. It takes the cost of the summarizer result and
multiplies it by 7%. If the basket’s summarized total doesn’t change, then the taxer function will not need to update its result.
Now that we have the summarizer and taxer selectors, we can use them inside a component, just as we would any other selector
function:
import{useDispatch,useSelector}from'react-redux'import'./Basket.css'importsummarizerfrom'./summarizer'importtaxerfrom'./taxer'constBasket=()=>{constbasket=useSelector((state)=>state.basket)const{itemCount,cost}=useSelector(summarizer)consttax=useSelector(taxer)constdispatch=useDispatch()return(<divclassName="Basket"><h2>Basket</h2>{basket&&basket.length?(<>{basket.map((item)=>(<divclassName="Basket-item"><divclassName="Basket-itemName">{item.name}</div><divclassName="Basket-itemProductId">{item.productId}</div><divclassName="Basket-itemPricing"><divclassName="Basket-itemQuantity">{item.quantity}</div><divclassName="Basket-itemPrice">{item.price}</div></div></div>))}<p>{itemCount}items</p><p>Total:${cost.toFixed(2)}</p><p>Salestax:${tax.toFixed(2)}</p><buttononClick={()=>dispatch({type:'clearBasket'})}>Clear</button></>):('Empty')}</div>)}exportdefaultBasket
When we run the code now, we see a summary at the bottom of the shopping basket, which will update whenever we buy a new product (see Figure 3-22).
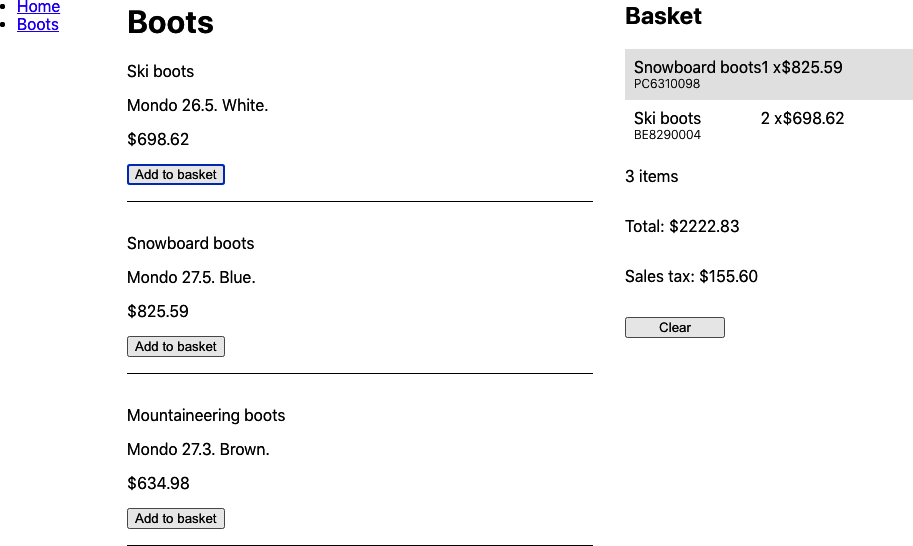
Figure 3-22. The selectors recalculate the total cost and sales tax only when the basket changes
Discussion
The first time you meet selector functions, they can seem complicated and hard to understand. But it is worth taking the time to
understand them. There is nothing Redux-specific about them. There is no reason why you can’t also use them with non-Redux reducers.
Because they have no dependencies beyond the reselect library itself, they are easy to unit test. We include example tests in
the code for this chapter.
You can download the source for this recipe from the GitHub site.