Chapter 6. Reactive Programming
Reactive programming is a programming paradigm where code reacts to changes in data values or events. Reactive programming enables us to build systems that respond dynamically to changes in real time. It is essential to underline that this chapter is written in the context of asynchronous programming. We cannot cover every aspect of reactive programming, as entire books have been written on the topic. Instead, we are going to focus on async approaches to polling and reacting to changes in data by building a basic heater system, where futures react to changes in temperature. We will then build an event bus by using atomics, mutexes, and queues to enable us to publish events to multiple subscribers.
By the end of this chapter, you will be familiar with enough async data-sharing concepts to construct thread-safe, mutable data structures. These data structures can be manipulated safely by multiple concurrent async tasks. You will also be able to implement the observer pattern. By the end of this chapter, you’ll be equipped with the skills to build async Rust solutions to reactive design patterns that you’ll find in further reading.
We start our reactive programming journey with building a basic reactive system.
Building a Basic Reactive System
In building our basic reactive system, we are going to implement the observer pattern. With this pattern, we have subjects and then observers that subscribe to updates of that subject. When the subject releases an update, the observers generally react to this update depending on the specific requirements of the observer. For our basic reactive system, we will build a simple heating system. The system turns on the heater when the temperature goes below the desired setting, as shown in Figure 6-1.

Figure 6-1. Our basic reactive heating system
In this system, the temperature and desired temperature are subjects. The heater and display are observers. Our heater will turn on if the temperature drops below the desired temperature setting. Our display will print out the temperature to the terminal if the temperature changes. In a real-life system, we would just connect our system to a temperature sensor. However, because we are using this example to explore reactive programming, we are skipping the detour into hardware engineering and making do with directly coding the effect of the heater and the heat loss on the temperature. Now that we have our system laid out, we can move onto defining our subjects.
Defining Our Subjects
Our observers in the system are going to be futures with nonstop polling since they are going to be polling the subjects continually throughout the program to see whether the subject has changed. Before we can start building our temperature system, we need the following dependencies:
[dependencies]tokio={version="1.26.0",features=["full"]}clearscreen="2.0.1"
We are using clearscreen to update the display of our system and the Tokio crate for an easy interface of async runtimes. LazyLock (which is now part of the standard library) allows for the lazy initialization of our variables, meaning they are created only when first accessed. With these dependencies, we need these imports to build our system:
usestd::sync::Arc;usestd::sync::atomic::{AtomicI16,AtomicBool};usecore::sync::atomic::Ordering;usestd::sync::LazyLock;usestd::future::Future;usestd::task::Poll;usestd::pin::Pin;usestd::task::Context;usestd::time::{Instant,Duration};
We now have everything needed, so we can define our subjects:
staticTEMP:LazyLock<Arc<AtomicI16>>=LazyLock::new(||{Arc::new(AtomicI16::new(2090))});staticDESIRED_TEMP:LazyLock<Arc<AtomicI16>>=LazyLock::new(||{Arc::new(AtomicI16::new(2100))});staticHEAT_ON:LazyLock<Arc<AtomicBool>>=LazyLock::new(||{Arc::new(AtomicBool::new(false))});
The subjects have the following responsibilities:

The current temperature of the system.

The desired temperature that we would like the room to be.

Whether the heater should be on or off. If the bool is
true, we instruct the heater to turn on. The heater will turn off if the bool isfalse.
Note
If you have Googled reactive programming or reactive systems before, you may have read about passing messages and events. Messages and events are certainly part of reactive programming, but we need to remember that an important part of software development is not to overengineer our system. The more complex our system is, the harder it is to maintain and change. Our system has basic feedback needs: the heater gets turned on or off based on a number. If we look into locks and channels that send messages between threads, they boil down to atomics for the locks and other data collections to handle the data. For now, just using atomics is enough because of the system’s simple requirements.
Subscribing to subjects with observers decouples our code. For instance, we can easily increase the number of observers by getting the new observers to observe the subject. We do not have to alter any code in existing subjects.
We now have everything needed for our subjects, so the next step is to build an observer to display our subjects and control our HEAT_ON subject.
Building Our Display Observer
Now that our subjects are defined, we can define our display future:
pubstructDisplayFuture{pubtemp_snapshot:i16,}implDisplayFuture{pubfnnew()->Self{DisplayFuture{temp_snapshot:TEMP.load(Ordering::SeqCst)}}}
When we create the future, we load the value of the temperature subject and store it. We are using Ordering::SeqCst here to ensure that the temperature value is consistent across all threads. This strict ordering guarantees that no other thread has modified the temperature in a way that we wouldn’t see.
We can then use this stored temperature to compare against the temperature at the time of polling:
implFutureforDisplayFuture{typeOutput=();fnpoll(mutself:Pin<&mutSelf>,cx:&mutContext<'_>)->Poll<Self::Output>{letcurrent_snapshot=TEMP.load(Ordering::SeqCst);letdesired_temp=DESIRED_TEMP.load(Ordering::SeqCst);letheat_on=HEAT_ON.load(Ordering::SeqCst);ifcurrent_snapshot==self.temp_snapshot{cx.waker().wake_by_ref();returnPoll::Pending}ifcurrent_snapshot<desired_temp&&heat_on==false{HEAT_ON.store(true,Ordering::SeqCst);}elseifcurrent_snapshot>desired_temp&&heat_on==true{HEAT_ON.store(false,Ordering::SeqCst);}clearscreen::clear().unwrap();println!("Temperature: {}\nDesired Temp: {}\nHeater On: {}",current_snapshotasf32/100.0,desired_tempasf32/100.0,heat_on);self.temp_snapshot=current_snapshot;cx.waker().wake_by_ref();returnPoll::Pending}}
This code does the following:
We get a snapshot of the system as a whole.
We check for any difference between the snapshot of the temperature that the future holds and the current temperature. If there is no difference, there is no point re-rendering the display or making any heating decisions, so we merely return
Pending, ending the poll.We check whether the current temperature is below the desired temperature. If it is, we turn the
HEAT_ONflag totrue.
If the temperature is higher than the desired temperature, we turn the
HEAT_ONflag tofalse.
We wipe the terminal for the update.

We print the current state of the snapshot.

We update the snapshot that the future references.
Initially, we get a snapshot of the entire system. This approach can be up for debate. Some people argue that we should be loading the atomic values at every step. This would get the true nature of the state every time we make a decision on altering the state of the subject or displaying it. This is a reasonable argument, but trade-offs always occur when it comes to these sorts of decisions.
For our system, the display is the only observer that is going to alter the state of the HEAT_ON flag, and the logic in our future is making the decision based on the temperature. However, two other factors affect the temperature, and these could affect the temperature between the snapshot and print, as shown in Figure 6-2.
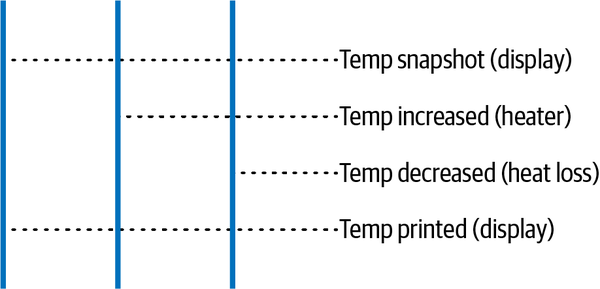
Figure 6-2. Futures affecting the temperature before the temperature snapshot is printed
In our system, it’s not the end of the world if the temperature display is slightly off for a split second. It could be argued that it is more important to take a snapshot, make decisions from that snapshot, and print that snapshot in order to see the exact data used to make a decision. This would also give us clear debugging information. We could also make the snapshot, alter the state of the HEAT_ON flag based on that snapshot, and then load every atomic variable for the print to the console so the display is always accurate the split second it is printed. Logging the snapshot for the decision and loading the atomics the moment we print is also an option.
For our simple system, we are getting to the point of splitting hairs, and we will stick to printing the snapshot so we can see how our system adapts and makes decisions. However, it is important to consider these trade-offs when building a reactive system. The data your observer is acting on could already be out of date.
For our simulation, we could remove the risk of operating on out-of-date data by restricting the runtime to just one thread. This would ensure that our snapshot would not be out of date, as another future could not alter the temperature while our display future is being processed. Instead of restricting the runtime to one thread, we could wrap our temperature in a mutex, which would also ensure that our temperature would not change between the snapshot and the print.
However, our system is reacting to temperature. Temperature isn’t a construct that our system just made up. Heat loss and the heater can be affecting our temperature in real time, and we would only be lying to ourselves if we came up with tricks to avoid the changing of the temperature in our system while we had another process altering the state of our subjects.
While our system is simple enough that we do not worry about out-of-date data, we can use the compare-and-exchange functionality, as shown in this code example from the standard library documentation:
usestd::sync::atomic::{AtomicI64,Ordering};letsome_var=AtomicI64::new(5);assert_eq!(some_var.compare_exchange(5,10,Ordering::Acquire,Ordering::Relaxed),Ok(5));assert_eq!(some_var.load(Ordering::Relaxed),10);assert_eq!(some_var.compare_exchange(6,12,Ordering::SeqCst,Ordering::Acquire),Err(10));assert_eq!(some_var.load(Ordering::Relaxed),10);
This is where we can appreciate why atomics are called atomics because their transactions are atomic. This means that no other transaction will happen on the atomic value while a transaction is being performed on the value. In the compare_exchange function, we are asserting that the atomic value is a certain value before we update it to the new value. If the value is not what we expect, we return an error with the atomic’s actual value. We can use the compare_exchange function to prompt observers to make another decision based on the value returned and attempt to make another update on the atomic value based on the updated information. We have now covered enough to highlight the data concurrency issues with reactive programming and areas that provide solutions. We can continue on with building our reactive system with the heater and heat-loss observers.
Building Our Heater and Heat-Loss Observer
For our heater observer to function, we need to read the HEAT_ON bool and not worry about the temperature. However, heaters have a time element. Sadly, at the time of this writing, we live in a world where heaters are not instant; they take time to heat up a room. So, instead of a temperature snapshot, our heater future has a time snapshot, giving our heater future the following form:
pubstructHeaterFuture{pubtime_snapshot:Instant,}implHeaterFuture{pubfnnew()->Self{HeaterFuture{time_snapshot:Instant::now()}}}
Now that we have a time snapshot, we can reference it and increase the temperature after a certain duration with the poll function:
implFutureforHeaterFuture{typeOutput=();fnpoll(mutself:Pin<&mutSelf>,cx:&mutContext<'_>``)->Poll<Self::Output>{ifHEAT_ON.load(Ordering::SeqCst)==false{self.time_snapshot=Instant::now();cx.waker().wake_by_ref();returnPoll::Pending}letcurrent_snapshot=Instant::now();ifcurrent_snapshot.duration_since(self.time_snapshot)<Duration::from_secs(3){cx.waker().wake_by_ref();returnPoll::Pending}TEMP.fetch_add(3,Ordering::SeqCst);self.time_snapshot=Instant::now();cx.waker().wake_by_ref();returnPoll::Pending}}
In our heater future, we carry out the following steps:
Exit as quickly as possible if the
HEAT_ONflag is off because nothing is going to happen. We want to release the future from the executor as quickly as possible to avoid blocking other futures.If the duration is not over 3 seconds, we also exit because time has not elapsed for the heater to take effect.
Finally, both time has elapsed and the
HEAT_ONflag is on, so we increase the temperature by three.
We update self.time_snapshot at every exit opportunity the HEAT_ON flag is false but not enough time has elapsed. If we did not update time_snapshot, our heater future could be polled with the HEAT_ON flag as false until 3 seconds have elapsed. But as soon as the HEAT_ON flag is switched to true, the effect on the temperature would be instant. For our heater future, we need to reset the state between each poll.
For our heat-loss future, we have the following:
pubstructHeatLossFuture{pubtime_snapshot:Instant,}implHeatLossFuture{pubfnnew()->Self{HeatLossFuture{time_snapshot:Instant::now()}}}
For our heat-loss future, the constructor method will be the same as the heater future, because we are referencing time elapsed between each poll. However, with this poll, we reset the snapshot only after the effect has taken place because heat loss is just a constant in this simulation. We recommend that you attempt to build this future yourself. If you did attempt to build the future yourself, it hopefully takes this form:
implFutureforHeatLossFuture{typeOutput=();fnpoll(mutself:Pin<&mutSelf>,cx:&mutContext<'_>)->Poll<Self::Output>{letcurrent_snapshot=Instant::now();ifcurrent_snapshot.duration_since(self.time_snapshot)>Duration::from_secs(3){TEMP.fetch_sub(1,Ordering::SeqCst);self.time_snapshot=Instant::now();}cx.waker().wake_by_ref();returnPoll::Pending}}
We now have all our futures that will poll continually as long as the program is running. Running all our futures with the following code will result in a display that continually updates the temperature and notes whether the heater is on:
#[tokio::main]asyncfnmain(){letdisplay=tokio::spawn(async{DisplayFuture::new().await;});letheat_loss=tokio::spawn(async{HeatLossFuture::new().await;});letheater=tokio::spawn(async{HeaterFuture::new().await;});display.await.unwrap();heat_loss.await.unwrap();heater.await.unwrap();}
After the desired temperature is reached, you should see it mildly oscillate above and below the desired temperature.
Warning
Oscillations are standard in classic systems theory. If we add a time snapshot to the display and delay the switching of the HEAT_ON flag, the oscillations will get bigger. Oscillations need to be noted. If you get a delay in an observer acting, and then another observer is also delayed acting on the outcome of the initial observer, you can get a chaotic system that is very hard to understand or predict. This was a big part of supply-chain disruption during and after the COVID-19 pandemic. Thinking in Systems by Donella H. Meadows (Chelsea Green Publishing, 2008) shows that a delayed reaction in demand can create oscillations in a supply chain. Long supply chains have multiple parts oscillating. If the oscillations become too out of pace, you get a chaotic system that is complex to resolve. This is partly why it took a long time post pandemic to recover supply chains. Luckily, computer systems are fairly instantaneous. But it is worth keeping in mind the dangers of chaining delays and reacting to them.
Now that our system is working, we can move on to getting input from users using callbacks.
Getting User Input via Callbacks
To get user input from the terminal, we are going to use the device_query crate with the following version:
device_query="1.1.3"
With this, we use these traits and structs:
usedevice_query::{DeviceEvents,DeviceState};usestd::io::{self,Write};usestd::sync::Mutex;
The device_query crate uses callbacks, which are a form of asynchronous programming. Callbacks are used to pass a function into another function. The function that is passed in is then called. We can code our own basic callback function with the following:
fnperform_operation_with_callback<F>(callback:F)whereF:Fn(i32),{letresult=42;callback(result);}fnmain(){letmy_callback=|result:i32|{println!("The result is: {}",result);};perform_operation_with_callback(my_callback);}
What we have just done is still blocking. We can make our callbacks nonblocking to the main thread by using an event loop thread that is a constant loop. This loop then accepts incoming events that are callbacks (Figure 6-3).
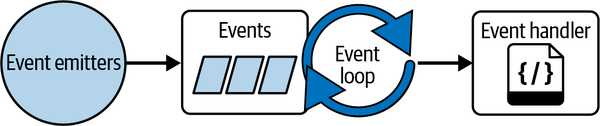
Figure 6-3. An event loop
For example, Node.js servers usually have a thread pool that the event loop passes events to. If our callback has a channel back to the source of where the event was emitted, data can be sent back to the source of the event when convenient.
For our input, we must keep track of the device state and input with the following:
staticINPUT:LazyLock<Arc<Mutex<String>>>=LazyLock::new(||{Arc::new(Mutex::new(String::new()))});staticDEVICE_STATE:LazyLock<Arc<DeviceState>>=LazyLock::new(||{Arc::new(DeviceState::new())});
We have to think about how our code is structured. Right now, our display is being updated when the display future checks the temperature, updating the display if the temperature has changed. However, this is no longer suitable when we have user input. If we think about it, it would not be a good application if the update of the user input is displayed only if the temperature changes. This would lead to users frustratingly pressing the same key multiple times, only to be dismayed to see their multiple presses executed when the temperature updates. Our system needs to update the display the moment the user presses the key. Considering this, we need our own render function that can be called in multiple places. This function takes the following form:
pubfnrender(temp:i16,desired_temp:i16,heat_on:bool,input:String){clearscreen::clear().unwrap();letstdout=io::stdout();letmuthandle=stdout.lock();println!("Temperature: {}\nDesired Temp: {}\nHeater On: {}",tempasf32/100.0,desired_tempasf32/100.0,heat_on);print!("Input: {}",input);handle.flush().unwrap();}
This function is similar to our display, but we also print out the input. This means that the poll function for our DisplayFuture calls the render function as follows:
#[tokio::main]asyncfnmain(){let_guard=DEVICE_STATE.on_key_down(|key|{letmutinput=INPUT.lock().unwrap();input.push_str(&key.to_string());std::mem::drop(input);render(TEMP.load(Ordering::SeqCst),DESIRED_TEMP.load(Ordering::SeqCst),HEAT_ON.load(Ordering::SeqCst),INPUT.lock().unwrap().clone());});letdisplay=tokio::spawn(async{DisplayFuture::new().await;});letheat_loss=tokio::spawn(async{HeatLossFuture::new().await;});letheater=tokio::spawn(async{HeaterFuture::new().await;});display.await.unwrap();heat_loss.await.unwrap();heater.await.unwrap();}
Notice the _guard, which is the callback guard. The callback guard in the device_query crate is returned when adding a callback. If we drop the guard, the event listener is removed. Luckily for us, our main thread is blocked until we exit the program because our display, heat loss, and heater tasks will continually poll until we force the program to exit.
The on_key_down function creates a thread and runs an event loop. This event loop has callbacks for mouse and keyboard movements. Once we get an event back from a keyboard press, we add it to our input state and re-render the display. We are not going to expend too much effort on mapping keys to various effects of the display, because that’s a bit too in the weeds for the goal of this chapter. Running the program now, you should be able to see the input get updated with a trace of the keys that you press.
Callbacks are simple and easy to implement. The callback’s execution also has a predictable flow. However, you can fall into the trap of having nested callbacks, which can evolve into a situation called callback hell. This results in the code being hard to maintain and follow.
You now have a basic system that takes input from users. If you want to explore this system even further, alter the input code to handle a change in desired temperature. Note that our system reacts only to basic data types. What if our system requires complex data types to represent events? Also, our system might need to know the order of events and react to all events to function correctly.
Not every reactive system is merely reacting to an integer value at the current time. For instance, if we were building a stock-trading system, we would want to know the historical data of a stock, not just the current price after we got around to polling it. We also cannot guarantee when the polling happens in async, so when we do get around to polling stock-price events, we would want access to all that had happened since the last poll in order to decide which events are important. To do this, we need an event bus that we can subscribe to.
Enabling Broadcasting with an Event Bus
An event bus is a system that enables parts of a wider system to send messages containing specific information. Unlike broadcast channels that have a simple pub/sub relationship, the event bus can stop at multiple stops where only a select few people get off. This means that we can have multiple subscribers for updates from a single source, but those subscribers can request that they receive only messages of a particular type, not every broadcasted message. We can have a subject that publishes an event to an event bus. Multiple observers can then consume that event in the order it was published. In this section, we are going to build our own event bus in order to explore the underlying mechanisms. However, broadcast channels are readily available in crates like Tokio.
Note
Broadcast channels are comparable to radio broadcasters. When a radio station emits a message, multiple listeners can listen to the same message as long as they all tune into the same channel. For a broadcast channel in programming, multiple listeners can subscribe to and receive the same messages. Broadcast channels are different from regular channels. In regular channels, a message is sent by one part of the program and is received by another part. In broadcast channels, a message is sent by one part of the program, and that same message is received by multiple parts of the program.
Using broadcast channels out of the box is preferable to building your own unless you have specific needs.
Before we build our event bus, we need the following dependencies:
tokio={version="1.26.0",features=["full"]}futures="0.3.28"
And we need these imports:
usestd::sync::{Arc,Mutex,atomic::{AtomicU32,Ordering}};usetokio::sync::MutexasAsyncMutex;usestd::collections::{VecDeque,HashMap};usestd::marker::Send;
We now have everything we need to build our event bus struct.
Building Our Event Bus Struct
Because async programming requires sending structs over threads for an async task to be polled, we are going to have to clone each event published and distribute those cloned events to every subscriber to consume. The consumers also need to be able to access a backlog of events if, for some reason, the consumer has been delayed. Consumers also need to be able to unsubscribe to events. Considering all these factors, our event bus struct takes the following form:
pubstructEventBus<T:Clone+Send>{chamber:AsyncMutex<HashMap<u32,VecDeque<T>>>,count:AtomicU32,dead_ids:Mutex<Vec<u32>>,}
Our events denoted by T need to implement the Clone trait so they can be cloned and distributed to each subscriber and the Send trait to be sent across threads. Our chamber field is where subscribers with a certain ID can access their queue of events. The count field will be used to allocate IDs, and dead_ids will be used to keep track of consumers that have unsubscribed.
Note that the chamber mutex is async, and the dead_ids mutex is not async. The chamber mutex is async because we could have loads of subscribers looping and polling the chamber to access their individual queue. We do not want an executor to be blocked by an async task waiting for the mutex. This would slow the performance of the system considerably. However, when it comes to our dead_ids, we will not be looping and polling this field. It will be accessed only when a consumer wants to unsubscribe. Having a blocking mutex also enables us to easily implement an unsubscribe process if a handle is dropped. We will cover the details for this when building our handle.
For our event bus struct, we can now implement the following functions:
impl<T:Clone+Send>EventBus<T>{pubfnnew()->Self{Self{chamber:AsyncMutex::new(HashMap::new()),count:AtomicU32::new(0),dead_ids:Mutex::new(Vec::new()),}}pubasyncfnsubscribe(&self)->EventHandle<T>{...}pubfnunsubscribe(&self,id:u32){self.dead_ids.lock().unwrap().push(id);}pubasyncfnpoll(&self,id:u32)->Option<T>{...}pubasyncfnsend(&self,event:T){...}}
All of our functions have a &self reference and no mutable references. This is because we are exploiting interior mutability with the atomics and mutexes, as the mutable reference is inside the mutexes, getting around Rust’s rule that we can have only one mutable reference at a time. The atomic also does not need a mutable reference, because we can perform atomic operations. This means that our event bus struct can be wrapped in an Arc and cloned multiple times to be sent across multiple threads, enabling those threads to all safely perform multiple mutable operations on the event bus. For our unsubscribe function, we merely push the ID to the dead_ids field. We cover the reasoning behind this in “Interacting with Our Event Bus via Async Tasks”.
The first operation that a consumer needs to do is to call the subscribe function of the bus, which is defined as follows:
pubasyncfnsubscribe(&self)->EventHandle<T>{letmutchamber=self.chamber.lock().await;letid=self.count.fetch_add(1,Ordering::SeqCst);chamber.insert(id,VecDeque::new());EventHandle{id,event_bus:Arc::new(self),}}
In this code, we return an EventHandle struct, and we will define the handle in the next subsection. We are increasing the count by one, using the new count for the ID, and inserting a new queue under that ID. We then return a reference to self, which is the event bus wrapped in an Arc, coupled with the ID in a handle struct to allow the consumer to interact with the event bus.
Warning
Although increasing the count by one and using that as the new ID is an easy way of allocating IDs, high-throughput long-running systems could run out of numbers eventually. If this risk is a serious consideration, you can add another field for IDs to be reclaimed after they have been cleared from the dead_ids field. You can pull from the reclaimed IDs when allocating a new ID. Then the increase of the count happens only if there are no IDs in the reclaimed IDs.
Now that the consumer has subscribed to the bus, it can poll with the following bus function:
pubasyncfnpoll(&self,id:u32)->Option<T>{letmutchamber=self.chamber.lock().await;letqueue=chamber.get_mut(&id).unwrap();queue.pop_front()}
We unwrap directly when getting the queue in relation to the ID because we will be interacting through a handle, and we can get that handle only when we subscribe to the bus. Thus, we know that the ID is certainly in the chamber. As each ID has its own queue, each subscriber can consume all the events published in their own time. This simple implementation can be altered so the poll function returns the entire queue, replacing the existing queue with an empty queue. This new approach reduces poll calls to the bus as the consumer loops through the queue it just extracted from a poll function call on the bus. Because we are putting our own structs as the events, we could also create a timestamp trait and state that this is required for events being put on the bus. The timestamp would enable us to discard events that have expired when polling is returning only recent events.
Now that we have a basic poll function defined, we can build our send function for the bus:
pubasyncfnsend(&self,event:T){letmutchamber=self.chamber.lock().await;for(_,value)inchamber.iter_mut(){value.push_back(event.clone());}}
We have everything needed for our bus to function on its internal data structures. We now need to build our own handle.
Building Our Event Bus Handle
Our handle needs to have an ID and a reference to the bus so the handle can poll the bus. Our handle is defined with the following code:
pubstructEventHandle<'a,T:Clone+Send>{pubid:u32,event_bus:Arc<&'aEventBus<T>>,}impl<'a,T:Clone+Send>EventHandle<'a,T>{pubasyncfnpoll(&self)->Option<T>{self.event_bus.poll(self.id).await}}
With the lifetime notation, we can see that the handle lifetime cannot outlive the bus lifetime. We must note that Arc counts the references and drops the bus only if there are no Arcs in our async system pointing to the bus. Therefore, we can guarantee that the bus will live as long as the last handle in our system, making our handle thread-safe.
We also need to take care of dropping the handle. If the handle is removed from memory, there is no way to access the queue relating to the ID of that handle, because the handle stores the ID. However, events will keep getting sent to the queue of that ID. If a developer uses our queue and the handle is dropped in their code without explicitly calling the unsubscribe function, they will have an event bus that will fill up with multiple queues that don’t have any subscribers. This situation would waste memory and even grow to the point where the computer runs out of memory, depending on certain parameters. This is called a memory leak, which is a real risk. Figure 6-4 is a photograph of a coffee machine that is suffering not from a coffee leak but from a memory leak.
To prevent memory leaks, we must implement the Drop trait for our handle, which will unsubscribe from the event bus when the handle is dropped:
impl<'a,T:Clone+Send>DropforEventHandle<'a,T>{fndrop(&mutself){self.event_bus.unsubscribe(self.id);}}
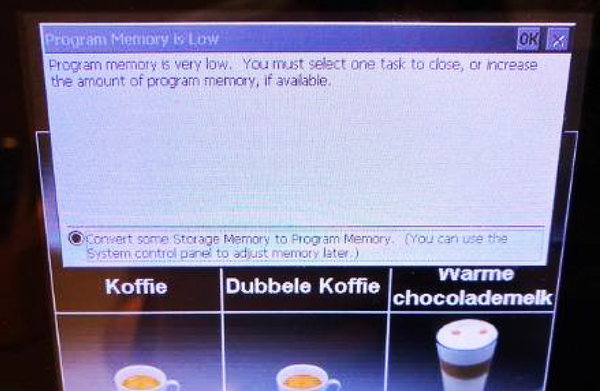
Figure 6-4. A coffee machine displaying a memory leak indicating the machine has run out of memory
Our handle is now complete, and we can use it to safely consume events from the bus without the risk of memory leaks. We are going to use our handle to build tasks that interact with our event bus.
Interacting with Our Event Bus via Async Tasks
Throughout this chapter, our observers have been implementing the Future trait and comparing the state of the subject to the state of the observer. Now that we are having events directly streamed to our ID, we can easily implement a consumer async task by using an async function:
asyncfnconsume_event_bus(event_bus:Arc<EventBus<f32>>){lethandle=event_bus.subscribe().await;loop{letevent=handle.poll().await;matchevent{Some(event)=>{println!("id: {} value: {}",handle.id,event);ifevent==3.0{break;}},None=>{}}}}
For our example, we are streaming a float that breaks the loop if 3.0 is sent. This is just for educational purposes, but implementing logic to affect the HEAT_ON atomic bool would be trivial. We could also implement a Tokio async sleep function on the None branch if we did not want to loop to aggressively poll the event bus.
Warning
The rate of creation of events can sometimes be bigger than the rate at which events can be processed. This results in a buildup of events, which is called backpressure. Backpressure can be solved by a range of approaches beyond the scope of this book. Concepts such as buffering, flow control, rate limiting, batch processing, and load balancing can help reduce backpressure when it builds up. We cover how to test for backpressure of channels in Chapter 11.
We also need a background task to clean up the dead IDs as a batch after a certain amount of time has elapsed. This garbage collection task can also be defined via an async function:
asyncfngarbage_collector(event_bus:Arc<EventBus<f32>>){loop{letmutchamber=event_bus.chamber.lock().await;letdead_ids=event_bus.dead_ids.lock().unwrap().clone();event_bus.dead_ids.lock().unwrap().clear();foridindead_ids.iter(){chamber.remove(id);}std::mem::drop(chamber);tokio::time::sleep(std::time::Duration::from_secs(1)).await;}}
We drop the chamber straight after the batch removal. We do not want to block other tasks trying to access the chamber when we are not using it.
Note
In database systems, not deleting the record the moment the delete request is made is a common practice. This is called tombstoning. Instead, the database marks a record to indicate GET requests to treat the record as if it has been deleted. Then, garbage collection processes periodically clean up the tombstoned records. Cleaning and reallocating storage on every delete request is an expensive choice because you want to keep handling async requests to the database.
We have everything needed to interact with our event bus. Now, we create our event bus and the references to it:
letevent_bus=Arc::new(EventBus::<f32>::new());letbus_one=event_bus.clone();letbus_two=event_bus.clone();letgb_bus_ref=event_bus.clone();
Now, even if the event_bus is directly dropped, the other references will keep the EventBus<f32> alive because of the Arc. All four references would have to be dropped. We then start our consumers and garbage collection process tasks:
let_gb=tokio::task::spawn(async{garbage_collector(gb_bus_ref).await});letone=tokio::task::spawn(async{consume_event_bus(bus_one).await});lettwo=tokio::task::spawn(async{consume_event_bus(bus_two).await});
In this example, we run the risk of sending events before the two tasks have subscribed, so we wait for one second and then broadcast three events:
std::thread::sleep(std::time::Duration::from_secs(1));event_bus.send(1.0).await;event_bus.send(2.0).await;event_bus.send(3.0).await;
The third event is a 3.0, meaning that the consuming tasks will unsubscribe from the bus. We can print the state of the chamber, wait for the garbage collector to wipe the dead IDs, and then print the state again:
let_=one.await;let_=two.await;println!("{:?}",event_bus.chamber.lock().await);std::thread::sleep(std::time::Duration::from_secs(3));println!("{:?}",event_bus.chamber.lock().await);
Running this gives us the following printout:
id: 0 value: 1
id: 1 value: 1
id: 0 value: 2
id: 1 value: 2
id: 0 value: 3
id: 1 value: 3
{1: [], 0: []}
{}
Both subscribers receive the events, and the garbage collection works when they unsubscribe.
The event bus is the backbone of reactive programming. We can continue to add and remove subscribers in a dynamic fashion. We can have control over how the events are distributed and consumed, and implementing code that just hooks into an event bus is simple.
Summary
While it is beyond the scope of this book to give a comprehensive view of reactive programming, we covered its fundamental async properties such as polling subjects and distributing data asynchronously through an event bus we wrote ourselves. You should now be able to come up with async implementations of reactive programming.
Reactive programming is not constrained to just one program with different threads and channels. Reactive programming concepts can be applied to multiple computers and processes under the title reactive systems. For instance, our message bus could be sending messages to various servers in a cluster. Event-driven systems are also useful when scaling architecture. We have to remember that with reactive programming, a solution has more moving parts. We moved to event-driven systems only when the live system started to fail in performance. Reaching for reactive programming straightaway can result in convoluted solutions that are hard to maintain, so be careful.
You may have noticed that we relied on Tokio for implementing our async code. In Chapter 7, we cover how to customize Tokio to solve more problems that have constraints and nuances. Dedicating an entire chapter to Tokio could be considered controversial, but it is actually the most widely used async runtime in the Rust ecosystem.