Chapter 11. Testing
We know by now how powerful writing async systems in Rust can be. However, when building big async systems in Rust, we need to know how to test our async code. This is because the complexity of the system grows as the size of the system increases.
Testing increases the feedback of the code that we are implementing, making our code faster to write and safer. For instance, if we have a big codebase and need to alter or add functionality into a piece of code, it would be slow and dangerous if we had to spin up the entire system and run it to see if our code works. Instead, altering or adding the code we need and running the specific tests for that piece of code not only provides a faster feedback loop, but also enables us to test more edge cases, making our code safer. In this chapter, we explore various approaches to testing async and the interfaces between our code and external systems.
By the end of this chapter, you will be able to build isolated tests where you can mock interfaces and inspect the calls to those interfaces. This gives you the ability to build truly isolated atomic tests. You will also be able to test for synchronization pitfalls like deadlocks, race conditions, and channel capacity issues that block async tasks. Finally, you will also learn how to mock interactions with networks such as servers, obtain fine-grained testing control of all futures, and know when to poll them to see how your system progresses under different polling conditions.
We can start our testing journey by covering the basics of synchronous testing.
Performing Basic Sync Testing
In “Building an Isolated Module”, we built an async runtime environment that has a synchronous interface. Unsurprisingly, because the interface includes just a couple of functions that are synchronous, the isolated module is one of the easiest to test. We can start our testing journey by performing synchronous testing.
Before we build our tests, we need the following dependency in our Cargo.toml:
[dev-dependencies]mockall="0.11.4"
The mockall dependency will enable us to mock traits and their functions so we can inspect inputs and mock outputs.
For the interface of our isolated module, we recall that the two functions are spawn, which returns a key, and get_result, which returns the result of the async task we spawn. We can define the following trait for these interactions:
pubtraitAsyncProcess<X,Y,Z>{fnspawn(&self,input:X)->Result<Y,String>;fnget_result(&self,key:Y)->Result<Z,String>;}
Here, we have generic parameters so we can vary the inputs, outputs, and the type of key that is used. We can now move on to our async function where we spawn a task, print something out, and then get the result from the async function and handle the result:
fndo_something<T>(async_handle:T,input:i32)->Result<i32,String>whereT:AsyncProcess<i32,String,i32>{letkey=async_handle.spawn(input)?;println!("something is happening");letresult=async_handle.get_result(key)?;ifresult>10{returnErr("result is too big".to_string());}ifresult==8{returnOk(result*2)}Ok(result*3)}
Here, we are relying on dependency injection. In a dependency injection, we pass a struct, object, or function into another function as a parameter. What we pass into the function then performs a computation.
For us, we pass in a struct that has implemented the trait, and then we call that trait. This is powerful. For example, we could implement a read trait for a struct that accesses a database for the read function. However, we could get a different struct that handles the reading from files and also implement the read trait. Depending on the storage solution we want, we can just feed that handle into the function. As you have probably guessed, we can create a mock struct and implement whatever functionality we want for the trait implemented on that mock struct, and then pass the mock struct into the function that we are testing. However, if we properly mock our struct by using mockall, we can also assert certain conditions, such as what is passed into our functions for the handler. Our test layout takes the following form:
#[cfg(test)]modget_team_processes_tests{usesuper::*;usemockall::predicate::*;usemockall::mock;mock!{DatabaseHandler{}implAsyncProcess<i32,String,i32>forDatabaseHandler{fnspawn(&self,input:i32)->Result<String,String>;fnget_result(&self,key:String)->Result<i32,String>;}}#[test]fndo_something_fail(){...}}
Inside our do_something_fail test function, we define the mock handler and assert that 4 is passed into the spawn function, which will then return a test_key:
letmuthandle=MockDatabaseHandler::new();handle.expect_spawn().with(eq(4)).returning(|_|{Ok("test_key".to_string())});
Now that we have the test_key, we can assume that it is going to be passed into our get_result function, and we state that get_result will return an 11:
handle.expect_get_result().with(eq("test_key".to_string())).returning(|_|{Ok(11)});
We can assume that the function we are testing will return an error, so we assert this
letoutcome=do_something(handle,4);assert_eq!(outcome,Err("result is too big".to_string()));
We are following the industry standard of arrange, act, and assert in our testing process:
- Arrange
-
We set up our test environment and define the expected behavior of our mocks. (This is done when we create the mock handler and specify the expected inputs and outputs.)
- Act
-
We execute the function under test with the arranged conditions. (This happens when we call
do_something(handle, 4).) - Assert
-
We verify that the outcome matches our expectations. (This is where we use
assert_eq!to check the result.)
Our test is now defined, as we can run it with a cargo test command, resulting in the following printout:
running 1 test
test get_team_processes_tests::do_something_fail ... ok
And there we have it: our test is passing. Even though we will not define every possible outcome in this book for the sake of brevity, it is a good opportunity for you to practice unit testing by attempting all edge cases.
Note
Mocking is powerful because it enables us to isolate our logic. Let’s imagine that our do_something function is in an application requring the database to be in a certain state. For instance, if do_something processes the number of team members in a database, the teams probably need to be in the database. However, if we want to run do_something, we would not want to have to populate the database and ensure that everything is lined up before we run the code. There are several reasons for this. If we wanted to redefine the parameters for another edge case, we would have to reshuffle the database. This would take a long time, and every time we run the code, we would have to fiddle with the database again. Mocking makes our test atomic. We can run our code again and again without needing to set up the environment. Developers who employ test-driven development generally develop at a faster pace with fewer bugs.
So we have the basic mocking defined for our program, but we are not going to be using the isolated module on everything. Your code might be fully async. This is especially true if you are doing web development. You may want to test async functions in your async module. To do this, we need to cover async mocking.
Mocking Async Code
To test our async traits, we need an async runtime in our test functions. You are free to pick whichever runtime you are comfortable with, but for our examples, we are going to stick with Tokio, giving us the following dependencies:
[dependencies]tokio={version="1.34.0",features=["full"]}[dev-dependencies]mockall="0.11.4"
We no longer need two functions for our trait because our trait is async; the async function will return a handle that we can wait on. So we have just the get_result function since the handle is managed in the async code:
usestd::future::Future;pubtraitAsyncProcess<X,Z>{fnget_result(&self,key:X)->implFuture<Output=Result<Z,String>>+Send+'static;}
The get_result function within our AsyncProcess trait returns a future as opposed to get_result just being an async function. This desugaring enables us to have more control over the traits that the future has implemented on them.
Our do_something function is also redefined:
asyncfndo_something<T>(async_handle:T,input:i32)->Result<i32,String>whereT:AsyncProcess<i32,i32>+Send+Sync+'static{println!("something is happening");letresult:i32=async_handle.get_result(input).await?;ifresult>10{returnErr("result is too big".to_string());}ifresult==8{returnOk(result*2)}Ok(result*3)}
The logic of how we handle the result stays the same: we spawn the task before the print statement and get the result after the print statement. Before we do any mocks, however, we must ensure that we have the following imports for our tests module:
usesuper::*;usemockall::predicate::*;usemockall::mock;usestd::boxed::Box;
Because our trait now has only one function, our mock is redefined with the following code:
mock!{DatabaseHandler{}implAsyncProcess<i32,i32>forDatabaseHandler{fnget_result(&self,key:i32)->implFuture<Output=Result<i32,String>>+Send+'static;}}
Now that our function is async, we need to define a runtime inside our test and then block on it. Our tests are not going to all run on one thread, so we can ensure that our tests are atomic by defining the runtime in each individual test:
#[test]fndo_something_fail(){letmuthandle=MockDatabaseHandler::new();handle.expect_get_result().with(eq(4)).returning(|_|{Box::pin(asyncmove{Ok(11)})});letruntime=tokio::runtime::Builder::new_current_thread().enable_all().build().unwrap();letoutcome=runtime.block_on(do_something(handle,4));assert_eq!(outcome,Err("result is too big".to_string()));}
We now have mocking for our async code. We advise that you have isolated async functions for processes that interact with other sources such as HTTP requests or database connections. This makes them easier to mock, which makes our code easier to test. However, we know with async that making calls to external resources is not the only thing we need to keep in mind when testing async code. Remember, we can also get syncing problems such as deadlocks with our async code, so we need to test for these.
Testing For Deadlocks
In a deadlock, an async task is held up with no way out of completing because of a lock. Not all the examples throughout the book expose the async system to deadlocks, but they can happen. A simple example of creating a deadlock is having two async tasks trying to access the same two locks but in opposite order (Figure 11-1).
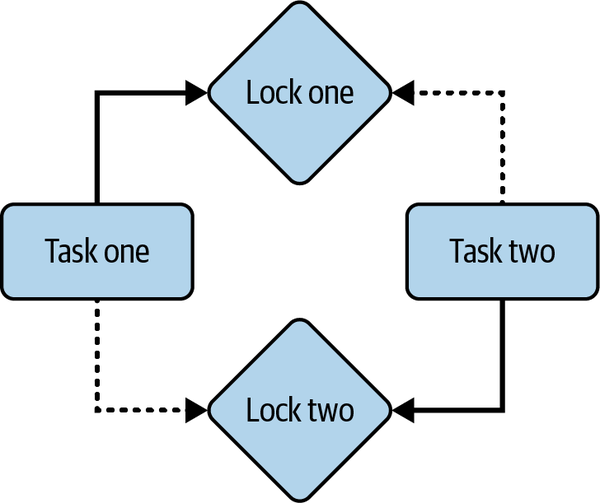
Figure 11-1. A deadlock
In Figure 11-1, task one acquires lock one. Task two acquires lock two. However, neither task has given up its lock, but each tries to acquire the other lock that is already held while still keeping hold of their own. This results in a deadlock: the two tasks will never finish because they can never acquire the second lock that they are trying to acquire.
This deadlock does not just hold up the two tasks. If other tasks require access to these locks, they will also be blocked when spawned; before we know it, our entire system will grind to a halt. Testing for deadlocks is important. With unit testing, we can try to catch these deadlocks before we integrate our code into the rest of the system. For our test, we have the following output:
#[cfg(test)]modtests{usetokio::sync::Mutex;usestd::sync::Arc;usetokio::time::{sleep,Duration,timeout};#[tokio::test]asyncfntest_deadlock_detection(){...}}
We are using the #[tokio::test] macro for our test. This is essentially the same as creating an async runtime inside the test function. Inside our test function, we create two mutexes and references to these mutexes, where both tasks can access both mutexes:
letresource1=Arc::new(Mutex::new(0));letresource2=Arc::new(Mutex::new(0));letresource1_clone=Arc::clone(&resource1);letresource2_clone=Arc::clone(&resource2);
We then spawn two tasks:
lethandle1=tokio::spawn(asyncmove{let_lock1=resource1.lock().await;sleep(Duration::from_millis(100)).await;let_lock2=resource2.lock().await;});lethandle2=tokio::spawn(asyncmove{let_lock2=resource2_clone.lock().await;sleep(Duration::from_millis(100)).await;let_lock1=resource1_clone.lock().await;});
Our first task goes for the first mutex, and the second mutex after a sleep. The second task reverses the order to locks that they are trying to acquire. The sleep functions will give both tasks the time to acquire their first locks before trying to acquire the second lock. We now want to wait on these tasks that are spawned, but we are testing for a deadlock. If a deadlock occurs and we do not set a timeout, the test will hang indefinitely. To avoid this, we can set a timeout:
letresult=timeout(Duration::from_secs(5),async{let_=handle1.await;let_=handle2.await;}).await;
The timeout is fairly big, but if the two async tasks have not finished after 5 seconds, we can conclude that the deadlock has occurred. Now that we have set our timeout, we can check it with the following code:
assert!(result.is_ok(),"A potential deadlock detected!");
Running our test gives this printout:
thread 'tests::test_deadlock_detection'
panicked at 'A potential deadlock detected!', src/main.rs:43:9
note: run with `RUST_BACKTRACE=1` environment variable to
display a backtrace
test tests::test_deadlock_detection ... FAILED

failures:
    tests::test_deadlock_detection

test result: FAILED. 0 passed; 1 failed; 0 ignored;
0 measured; 0 filtered out; finished in 5.01s
The time is just over 5 seconds, and we get a helpful message that a potential deadlock has been detected. We have not only caught a deadlock but also isolated the specific function causing the deadlock.
Note
Another locking issue, called livelocks, has the same overall effect as deadlocks: livelocks can grind the system to a halt. In a livelock, two or more async tasks get held up. However, instead of two or more async tasks holding and not progressing, the two or more async tasks are responding to each other but not progressing. A simple example is two async tasks echoing the same message to each other in a constant loop. A classic but clear analogy of the difference between deadlocks and livelocks is that a deadlock is like two people in a corridor standing still, waiting for the other one to move but neither of them moving. Livelocks, on the other hand, are two people trying to constantly sidestep each other, but both stepping in the wrong way, resulting in a constant block so neither person passes.
Although we should avoid deadlocks at all costs, their occurrences are generally obvious because the system usually grinds to a halt. However, our code can silently cause errors without us knowing. This is why we need to test for race conditions.
Testing for Race Conditions
In a race condition, the state of data gets changed, but the reference to that state is out of date. A simple example of a data race is depicted in Figure 11-2.
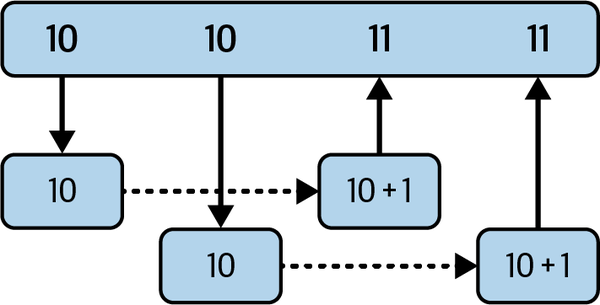
Figure 11-2. A race condition
Figure 11-2 shows two async tasks that are getting a number from a data store and increasing the number by one. Because the second task gets the data before the first task has updated the data store, both tasks increase from 10, which results in the data being 11 when it should be 12. Throughout this book, we have protected against this with mutexes or specific atomic operations that prevent data races from happening. The compare and update atomic operations are the simplest way of preventing this race condition example from happening. However, although preventing race conditions is the best approach, the way to do so is not always clear, and we need to explore how to test our code for data races. The outline of our test takes the following form:
#[cfg(test)]modtests{usestd::sync::atomic::{AtomicUsize,Ordering};usetokio::time::{sleep,Duration};usetokio::runtime::Builder;staticCOUNTER:AtomicUsize=AtomicUsize::new(0);asyncfnunsafe_add(){letvalue=COUNTER.load(Ordering::SeqCst);COUNTER.store(value+1,Ordering::SeqCst);}#[test]fntest_data_race(){...}}
Instead of doing an atomic add, we get the number, increase the number, and then set the new value so we have the chance of a race condition as shown in Figure 11-2. In our test function, we can build a single-threaded runtime and spawn 10,000 unsafe_add tasks. Once we have handled those tasks, we can assert that the COUNTER is 10,000:
letruntime=Builder::new_current_thread().enable_all().build().unwrap();letmuthandles=vec![];lettotal=100000;for_in0..total{lethandle=runtime.spawn(unsafe_add());handles.push(handle);}forhandleinhandles{runtime.block_on(handle).unwrap();}assert_eq!(COUNTER.load(Ordering::SeqCst),total,"race condition occurred!");
If we run our test, we can see that it passes. This is because the runtime has only one thread, and there is no async between the get and the set. However, say we change our runtime to have multiple threads:
letruntime=tokio::runtime::Runtime::new().unwrap();
We get the following error:
thread'tests::test_data_race'panickedat'assertion failed: `(left == right)`left: `99410`,right: `100000`: race condition occurred!'
Some of these tasks have been the victims of a race condition. Say we were to put another async function between the set and get, such as a sleep function:
letvalue=COUNTER.load(Ordering::SeqCst);sleep(Duration::from_secs(1)).await;COUNTER.store(value+1,Ordering::SeqCst);
We would get the following error:
thread'tests::test_data_race'panickedat'assertion failed: `(left == right)`left: `1`,right: `100000`: Race Condition occurred!'
All our tasks are victims of race conditions. This is because all the tasks initially read the COUNTER before any of the tasks had written to it because of the async sleep yielding control back to the executor for other async tasks to read the COUNTER.
This result would also happen in the single-threaded environment if the sleep is nonblocking. This highlights the need to use multithreaded test environments if we are concerned about race conditions. We can also appreciate the speed at which we changed the parameters surrounding our task and can test the effect of the parameter changes on our tasks.
We know mutexes and atomic values are not the only way to enable multiple tasks to access data. We can use channels to send data between async tasks. Therefore, we need to test our channel capacity.
Testing Channel Capacity
We have used unbound channels for some of our examples, but we sometimes want to restrict the maximum size of the channel to prevent excessive memory consumption. However, if the channel reaches its maximum limit, senders cannot send more messages to the channel. We may have a system such as a collection of actors, and we need to see whether our system clogs up if we send too many messages into the system. Depending on the needs, we may require the system to slow down until all the messages are processed, but it is good to test the system so we know how it works for our use cases.
For our tests, we have the following layout:
#[cfg(test)]modtests{usetokio::sync::mpsc;usetokio::time::{Duration,timeout};usetokio::runtime::Builder;#[test]fntest_channel_capacity(){...}}
Inside our test function, we define our async runtime and channel with a capacity of five:
letruntime=Builder::new_current_thread().enable_all().build().unwrap();let(sender,mutreceiver)=mpsc::channel::<i32>(5);
We then spawn a task that sends messages above the capacity of our channel:
letsender=runtime.spawn(asyncmove{foriin0..10{sender.send(i).await.expect("Failed to send message");}});
We want to see whether our system will break down with a timeout test:
letresult=runtime.block_on(async{timeout(Duration::from_secs(5),async{sender.await.unwrap();}).await});assert!(result.is_ok(),"A potential filled channel is not handled correctly");
Right now, our test will fail because the sender future will never complete, so our timeout is exceeded. To make our tests pass, we need to put in a receiver future before the timeout test:
letreceiver=runtime.spawn(asyncmove{letmuti=0;whileletSome(msg)=receiver.recv().await{assert_eq!(msg,i);i+=1;println!("Got message: {}",msg);}});
Now when we run our test, it passes. Although we have tested a simple system of a sender and receiver, we must appreciate that our tests highlighted that our system will grind to a halt because we were not handling our messages properly. Channels can also result in deadlocks, just like our mutexes, and our timeout test will also highlight deadlocks if our testing is sufficient enough.
As we know, channels enable us to share data across the system asynchronously. When it comes to sharing data across processes and computers, we can use network protocols. No doubt in the wild, you will write async code that will interact with a server using a protocol. Our interactions also need to be tested.
Testing Network Interactions
When it comes to running network interactions in development and testing them, it might be tempting to spin up the server locally and rely on that server. However, this can be bad for testing. For instance, if we have an operation that deletes a row on the server after we have run the test once, we cannot run it again right away because the row is deleted. We could build a step that inserts the row, but this gets more complicated if the row has dependencies. Also, the cargo test command runs over multiple processes. If a couple of tests are hitting the same server, we can get data race conditions on the server. This is where we use mockito. This crate enables us to mock servers in the test directly and assert that the server endpoint was called with certain parameters. For our example of network testing, we need the following dependencies:
[dependencies]tokio={version="1.34.0",features=["full"]}reqwest={version="0.11.22",features=["json"]}[dev-dependencies]mockito="1.2.0"
And our test outline takes the following form:
#[cfg(test)]modtests{usetokio::runtime::Builder;usemockito::Matcher;usereqwest;#[test]fntest_networking(){...}}
Inside our test function, we spin up our test server:
letmutserver=mockito::Server::new();leturl=server.url();
Here, mockito is finding a port that is not currently in use on the computer. If we send requests to the URL, our mock server can track them. Remember, our server is in the scope of the test function, so after the test is finished, the mock server will be terminated. With mockito, our tests remain truly atomic.
We then define a mock for a server endpoint:
letmock=server.mock("GET","/my-endpoint").match_query(Matcher::AllOf(vec![Matcher::UrlEncoded("param1".into(),"value1".into()),Matcher::UrlEncoded("param2".into(),"value2".into()),])).with_status(201).with_body("world").expect(5).create();
Our mock has the endpoint /my-endpoint. Our mock also expects certain parameters in the URL. Our mock will return the response code of 201 with a body of world. We also expect our server to be hit five times. We can add more endpoints if we want, but for this example we are using only one to avoid bloating the chapter.
Now that our mock server is built, we define our runtime environment:
letruntime=Builder::new_current_thread().enable_io().enable_time().build().unwrap();letmuthandles=vec![];
Everything is ready, so we send five async tasks to our runtime:
for_in0..5{leturl_clone=url.clone();handles.push(runtime.spawn(asyncmove{letclient=reqwest::Client::new();client.get(&format!("{}/my-endpoint?param1=value1¶m2=value2",url_clone)).send().await.unwrap()}));}
Finally, we can block the thread for the async tasks and then assert the mock:
forhandleinhandles{runtime.block_on(handle).unwrap();}mock.assert();
We can assert that all our async tasks achieved their goal of hitting the server. If one of our tasks was unsuccessful, our test will fail.
Note
When defining a URL for requests, it is best to have the definition dynamic as opposed to hardcoded. This enables us to change the host of the URL depending on whether we are making requests to a live server, local server, or mock server. Using environment variables is tempting. However, in testing, this can cause problems in the multithreaded environment of cargo test. Instead, it is best to define a trait that extracts configuration variables. We then pass structs that implement this extracted config variable trait. When binding our view functions to a live server, we can pass in a struct that extracts config variables from the environment. However, we can also just pass the mockito URL into the extracted config variable trait implementation when testing functions and views that make calls to other servers.
There is more functionality to mockito. For instance, JSON bodies, functions determining the response of the request, and other features are available when reading the API docs of mockito. Now that we can mock servers and traits, we can test our systems in an isolated environment. However, what about isolating futures and testing these futures in a fine-grained way, inspecting what the future is like between polling? This is where async testing crates help us out.
Fine-Grained Future Testing
For this section, we will use the Tokio testing tool. However, the concepts covered here can be applied when testing futures in any async runtime. For our tests, we need the following dependencies:
[dependencies]tokio={version="1.34.0",features=["full"]}[dev-dependencies]tokio-test="0.4.3"
For our fine-grained testing, we will have two futures acquire the same mutex, increase the count by one, and then finish. Because some indirect interaction occurs between two futures through acquiring the same mutex, we can poll the futures individually and determine the state of the future at the time the future is polled.
Initially, our tests have the following layout:
#[cfg(test)]modtests{usetokio::sync::Mutex;usetokio::time::{sleep,Duration};usetokio_test::{task::spawn,assert_pending};usestd::sync::Arc;usestd::task::Poll;asyncfnasync_mutex_locker(mutex:Arc<Mutex<i32>>)->(){letmutlock=mutex.lock().await;*lock+=1;sleep(Duration::from_millis(1)).await;}#[tokio::test]asyncfntest_monitor_file_metadata(){...}}
Inside our test, we define our mutex with the references for the futures:
letmutex=Arc::new(Mutex::new(0));letmutex_clone1=mutex.clone();letmutex_clone2=mutex.clone();
We can now spawn the futures with the mutex references by using the tokio_test::spawn function:
letmutfuture1=spawn(async_mutex_locker(mutex_clone1));letmutfuture2=spawn(async_mutex_locker(mutex_clone2));
We then poll our futures, asserting that both should be pending:
assert_pending!(future1.poll());assert_pending!(future2.poll());
Although both futures are pending, we know that the first future will acquire the mutex first because it was polled first. We could have swapped the order of polling, and we would get the opposite effect. This is where we can see the power of this testing approach. It enables us to inspect what happens to futures if we change the order of polling. We can then test edge cases at a deeper level since we cannot ensure the order of polling in our live system unless we purposely design our system to do so.
As we have seen in our deadlock example, as long as our first future has acquired the lock of the mutex, we know that no matter how many times we poll the second future, the second future will always be pending. We ensure that our assumption is correct as follows:
for_in0..10{assert_pending!(future2.poll());sleep(Duration::from_millis(1)).await;}
Here we can see with our assert_pending trait, if our assumption is incorrect, our test will fail. Adequate time has elapsed, so we can assume that if we poll the first future now, it will be ready. We define the following assertion:
assert_eq!(future1.poll(),Poll::Ready(()));
However, we have not dropped our first future, and we do not give up the lock for the entirety of the future. Therefore, we can conclude that even if we wait for a time that would allow the second future to complete, the second future will still be pending since the first future is still keeping hold of the mutex guard. We can assert this assumption with this code:
sleep(Duration::from_millis(3)).await;assert_pending!(future2.poll());
We can assert that our theory around holding onto the mutex is correct by dropping the first future, waiting, and then asserting that the second future is now finished:
drop(future1);sleep(Duration::from_millis(1)).await;assert_eq!(future2.poll(),Poll::Ready(()));
We can then assert that our mutex has the value we expect:
letlock=mutex.lock().await;assert_eq!(*lock,2);
If we run our test, we can see that it will pass.
Here, we have managed to freeze our async system, inspect the state, and then poll again, progressing our futures one step at a time. We can even swap around the order of the polling whenever we want in the test. This gives us a lot of power in testing results when the order of polling changes.
Summary
We covered a range of testing methods to async problems in a test-driven approach. We highly recommend that if you are starting a new async Rust project, you build the tests as you write the async code. You will maintain a fast development pace as a result.
We are now at the end of our journey together. We hope you are excited about using async Rust. It is a powerful and evolving field. With your new skills and async knowledge, you now have another tool that you can bring to your solutions. You can break problems into async concepts and implement powerful, fast solutions. We hope you have experienced joy at the beauty of async and in the way Rust implements async systems. We honestly are excited about what you will build with async Rust.