Chapter 8. Testing
In this chapter, we’ll look at various techniques for testing your React applications. In general, we’ve found that it is a bad idea to be too prescriptive about the precise mix of tests you should have. A good guiding principle is to follow these two rules:
-
Never write code unless you have a failing test.
-
If a test passes the first time you run it, delete it.
These two rules will help you build code that works while avoiding creating redundant tests that provide little value.
We have found that early in a project, it is easier to write more browser-based tests. These tests tend to be higher-level and help capture the principal business requirements for an application. Later, when the application’s architecture starts to emerge and stabilize, it becomes easier to write more unit tests of individual components. They are faster to write and quicker to run, and once you have a stable structure to your code, you will not need to update them continuously.
Sometimes it’s worth loosening the definition of what a test is. When you are working on layout code, whose primary value is visual, you might consider a Storybook story to be a “test.” The assertion is done by your eye, looking at the component as you create. Of course, this kind of test will not automatically pick up regression failures, but we present a technique in a recipe that will allow you to turn these visual checks into actual automated tests.
If you write tests before you write code, you will find that tests are tools for design. They will become executable examples of how you would like your application to work.
Instead, if you write tests after you write the code, they will be simply artifacts. Pieces of code that you must slavishly create because they feel like the sorts of things a professional developer should write.
We focus on four tools in this chapter: the React Testing Library, Storybook, the Selenium library, and Cypress.
The React Testing Library is an excellent way of creating very detailed unit tests.
Storybook is a gallery tool that we have looked at previously. We include it in this chapter because a gallery is a set of code examples, which is also what tests are. You will find ways of using Storybook as part of your testing/development process.
Selenium is one of the most established libraries for testing your application in a real browser.
Finally, what is quickly becoming our favorite tool for testing: Cypress. Cypress is similar to Selenium in that it runs inside a browser. But it includes a whole host of additional features, such as test replays, generated videos of test runnings, and a significantly simpler programming model. If you use only one tool from this chapter, let it be Cypress.
Use the React Testing Library
Problem
There are many ways that you can test a React application. Early on in a project, when you are still defining an application’s essential purpose and function, you might choose to create tests in some very high-level form, such as Cucumber tests. If you are looking at some isolated piece of the system (such as creating and maintaining a data item), you might want to create functional tests using a tool like Cypress.
But if you are deep into the detail of creating a single component, then you will probably want to create unit tests. Unit tests are so-called because they attempt to test a single piece of code as an isolated unit. While it’s debatable whether unit test is the correct term for testing components (which often contain subcomponents and so are not isolated), it’s the name usually applied to tests of components that you can test outside of a browser.
But how do you unit test React components? There have historically been several approaches. Early unit tests relied on rendering the component into an HTML string, which required minimal testing infrastructure, but there were multiple downsides:
-
Handling re-renders when the component state changed.
-
Making assertions on HTML elements that the test must parse from the string.
-
To test UI interactions, you need to mock the event model.
It was not long before developers created libraries to take care of the details of each of these problems.
However, tests created in this way lacked the reality of tests created in browsers. The subtleties of the interaction between the virtual Document Object Model (DOM) and the browser DOM were lost. Often subcomponents were not rendered to reduce the complexity of the tests.
The result was that React applications often had few unit tests. Developers would refactor their code to move complex logic into easily testable JavaScript functions. Developers would have to test anything more complex with a real browser, leading to slower tests. Because they were slow, developers would be discouraged from testing too many scenarios.
So how can you unit test React components realistically without the overhead of launching the entire app and running the tests in a real browser?
Solution
The Testing Library by Kent C. Dodds attempts to avoid the issues with previous unit testing libraries by providing a standalone implementation of the DOM. As a result, tests can render a React component to a virtual DOM, which can then be synchronized with the Testing Library’s DOM and create a tree of HTML elements that behave like they would in a real browser.
You can inspect the elements in the same way that you would within a browser. They have the same attributes and properties. You can
even pass keystrokes to input fields and have them behave the same way as fields in the browser.
If you created your application with create-react-app, you should already have the Testing Library installed. If not, you can
install it from the command line:
$ npm install --save-dev "@testing-library/react"$ npm install --save-dev "@testing-library/jest-dom"$ npm install --save-dev "@testing-library/user-event"
These three libraries will allow us to unit test components.
The Testing Library allows us to render components using the DOM implementation in @testing-library/jest-dom. The User Event
library (@testing-library/user-event) simplifies interacting with the generated DOM elements. This User Event library allows us to
click the buttons and type into the fields of our components.
To show how to unit test components, we will need an application to test. We’ll be using the same application through much of this chapter. When the application opens, it asks the user to perform a simple calculation. The application will say if the user’s answer is right or wrong (see Figure 8-1).
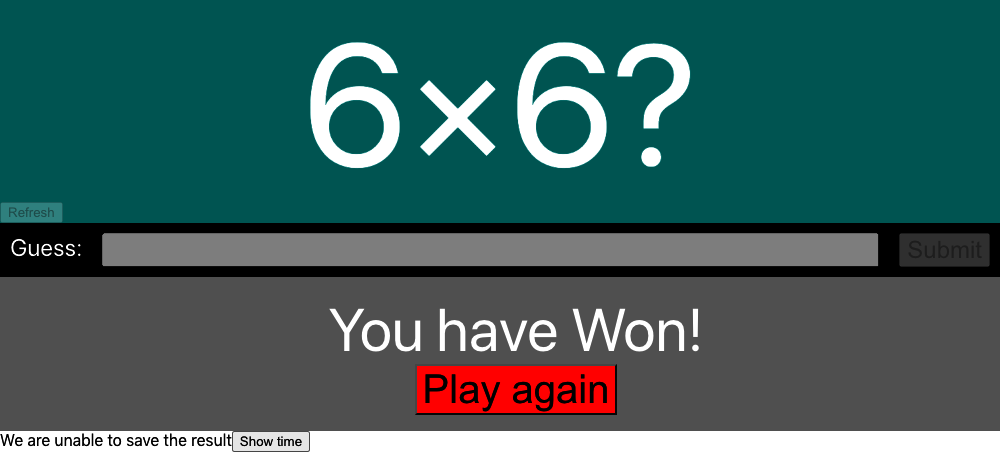
Figure 8-1. The application under test
The main component of the application is called App. We can create a unit test for this component by writing a new file called
App.test.js:
describe('App',()=>{it('should tell you when you win',()=>{// Given we've rendered the app// When we enter the correct answer// Then we are told that we've won})})
The preceding code is a Jest test, with a single scenario that tests that the App component will tell us we’ve won if we enter the
correct answer. We’ve put placeholder comments for the structure of the test.
We will begin by rendering the App component. We can do this by importing the component and passing it to the Testing Library’s
render function:
import{render}from'@testing-library/react'importAppfrom'./App'describe('App',()=>{it('should tell you when you win',()=>{// Given we've rendered the apprender(<App/>)// When we enter the correct answer// Then we are told that we've won})})
Notice that we pass actual JSX to the render function, which means that we could, if we wanted, test the component’s behavior
when passed different sets of properties.
For the next part of the test, we’ll need to enter the correct answer. To do that, we must first know what the correct answer is.
The puzzle is always a randomly generated multiplication, so we can capture the numbers from the page and then type the product into
the Guess field.1
We will need to look at the elements generated by the App component. The render function returns an object that contains the
elements and a set of functions for filtering them. Instead of using this returned value, we’ll instead use the Testing Library’s
screen object.
You can think of the screen object as the contents of the browser window. It allows us to find elements within the page so that we
can interact with them. For example, if we want to find the input field labeled Guess, we can do it like this:
constinput=screen.getByLabelText(/guess:/i)
The filter methods in the screen object typically begin with:
getBy...-
If you know that the DOM contains a single instance of the matching element
queryBy...-
If you know there are zero or one elements that match
getAllBy...-
If you know there are one or more matching elements (returns an array)
queryAllBy...-
To find zero or more elements (returns an array)
These methods will throw an exception if they find more or fewer elements than they were expecting. There are also findBy... and
findAllBy... methods that are asynchronous versions of getBy... and getAllBy... that return promises.
For each of these filter method types, you can search the following:
| Function name ends | Description |
|---|---|
|
Finds field by label |
|
Finds field with placeholder text |
|
With matching text content |
|
Finds by value |
|
Matching the alt attribute |
|
Matching the title attribute |
|
Finds by aria role |
|
Finds by data-testid attribute |
There are nearly 50 ways to find elements within the page. However, you might have noticed that none of them use a CSS selector to track an element down, which is deliberate. The Testing Library restricts the number of ways that you can find elements within the DOM. It doesn’t allow you to, for example, find elements by class name to reduce the fragility of the test. Class names are frequently used for cosmetic styling and are subject to frequent change.
It is still possible to track down elements with selectors, by using the container returned by the render method:
const{container}=render(<App/>)consttheInput=container.querySelector('#guess')
But this approach is considered poor practice. If you use the Testing Library, it’s probably best to follow the standard approach and find elements based upon their content or role.
There is one small concession to this approach made by the filter functions: the ...ByTestId functions. If you have no practical
way of finding an element by its content, you can always add a data-testid attribute to the relevant tag. That is useful for the
test we are currently writing because we need to find two numbers displayed on the page. And these numbers are randomly generated,
so we don’t know their content (Figure 8-2).
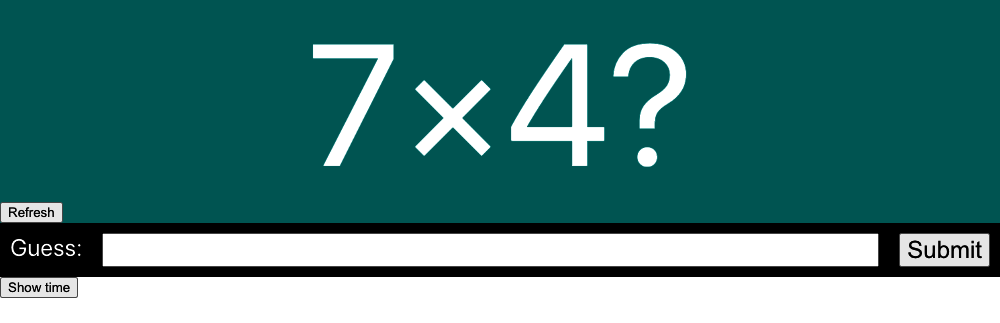
Figure 8-2. We cannot find the numbers by content because we won’t know what they are
So, we make a small amendment to the code and add test IDs:
<divclassName="Question-detail"><divdata-testid="number1"className="number1">{pair&&pair[0]}</div>×<divdata-testid="number2"className="number2">{pair&&pair[1]}</div>?</div>
This means we can start to implement the next part of our test:
import{render,screen}from'@testing-library/react'importAppfrom'./App'describe('App',()=>{it('should tell you when you win',()=>{// Given we've rendered the apprender(<App/>)// When we enter the correct answerconstnumber1=screen.getByTestId('number1').textContentconstnumber2=screen.getByTestId('number2').textContentconstinput=screen.getByLabelText(/guess:/i)constsubmitButton=screen.getByText('Submit')// Err...// Then we are told that we've won})})
We have the text for each of the numbers, and we have the input element. We now need to type the correct number into the field and
then submit the answer. We’ll do this with the @testing-library/user-event library. The User Event library
simplifies the process
of generating JavaScript events for HTML elements. You will often see the User Event library imported with the alias user, which
is because you can think of the calls to the User Event library as the actions a user is making:
import{render,screen}from'@testing-library/react'importuserfrom'@testing-library/user-event'importAppfrom'./App'describe('App',()=>{it('should tell you when you win',()=>{// Given we've rendered the apprender(<App/>)// When we enter the correct answerconstnumber1=screen.getByTestId('number1').textContentconstnumber2=screen.getByTestId('number2').textContentconstinput=screen.getByLabelText(/guess:/i)constsubmitButton=screen.getByText('Submit')user.type(input,''+parseFloat(number1)*parseFloat(number2))user.click(submitButton)// Then we are told that we've won})})
Finally, we need to assert that we have won. We can write this simply by looking for some element containing the word won:2
// Then we are told that we've wonscreen.getByText(/won/i)
This assertion will work because getByText throws an exception if it does not find precisely one matching element.
If you are unsure about the current HTML state at some point in a test, try adding screen.getByTestId('NONEXISTENT') into the
code. The exception that’s thrown will show you the current HTML.
However, the test is liable to break if your application is running slowly. This is because the get... and query... functions look
at the existing state of the DOM. If the result takes a couple of seconds to appear, the assertion will fail. For this reason, it’s
a good idea to make some assertions asynchronous. It makes the code a little more complex, but the test will be more stable when
running against slow-moving code.
The find... methods are asynchronous versions of the get... methods, and the Testing Library’s waitFor will allow you to
rerun code for a period of time. By combining the two functions, we can create the final part of our test:
import{render,screen,waitFor}from'@testing-library/react'importuserfrom'@testing-library/user-event'importAppfrom'./App'describe('App',()=>{it('should tell you when you win',async()=>{// Given we've rendered the apprender(<App/>)// When we enter the correct answerconstnumber1=screen.getByTestId('number1').textContentconstnumber2=screen.getByTestId('number2').textContentconstinput=screen.getByLabelText(/guess:/i)constsubmitButton=screen.getByText('Submit')user.type(input,''+parseFloat(number1)*parseFloat(number2))user.click(submitButton)// Then we are told that we've wonawaitwaitFor(()=>screen.findByText(/won/i),{timeout:4000})})})
Discussion
Working with different teams, we found that early on in a project, the developers would write unit tests for each component. But over time, they would write fewer and fewer unit tests. Eventually, they might even delete unit tests if they required too much maintenance.
This happens partly because unit tests are more abstract than browser tests. They are doing the same kinds of things as browser tests, but they do them invisibly. When they are interacting with components, you don’t see them.
A second reason is that teams often see tests as deliverable artifacts within a project. The team might even have builds that fail if unit tests don’t cover a certain percentage of the code.
These issues generally disappear if developers write tests before they write code. If you write the tests first, a line at a time, you will have a much better grasp of the current state of HTML. If you stop seeing tests as development artifacts and start to look at them as tools for designing your code, they stop becoming a time-consuming burden and become tools that make your work easier.
The important thing when writing code is that you begin with a failing test. In the early days of a project, that might be a failing browser test. As the project matures and the architecture stabilizes, you should create more and more unit tests.
You can download the source for this recipe from the GitHub site.
Use Storybook for Render Tests
Problem
Tests are simply examples that you can execute. Consequently, tests have a lot in common with component gallery systems like Storybook. Both tests and galleries are examples of components running in particular circumstances. Whereas a test will make assertions with code, a developer will make an assertion of a library example by looking at it and checking that it appears as expected. In both galleries and tests, exceptions will be easily visible.
There are differences. Tests can automatically interact with components; gallery components require a person to press buttons and type text. Developers can run tests with a single command; galleries have to be manually viewed, one example at a time. Gallery components are visual and easy to understand; tests are abstract and less fun to create.
Is there some way to combine galleries like Storybook with automated tests to get the best of both worlds?
Solution
We’re going to look at how you can reuse your Storybook stories inside tests. You can install Storybook into your application with this command:
$ npx sb initThe example application in this chapter is a simple mathematical game in which the user needs to calculate the answer to a multiplication problem (see Figure 8-3).
Figure 8-3. The example application
One of the components in the game is called Question, and it displays a randomly generated multiplication question (Figure 8-4).

Figure 8-4. The Question component
Let’s say we don’t worry too much about tests for this component. Let’s just build it by creating some Storybook stories. We’ll write a new Question.stories.js file:
importQuestionfrom'./Question'constInfo={title:'Question',}exportdefaultInfoexportconstBasic=()=><Question/>
And then we’ll create an initial version of the component that we can look at in Storybook and be happy with:
import{useEffect,useState}from'react'import'./Question.css'constRANGE=10functionrand(){returnMath.floor(Math.random()*RANGE+1)}constQuestion=({refreshTime})=>{const[pair,setPair]=useState()constrefresh=()=>{setPair((pair)=>{return[rand(),rand()]})}useEffect(refresh,[refreshTime])return(<divclassName="Question"><divclassName="Question-detail"><divdata-testid="number1"className="number1">{pair&&pair[0]}</div>×<divdata-testid="number2"className="number2">{pair&&pair[1]}</div>?</div><buttononClick={refresh}>Refresh</button></div>)}exportdefaultQuestion
This component displays a randomly generated question if the user clicks the Refresh button or if a parent component passes in a new
refreshTime value.
We display the component in Storybook, and it looks like it works fine. We can click the Refresh button, and it refreshes. So at that point, we start to use the component in the main application. After a while, we add a few extra features, but none of them are visual changes, so we don’t look at the Storybook stories for it again. After all, it will still look the same. Right?
This is a modified version of the component, after we’ve wired it into the rest of the application:
import{useEffect,useState}from'react'import'./Question.css'constRANGE=10functionrand(){returnMath.floor(Math.random()*RANGE+1)}constQuestion=({onAnswer,refreshTime})=>{const[pair,setPair]=useState()constresult=pair&&pair[0]*pair[1]useEffect(()=>{onAnswer(result)},[onAnswer,result])constrefresh=()=>{setPair((pair)=>{return[rand(),rand()]})}useEffect(refresh,[refreshTime])return(<divclassName="Question"><divclassName="Question-detail"><divdata-testid="number1"className="number1">{pair&&pair[0]}</div>×<divdata-testid="number2"className="number2">{pair&&pair[1]}</div>?</div><buttononClick={refresh}>Refresh</button></div>)}exportdefaultQuestion
This version is only slightly longer than before. We’ve added an onAnswer callback function that will return the correct answer
to the parent component each time the application generates a new question.
The new component appears to work well in the application, but then an odd thing occurs. The next time someone looks at Storybook, they notice an error, as shown in Figure 8-5.
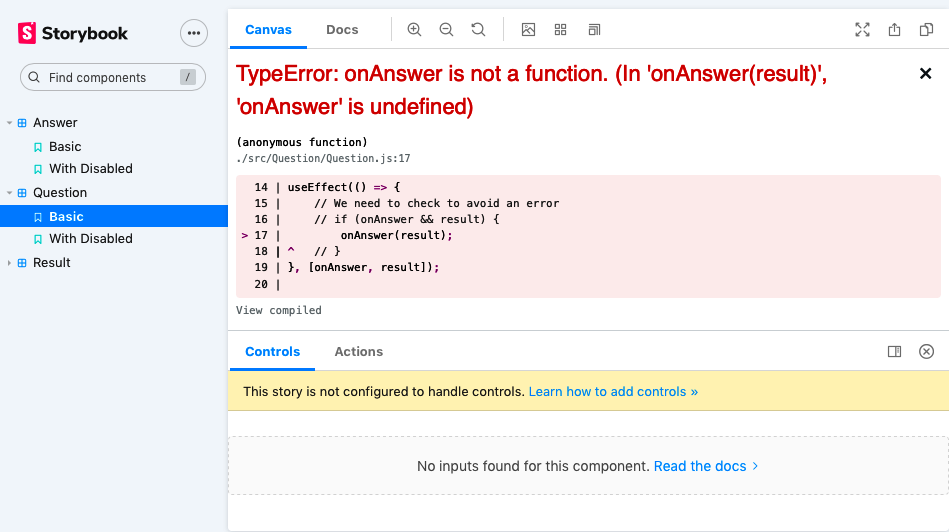
Figure 8-5. An error occurs when we look at the new version of the component
What happened? We’ve added an implicit assumption into the code that the parent component will always pass an onAnswer callback
into the component. Because the Storybook stories rendered Basic story without an onAnswer, we got the error:
<Question/>
Does this matter? Not for a simple component like this. After all, the application itself still worked. But failure to cope with missing properties, such as the missing callback here or, more frequently, missing data, is one of the most typical causes of errors in React.
Applications frequently generate React properties using data from the network, and that means the initial properties you pass to components will often be null or undefined. It’s generally a good idea to either use a type-safe language, like TypeScript, to avoid these issues or write tests that check that your components can cope with missing properties.
We created this component without any tests, but we did create it with a Storybook story—and that story did catch the issue. So is there some way to write a test that will automatically check that Storybook can render all the stories?
We’re going to create a test for this component in a file called Question.test.js.
Consider creating a folder for each component. Instead of simply having a file called Question.js in the src directory,
create a folder called src/Question, and inside there you can place Question.js, Question.stories.js, and Question.test.js.
If you then add an src/Question/index.js file, which does a default export of the Question component, the rest of your code will
be unaffected, and you will reduce the number of files other developers have to deal with.3
In the test file, we can then create a Jest test that loads each of the stories and then passes them to the Testing Library’s render
function:4
import{render}from'@testing-library/react'importQuestionfrom'./Question'conststories=require('./Question.stories')describe('Question',()=>{it('should render all storybook stories without error',()=>{for(letstoryinstories){if(story!=='default'){letC=stories[story]render(<C/>)}}})})
If your stories are using decorators to provide such things as routers or styling, this technique will not pick them up
automatically. You should add them into the render method within the test.
When you run this test, you will get a failure:
onAnswer is not a functionTypeError: onAnswer is not a function
We can fix the error by checking if there is a callback before calling it:
useEffect(()=>{// We need to check to avoid an errorif(onAnswer&&result){onAnswer(result)}},[onAnswer,result])
This technique allows you to create some elementary tests for a component with minimal effort. It’s worth creating a story for the component, which includes no properties whatsoever. Then, before you add a new property, create a story that uses it and think about how you will expect the component to behave.
Even though the test will perform only a simple render of each story, there is no reason why you can’t import a single story and create a test using that story:
import{render,screen}from'@testing-library/react'importuserfrom'@testing-library/user-event'importQuestionfrom'./Question'import{Basic,WithDisabled}from'./Question.stories'...it('should disable the button when asked',()=>{render(<WithDisabled/>)constrefreshButton=screen.getByRole('button')expect(refreshButton.disabled).toEqual(true)})
Discussion
Storybook render tests introduce rudimentary unit testing into your application, and it can find a surprising number of regression bugs. It also helps you think of tests as examples, which are there to help you design your code rather than coding artifacts that you must create to keep the team lead happy. Creating render tests for stories is also helpful if you have a team that is new to unit testing. By creating visual examples, it avoids the problems that can arise from nonvisual tests feeling abstract. It can also get developers into the habit of having a test file for each component in the system. When you need to make a minor change to the component, it will then be much easier to add a small unit test function before adding the change.
You can download the source for this recipe from the GitHub site.
Test Without a Server Using Cypress
Problem
One of the principal features of high-quality code is the way it responds to errors. The first of Peter Deutsch’s Eight Fallacies of Distributed Computing is: the network is reliable. Not only is the network not reliable, but neither are the servers or databases that connect to it. At some point, your application is going to have to deal with some network failure. It might be that the phone loses its connection, or the server goes down, or the database crashes, or someone else has deleted the data you are trying to update. Whatever the causes, you will need to decide what your application will do when terrible things happen.
Network issues can be challenging to simulate in testing environments. If you write code that puts the server into some error state, that is likely to cause problems for other tests or users who connect to the server.
How can you create automated tests for network failure cases?
Solution
For this recipe, we are going to use Cypress. We mentioned the Cypress testing system in Chapter 1. It’s a genuinely remarkable testing system that is rapidly becoming our go-to tool in many development projects.
To install Cypress into your project, type the following:
$ npm install --save-dev cypressCypress works by automating a web browser. In that sense, it is similar to other systems like Selenium. Still, the difference is that Cypress does not require you to install a separate driver, and it can both control the browser remotely and inject itself into the browser’s JavaScript engine.
Cypress can therefore actively replace core parts of the JavaScript infrastructure with faked versions that it can control. For example, Cypress can replace the JavaScript fetch function used to make network calls to the server.5 Cypress tests can therefore spoof the behavior of a network server and allow a client-side developer to artificially craft responses from the server.
We will use the example game application that we use for other recipes in this chapter. We will add a network call to store the result each time a user answers a question. We can do this without creating the actual server code by faking the responses in Cypress.
To show how this works, we will first create a test that simulates the server responding correctly. Then we will create a test to simulate a server failure.
Once Cypress is installed, create a file in cypress/integration/ called 0001-basic-game-functions.js:6
describe('Basic game functions',()=>{it('should notify the server if I lose',()=>{// Given I started the application// When I enter an incorrect answer// Then the server will be told that I have lost})})
We’ve put placeholder comments for each of the steps we will need to write.
Each command and assertion in Cypress begins with cy. If we want to open the browser at location http://localhost:3000, we can do
it with the following:
describe('Basic game functions',()=>{it('should notify the server if I lose',()=>{// Given I started the applicationcy.visit('http://localhost:3000')// When I enter an incorrect answer// Then the server will be told that I have lost})})
$ npx cypress runThat command will run all tests without showing the browser.7 We can also type the following:
$ npx cypress openThis command will open the Cypress application window (as you can see in Figure 8-6). If we double-click the test file, the test will open in a browser (as you can see in Figure 8-7).
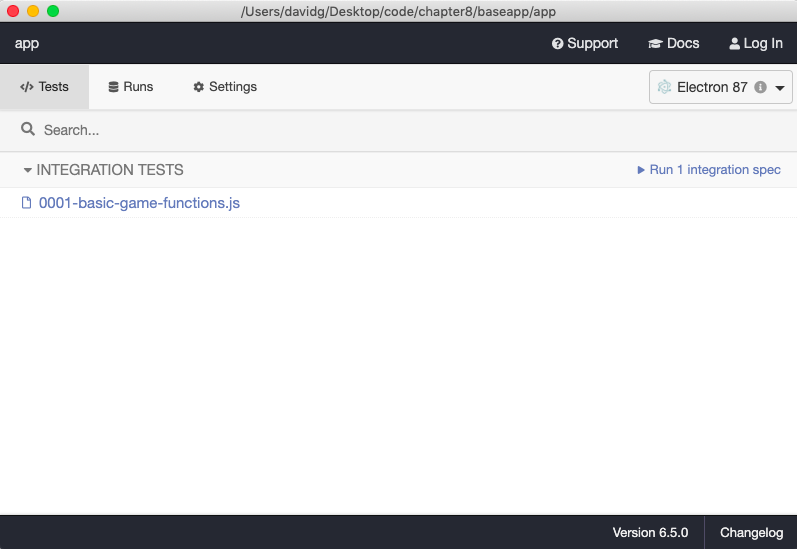
Figure 8-6. The test will appear in the Cypress window when you type npx cypress open
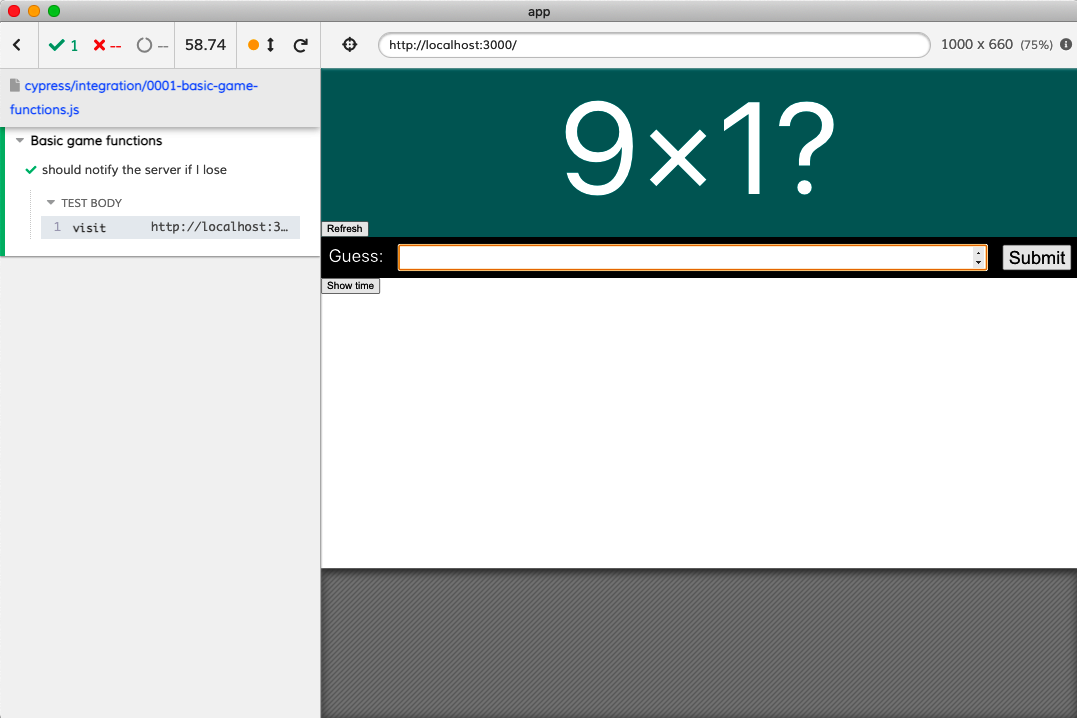
Figure 8-7. A Cypress test running in a browser
The example application asks the user to multiply two random numbers (see Figure 8-8). The numbers will be in the range 1–10, so if
we enter the value 101, we can be sure that the answer will be incorrect.
Cypress does not allow you to capture textual content from the screen directly. So we cannot simply read the values of the two numbers and store them in variables because the commands in Cypress don’t immediately perform the actions in the browser. Instead, when you run a command, Cypress adds it to a chain of instructions, which it performs at the end of the test. This approach might seem a little odd, but these chainable instructions allow Cypress to cope with most of the problems caused by asynchronous interfaces.8 The downside is that no command can return the page’s contents as the page will not exist when the command runs.
We will see elsewhere in this chapter how we can remove randomness in test scenarios and make this test deterministic, which will remove the need to capture data from the page.
Figure 8-8. The application asks the user to calculate the product of two random numbers
We can use the cy.get command to find the input field by a CSS selector. We can also use the cy.contains command to find the
Submit button:
describe('Basic game functions',()=>{it('should notify the server if I lose',()=>{// Given I started the applicationcy.visit('http://localhost:3000')// When I enter an incorrect answercy.get('input').type('101')cy.contains('Submit').click()// Then the server will be told that I have lost})})
Now we just need to test that the application contacts the server with the result of the game.
We will use the cy.intercept() command to do this. The cy.intercept() command will change the behavior of network requests in
the application so that we can fake responses for a given request. If the result is going to be POSTed to the endpoint
/api/result, we generate a faked response like this:
cy.intercept('POST','/api/result',{statusCode:200,body:'',})
Once this command takes effect, network requests to /api/result will receive the faked response. That means we need to run the command before the network request is made. We will do it at the start of the test:
describe('Basic game functions',()=>{it('should notify the server if I lose',()=>{// Given I started the applicationcy.intercept('POST','/api/result',{statusCode:200,body:'',})cy.visit('http://localhost:3000')// When I enter an incorrect answercy.get('input').type('101')cy.contains('Submit').click()// Then the server will be told that I have lost})})
We’ve now specified the network response. But how do we assert that the application has made the network call, and how do we know that it has sent the correct data to the /api/result endpoint?
We will need to give the network request an alias. This will allow us to refer to the request later in the test:9
cy.intercept('POST','/api/result',{statusCode:200,body:'',}).as('postResult')
We can then make an assertion at the end of the test, which will wait for the network call to be made and will check the contents of the data sent in the request body:
describe('Basic game functions',()=>{it('should notify the server if I lose',()=>{// Given I started the applicationcy.intercept('POST','/api/result',{statusCode:200,body:'',}).as('postResult')cy.visit('http://localhost:3000')// When I enter an incorrect answercy.get('input').type('101')cy.contains('Submit').click()// Then the server will be told that I have lostcy.wait('@postResult').then((xhr)=>{expect(xhr.request.body.guess).equal(101)expect(xhr.request.body.result).equal('LOSE')})})})
This assertion is checking two of the attributes of the request body for the expected values.
If we run the test now, it will pass (as you can see in Figure 8-9).
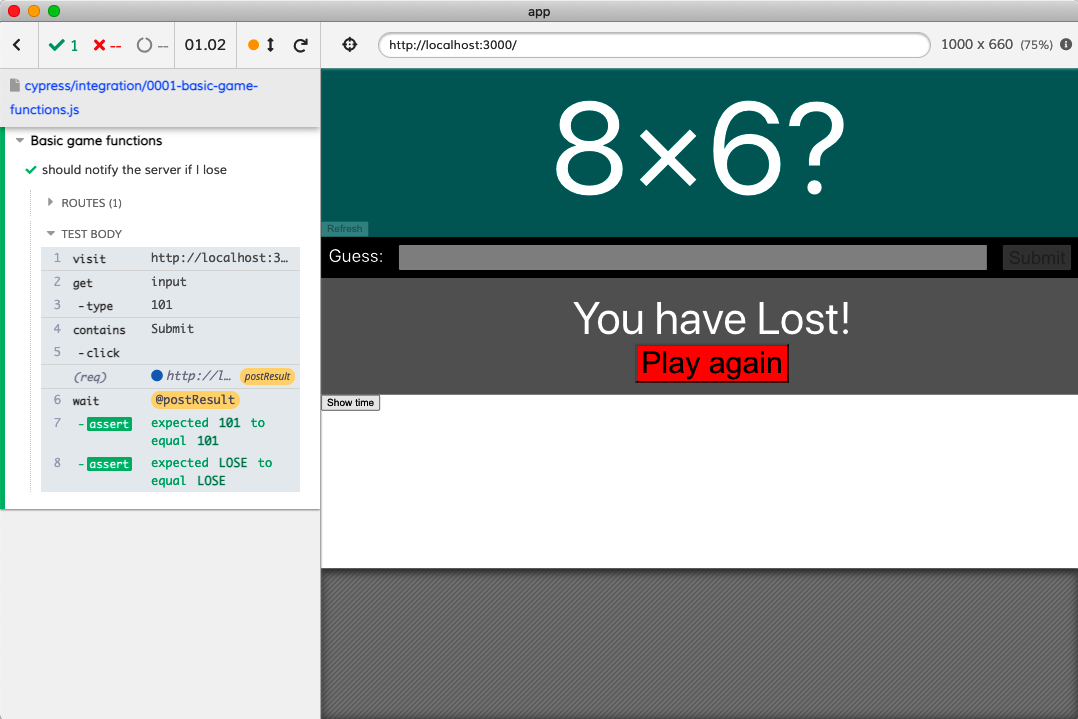
Figure 8-9. The completed test passes
Now that we’ve created a test for the successful case, we can write a test for the failure case. The application should display a message on-screen if the network call fails. We don’t actually care what details are sent to the server in this test, but we still need to wait for the network request to complete before checking for the existence of the error message:
it('should display a message if I cannot post the result',()=>{// Given I started the applicationcy.intercept('POST','/api/result',{statusCode:500,body:{message:'Bad thing happened!'},}).as('postResult')cy.visit('http://localhost:3000')// When I enter an answercy.get('input').type('16')cy.contains('We are unable to save the result').should('not.exist')cy.contains('Submit').click()// Then I will see an error messagecy.wait('@postResult')cy.contains('We are unable to save the result')})
Notice that we check for the error message not existing before we make the network call to ensure that the network call causes the error.
In addition to generating stubbed responses and status codes, cy.intercept can perform other tricks, such as slowing response
times, throttling network speed, or generating responses from test functions. For further details, see the
cy.intercept
documentation.
Discussion
Cypress testing can transform how a development team works, specifically in its ability to mock network calls. Teams frequently develop APIs at a different cadence than frontend code. Also, some teams have developers who specialize in frontend or server code. Cypress can help in these situations because it allows frontend developers to write code against endpoints that don’t currently exist. Cypress can also simulate all of the pathological failure cases.
Network performance can introduce intermittent bugs. Development environments use local servers with little or no data, which means that API performance is far better at development time than in a production environment. It is straightforward to write code that assumes that data is immediately available, but this code will break in a production environment where the data may take a second or so to arrive.
It is therefore worth having at least one test for each API call where the response is slowed by a second or so:
cy.intercept('GET','/api/widgets',{statusCode:200,body:[{id:1,name:'Flange'}],delay:1000,}).as('getWidgets')
Simulating slow network responses will often flush out a whole plethora of asynchronous bugs that might otherwise creep into your code.
Almost as importantly, creating artificially slow network responses will give you a sense of the overall impact of each API call on performance.
You can download the source for this recipe from the GitHub site.
Use Cypress for Offline Testing
Problem
This recipe uses a custom Cypress command invented by Etienne Bruines.
Applications need to cope with being disconnected from the network. We’ve seen elsewhere how to create a hook to detect if we are currently offline.10 But how are we test for offline behavior?
Solution
We can simulate offline working using Cypress. Cypress tests can inject code that modifies the internal behavior of the browser under test. We should therefore be able to modify the network code to simulate offline conditions.
For this recipe, you will need to install Cypress in your application. If you don’t already have Cypress, you can install it by running this command in your application directory:
$ npm install --save-dev cypressYou can then add a 0002-offline-working.js file to the cypress/integration directory:
describe('Offline working',()=>{it('should tell us when we are offline',{browser:'!firefox'},()=>{// Given we have started the application// When the application is offline// Then we will see a warning// When the application is back online// Then we will not see a warning})})
We will ignore this test on Firefox. The offline simulation code relies upon the Chrome DevTools remote debugging protocol, which is not currently available in the Firefox browser.
We have marked out the structure of the test as a series of comments. Cypress commands all begin with cy, so we can open the
application like this:
describe('Offline working',()=>{it('should tell us when we are offline',{browser:'!firefox'},()=>{// Given we have started the applicationcy.visit('http://localhost:3000')// When the application is offline// Then we will see a warning// When the application is back online// Then we will not see a warning})})
The question is, how do we force the browser to simulate offline working?
We can do it because Cypress is designed to be extensible. We can add a custom Cypress command that will allow us to go offline and back online:
cy.network({offline:true})cy.network({offline:false})
To add a custom command, open the cypress/support/commands.js file, and add the following code:
Cypress.Commands.add('network',(options={})=>{Cypress.automation('remote:debugger:protocol',{command:'Network.enable',})Cypress.automation('remote:debugger:protocol',{command:'Network.emulateNetworkConditions',params:{offline:options.offline,latency:0,downloadThroughput:0,uploadThroughput:0,connectionType:'none',},})})
This command uses the remote debugging protocol in DevTools to emulate offline network conditions. Once you have saved this file, you can then implement the rest of the test:
describe('Offline working',()=>{it('should tell us when we are offline',{browser:'!firefox'},()=>{// Given we have started the applicationcy.visit('http://localhost:3000')cy.contains(/you are currently offline/i).should('not.exist')// When the application is offlinecy.network({offline:true})// Then we will see a warningcy.contains(/you are currently offline/i).should('be.visible')// When the application is back onlinecy.network({offline:false})// Then we will not see a warningcy.contains(/you are currently offline/i).should('not.exist')})})
If you run the test now, in Electron, it will pass (see Figure 8-10).
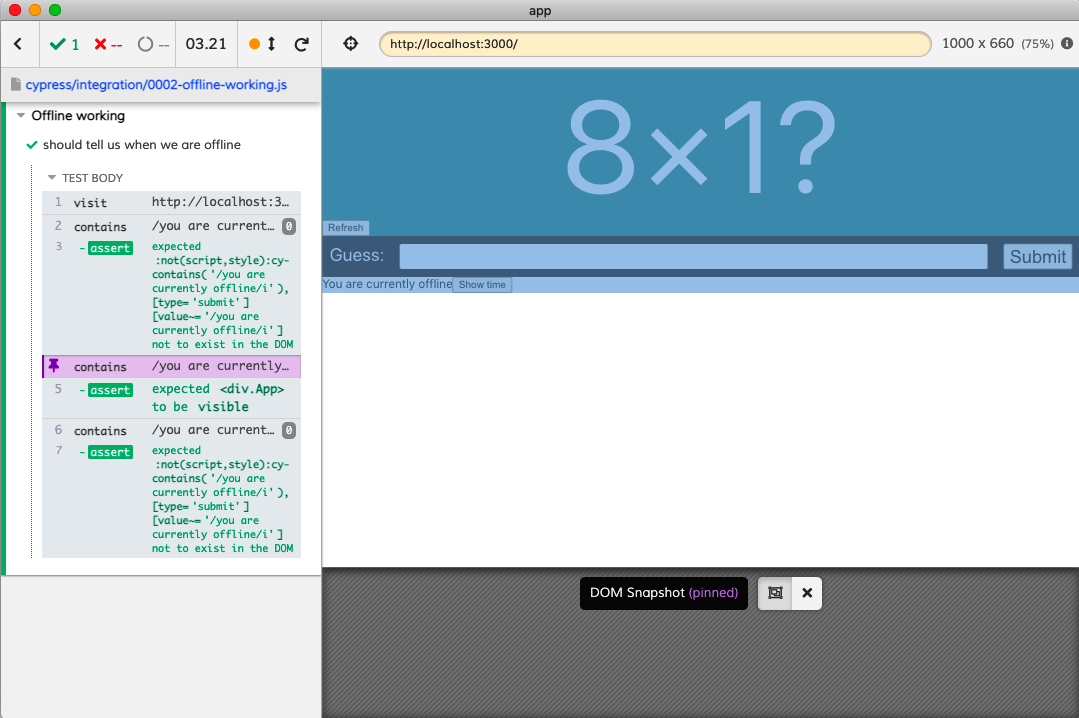
Figure 8-10. You can view each stage of the online/offline test by clicking on the left panel
Discussion
It should be possible to create similar commands that simulate various network conditions and speeds.
For more information on how the network command works, see this blog post from Cypress.io.
You can download the source for this recipe from the GitHub site.
Test in a Browser with Selenium
Problem
Nothing beats running your code inside a real browser, and the most common way of writing automated browser-based tests is by using a web driver. You can control most browsers by sending a command to a network port. Different browsers have different commands, and a web driver is a command-line tool that simplifies controlling the browser.
But how can we write a test for a React application that uses a web driver?
Solution
We are going to use the Selenium library. Selenium is a framework that provides a consistent API for a whole set of different web drivers, which means that you can write a test for Firefox and the same code should work in the same way for Chrome, Safari, and Edge.11
We will use the same example application that we are using for all recipes in this chapter. It’s a game that asks the user for the answer to a simple multiplication problem.
The Selenium library is available for a whole set of different languages, such as Python, Java, and C#. We will be using the JavaScript version: Selenium WebDriver.
We’ll begin by installing Selenium:
$ npm install --save-dev selenium-webdriverWe will also need to install at least one web driver. You can install web drivers globally, but it is more manageable to install
them in your application. We could install a driver like geckodriver for Firefox, but for now, we will install chromedriver for
Chrome:
$ npm install --save-dev chromedriverWe can now start to create a test. It’s useful to include Selenium tests inside the src folder of the application, because it will make it easier to use an IDE to run the tests manually. So we’ll create a folder called src/selenium and then add a file inside it called 0001-basic-game-functions.spec.js:12
describe('Basic game functions',()=>{it('should tell me if I won',()=>{// Given I have started the application// When I enter the correct answer// Then I will be told that I have won})})
We have outlined the test in the comments.
While it’s convenient to include Selenium tests in the src tree, it can mean that a tool like Jest will run it as if it were
a unit test, which is a problem if you run unit tests continually in the background. For example, if you created your application
with create-react-app and leave an npm run test command running, you will find that a browser will suddenly appear on your screen
each time you save the Selenium test. To avoid this, adopt some naming convention to distinguish between Selenium and unit tests. If
you name all your Selenium tests *.spec.js, you can modify your test script to avoid them by setting it to react-scripts test
‘.*.test.js’.
Selenium uses a web driver to automate the web browser. We can create an instance of the driver at the start of each test:
import{Builder}from'selenium-webdriver'letdriverdescribe('Basic game functions',()=>{beforeEach(()=>{driver=newBuilder().forBrowser('chrome').build()})afterEach(()=>{driver.quit()})it('should tell me if I won',()=>{// Given I have started the application// When I enter the correct answer// Then I will be told that I have won})})
In this example, we are creating a Chrome driver.
By creating a driver for each test, we will also create a fresh instance of the browser for each test, ensuring that no browser state is carried between tests. If we carry no state between tests, it will allow us to run the tests in any order. We have no such guarantee on shared server state. If your tests are reliant upon, for example, database data, you should ensure that each test initializes the server correctly when it starts.
For Selenium to create an instance of the driver, we should also explicitly require the driver:
import{Builder}from'selenium-webdriver'require('chromedriver')letdriverdescribe('Basic game functions',()=>{beforeEach(()=>{driver=newBuilder().forBrowser('chrome').build()})afterEach(()=>{driver.quit()})it('should tell me if I won',()=>{// Given I have started the application// When I enter the correct answer// Then I will be told that I have won})})
We can now start to fill out the test. The JavaScript version of Selenium is highly asynchronous. Virtually all commands return promises, which means that it is very efficient, but it is also far too easy to introduce testing bugs.
Let’s begin our test by opening the application:
import{Builder}from'selenium-webdriver'require('chromedriver')letdriverdescribe('Basic game functions',async()=>{beforeEach(()=>{driver=newBuilder().forBrowser('chrome').build()})afterEach(()=>{driver.quit()})it('should tell me if I won',()=>{// Given I have started the applicationawaitdriver.get('http://localhost:3000')// When I enter the correct answer// Then I will be told that I have won},60000)})
The driver.get command tells the browser to open the given URL. For this to work, we’ve also had to make two other changes. First,
we’ve had to mark the test function with async, which will allow us to await the promise returned by driver.get.
Second, we’ve added a timeout value of 60,000 milliseconds to the test, overriding the implicit five-second limit of Jest tests. If you don’t increase the default timeout, you will find your test fails before the browser starts. We’ve set it to 60,000 milliseconds here to ensure the test works on any machine. You should adjust this value to match your expected hardware.
To enter the correct value into the game, we will need to read the two numbers that appear in the question (as shown in Figure 8-11).
Figure 8-11. The game asks the user to calculate a random product
We can find the two numbers on the page and the input and submit buttons using a command called findElement:
constnumber1=awaitdriver.findElement(By.css('.number1')).getText()constnumber2=awaitdriver.findElement(By.css('.number2')).getText()constinput=awaitdriver.findElement(By.css('input'))constsubmit=awaitdriver.findElement(By.xpath("//button[text()='Submit']"))
If you are ever reading a set of elements from the page and don’t care about resolving them in a strict order, you can use the
Promise.all function to combine them into a single promise that you can then await:
const[number1,number2,input,submit]=awaitPromise.all([driver.findElement(By.css('.number1')).getText(),driver.findElement(By.css('.number2')).getText(),driver.findElement(By.css('input')),driver.findElement(By.xpath("//button[text()='Submit']")),])
In the example application, this optimization will save virtually no time, but if you have a page that renders different components in uncertain orders, combining the promises can improve test performance.
This means we can now complete the next part of our test:
import{Builder,By}from'selenium-webdriver'require('chromedriver')letdriverdescribe('Basic game functions',async()=>{beforeEach(()=>{driver=newBuilder().forBrowser('chrome').build()})afterEach(()=>{driver.quit()})it('should tell me if I won',()=>{// Given I have started the applicationawaitdriver.get('http://localhost:3000')// When I enter the correct answerconst[number1,number2,input,submit]=awaitPromise.all([driver.findElement(By.css('.number1')).getText(),driver.findElement(By.css('.number2')).getText(),driver.findElement(By.css('input')),driver.findElement(By.xpath("//button[text()='Submit']")),])awaitinput.sendKeys(''+number1*number2)awaitsubmit.click()// Then I will be told that I have won},60000)})
Notice that we are not combining the promises returned by sendKeys and click because we care that the test enters the answer
into the input field before we submit it.
Finally, we want to assert that a You have won! message appears on the screen (see Figure 8-12).
Figure 8-12. The app tells the user they got the correct answer
Now we could write our assertion like this:
constresultText=awaitdriver.findElement(By.css('.Result')).getText()expect(resultText).toMatch(/won/i)
This code will almost certainly work because the result is displayed quickly after the user submits an answer. React applications will often display dynamic results slowly, particularly if they rely upon data from the network. If we modify the application code to simulate a two-second delay before the result appears,13 our test will produce the following error:
no such element: Unable to locate element: {"method":"css selector","selector":".Result"}(Session info: chrome=88.0.4324.192)NoSuchElementError: no such element: Unable to locate element: {"method":"css selector","selector":".Result"}(Session info: chrome=88.0.4324.192)
We can avoid this problem by waiting until the element appears on the screen and then waiting until the text matches the expected
result. We can do both of those things with the driver.wait function:
awaitdriver.wait(until.elementLocated(By.css('.Result')))constresultElement=driver.findElement(By.css('.Result'))awaitdriver.wait(until.elementTextMatches(resultElement,/won/i))
This gives us the final version of our test:
import{Builder,By}from'selenium-webdriver'require('chromedriver')letdriverdescribe('Basic game functions',async()=>{beforeEach(()=>{driver=newBuilder().forBrowser('chrome').build()})afterEach(()=>{driver.quit()})it('should tell me if I won',()=>{// Given I have started the applicationawaitdriver.get('http://localhost:3000')// When I enter the correct answerconst[number1,number2,input,submit]=awaitPromise.all([driver.findElement(By.css('.number1')).getText(),driver.findElement(By.css('.number2')).getText(),driver.findElement(By.css('input')),driver.findElement(By.xpath("//button[text()='Submit']")),])awaitinput.sendKeys(''+number1*number2)awaitsubmit.click()// Then I will be told that I have wonawaitdriver.wait(until.elementLocated(By.css('.Result')))constresultElement=driver.findElement(By.css('.Result'))awaitdriver.wait(until.elementTextMatches(resultElement,/won/i))},60000)})
Discussion
In our experience, web driver tests are the most popular form of automated tests for web applications—popular that is, in the sense of frequently used. They are inevitably dependent upon matching versions of browsers and web drivers, and they do have a reputation for failing intermittently. Timing issues usually cause these failures, and those timing issues occur more in Single-Page Applications, which can update their contents asynchronously.
Although it is possible to avoid these problems by carefully adding timing delays and retries into the code, this can make your tests sensitive to environmental changes, such as running your application on a different testing server. Another option, if you experience a lot of intermittent failures, is to move more of your tests to a system like Cypress, which is generally more tolerant of timing failures.
You can download the source for this recipe from the GitHub site.
Test Cross-Browser Visuals with ImageMagick
Problem
Applications can look very different when viewed on different browsers. Applications can even look different if viewed on the same browser but on a different operating system. One example of this would be Chrome, which tends to hide scrollbars when viewed on a Mac but display them on Windows. Thankfully, old browsers like Internet Explorer are finally disappearing, but even modern browsers can apply CSS in subtly different ways, radically changing the appearance of a page.
It can be time-consuming to constantly check an application manually across a range of browsers and platforms.
What can we do to automate this compatibility process?
Solution
In this recipe, we’re going to combine three tools to check for visual consistency across different browsers and platforms:
- Storybook
-
This will give us a basic gallery of all of the components, in all relevant configurations, that we need to check.
- Selenium
-
This will allow us to capture the visual appearance of all of the components in Storybook. The Selenium Grid will also allow us to remotely connect to browsers on different operating systems to make comparisons between operating systems.
- ImageMagick
-
Specifically, we’ll use ImageMagick’s
comparetool to generate visual differences between two screenshots and provide a numerical measure of how far apart the two images are.
We’ll begin by installing Storybook. You can do this in your application with this command:
$ npx sb initYou will then need to create stories for each of the components and configurations you are interested in tracking. You can find out how to do this from other recipes in this book or the Storybook tutorials.
Next, we will need Selenium to automate the capture of screenshots. You can install Selenium with this command:
$ npm install --save-dev selenium-webdriverYou will also need to install the relevant web drivers. For example, to automate Firefox and Chrome, you will need the following:
$ npm install --save-dev geckodriver$ npm install --save-dev chromedriver
Finally, you will need to install ImageMagick, a set of command-line image manipulation tools. For details on how to install ImageMagick, see the ImageMagick download page.
We are going to use the same example game application that we’ve used previously in this chapter. You can see the components from the application displayed in Storybook in Figure 8-13.

Figure 8-13. Components from the application displayed in Storybook
You can run the Storybook server on your application by typing:
$ npm run storybookNext, we will create a test that will just be a script for capturing screenshots of each of the components inside Storybook. In a folder called src/selenium, create a script called shots.spec.js:14
import{Builder,By,until}from'selenium-webdriver'require('chromedriver')letfs=require('fs')describe('shots',()=>{it('should take screenshots of storybook components',async()=>{constbrowserEnv=process.env.SELENIUM_BROWSER||'chrome'consturl=process.env.START_URL||'http://localhost:6006'constdriver=newBuilder().forBrowser('chrome').build()driver.manage().window().setRect({width:1200,height:900,x:0,y:0,})constoutputDir='./screenshots/'+browserEnvfs.mkdirSync(outputDir,{recursive:true})awaitdriver.get(url)awaitdriver.wait(until.elementLocated(By.className('sidebar-item')),60000)letelements=awaitdriver.findElements(By.css('button.sidebar-item'))for(leteofelements){constexpanded=awaite.getAttribute('aria-expanded')if(expanded!=='true'){awaite.click()}}letlinks=awaitdriver.findElements(By.css('a.sidebar-item'))for(letlinkoflinks){awaitlink.click()consts=awaitlink.getAttribute('id')letencodedString=awaitdriver.findElement(By.css('#storybook-preview-wrapper')).takeScreenshot()awaitfs.writeFileSync(`${outputDir}/${s}.png`,encodedString,'base64')}driver.quit()},60000)})
This script opens a browser to the Storybook server, opens each of the components, and takes a screenshot of each story, which it stores in a subdirectory within screenshots.
We could use a different testing system to take screenshots of each component, such as Cypress. The advantage of using Selenium is that we can remotely open a browser session on a remote machine.
By default, the shots.spec.js test will take screenshots of Storybook at address http://localhost:6006 using the Chrome browser. Let’s say we are running the shots test on a Mac. If we have a Windows machine on the same network, we can install a Selenium Grid server, which is a proxy server that allows remote machines to start a web driver session.
If the Windows machine has address 192.168.1.16, we can set this environment variable on the command line before running the
shots.spec.js test:
$ export SELENIUM_REMOTE_URL=http://192.168.1.16:4444/wd/hubBecause the Windows machine will be accessing the Storybook server back on the Mac, for example, with an IP address of
192.168.1.14, we will also need to set an environment variable for that on the command line:
$ export START_URL=http://192.168.1.14:6006We can also choose which browser we want the Windows machine to use:15
$ export SELENIUM_BROWSER=firefoxIf we create a script to run shots.spec.js in package.json:
"scripts":{..."testShots":"CI=true react-scripts test --detectOpenHandles \'selenium/shots.spec.js'"}
we can run the test and capture the screenshots of each component:
$ npm run testShotsThe test will use the environment variables we created to contact the Selenium Grid server on the remote machine. It will ask Selenium Grid to open a Firefox browser to our local Storybook server. It will then send a screenshot of each of the components over the network, where the test will store them in a folder called screenshots/firefox.
Once we’ve run it for Firefox, we can then run it for Chrome:
$ export SELENIUM_BROWSER=chrome$ npm run testShots
The test will write the Chrome screenshots to screenshots/chrome.
A fuller implementation of this technique would also record the operating system and type of client (e.g., screen size) used.
We now need to check for visual differences between the screenshots from Chrome and the screenshots from Firefox, and this is where
ImageMagick is useful. The
compare command in ImageMagick can generate an image that highlights the visual differences between two
other images. For example, consider the two screenshots from Firefox and Chrome in Figure 8-14.
Figure 8-14. The same component in Chrome and Firefox
These two images appear to be identical. If we type in this command from the application directory:
$ compare -fuzz 15% screenshots/firefox/question--basic.png \screenshots/chrome/question--basic.png difference.png
we will generate a new image that shows the differences between the two screenshots, which you can see in Figure 8-15.

Figure 8-15. The generated image showing the differences between two screen captures
The generated image shows pixels that are more than 15% visually different between the two images. And you can see that the screenshots are virtually identical.
That’s good, but it still requires a human being to look at the images and assess whether the differences are significant. What else can we do?
The compare command also has the ability to display a numerical measure of the difference between two images:
$ compare -metric AE -fuzz 15% screenshots/firefox/question--basic.pngscreenshots/chrome/question--basic.png difference.png6774
The value 6774 is a numerical measure (based on the absolute error count, or AE) of the visual difference between the two
images. For another example, consider the two screenshots in Figure 8-16, which show the Answer component when given a
disabled property.

Figure 8-16. Disabled form rendered by Chrome and Firefox
Comparing these two images returns a much larger number:
$ compare -metric AE -fuzz 15% screenshots/firefox/answer--with-disabled.pngscreenshots/chrome/answer--with-disabled.png difference3.png28713
Indeed, the generated image (see Figure 8-17) shows precisely where the difference lies: the disabled input field.

Figure 8-17. The visual difference between the Chrome and Firefox forms
Figure 8-18 shows a similarly significant difference (21,131) for a component that displays different font styling between the browsers, resulting from some Mozilla-specific CSS attributes.
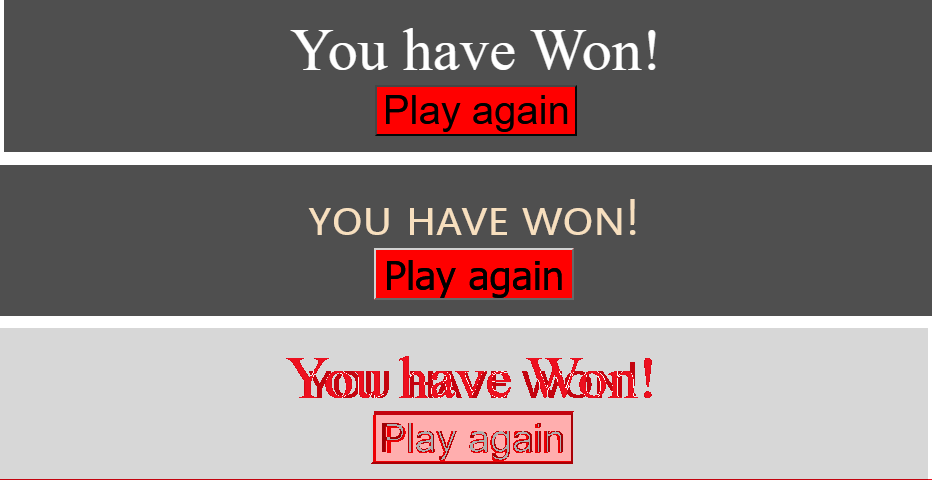
Figure 8-18. A component with different text styling in Chrome and Firefox
In fact, it’s possible to write a shell script to run through each of the images and generate a small web report showing the visual differences alongside their metrics:
#!/bin/bashmkdir -p screenshots/diffexport HTML=screenshots/compare.htmlecho '<body><ul>' > $HTMLfor file in screenshots/chrome/*.pngdoFROM=$fileTO=$(echo $file | sed 's/chrome/firefox/')DIFF=$(echo $file | sed 's/chrome/diff/')echo "FROM $FROM TO $TO"ls -l $FROMls -l $TOMETRIC=$(compare -metric AE -fuzz 15% $FROM $TO $DIFF 2>&1)echo "<li>$FROM $METRIC<br/><img src=../$DIFF/></li>" >> $HTMLdoneecho "</li></body>" >> $HTML
This script creates the screenshots/compare.html report you can see in Figure 8-19.
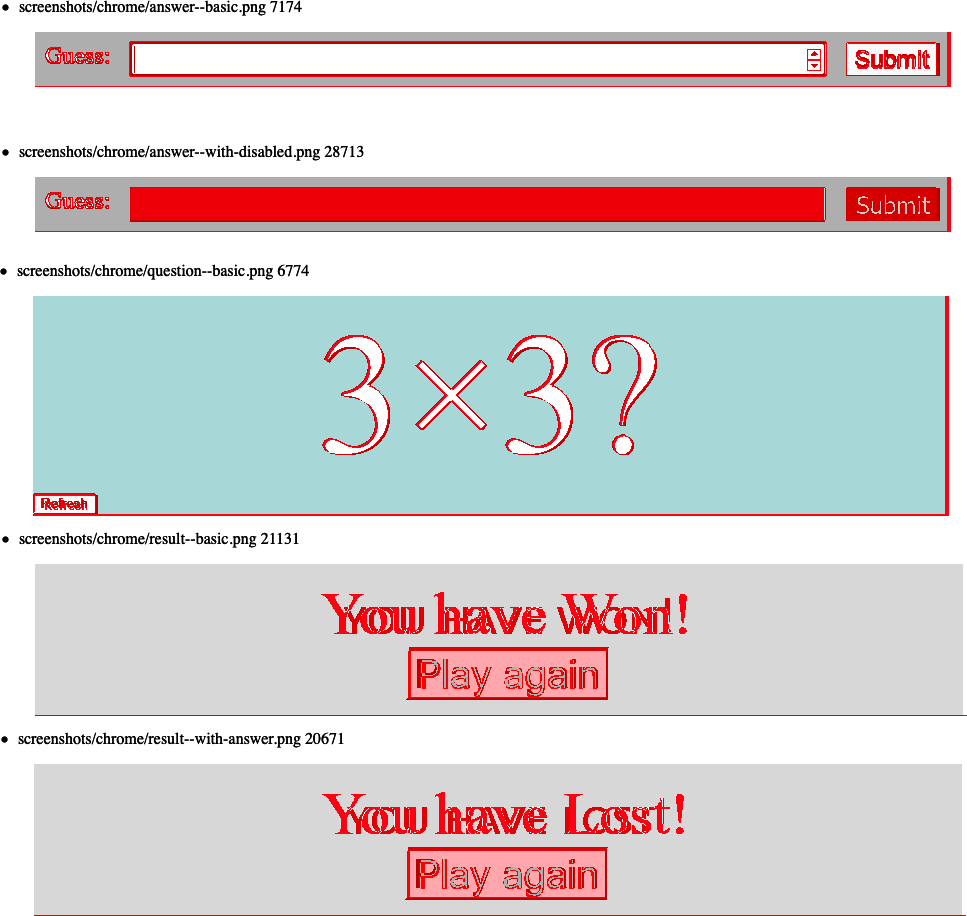
Figure 8-19. An example of the generated comparison report
Discussion
To save space, we have shown only a simplistic implementation of this technique. It would be possible to create a ranked report that showed visual differences from largest to smallest. Such a report would highlight the most significant visual differences between platforms.
You can also use automated visual tests to prevent regressions. You need to avoid false positives caused by minor variations, such as anti-aliasing. A continuous integration job could set some visual threshold between images and fail if any components vary by more than that threshold.
You can download the source for this recipe from the GitHub site.
Add a Console to Mobile Browsers
Problem
This recipe is slightly different from the others in this chapter because instead of being about automated testing, it’s about manual testing—specifically manually testing code on mobile devices.
If you are testing an application on a mobile, you might stumble across a bug that doesn’t appear in the desktop environment. Generally, if a bug appears, you’re able to add debug messages into the JavaScript console. But mobile browsers tend not to have a visible JavaScript console. It’s true that if you are using Mobile Chrome, you can try debugging it remotely with a desktop version of Chrome. But what if you discover the problem in another browser? Or if you simply don’t want to go through the work of setting up a remote debug session?
Is there some way to access the JavaScript console, and other development tools, from within a mobile browser?
Solution
We are going to use a piece of software called Eruda.
Eruda is a lightweight implementation of a development tools panel, which will allow you to view the JavaScript console, the structure of the page, and a whole heap of other plugins and extensions.
To enable Eruda, you will need to install a small amount of reasonably rudimentary JavaScript in the head section of your application. You can download Eruda from a content distribution network. Still, because it can be pretty large, you should enable it only if the person using the browser has indicated that they want to access it.
One way of doing this is by enabling Eruda only if eruda=true appears in the URL. Here’s an example script that you can insert into your page container:16
<script>(function(){varsrc='//cdn.jsdelivr.net/npm/eruda';if(!/eruda=true/.test(window.location)&&localStorage.getItem('active-eruda')!='true')return;document.write('<scr'+'ipt src="'+src+'"></scr'+'ipt>');document.write('<scr'+'ipt>');document.write('window.addEventListener('+'"load", '+'function () {'+' var container=document.createElement("div"); '+' document.body.appendChild(container);'+' eruda.init({'+' container: container,'+' tool: ["console", "elements"]'+' });'+'})');document.write('</scr'+'ipt>');})();</script>
If you now open your application as http://ipaddress/?eruda=true or http://ipaddress/#eruda=true, you will notice that an additional button has appeared in the interface, as shown in Figure 8-20.
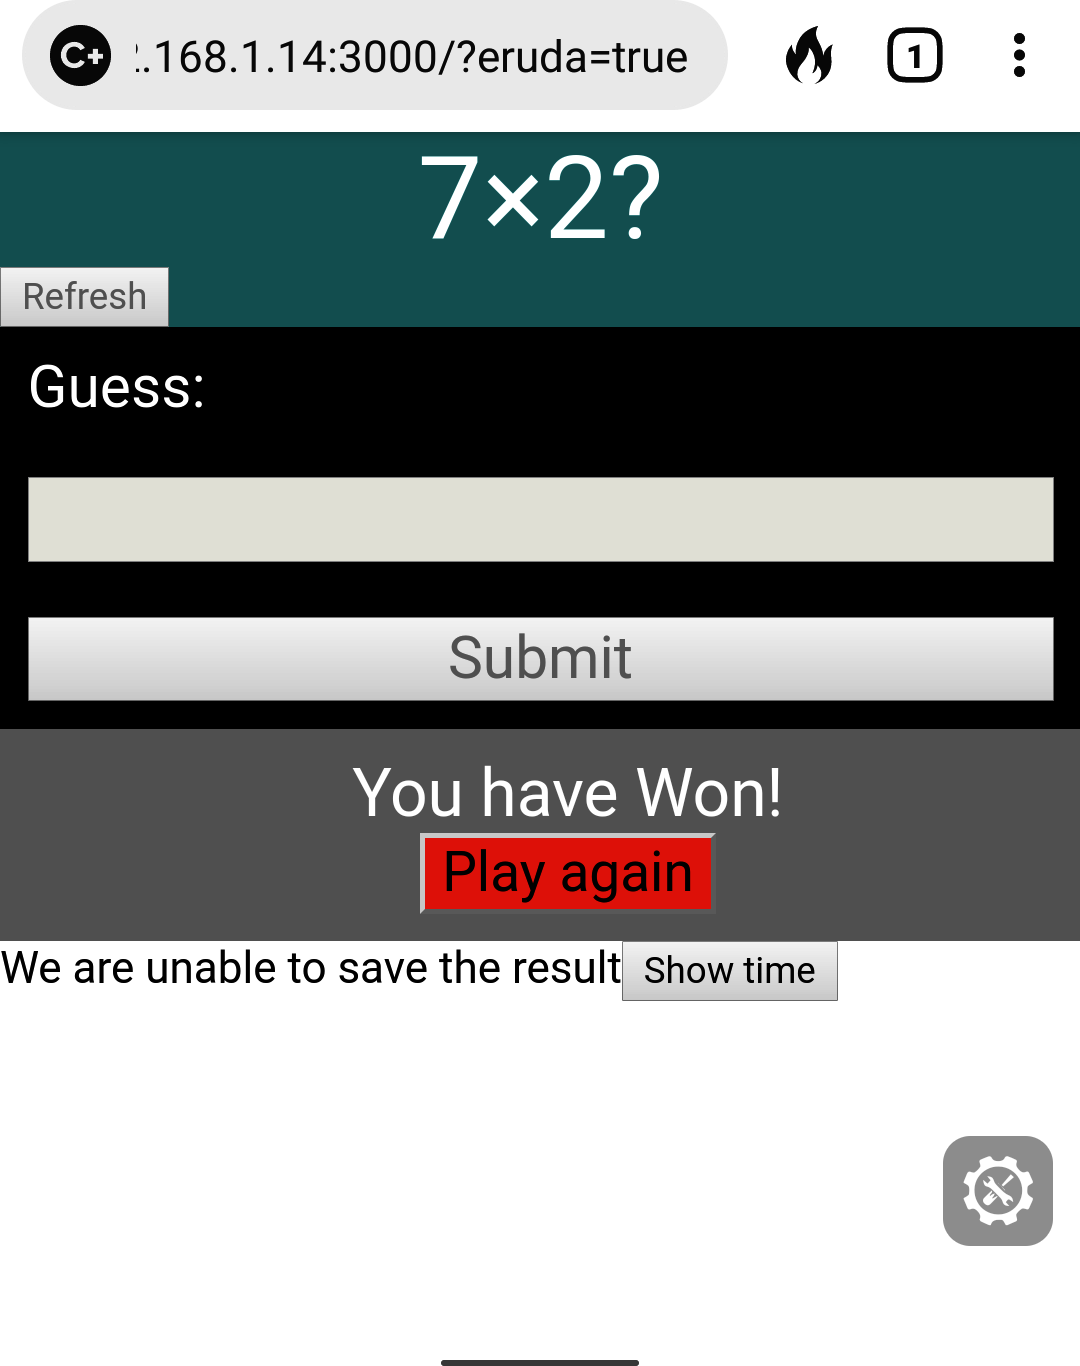
Figure 8-20. If you add ?eruda=true to the URL, a button will appear on the right of the page
If you are using the example application for this chapter, then try entering a few answers into the game.17 Then, click the Eruda button. The console will appear as shown in Figure 8-21.
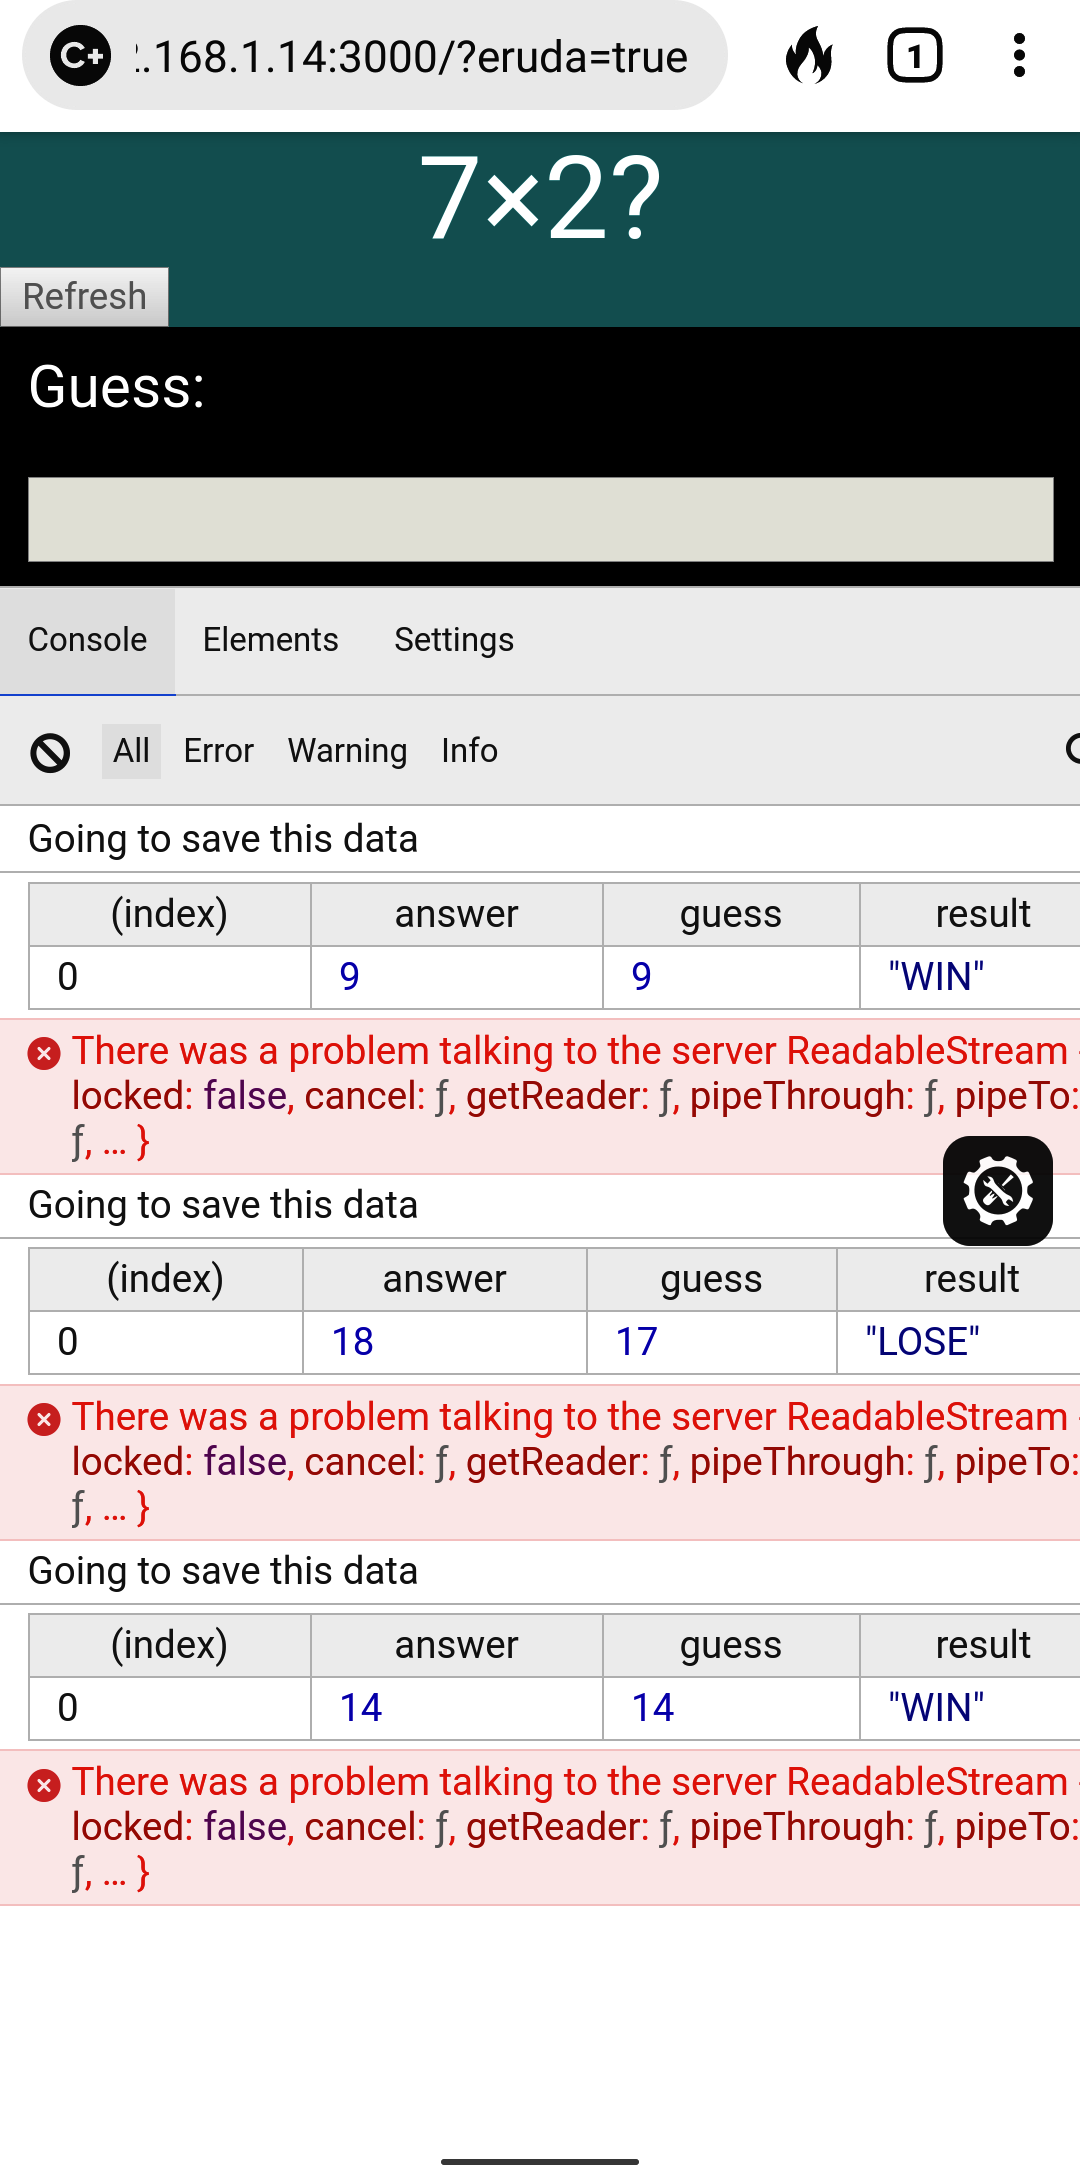
Figure 8-21. Clicking the button opens the Eruda tools
Because the endpoint the example application calls is missing, you should find some errors and other logs recorded in the console.
The console even supports the much underused console.table function, which is a helpful way of displaying an array of objects in
tabular format.
The Elements tab provides a fairly rudimentary view of the DOM (see Figure 8-22).
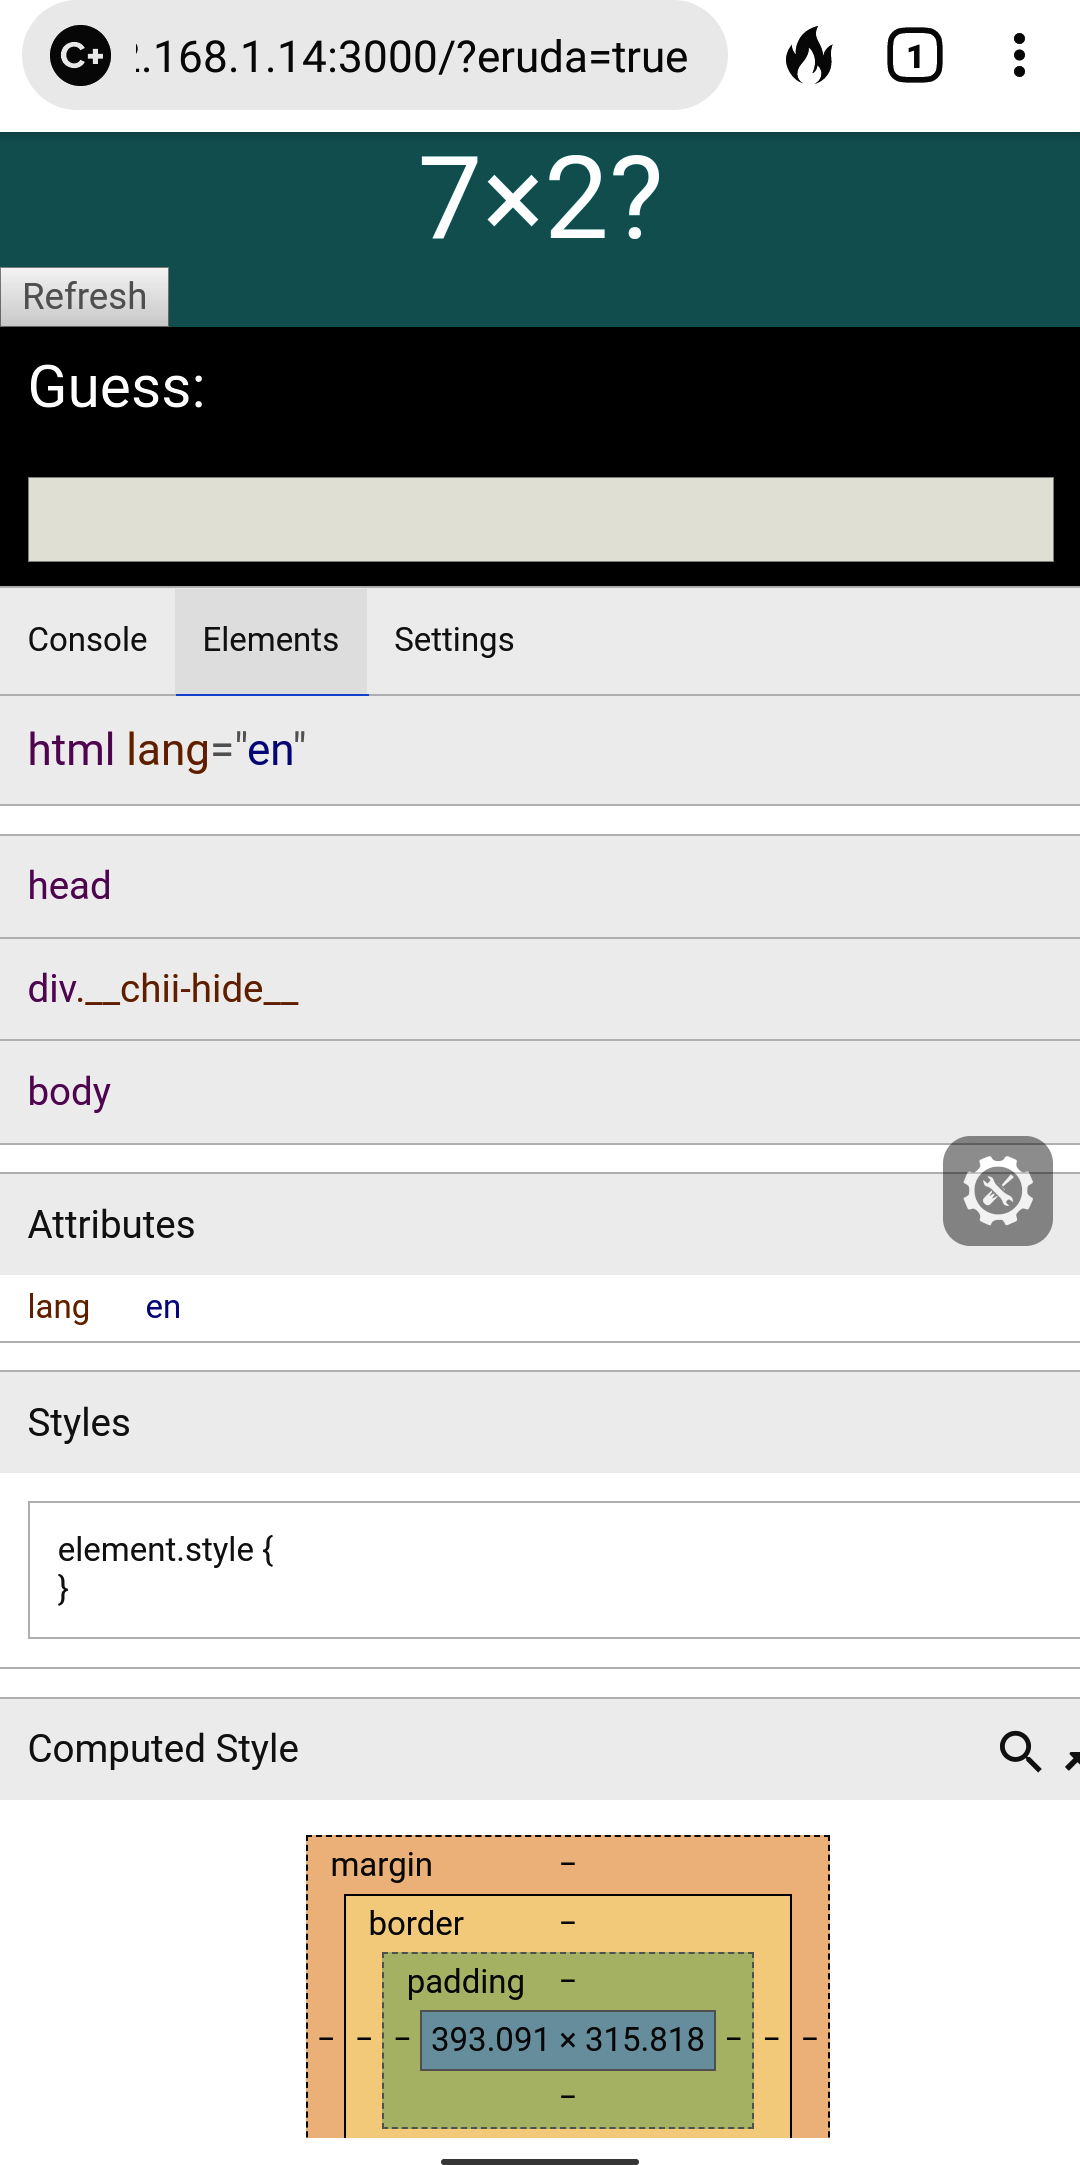
Figure 8-22. The Eruda elements view
Meanwhile, the Settings tab has an extensive set of JavaScript features that you can enable and disable while interacting with the web page (see Figure 8-23).
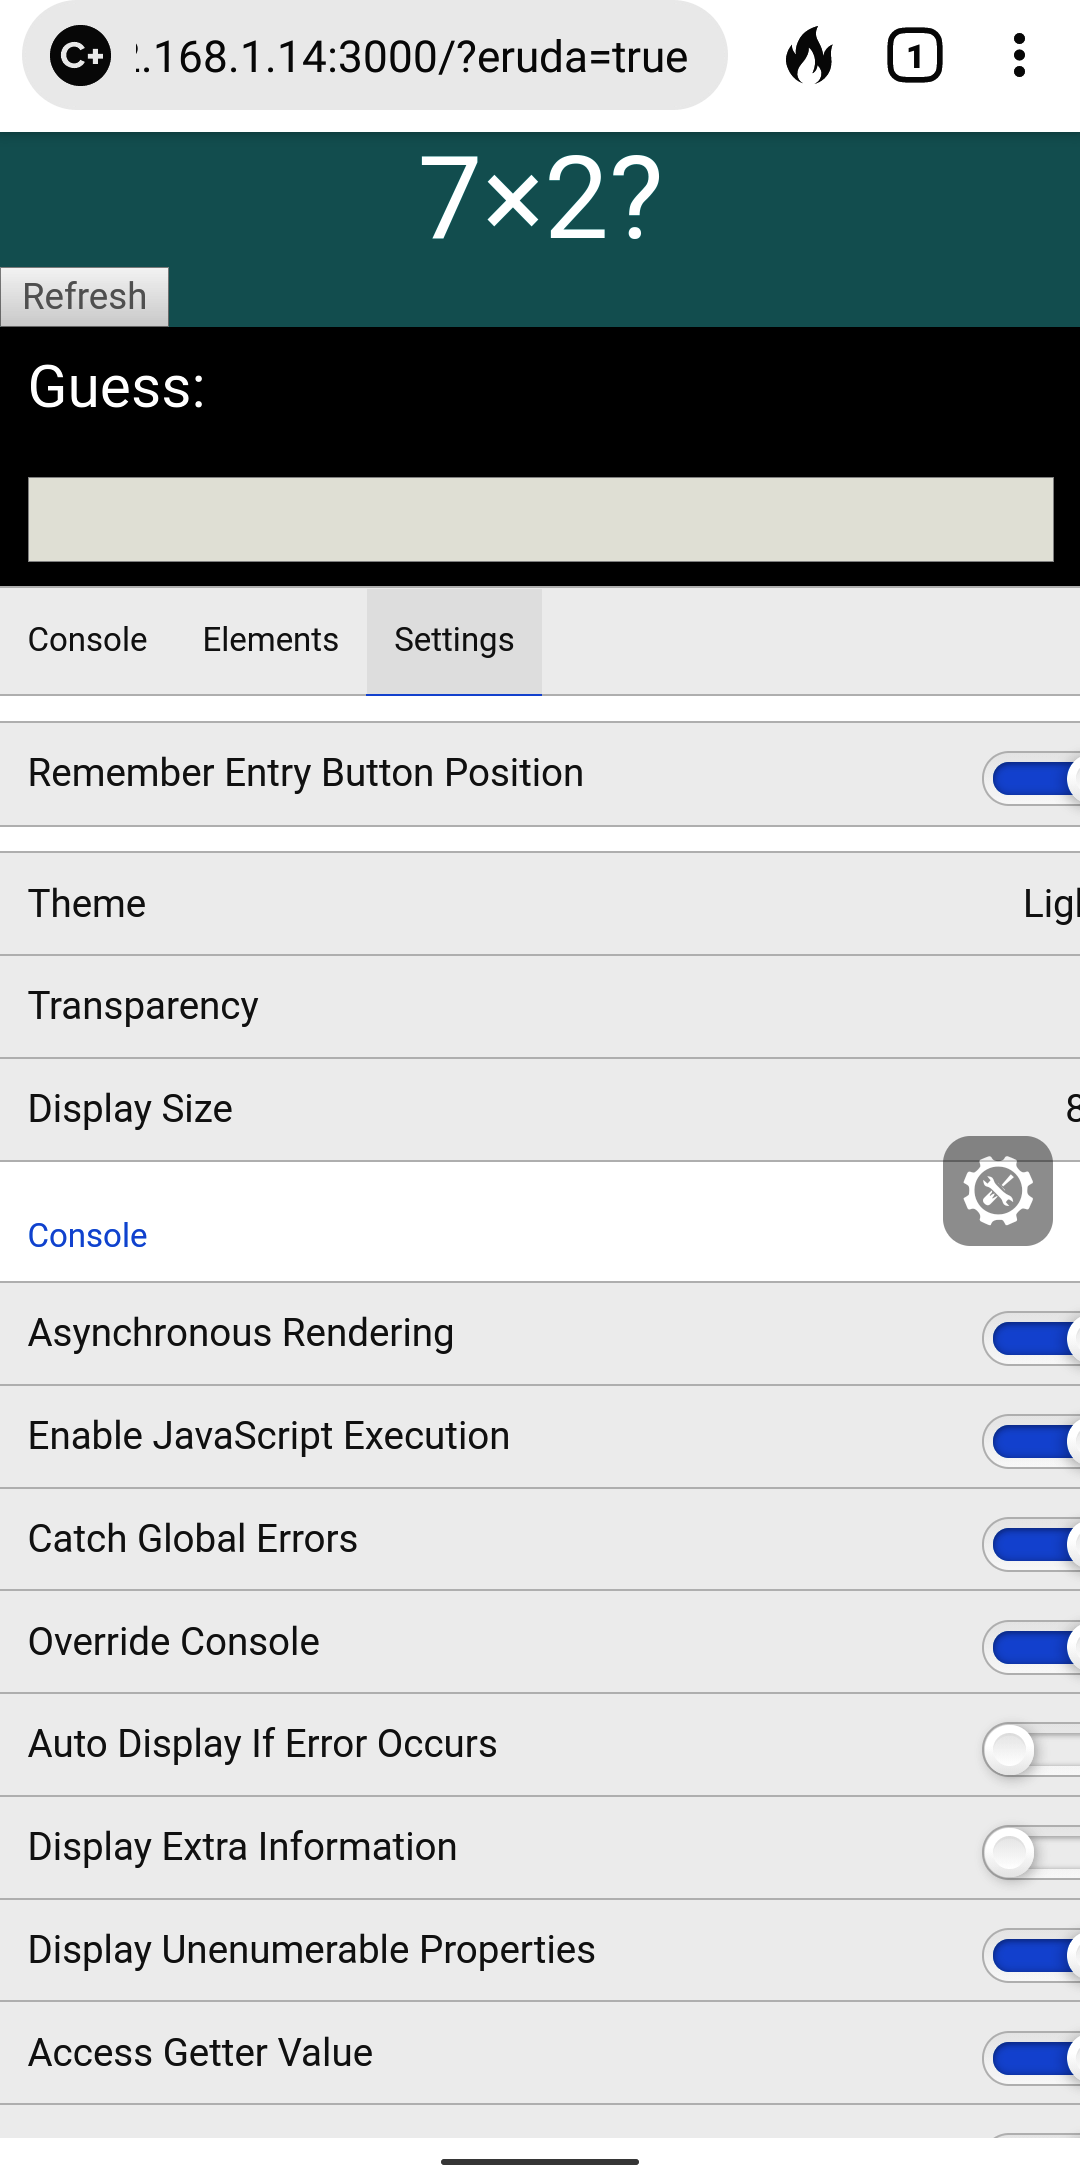
Figure 8-23. The Eruda settings view
Discussion
Eruda is a delightful tool that delivers a whole bucket of functionality, with very little work required by the developer. In addition to the basic features, it also has plugins that allow you to track performance, set the screen refresh rate, generate fake geolocations, and even write and run JavaScript from inside the browser. Once you start to use it, you probably find that it quickly becomes a standard part of your manual testing process.
You can download the source for this recipe from the GitHub site.
Remove Randomness from Tests
Problem
In a perfect world, tests would always have a completely artificial environment. Tests are examples of how you would like your application to work under explicitly defined conditions. But tests often have to cope with uncertainties. For example, they might run at different times of day. The example application that we have used throughout this chapter has to deal with randomness.
Our example application is a game that presents the user with a randomly generated question that they must answer (see Figure 8-24).
Figure 8-24. The game asks the user to calculate a random multiplication problem
Randomness might also appear in the generation of identifiers within the code or random data sets. If you ask for a new username, your application might suggest a randomly generated string.
But randomness creates a problem for tests. This is an example test that we implemented earlier in this chapter:
describe('Basic game functions',()=>{it('should notify the server if I lose',()=>{// Given I started the application// When I enter an incorrect answer// Then the server will be told that I have lost})})
There was actually a good reason why that test looked at the case where the user entered an incorrect answer. The question asked is always to calculate the product of two numbers between 1 and 10. It’s therefore easy to think of an incorrect answer: 101. It will always be wrong. But if we want to write a test to show what happens when the user enters the correct answer, we have a problem. The correct answer depends upon data that is randomly generated. We could write some code that finds the two numbers that appear on the screen, as in this example from the first Selenium recipe in this chapter:
const[number1,number2,input,submit]=awaitPromise.all([driver.findElement(By.css('.number1')).getText(),driver.findElement(By.css('.number2')).getText(),driver.findElement(By.css('input')),driver.findElement(By.xpath("//button[text()='Submit']")),])awaitinput.sendKeys(''+number1*number2)awaitsubmit.click()
Sometimes this approach is not even possible. For example, Cypress does not allow you to capture data from the page. If we wanted to write a Cypress test to enter the correct answer to the multiplication problem, we would have great difficulty. That’s because Cypress does not allow you to capture values from the page and pass them to other steps in the test.
It would be much better if we could turn off the randomness during a test.
But can we?
Solution
We will look at how we can use the Sinon library to temporarily replace the Math.random function with a faked one of our own
making.
Let’s first consider how we can do this inside a unit test. We’ll create a new test for the top-level App component, which will
check that entering the correct value results in a message saying that we won.
We’ll create a function that will fix the return value of Math.random:
constsinon=require('sinon')functionmakeRandomAlways(result){if(Math.random.restore){Math.random.restore()}sinon.stub(Math,'random').returns(result)}
This function works by replacing the random method of the Math object with a stubbed method that always returns the same
value. We can now use this in a test. The Question that appears on the page always generates random numbers between 1 and 10,
based upon the value of:
Math.random()*10+1
If we fix Math.random so that it always produced the value 0.5, then the “random” number will always be 6. That means we can
write a unit test like this:
it('should tell you that you entered the right answer',async()=>{// Given we've rendered the appmakeRandomAlways(0.5)render(<App/>)// When we enter the correct answerconstinput=screen.getByLabelText(/guess:/i)constsubmitButton=screen.getByText('Submit')user.type(input,'36')user.click(submitButton)// Then we are told that we've wonawaitwaitFor(()=>screen.findByText(/won/i),{timeout:4000})})
And this test will always pass because the application will always ask the question, “What is 6 × 6?”
The real value of fixing Math.random is when we use a testing framework that explicitly prevents us from capturing a randomly
generated value such as Cypress, as we saw earlier.
Cypress allows us to add custom commands by adding them to the cypress/support/commands.js script. If you edit that file and add this code:
Cypress.Commands.add('random',(result)=>{cy.reload().then((win)=>{if(win.Math.random.restore){win.Math.random.restore()}sinon.stub(win.Math,'random').returns(result)})})
you will create a new command called cy.random. We can use this command to create a test for the winning case that we
discussed in the introduction:18
describe('Basic game functions',()=>{it('should notify the server if I win',()=>{// Given I started the applicationcy.intercept('POST','/api/result',{statusCode:200,body:'',}).as('postResult')cy.visit('http://localhost:3000')cy.random(0.5)cy.contains('Refresh').click()// When I enter the correct answercy.get('input').type('36')cy.contains('Submit').click()// Then the server will be told that I have woncy.wait('@postResult').then((xhr)=>{assert.deepEqual(xhr.request.body,{guess:36,answer:36,result:'WIN',})})})})
After calling the cy.random command, we need to click the Refresh button in case the application generated the random
numbers before the Math.random function was replaced.
Discussion
You can never remove all randomness from a test. For example, the machine’s performance can significantly affect when and how often your components are re-rendered. But removing uncertainty as much as we can is generally a good thing in a test. The more we can do to remove external dependencies from our tests, the better.
We will also look at removing external dependencies in the following recipe.
You can download the source for this recipe from the GitHub site.
Time Travel
Problem
Time can be the source of a tremendous number of bugs. If time were simply a scientific measurement, it would be relatively straightforward. But it isn’t. The representation of time is affected by national boundaries and by local laws. Some countries have their own time zone. Others have multiple time zones. One reassuring factor is that all countries have a time zone offset in whole hours, except for places like India, where time is offset by +05:30 from UTC.
That’s why it is helpful to try to fix the time within a test. But how do we do that?
Solution
We will look at how you can fix the time when testing your React application. There are some issues that you need to consider when testing time-dependent code. First, you should probably avoid changing the time on your server. In most cases, it’s best to set your server to UTC and leave it that way.
That does mean that if you want to fake date and time in your browser, you will have problems as soon as the browser makes contact with the server. That means you will either have to modify the server APIs to accept an effective date or test time-dependent browser code in isolation from the server.19
We will adopt the latter approach for this recipe: using the Cypress testing system to fake any connections with the server.
We will use the same application we use for other recipes in this chapter. It’s a simple game that asks the user to calculate the product of two numbers. We’re going to test a feature of the game that gives the user 30 seconds to provide an answer. After 30 seconds, they will see a message telling them they’ve run out of time (see Figure 8-25).
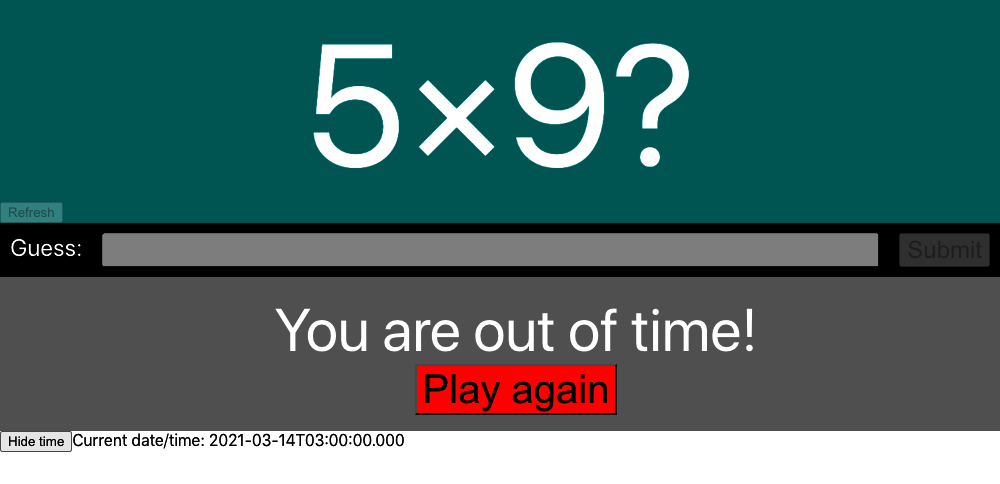
Figure 8-25. The player will lose if they don’t answer within 30 seconds
We could try writing a test that somehow pauses for 30 seconds, but that has two problems. First, it will slow your test down. You don’t need many 30-second pauses before your tests will become unbearable to run. Second, adding a pause is not a very precise way to test a feature. If you try to pause for 30 seconds, you might pause for 30.5 seconds before looking for the message.
To get precision, we need to take control of time within the browser. As you saw in the previous recipe, Cypress can inject code
into the browser, replacing critical pieces of code with stubbed functions, which we can control. Cypress has a built-in command
called cy.clock, which allows us to specify the current time.
Let’s see how to use cy.clock by creating a test for the timeout feature. This will be the structure of our test:
describe('Basic game functions',()=>{it('should say if I timed out',()=>{// Given I have started a new game// When 29 seconds have passed// Then I will not see the time-out message// When another second has passed// Then I will see the time-out message// And the game will be over})})
We can start by opening the application and clicking the Refresh button:
describe('Basic game functions',()=>{it('should say if I timed out',()=>{// Given I have started a new gamecy.visit('http://localhost:3000')cy.contains('Refresh').click()// When 29 seconds have passed// Then I will not see the time-out message// When another second has passed// Then I will see the time-out message// And the game will be over})})
Now we need to simulate 29 seconds of time passing. We can do this with the cy.clock and cy.tick commands. The cy.clock
command allows you to either specify a new date and time; or, if you call cy.clock without parameters, it will set the time and date back to 1970. The cy.tick() command allows you to add a set number of milliseconds to the current date and time:
describe('Basic game functions',()=>{it('should say if I timed out',()=>{// Given I have started a new gamecy.clock()cy.visit('http://localhost:3000')cy.contains('Refresh').click()// When 29 seconds have passedcy.tick(29000)// Then I will not see the time-out message// When another second has passed// Then I will see the time-out message// And the game will be over})})
We can now complete the other steps in the test. For details on the other Cypress commands we’re using, see the Cypress documentation:
describe('Basic game functions',()=>{it('should say if I timed out',()=>{// Given I have started a new gamecy.clock()cy.visit('http://localhost:3000')cy.contains('Refresh').click()// When 29 seconds have passedcy.tick(29000)// Then I will not see the time-out messagecy.contains(/out of time/i).should('not.exist')// When another second has passedcy.tick(1000)// Then I will see the time-out messagecy.contains(/out of time/i).should('be.visible')// And the game will be overcy.get('input').should('be.disabled')cy.contains('Submit').should('be.disabled')})})
If we run the test in Cypress, it passes (as you can see in Figure 8-26).
Figure 8-26. By controlling time, we can force a timeout in the test
That’s a relatively simple time-based test. But what if we wanted to test something much more complex, like daylight saving time (DST)?
DST bugs are the bane of most development teams. They sit in your codebase silently for months and then suddenly appear in the spring and fall, in the early hours of the morning.
When DST occurs depends upon your time zone. And that’s a particularly awful thing to deal with in client code because JavaScript dates don’t work with time zones. They can certainly handle offsets; for example, you can create a Date object in a browser like Chrome that is set to five hours before Greenwich Mean Time:20
newDate('2021-03-14 01:59:30 GMT-0500')
But JavaScript dates are all implicitly in the time zone of the browser. When you create a date with a time zone name in it, the JavaScript engine will simply shift it into the browser’s time zone.
The browser’s time zone is fixed at the time that the browser opens. There’s no way to say Let’s pretend we’re in New York from now on.
If developers create tests for DST, the tests might work only in the developer’s time zone. The tests might fail if run on an integration server set to UTC.
There is, however, a way around this problem. On Linux and Mac computers (but not Windows), you can specify the time zone when you
launch a browser by setting an environment variable called TZ. If we start the Cypress with the TZ variable set, any browser
that Cypress launches will inherit it, which means that while we can’t set the time zone for a single test, we can set it for an
entire test run.
First, let’s launch Cypress with the time zone set to New York:
$ TZ='America/New_York' npx cypress openThe example application has a button that allows you to see the current time (see Figure 8-27).
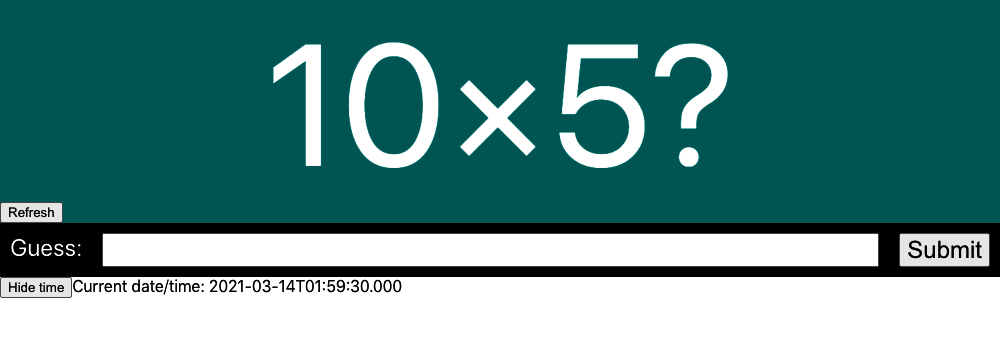
Figure 8-27. The current time is shown on the screen
We can create a test that checks that the time on the page correctly handles the change to DST. This is the test we’ll create:
describe('Timing',()=>{it('should tell us the current time',()=>{cy.clock(newDate('2021-03-14 01:59:30').getTime())cy.visit('http://localhost:3000')cy.contains('Show time').click()cy.contains('2021-03-14T01:59:30.000').should('be.visible')cy.tick(30000)cy.contains('2021-03-14T03:00:00.000').should('be.visible')})})
In this test, we are passing an explicit date to cy.clock. We need to convert this to milliseconds by calling getTime as
cy.clock accepts only numeric times. We then check the initial time, and 30 seconds later, we check the time rolls over to 3 a.m.,
instead of 2 a.m. (as shown in Figure 8-28).
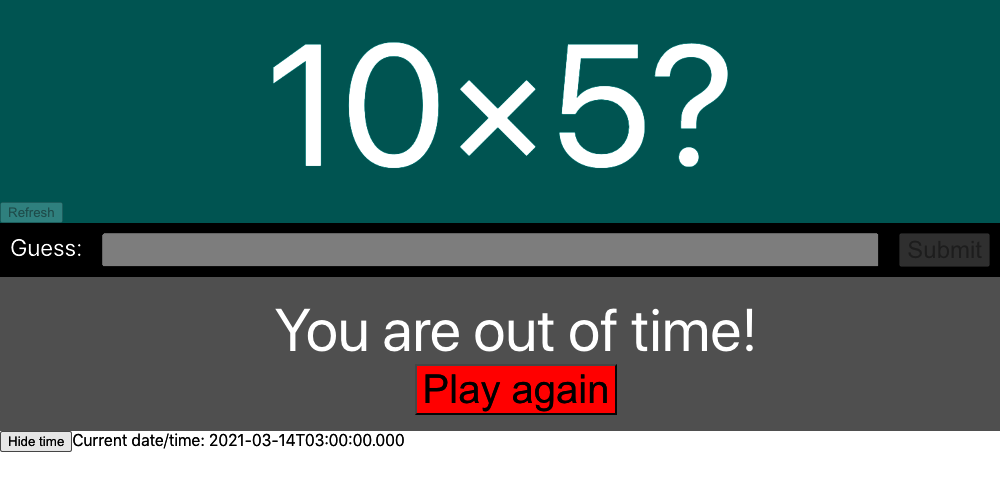
Figure 8-28. After 30 seconds, the time correctly changes from 01:59 to 03:00
Discussion
If you need to create tests that depend on the current time zone, consider placing them into a subfolder so you can run them
separately. If you want to format dates into various time zones, you can use the toLocaleString date method:
newDate().toLocaleString('en-US',{timeZone:'Asia/Tokyo'})
You can download the source for this recipe from the GitHub site.
1 You will see in other recipes in this chapter that it’s possible to dynamically remove the randomness from a test and fix the correct answer without capturing the question from the page.
2 Notice that many tests make text comparisons using regular expressions, which allows, as in this example, for case-insensitive matches of substrings. Regular expressions can prevent tests from breaking frequently.
3 See the source code in the GitHub repository to see how we’ve structured the code in the example application.
4 If you don’t have the Testing Library installed, see “Use the React Testing Library”.
5 Either directly or indirectly via libraries such as Axios.
6 It doesn’t matter what you call the file, but we follow the convention of prefixing high-level tests such as this with story numbers. Doing so reduces the likelihood of test merge conflicts and makes it much easier to track the intent of individual changes.
7 This will run the tests more quickly and record a video for each one, which is helpful if your tests run on an integration server.
8 Cypress commands are similar in many ways to promises, although they are not promises. You can think of each one as a “prom-ish.”
9 The cy.intercept command cannot simply return a reference to the faked network request because of the chainable nature of Cypress commands.
10 See “Monitor Online Status”.
11 This doesn’t mean that the tests will work against every browser, just that they will all run across every browser.
12 We are following a convention where we prefix the test with its associated story number. Selenium does not require this.
13 You will find the code to do this in the downloadable source for this chapter from GitHub.
14 You could put this script anywhere, but this is the location we used in the example code on the GitHub site.
15 The remote machine must have the appropriate browser and web driver installed for this to work.
16 For create-react-app applications, this should be added to public/index.html.
17 The code is available in the source code repository for this book.
18 You can find out more about this test in “Test Without a Server Using Cypress”.
19 That is, allow the browser to say to the server Let’s pretend it’s Thursday, April 14.
20 Firefox will not generally accept this format.