Chapter 3. psql
psql is the de rigueur command-line utility packaged with PostgreSQL. Aside from its common use of running queries, you can use psql to execute scripts, import and export data, restore tables, do other database administration, and even generate reports. If you have access only to a server’s command line with no GUI, psql is your only choice to interact with PostgreSQL. If you fall into this group, you have to be intimate with myriad commands and options. We suggest that you print out the dump of psql help as discussed in “psql Interactive Commands” and enshrine it above your workstation.
Environment Variables
As with other command-line tools packaged with PostgreSQL, you can forgo specifying your
connection settings—host, port, user—by initializing the PGHOST, PGPORT,
and PGUSER environment variables. To avoid having to
retype the password, you can initialize the variable
PGPASSWORD. For more secure access, create a password
file as described in PostgreSQL
Password File. Since version 9.2 psql accepts two new environment
variables:
PSQL_HISTORYSets the name of the psql history file that lists all commands executed in the recent past. The default is ~/.psql_history.
PSQLRCSpecifies the location and name of a custom configuration file. Should you decide to create this file, you can place most of your settings in here. At startup, psql will read settings from your configuration file before loading default values, and your file’s settings will override the defaults.
If you omit the parameters when starting psql and failed to initialize environment variables, psql will use the standard defaults.
Note
If you use pgAdmin3, once connected to a database, you can click an icon to open up psql with the same parameters you have in pgAdmin.
Interactive versus Noninteractive psql
Run psql interactively by typing psql from your OS command line. Your prompt will transfigure to the
psql prompt, signaling that you are now in the interactive psql console.
Begin typing in commands. For SQL statements, terminate with a semicolon.
If you press Enter without a semicolon, psql will assume that your
statement continues to the next line.
Typing \? while in
the psql console brings up a list of available commands. For convenience,
we’ve reprinted this list in Appendix B, highlighting new
additions in the latest versions; see “psql Interactive Commands”. Typing \h followed by the command will
bring up the relevant sections of the PostgreSQL documentation pertaining
to the command.
To run commands repeatedly or in a sequence, you’re better off
creating a script first and then running it using psql noninteractively.
At your OS prompt, type psql followed by the name of the
script file. Within this script you can mix an unlimited number of SQL and
psql commands. Alternatively, you can pass in one or more SQL statements
surrounded by double quotes. Noninteractive psql is well-suited for
automated tasks. Batch your commands into a file; then schedule it to run
at regular intervals using a scheduling daemon like pgAgent, crontab in
Linux/Unix, or Windows Scheduler.
Noninteractive psql offers few command-line options because the
script file does most of the work. For a listing of all options, see “psql Noninteractive Commands”. To execute a file, use the
-f option, as in the following:
psql -f some_script_fileTo execute SQL on the fly, use the -c option. Separate
multiple statements with a semicolon as in the following:
psql -d postgresql_book -c "DROP TABLE IF EXISTS dross; CREATE SCHEMA staging;"You can embed interactive commands inside script files. Example 3-1 is the contents of a script
named build_stage.psql, which we will
use to create a staging table called
staging.factfinder_import that is loaded in Example 3-10. The script first generates a
CREATE TABLE statement, which it writes to a new file called
create_script.sql. It then executes
the generated create_script.sql.
Example 3-1. Script that includes psql interactive commands
\a\t \g create_script.sql SELECT 'CREATE TABLE staging.factfinder_import ( geo_id varchar(255), geo_id2 varchar(255), geo_display varchar(255),' || array_to_string(array_agg('s' || lpad(i::text,2,'0') || ' varchar(255),s' || lpad(i::text,2,'0') || '_perc varchar(255)'),',') || ');' FROM generate_series(1,51) As i; \o
\i create_script.sql
Since we want the output of our query to be saved as an executable statement, we need to remove the headers by using the
\toption (shorthand for --tuples-only) and use the\aoption to get rid of the extra breaking elements that psql normally puts in. We then use the\goption to force our query output to be redirected to a file.We call the
\owithout file arguments to stop redirection of query results to file.
To execute our generated script, we use the
\ifollowed by the generated script name create_script.sql. The\iis the interactive version of the noninteractive-foption.
To run Example 3-1, we enter the following at an OS prompt:
psql -f build_stage.psql -d postgresql_book
Example 3-1 is an adaptation of
an approach we describe in How to
Create an N-column Table. As noted in the article, you can perform
this without an intermediary file by using the DO command
introduced in PostgreSQL 9.0.
psql Customizations
If you spend most of your day in psql, consider tailoring the psql environment to make you more productive. psql reads settings from a configuration file called psqlrc, if present. When psql launches, it searches for this file and runs all commands therein.
On Linux/Unix, the file is customarily named .psqlrc and should be placed in your home
directory. On Windows, the file is called psqlrc.conf and should be placed in the
%APPDATA%\postgresql folder, which
usually resolves to C:\Users\username\AppData\Roaming\postgresql.
Don’t worry if you can’t find the file right after installation; you
usually need to create it. Any settings in the file will override psql
defaults.
Example 3-2 is a glimpse into the contents of a psqlrc file. You can include any psql command.
Example 3-2. Example psqlrc file
\pset null 'NULL'
\encoding latin1
\set PROMPT1 '%n@%M:%>%x %/# '
\pset pager always
\timing on
\set qstats92 '
    SELECT usename, datname, left(query,100) || ''...'' As query
    FROM pg_stat_activity WHERE state != ''idle'' ;
'
Warning
Each command must be on a single line without breaks. Our examples may add line breaks to accommodate printing.
When you launch psql now, the result of executing the configuration file echoes to the screen:
Null display is "NULL".
Timing is on.
Pager is always used.
psql (9.6beta3)
Type "help" for help.
postgres@localhost:5442 postgresql_book#
Some commands work only on Linux/Unix systems, while others work
only on Windows. In either OS, you should use the Linux/Unix−style slash
(forward slash) for path. If you want to bypass the configuration file and
start psql with all its defaults, start it with the -X
option.
You can change settings on the fly while in psql, though the change
will only be in effect during your psql session. To remove a configuration
variable or set it back to the default, issue the \unset command followed by the
setting, as in: \unset qstat92.
When using set, keep in mind that the variable you
set is case sensitive. Use all caps to set system options, and lowercase
for your own variables. In Example 3-2,
PROMPT1 is a system setting for how the psql prompt should appear,
whereas qstats92 is a variable initialized as shorthand
to display current activities on the PostgreSQL server.
Custom Prompts
If you spend your waking hours playing with psql connecting to multiple servers and databases, customizing your prompt to display the connected server and database will enhance your situational awareness and possibly avoid disaster. Here’s a simple way to set a highly informational prompt:
\set PROMPT1 '%n@%M:%>%x %/# '
This includes whom we are logged in as (%n), the host
server (%M), the port (%>), the transaction
status (%x), and the database (%/). This is
probably overkill, so economize as you see fit. The complete listing of
prompt symbols is documented in the psql
Reference Guide.
When we connect with psql to our database, our enhanced prompt looks like:
postgres@localhost:5442 postgresql_book#
Should we switch to another database using \connect postgis_book, our prompt
changes to:
postgres@localhost:5442 postgis_book#
Timing Executions
You may find it instructive to have psql output the time it took for each
query to execute. Use the \timing command to toggle it on and
off.
When enabled, each query you run will report the duration at the
end. For example, with \timing on, executing SELECT
COUNT(*) FROM pg_tables; outputs:
count
--------
73
(1 row)
Time: 18.650 ms
Autocommit Commands
By default, autocommit is on, meaning any SQL command you issue that changes data will
immediately commit. Each command is its own transaction and is
irreversible. If you are running a large batch of precarious updates,
you may want a safety net. Start by turning off autocommit: \set AUTOCOMMIT off. Now, you
have the option to roll back your statements:
UPDATEcensus.factsSETshort_name='This is a mistake.';
To undo the update, run:
ROLLBACK;
To make the update permanent, run:
COMMIT;
Warning
Don’t forget to commit your changes if autocommit is off; otherwise, they roll back when you exit psql.
Shortcuts
You can use the \set command to create useful keyboard shortcuts. Store universally applicable
shortcuts in your psqlrc file. For
example, if you use EXPLAIN ANALYZE VERBOSE once every 10
minutes, create a shortcut as follows:
\set eav 'EXPLAIN ANALYZE VERBOSE'
Now, all you have to type is :eav (the colon resolves the variable):
:eav SELECT COUNT(*) FROM pg_tables;
You can even save entire queries as shortcuts as we did in Example 3-2. Use lowercase to name your shortcuts to distinguish them from system settings.
Retrieving Prior Commands
As with many command-line tools, you can use the up arrows in psql to recall commands.
The HISTSIZE variable determines the
number of previous commands that you can recall. For example, \set
HISTSIZE 10 lets you recover the past 10 commands.
If you spent time building and testing a difficult query or performing a series of important updates, you may want to have the history of commands piped into separate files for perusal later:
\set HISTFILE ~/.psql_history - :DBNAME
psql Gems
In this section, we cover helpful featurettes buried inside the psql documentation.
Watching Statements
The \watch command has been in psql since PostgreSQL 9.3. Use it to repeatedly
run an SQL statement at fixed intervals so you can monitor the output.
For example, suppose you want to keep tabs on queries that have yet to
complete. Tag the watch command to the end of the query as shown in
Example 3-3.
Example 3-3. Watching connection traffic every 10 seconds
SELECT datname, query
FROM pg_stat_activity
WHERE state = 'active' AND pid != pg_backend_pid();
\watch 10
Although \watch is primarily for monitoring query
output, you can use it to execute statements at fixed intervals. In
Example 3-4, we first create a table using bulk
insert syntax
and then log activity
every five seconds after. Only the
last statement that does the insert is repeated every five seconds.
Example 3-4. Log traffic every five seconds
SELECT * INTO log_activity FROM pg_stat_activity;
Create table and do first insert.
Insert every five seconds.
To kill a watch, use CTRL-X CTRL-C.
Retrieving Details of Database Objects
Various psql describe commands list
database objects along with details. Example 3-5 demonstrates how to list all
tables and their sizes on disk in the pg_catalog schema that begins with
the letters pg_t.
Example 3-5. List tables with \dt+
\dt+ pg_catalog.pg_t*
Schema     | Name             | Type  | Owner    | Size   | Description
-----------+------------------+-------+----------+--------+------------
pg_catalog | pg_tablespace    | table | postgres | 40 kB  |
pg_catalog | pg_trigger       | table | postgres | 16 kB  |
pg_catalog | pg_ts_config     | table | postgres | 40 kB  |
pg_catalog | pg_ts_config_map | table | postgres | 48 kB  |
pg_catalog | pg_ts_dict       | table | postgres | 40 kB  |
pg_catalog | pg_ts_parser     | table | postgres | 40 kB  |
pg_catalog | pg_ts_template   | table | postgres | 40 kB  |
pg_catalog | pg_type          | table | postgres | 112 kB |
If you need further detail on a particular object, use the \d+ command as shown in Example 3-6.
Example 3-6. Describe object with \d+
\d+ pg_ts_dict
Table "pg_catalog.pg_ts_dict"
Column         | Type | Modifiers | Storage  | Stats target | Description
---------------+------+-----------+----------+--------------+------------
dictname       | name | not null  | plain    |              |
dictnamespace  | oid  | not null  | plain    |              |
dictowner      | oid  | not null  | plain    |              |
dicttemplate   | oid  | not null  | plain    |              |
dictinitoption | text |           | extended |              |
Indexes:
"pg_ts_dict_dictname_index" UNIQUE, btree (dictname, dictnamespace)
"pg_ts_dict_oid_index" UNIQUE, btree (oid)
Has OIDs: yes
Crosstabs
New in PostgreSQL 9.6 psql is the \crosstabview command, which greatly
simplifies crosstab queries. This labor-saving command is available only
in the psql enviroment. We’ll illustrate with an example in Example 3-7, following it with an
explanation.
Example 3-7. Crosstab view
SELECTstudent,subject,AVG(score)::numeric(5,2)Asavg_scoreFROMtest_scoresGROUPBYstudent,subjectORDERBYstudent,subject\crosstabviewstudentsubjectavg_score
 student | algebra | calculus | chemistry | physics | scheme
---------+---------+----------+-----------+---------+--------
 alex    |   74.00 |    73.50 |     82.00 |   81.00 |
 leo     |   82.00 |    65.50 |     75.50 |   72.00 |
 regina  |   72.50 |    64.50 |     73.50 |   84.00 |  90.00
 sonia   |   76.50 |    67.50 |     84.00 |   72.00 |
(4 rows)
The \crosstabview immediately follows the query you want to cross tabulate. The
\crosstabview should list three columns selected by the
query, with an optional fourth column to control sorting. The cross
tabulation outputs a table where the first column serves as a row
header, the second column as a column header, and the last as the value
that goes in each cell. You can also omit the column names from the
\crosstabview command, in which case the SELECT statement must request exactly three
columns used in order for the cross tabulation.
In Example 3-7, student is the row header and subject is the column header. The average score column provides the entry for
each pivoted cell. Should our data contain a missing student-subject
pair, the corresponding cell would be null. We specified all the columns
in the \crosstabview command, but we
could have omitted them because they are in our SELECT in
the right order.
Dynamic SQL Execution
Suppose you wanted to construct SQL statements to run based on the output of a query. In
prior versions of PostgreSQL, you would build the SQL, output it to a
file, then execute the file. Alternatively you could use the
DO construct, which could be unwieldy in psql for long SQL
statements. Starting with PostgreSQL 9.6, you can execute generated SQL
in a single step with the new \gexec command,
which iterates through each cell of your query and executes the SQL
therein. Iteration is first by row then by column. It’s not yet smart
enough to discern whether each cell contains a legitimate SQL. gexec is
also oblivious to the result of the SQL execution. Should the SQL within
a particular cell throw an error, gexec merrily treads along. However,
it skips over nulls. Example 3-8 creates two
tables and inserts one row in each table using the \gexec command.
Example 3-8. Using gexec to create tables and insert data
SELECT'CREATE TABLE '||person.name||'( a integer, b integer)'Ascreate,'INSERT INTO '||person.name||' VALUES(1,2) 'ASinsertFROM(VALUES('leo'),('regina'))ASperson(name)\gexec
CREATE TABLE
INSERT 0 1
CREATE TABLE
INSERT 0 1
In the next example we use gexec to obtain metadata by querying
information_schema.
Example 3-9. Using gexec to retrieve counts of records in each table
SELECT'SELECT '||quote_literal(table_name)||' AS table_name,COUNT(*) As count FROM '||quote_ident(table_name)AScnt_qFROMinformation_schema.tablesWHEREtable_nameIN('leo','regina')\gexec
table_name | count
-----------+------
leo        | 1
(1 row)

table_name | count
-----------+------
 regina    | 1
(1 row)
Importing and Exporting Data
psql has a \copy command that lets you import data from and export data to a text file. The tab
is the default delimiter, but you can specify others. Newline breaks must
separate the rows. For our first example, we downloaded data from US Census Fact Finder covering
racial demographics of housing in Massachusetts. You can download the file
we use in this example, DEC_10_SF1_QTH1_with_ann.csv, from the PostgreSQL Book Data.
psql Import
Our usual sequence in loading denormalized or unfamiliar data is to create a staging schema to accept the incoming data. We then write explorative queries to get a sense of what we have on our hands. Finally, we distribute the data into various normalized production tables and delete the staging schema.
Before bringing the data into PostgreSQL, you must first create a table to store the incoming data. The data must match the file both in the number of columns and in data types. This could be an annoying extra step for a well-formed file, but it does obviate the need for psql to guess at data types.
psql processes the entire import as a single transaction; if it encounters any errors in the data, the entire import fails. If you’re unsure about the data contained in the file, we recommend setting up the table with the most accommodating data types and then recasting them later if necessary. For example, if you can’t be sure that a column will have just numeric values, make it character varying to get the data in for inspection and then recast it later.
Example 3-10 loads data into the table we created in Example 3-1. Launch psql from the command line and run the commands in Example 3-10.
Example 3-10. Importing data with psql
\connect postgresql_book
\cd /postgresql_book/ch03
\copy staging.factfinder_import FROM DEC_10_SF1_QTH1_with_ann.csv CSV
In Example 3-10, we launch
interactive psql, connect to our database, use \cd to change the current directory to
the folder containing our file, and import our data using the
\copy command. Because the default delimiter is a tab, we
augment our statement with CSV to tell psql that our data
is comma-separated instead.
If your file has nonstandard delimiters such as pipes, indicate the delimiter as follows:
\copy sometable FROM somefile.txt DELIMITER '|';
During import, you can replace null values with something of your
own choosing by adding a NULL AS, as in the following:
\copy sometable FROM somefile.txt NULL As '';
Warning
Don’t confuse the \copy command in psql with the
COPY statement provided by the SQL language. Because psql
is a client utility, all paths are interpreted relative to the
connected client. The SQL copy is server-based and runs under the
context of the postgres service OS account. The input file for an SQL
copy must reside in a path accessible by the postgres service
account.
psql Export
Exporting data is even easier than importing. You can even export
selected rows from a table. Use the psql \copy command to
export. Example 3-11 demonstrates how
to export the data we just loaded back to a tab-delimited file.
Example 3-11. Exporting data with psql
\connect postgresql_book
\copy (SELECT * FROM staging.factfinder_import  WHERE s01 ~ E'^[0-9]+' )
TO '/test.tab'
WITH DELIMITER E'\t' CSV HEADER
The default behavior of exporting data without qualifications is
to export to a tab-delimited file. However, the tab-delimited format does
not export header columns. You can use the HEADER option
only with the comma-delimited format (see Example 3-12).
Example 3-12. Exporting data with psql
\connect postgresql_book
\copy staging.factfinder_import TO '/test.csv'
WITH CSV HEADER QUOTE '"' FORCE QUOTE *
FORCE QUOTE * double quotes all columns. For clarity,
we specified the quoting character even though psql defaults to double
quotes.
Copying from or to Program
Since PostgreSQL 9.3, psql can fetch data from the output of command-line programs such as curl, ls, and wget, and dump the data into a table. Example 3-13 imports a directory listing using a dir command.
Example 3-13. Import directory listing with psql
\connect postgresql_book
CREATE TABLE dir_list (filename text);
\copy dir_list FROM PROGRAM 'dir C:\projects /b'
Hubert Lubaczewski has more examples of using \copy. Visit Depesz: Piping copy to from an external
program.
Basic Reporting
Believe it or not, psql is capable of producing basic HTML reports. Try the following and check out the generated output, shown in Figure 3-1.
psql -d postgresql_book -H -c "
SELECT category, COUNT(*) As num_per_cat
FROM pg_settings
WHERE category LIKE '%Query%'
GROUP BY category
ORDER BY category;
" -o test.html
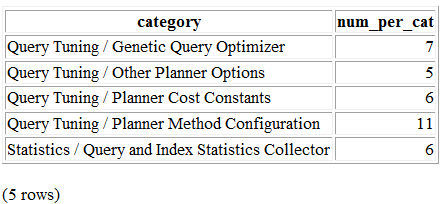
Figure 3-1. Minimalist HTML report
Not too shabby. But the command outputs only an HTML table, not a fully qualified HTML document. To create a meatier report, compose a script, as shown in Example 3-14.
Example 3-14. Script to generate report
\o settings_report.html\t on
\pset format html
SELECT category, string_agg(name || '=' || setting, E'\n' ORDER BY name) As settings
FROM pg_settings WHERE category LIKE '%Planner%' GROUP BY category ORDER BY category; \H \qecho '</td><td><h2>File Locations</h2>' \x off
\t on \pset format html SELECT name, setting FROM pg_settings WHERE category = 'File Locations' ORDER BY name; \qecho '<h2>Memory Settings</h2>' SELECT name, setting, unit FROM pg_settings WHERE category ILIKE '%memory%' ORDER BY name; \qecho '</td></tr></table>' \qecho '</body></html>' \o
Redirects query output to a file.
CSS table settings for query output.
Appends additional HTML.
Expand mode. Repeats the column headers for each row and outputs each column of each row as a separate row.
Forces the queries to output as an HTML table.
string_agg(), introduced in PostgreSQL 9.0, concatenates all properties in the same category into a single column.Turns off expand mode. The second and third queries should output one row per table row.
Toggles tuples mode. When on, column headers and row counts are omitted.
Example 3-14 demonstrates that by
interspersing SQL and psql commands, you can create a comprehensive
tabular report replete with subreports. Run Example 3-14 by connecting interactively with
psql and executing \i settings_report.psql. Alternatively,
run psql noninteractively by executing psql -f
settings_report.psql from your OS command line. The output
generated by settings_report.html is
shown in Figure 3-2.
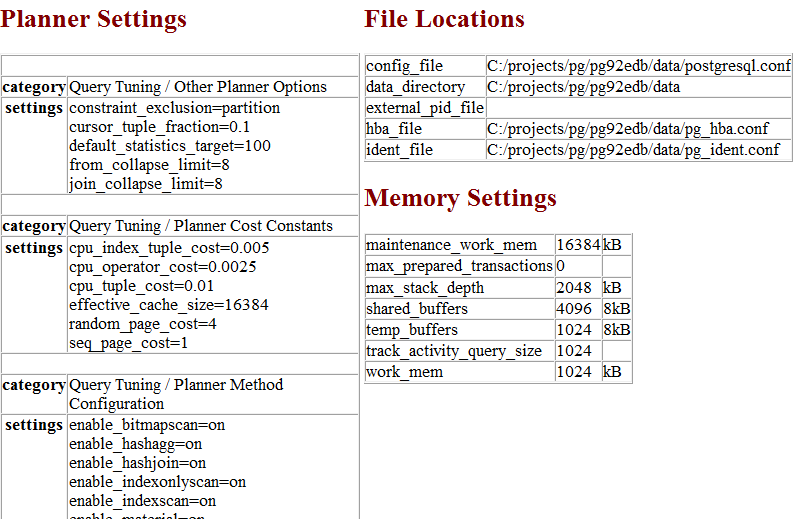
Figure 3-2. Advanced HTML report
As demonstrated, composing psql scripts lets you show output from many queries within a single report. Further, after you write a script, you can schedule its execution in the future, and at fixed intervals. Use a daemon like pgAgent, crontab, or Windows Scheduler.