In this chapter
What is the Go standard library and why is it important? The Go standard library is a set of core packages that enhance and extend the language. These packages add to the number of different types of programs you can write without the need to build your own packages or download packages others have published. Since these packages are tied to the language, they come with some special guarantees:
These guarantees make the standard library special and something you want to leverage as much as possible. By using packages from the standard library, you make it easier to manage your code and ensure that it’s reliable. This is because you don’t have to worry if your program is going to break between release cycles, nor do you have to manage third-party dependencies.
All these benefits would be useless if the standard library didn’t contain all the great packages that it does. Go developers in the community depend on these packages more so than in other languages. This is because they are well designed and provide more functionality than is normally found in traditional standard libraries. In the end, the Go community relies on the standard library for lots of things that developers in other languages do not, such as networking, HTTP, image processing, and cryptology.
In this chapter we’ll take a high-level look at the current set of packages that are a part of the standard library. Then we’ll explore in greater detail three packages that come in handy for many different programs: log, json, and io. These packages also show off some of the great things that Go has to offer.
The standard library is filled with so many packages that it would be impossible to cover them all in the scope of one chapter. Currently there are well over 100 packages organized within 38 categories.
archive   bufio      bytes     compress   container   crypto    database
debug     encoding   errors    expvar     flag        fmt       go
hash      html       image     index      io          log       math
mime      net        os        path       reflect     regexp    runtime
sort      strconv    strings   sync       syscall     testing   text
time      unicode    unsafe
Many of the categories in listing 8.1 are also packages themselves. For a detailed description and a look at all the available packages, the Go team maintains documentation on the Go website at http://golang.org/pkg/.
The pkg section of the golang website provides the godoc documentation for each package. Figure 8.1 shows an example of the package documentation on the golang website for the io package.
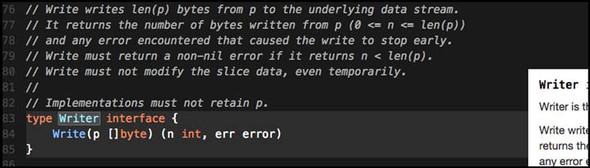
If you want documentation that you can interact with, Sourcegraph has indexed all the code for the standard library and many of the public repositories that contain Go code. Figure 8.2 shows an example of the package documentation on the Sourcegraph website (https://sourcegraph.com/)for the io package.
No matter how you installed Go, all the source code for the standard library can be found on your development machine in the $GOROOT/src/pkg folder. Having the source code for the standard library is important for the Go tooling to work. Tools like godoc, gocode, and even go build read this source code to perform their functions. If this source code is not on your machine and accessible through the $GOROOT variable, you’ll get errors when trying to build your programs.
The source code for the standard library is precompiled as part of your Go distribution package. These precompiled files, called archive files, can be found in the $GOROOT/pkg folder for each target platform and operating system you have installed. In figure 8.3 you can see files with an .a extension, which are the archive files.
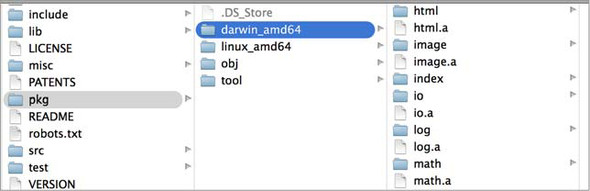
These files are special static Go libraries that the Go build tools create and use when compiling and linking your final programs together. This helps the build process to be fast. But there’s no way to specify these files when performing a build, so you can’t share them. The Go tooling knows when it can use an existing .a file and when it needs to rebuild one from the source code on your machine.
With this background in place, let’s take a look at a few of the packages in the standard library and see how you can consume them in your own programs.
Your programs have bugs, even if they haven’t shown themselves yet. That’s the nature of software development. Logging is a way to find those bugs and learn more about how your program is functioning. Logs can be your eyes and ears, providing code tracing, profiling, and analytics. With this in mind, the standard library provides a log package that can be used with some basic configuration. You can also create custom loggers to implement your own specific logging needs.
Logging has a long history in UNIX, and this has carried over into the log package. Traditional CLI (command-line interface) programs write their output to the stdout device. This device exists on all operating systems and is the default destination for standard text output. Terminals are configured by default to display text written to this device. Using this single destination works great until you have a program that needs to write both output and details about how the program is functioning. When you want to write logging information, you want to write that to a different destination so your output and logging won’t be mixed together.
To solve this problem, UNIX architects added a device called stderr. This device was created to be the default destination for logging. It allows developers to separate their programs’ output from their logging. For a user to see both the output and the logging when running a program, terminal consoles are configured to display what’s written to both stdout and stderr. But if your program only writes logs, then it’s common practice to write general logging information to stdout and errors or warnings to stderr.
Let’s start with the base functionality provided by the log package before you learn how to create your own custom loggers. The purpose of logging is to get a trace of what the program is doing, where it’s happening, and when. This is some of the information that you can write on every log line with some configuration.
TRACE: 2009/11/10 23:00:00.000000 /tmpfs/gosandbox-/prog.go:14: message
In listing 8.2 you see a log entry produced by the log package. This log entry contains a prefix, a datetime stamp, the full path to the source code writing to the log, the line of code performing the write, and finally the message. Let’s look at a program that allows you to configure the log package to write such a line.
01 // This sample program demonstrates how to use the base log package.
02 package main
03
04 import (

05     "log"
06 )
07
08 func init() {
09     log.SetPrefix("TRACE: ")
10     log.SetFlags(log.Ldate | log.Lmicroseconds | log.Llongfile)
11 }
12
13 func main() {
14     // Println writes to the standard logger.
15     log.Println("message")
16
17     // Fatalln is Println() followed by a call to os.Exit(1).
18     log.Fatalln("fatal message")
19
20     // Panicln is Println() followed by a call to panic().
21     log.Panicln("panic message")
22 }
If you run the program from listing 8.3, you should get something close to the same output from listing 8.2. Let’s break down the code and see how it works.
08 func init() {
09     log.SetPrefix("TRACE: ")
10     log.SetFlags(log.Ldate | log.Lmicroseconds | log.Llongfile)
11 }
On lines 08 through 11, we have a function called init(). This function is executed before main() as part of the program initialization. It’s common to set the log configuration inside of init() so the log package can be used immediately when the program starts. In our program on line 09, we set the string to be used as a prefix for each line. This should be a string that allows you to identify a log line over normal program output. Traditionally this string is written in capital letters.
There are several flags associated with the log package that control other information that can be written on each log line. The following listing shows the flags that currently exist.
const (
  // Bits or'ed together to control what's printed. There is no control
  // over the order they appear (the order listed here) or the format
  // they present (as described in the comments).  A colon appears after
  // these items:
  //    2009/01/23 01:23:23.123123 /a/b/c/d.go:23: message

  // the date: 2009/01/23
  Ldate = 1 << iota

  // the time: 01:23:23

  Ltime

  // microsecond resolution: 01:23:23.123123. assumes Ltime
  Lmicroseconds

  // full file name and line number: /a/b/c/d.go:23
  Llongfile

  // final file name element and line number: d.go:23
  // overrides Llongfile
  Lshortfile

  // initial values for the standard logger
  LstdFlags = Ldate | Ltime
)
Listing 8.5 comes right out of the source code for the log package. These flags are declared as constants, and the first constant in this block is called Ldate, which is declared with special syntax.
// the date: 2009/01/23
  Ldate = 1 << iota
The iota keyword has a special purpose when it comes to declaring a block of constants. It instructs the compiler to duplicate the expression for every constant until the block ends or an assignment statement is found. Another function of the iota keyword is that the value of iota for each preceding constant gets incremented by 1, with an initial value of 0. Let’s look at this more closely.
const (
  Ldate = 1 << iota  // 1 << 0 = 000000001 = 1
  Ltime              // 1 << 1 = 000000010 = 2
  Lmicroseconds      // 1 << 2 = 000000100 = 4
  Llongfile          // 1 << 3 = 000001000 = 8
  Lshortfile         // 1 << 4 = 000010000 = 16
  ...
)
Listing 8.7 shows what’s happening behind the scenes with the constant declarations. The << operator performs a left bitwise shift of the bits represented by the value on the left side of the operator. In each case the bit pattern for the value of 1 is shifted to the left iota position. This has the effect of giving each constant its own unique bit position, which you’ll see is perfect when working with flags.
The LstdFlags constant shows the purpose behind giving each constant its own unique bit position.
const (
  ...
  LstdFlags = Ldate(1) | Ltime(2) = 00000011 = 3
)
In listing 8.8 you see the LstdFlags constant break the iota chain because of the use of the assignment operator. The LstdFlags constant is assigned the value of 3, thanks to the fact that the pipe operator (|) is used to or bits together. Or’ing bits is equivalent to joining bits so each individually set bit is then represented in the final value. When bits 1 and 2 are ored together, they form the value of 3.
Let’s look again at how we set the log flags we wanted applied.
08 func init() {
09     ...
10     log.SetFlags(log.Ldate | log.Lmicroseconds | log.Llongfile)
11 }
Here we piped the Ldate, Lmicroseconds, and Llongfile flags together and passed the value of that operation to the SetFlags function. These flags, when piped together, represent the value 13 and bits 4, 3, and 1 (00001101). Since each constant represents an individual bit, flags can be joined together using the pipe operator to create a value that represents all the log options we want applied. The log package then takes that integer value we passed and inspects which bits are set to apply the correct attributes we requested.
With the log package initialized, you can look at main() and see how to write messages.
13 func main() {
14     // Println writes to the standard logger.
15     log.Println("message")
16
17     // Fatalln is Println() followed by a call to os.Exit(1).
18     log.Fatalln("fatal message")
19
20     // Panicln is Println() followed by a call to panic().
21     log.Panicln("panic message")
22 }
Listing 8.10 shows how to write log messages using three different functions: Println, Fatalln, and Panicln. These functions have a format version, as well, that end with the letter f instead of the letters ln. The Fatal family of functions is used to write a log message and then terminate the program using the os.Exit(1) function call. The Panic family of functions is used to write a log message and then issue a panic, which unless recovered, will cause the program to terminate and stack trace. The Print family of functions is the standard way to write log messages.
One nice thing about the log package is that loggers are multigoroutine-safe. This means that multiple goroutines can call these functions from the same logger value at the same time without the writes colliding with each other. The standard logger and any customized logger you may create will have this attribute.
Now that you know how to use the log package and configure it, let’s explore how to create customized loggers so you can have different logging levels that can write logs to different destinations.
Creating customized loggers require that you create your own Logger type values. Each logger you create can be configured for a unique destination and set with its own prefix and flags. Let’s look at an example program that creates different Logger type pointer variables to support different logging levels.
01 // This sample program demonstrates how to create customized loggers.
02 package main
03
04 import (
05     "io"
06     "io/ioutil"
07     "log"
08     "os"
09 )
10
11 var (
12     Trace   *log.Logger // Just about anything
13     Info    *log.Logger // Important information
14     Warning *log.Logger // Be concerned
15     Error   *log.Logger // Critical problem
16 )
17
18 func init() {
19     file, err := os.OpenFile("errors.txt",
20         os.O_CREATE|os.O_WRONLY|os.O_APPEND, 0666)
21     if err != nil {
22         log.Fatalln("Failed to open error log file:", err)
23     }
24
25     Trace = log.New(ioutil.Discard,
26         "TRACE: ",
27         log.Ldate|log.Ltime|log.Lshortfile)
28
29     Info = log.New(os.Stdout,
30         "INFO: ",
31         log.Ldate|log.Ltime|log.Lshortfile)
32

33     Warning = log.New(os.Stdout,
34         "WARNING: ",
35         log.Ldate|log.Ltime|log.Lshortfile)
36
37     Error = log.New(io.MultiWriter(file, os.Stderr),
38         "ERROR: ",
39         log.Ldate|log.Ltime|log.Lshortfile)
40 }
41
42 func main() {
43     Trace.Println("I have something standard to say")
44     Info.Println("Special Information")
45     Warning.Println("There is something you need to know about")
46     Error.Println("Something has failed")
47 }
Listing 8.11 shows a complete program that creates four different Logger type pointer variables. They’re named Trace, Info, Warning, and Error. Each variable is configured differently because of the importance each represents. Let’s break down the code so you can learn how all this works.
On lines 11 through 16 we declare the four Logger type pointer variables for our different logging levels.
11 var (
12     Trace   *log.Logger // Just about anything
13     Info    *log.Logger // Important information
14     Warning *log.Logger // Be concerned
15     Error   *log.Logger // Critical problem
16 )
In listing 8.12 you see the declaration of the Logger type pointer variables. We’ve given each logger a short but descriptive variable name. Next, let’s look at the code in init() that creates and assigns the address of each Logger type value to each variable.
25     Trace = log.New(ioutil.Discard,
26         "TRACE: ",
27         log.Ldate|log.Ltime|log.Lshortfile)
28
29     Info = log.New(os.Stdout,
30         "INFO: ",
31         log.Ldate|log.Ltime|log.Lshortfile)
32
33     Warning = log.New(os.Stdout,
34         "WARNING: ",
35         log.Ldate|log.Ltime|log.Lshortfile)
36
37     Error = log.New(io.MultiWriter(file, os.Stderr),
38         "ERROR: ",
39         log.Ldate|log.Ltime|log.Lshortfile)
To create each logger, we use the New function from the log package, which creates a properly initialized Logger type value. The New function returns the address to the newly created value. Before the New function can create a value, we need to pass it some parameters.
// New creates a new Logger. The out variable sets the
// destination to which log data will be written.
// The prefix appears at the beginning of each generated log line.
// The flag argument defines the logging properties.
func New(out io.Writer, prefix string, flag int) *Logger {
    return &Logger{out: out, prefix: prefix, flag: flag}
}
Listing 8.14 shows the declaration of the New function from the source code for the log package. The first parameter is the destination we want the logger to write to. This is provided as a value that implements the io.Writer interface. The second parameter is the prefix that you saw before, and log flags comprise the final parameter.
In our program, the Trace logger uses the Discard variable from the ioutil package as the destination to write to.
25     Trace = log.New(ioutil.Discard,
26         "TRACE: ",
27         log.Ldate|log.Ltime|log.Lshortfile)
The Discard variable has some very interesting properties.
// devNull is a named type using int as its base type.
type devNull int

// Discard is an io.Writer on which all Write calls succeed
// without doing anything.
var Discard io.Writer = devNull(0)

// Implementation of the io.Writer interface.
func (devNull) Write(p []byte) (int, error) {
    return len(p), nil
}
Listing 8.16 shows the declaration of the Discard variable and the implementation surrounding it. The Discard variable is declared to be of interface type io.Writer and is given a value of 0 of type devNull. Anything written to this variable is discarded based on the implementation of the Write method for the devNull type. Using the Discard variable is a technique you can use to disable a logging level when the output for that level is not required.
The Info and Warning loggers both use the stdout destination.
29     Info = log.New(os.Stdout,
30         "INFO: ",
31         log.Ldate|log.Ltime|log.Lshortfile)
32
33     Warning = log.New(os.Stdout,
34         "WARNING: ",
35         log.Ldate|log.Ltime|log.Lshortfile)
The declaration of the Stdout variable is also interesting.
// Stdin, Stdout, and Stderr are open Files pointing to the standard
// input, standard output, and standard error file descriptors.
var (
    Stdin  = NewFile(uintptr(syscall.Stdin), "/dev/stdin")
    Stdout = NewFile(uintptr(syscall.Stdout), "/dev/stdout")
    Stderr = NewFile(uintptr(syscall.Stderr), "/dev/stderr")
)

os/file_unix.go

// NewFile returns a new File with the given file descriptor and name.
func NewFile(fd uintptr, name string) *File {
In listing 8.18 you can see the declaration for the three variables that represent the standard destinations that exist on all operating systems: Stdin, Stdout, and Stderr. All these variables are declared to be pointers of type File, which implements the io.Writer interface. This leads us to the final logger, Error.
37     Error = log.New(io.MultiWriter(file, os.Stderr),
38         "ERROR: ",
39         log.Ldate|log.Ltime|log.Lshortfile)
In listing 8.19 you can see that the first parameter to the New function comes from a special function called MultiWriter from the io package.
io.MultiWriter(file, os.Stderr)
Listing 8.20 isolates the call to the MultiWriter function, which returns an interface type value of io.Writer that contains both the file that we opened and the stderr destination. The MultiWriter function is a variadic function that accepts any number of values that implement the io.Writer interface. The function returns a single io.Writer value that bundles all of the io.Writer values that are passed in. This allows functions like log.New to accept multiple writers within a single writer. Now when we write a log using the Error logger, the output will be written to both the file and stderr.
Now that you know how to create custom loggers, let’s look at how you can use them to write messages.
42 func main() {
43     Trace.Println("I have something standard to say")
44     Info.Println("Special Information")
45     Warning.Println("There is something you need to know about")
46     Error.Println("Something has failed")
47 }
Listing 8.21 shows the main() function from listing 8.11. On lines 43 through 46 we write a single message for each logger that we created. Each logger variable contains a set of methods that are identical to the set of functions that are implemented by the log package.
func (l *Logger) Fatal(v ...interface{})
func (l *Logger) Fatalf(format string, v ...interface{})
func (l *Logger) Fatalln(v ...interface{})
func (l *Logger) Flags() int
func (l *Logger) Output(calldepth int, s string) error
func (l *Logger) Panic(v ...interface{})
func (l *Logger) Panicf(format string, v ...interface{})
func (l *Logger) Panicln(v ...interface{})
func (l *Logger) Prefix() string
func (l *Logger) Print(v ...interface{})
func (l *Logger) Printf(format string, v ...interface{})
func (l *Logger) Println(v ...interface{})
func (l *Logger) SetFlags(flag int)
func (l *Logger) SetPrefix(prefix string)
Listing 8.22 shows all the methods that have been implemented for the Logger type.
The log package has been implemented with the long history and understanding of the purpose of logging and how it has been applied in practice. Writing output to stdout and logging to stderr has long been the tradition of many CLI-based programs. But when your program is only outputting logs, then using stdout, stderr, and files is perfectly acceptable.
The log package from the standard library has everything you need for logging and its use is recommended. You can trust the implementation not only because it’s part of the standard library, but because it’s used widely by the community.
Many applications, whether they’re using databases, making web calls, or working within a distributed system, need to consume and publish data. If your application is working with either XML or JSON, the standard library has packages called xml and json that make working with these data formats trivial. If you have your own data formats that need to be encoded and decoded, the implementation of these packages is a great road map of how to implement your own packages.
Working with and using JSON is more common nowadays than working with XML. This is primarily because using JSON requires less markup than working with XML. This means less data per message needs to be sent over the network, which helps with the overall performance of the system. Also, JSON can be transformed into BSON (Binary JavaScript Object Notation), which reduces the size of each message even further. In view of this, we’ll explore how to consume and publish JSON in Go applications. But working with XML is very similar.
The first aspect of working with JSON we’ll explore is using the NewDecoder function and Decode method from the json package. If you’re consuming JSON from a web response or a file, this is the function and method you want to use. Let’s look at an example that works with the http package to perform a Get request against the Google search API that returns results in JSON. The next listing shows what the response looks like.
{
    "responseData": {
        "results": [
            {
                "GsearchResultClass": "GwebSearch",
                "unescapedUrl": "https://www.reddit.com/r/golang",
                "url": "https://www.reddit.com/r/golang",
                "visibleUrl": "www.reddit.com",
                "cacheUrl": "http://www.google.com/search?q=cache:W...",
                "title": "r/\u003cb\u003eGolang\u003c/b\u003e - Reddit",
                "titleNoFormatting": "r/Golang - Reddit",
                "content": "First Open Source \u003cb\u003eGolang\u..."
            },
            {
                "GsearchResultClass": "GwebSearch",
                "unescapedUrl": "http://tour.golang.org/",
                "url": "http://tour.golang.org/",
                "visibleUrl": "tour.golang.org",
                "cacheUrl": "http://www.google.com/search?q=cache:O...",
                "title": "A Tour of Go",
                "titleNoFormatting": "A Tour of Go",
                "content": "Welcome to a tour of the Go programming ..."

            }
        ]
    }
}
Here’s the example that retrieves and decodes the response into a struct type.
01 // This sample program demonstrates how to decode a JSON response
02 // using the json package and NewDecoder function.
03 package main
04
05 import (
06     "encoding/json"
07     "fmt"
08     "log"
09     "net/http"
10 )
11
12 type (
13     // gResult maps to the result document received from the search.
14     gResult struct {
15         GsearchResultClass string `json:"GsearchResultClass"`
16         UnescapedURL       string `json:"unescapedUrl"`
17         URL                string `json:"url"`
18         VisibleURL         string `json:"visibleUrl"`
19         CacheURL           string `json:"cacheUrl"`
20         Title              string `json:"title"`
21         TitleNoFormatting  string `json:"titleNoFormatting"`
22         Content            string `json:"content"`
23     }
24
25     // gResponse contains the top level document.
26     gResponse struct {
27         ResponseData struct {
28             Results []gResult `json:"results"`
29         } `json:"responseData"`
30     }
31 )
32
33 func main() {
34     uri := "http://ajax.googleapis.com/ajax/services/search/web?
                                                  v=1.0&rsz=8&q=golang"
35
36     // Issue the search against Google.
37     resp, err := http.Get(uri)
38     if err != nil {
39        log.Println("ERROR:", err)
40        return
41     }
42     defer resp.Body.Close()
43
44     // Decode the JSON response into our struct type.
45     var gr gResponse
46     err = json.NewDecoder(resp.Body).Decode(&gr)

47     if err != nil {
48         log.Println("ERROR:", err)
49         return
50     }
51
52     fmt.Println(gr)
53 }
The code on line 37 in listing 8.24 shows a program that makes an HTTP Get call that retrieves a JSON document from Google. Then, using the NewDecoder function and Decode method on line 46, the JSON document from the response is decoded into a variable of the struct type that’s declared on line 26. On line 52 the value of the variable is written to stdout.
If you look at the type declarations for gResponse and gResult on lines 26 and 14, you’ll notice strings declared at the end of each field. These are called tags, and they’re the mechanism to provide metadata about the field mapping between the JSON document and the struct type. If tags are not present, the decoding and encoding process will attempt to match against the field names directly in a case-insensitive way. When a mapping can’t be made, the field in the struct value will contain its zero value.
Thanks to the standard library, all of the technical aspects of performing HTTP Get calls and decoding JSON into struct types are taken care of. Let’s look at the declaration of both the NewDecoder function and Decode method.
// NewDecoder returns a new decoder that reads from r.
//
// The decoder introduces its own buffering and may
// read data from r beyond the JSON values requested.
func NewDecoder(r io.Reader) *Decoder

// Decode reads the next JSON-encoded value from its
// input and stores it in the value pointed to by v.
//
// See the documentation for Unmarshal for details about
// the conversion of JSON into a Go value.
func (dec *Decoder) Decode(v interface{}) error
In listing 8.25 you can see that the NewDecoder function accepts any value whose type implements the io.Reader interface. In the next section you’ll learn more about the io.Reader and io.Writer interfaces. For now, understand that many different types from within the standard library implement these interfaces, including types from the http package. When types implement these particular interfaces, you get a lot of support and functionality for free.
The NewDecoder function returns a pointer value of type Decoder. Since Go supports compound statement calls, the return value from the NewDecoder function can be used to call the Decode method immediately without the need to declare a variable first. In listing 8.25 you can see that the Decode method accepts a value of type interface{} and returns an error.
As described in chapter 5, the empty interface is an interface implemented by every type. This means the Decode method can accept values of any type. Through the use of reflection, the Decode method will inspect the type information about the value you pass in. Then as it reads the JSON response, it will decode the response into a value of that type. This means you don’t need to create values yourself; Decode can do this for you.
var gr *gResponse
err = json.NewDecoder(resp.Body).Decode(&gr)
In listing 8.26 we pass the address of a pointer variable of type gResponse, with the value of nil, to the Decode method. After the method call, the value of the pointer variable will be assigned to a value of type gResponse and initialized based on the JSON document being decoded.
Sometimes the JSON documents you’re working with come to you as a string value. In these cases, you need to convert the string into a byte slice ([]byte) and use the Unmarshal function from the json package.
01 // This sample program demonstrates how to decode a JSON string.
02 package main
03
04 import (
05     "encoding/json"
06     "fmt"
07     "log"
08 )
09
10 // Contact represents our JSON string.
11 type Contact struct {
12     Name    string `json:"name"`
13     Title   string `json:"title"`
14     Contact struct {
15         Home string `json:"home"`
16         Cell string `json:"cell"`
17     } `json:"contact"`
18 }
19
20 // JSON contains a sample string to unmarshal.
21 var JSON = `{
22     "name": "Gopher",
23     "title": "programmer",
24     "contact": {
25         "home": "415.333.3333",
26         "cell": "415.555.5555"

27     }
28 }`
29
30 func main() {
31     // Unmarshal the JSON string into our variable.
32     var c Contact
33     err := json.Unmarshal([]byte(JSON), &c)
34     if err != nil {
35         log.Println("ERROR:", err)
36         return
37     }
38
39     fmt.Println(c)
40 }
In listing 8.27 we have an example that takes a JSON document inside of a string variable and uses the Unmarshal function to decode the JSON into a struct type value. If you run the program, you’ll get the following output.
{Gopher programmer {415.333.3333 415.555.5555}}
Sometimes it’s not possible to declare a struct type and you need more flexibility to work with the JSON document. In these cases you can decode or unmarshal the JSON document into a map variable.
01 // This sample program demonstrates how to decode a JSON string.
02 package main
03
04 import (
05     "encoding/json"
06     "fmt"
07     "log"
08 )
09
10 // JSON contains a sample string to unmarshal.
11 var JSON = `{
12     "name": "Gopher",
13     "title": "programmer",
14     "contact": {
15         "home": "415.333.3333",
16         "cell": "415.555.5555"
17     }
18 }`
19
20 func main() {
21     // Unmarshal the JSON string into our map variable.
22     var c map[string]interface{}
23     err := json.Unmarshal([]byte(JSON), &c)
24     if err != nil {

25         log.Println("ERROR:", err)
26         return
27     }
28
29     fmt.Println("Name:", c["name"])
30     fmt.Println("Title:", c["title"])
31     fmt.Println("Contact")
32     fmt.Println("H:", c["contact"].(map[string]interface{})["home"])
33     fmt.Println("C:", c["contact"].(map[string]interface{})["cell"])
34 }
In listing 8.29 we’ve changed the program from listing 8.27 to use a map variable instead of our struct type variable. The map variable is declared as a map with a key of type string and a value of type interface{}. This means the map can store any type of value for any given key. Though this gives you great flexibility when working with JSON documents, it has one minor drawback. Look at the syntax required to access the home field from the contact subdocument.
fmt.Println("\tHome:", c["contact"].(map[string]interface{})["home"])
Because the value for each key is of type interface{}, you need to convert the value to the proper native type in order to work with the value. Listing 8.30 shows how you need to convert the value of the contact key to another map with a key of type string and a value of type interface{}. This can make using maps that contain JSON documents sometimes unfriendly to work with. But if you never need to dig into the JSON documents you’re working with or you plan to do very little manipulation, using a map can be fast, and then there’s no need to declare new types.
The second aspect of working with JSON we’ll explore is using the MarshalIndent function from the json package. This comes in handy when you want to publish a pretty-printed JSON document from a Go map or struct type value. Marshaling is the process of transforming data into a JSON string. Here’s an example that converts a map type into a JSON string.
01 // This sample program demonstrates how to marshal a JSON string.
02 package main
03
04 import (
05     "encoding/json"
06     "fmt"
07     "log"
08 )
09
10 func main() {

11     // Create a map of key/value pairs.
12     c := make(map[string]interface{})
13     c["name"] = "Gopher"
14     c["title"] = "programmer"
15     c["contact"] = map[string]interface{}{
16         "home": "415.333.3333",
17         "cell": "415.555.5555",
18     }
19
20     // Marshal the map into a JSON string.
21     data, err := json.MarshalIndent(c, "", "    ")
22     if err != nil {
23         log.Println("ERROR:", err)
24         return
25     }
26
27     fmt.Println(string(data))
28 }
Listing 8.31 shows how to use the MarshalIndent function from the json package to convert a map to a JSON string. The MarshalIndent function returns a byte slice that represents the JSON string and an error value. Here’s a look at the declaration of the MarshalIndent function from the json package.
// MarshalIndent is like Marshal but applies Indent to format the output
func MarshalIndent(v interface{}, prefix, indent string)
                                                       ([]byte, error) {
You can see the use of the empty interface type again as the parameter to the MarshalIndent function. The MarshalIndent function uses reflection to determine how to transform the map type into a JSON string.
If you don’t need the pretty-print formatting for your JSON encoding, the json package also provides a function called Marshal. This function is good for producing JSON that could be returned in a network response, like a web API. The Marshal function works the same as the MarshalIndent function, but without the parameters for prefix and indent.
If you’re working with JSON or even XML, all the support you need to decode, unmarshal, and marshal data in these formats is provided to you already by the standard library. With each new release of Go, these packages get faster and faster, making working with JSON and XML a great choice. Thanks to the reflection package and the support for tags, it’s easy to declare struct types and map those fields to the document fields you need to consume and publish. Since the json and xml packages provide support for the io.Reader and io.Writer interfaces, it doesn’t matter where your JSON and XML documents are coming from. Everything is supported to make working with JSON and XML painless.
One of the things that makes the UNIX-based operating systems so great is the idea that the output of one program can be the input for another. This philosophy has created a suite of simple programs that do only one thing and do it really well. Then, by composing programs together, scripts can be created to do some amazing things. In this world the stdout and stdin devices serve as the conduits to move data between processes.
This same idea has been extended to the io package, and the functionality that it provides is amazing. The package supports working with streams of data very efficiently, regardless of what the data is, where it’s coming from, or where it’s going. Instead of stdout and stdin, you have two interfaces called io.Writer and io.Reader. Values from types that implement these interfaces can be used against all the functionality provided by the io package or any function and method in any other package that also accepts values of these interface types. That’s the real beauty of creating functionality and APIs from interfaces types. Developers can compose on top of existing functionality, take advantage of what exists, and focus on the business problems they’re trying to solve.
With this in mind, let’s start by looking at the declaration for the io.Writer and io.Reader interfaces and then examine code examples that showcase some of the amazing functionality of the io package.
The io package is built around working with values from types that implement the io.Writer and io.Reader interfaces. The functions and methods that make up the io package have no understanding about the type of data nor how that data is physically read and written. This is thanks to the abstraction that the io.Writer and io.Reader interfaces provide. Let’s start by looking at the declaration of the io.Writer interface.
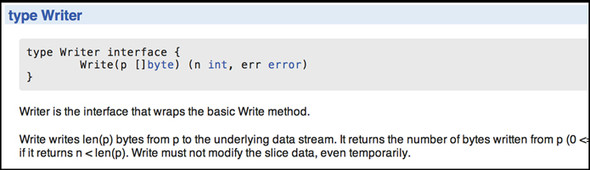
type Writer interface {
        Write(p []byte) (n int, err error)
}
Listing 8.33 shows the declaration of the io.Writer interface. The interface declares a single method called Write that accepts a byte slice and returns two values. The first value is the number of bytes written, and the second value is an error. The rules for implementing this method are as follows.
Write writes len(p) bytes from p to the underlying data stream. It
returns the number of bytes written from p (0 <= n <= len(p)) and any
error encountered that caused the write to stop early. Write must
return a non-nil error if it returns n < len(p). Write must not modify
the slice data, even temporarily.
The rules in listing 8.34 come from the standard library. They mean that the implementation of the Write method should attempt to write the entire length of the byte slice that’s passed in. But if that isn’t possible, then the method must return an error. The number of bytes reported as written can be less than the length of the byte slice, but never more. Finally, the byte slice must never be modified in any way.
Let’s look at the declaration of the Reader interface.
type Reader interface {
        Read(p []byte) (n int, err error)
}
The io.Reader interface in listing 8.35 declares a single method, Read, that accepts a byte slice and returns two values. The first value is the number of bytes read and the second value is an error. The rules for implementing this method are as follows.
(1) Read reads up to len(p) bytes into p. It returns the number of bytes
read (0 <= n <= len(p)) and any error encountered. Even if Read returns
n < len(p), it may use all of p as scratch space during the call. If
some data is available but not len(p) bytes, Read conventionally
returns what is available instead of waiting for more.

(2) When Read encounters an error or end-of-file condition after
successfully reading n > 0 bytes, it returns the number of bytes read.
It may return the (non-nil) error from the same call or return the
error (and n == 0) from a subsequent call. An instance of this general
case is that a Reader returning a non-zero number of bytes at the end
of the input stream may return either err == EOF or err == nil. The next
Read should return 0, EOF regardless.

(3) Callers should always process the n > 0 bytes returned before
considering the error err. Doing so correctly handles I/O errors that
happen after reading some bytes and also both of the allowed EOF
behaviors.

(4) Implementations of Read are discouraged from returning a zero byte
count with a nil error, and callers should treat that situation as a
no-op.
There are four rules listed in the standard library about implementing the Read method. The first rule states that the implementation should attempt to read the entire length of the byte slice that’s passed in. It’s okay to read less than the entire length, and it shouldn’t wait to read the entire length if that much data isn’t available at the time of the call.
The second rule provides guidance about end of file (EOF) read conditions. When the last byte is read, two options are available. Read either returns the final bytes with the proper count and EOF for the error value, or returns the final bytes with the proper count and nil for the error value. In the latter case, the next read must return no bytes with the count of 0 and EOF for the error value.
The third rule is a suggestion for those who make the Read call. Any time the Read method returns bytes, those bytes should be processed first before checking the error value for an EOF or other error value. Finally, the fourth rule requests that implementations of the Read method never return a 0 byte read count with an error value of nil. Reads that result in no bytes read should always return an error.
Now that you know what the io.Writer and io.Reader interfaces look like and how they’re expected to behave, let’s look at some examples of how you can use these interfaces and the io package in your programs.
This example shows how different packages from the standard library work together by providing support for values from types that implement the io.Writer interface. The example uses the bytes, fmt, and os packages to buffer, concatenate, and write a string to stdout.
01 // Sample program to show how different functions from the
02 // standard library use the io.Writer interface.
03 package main
04
05 import (
06     "bytes"
07     "fmt"
08     "os"
09 )
10
11 // main is the entry point for the application.
12 func main() {
13     // Create a Buffer value and write a string to the buffer.
14     // Using the Write method that implements io.Writer.
15     var b bytes.Buffer
16     b.Write([]byte("Hello "))
17
18     // Use Fprintf to concatenate a string to the Buffer.
19     // Passing the address of a bytes.Buffer value for io.Writer.
20     fmt.Fprintf(&b, "World!")
21
22     // Write the content of the Buffer to the stdout device.
23     // Passing the address of a os.File value for io.Writer.
24     b.WriteTo(os.Stdout)
25 }
When you run the program in listing 8.37, you’ll get the following output.
Hello World!
This program is using three packages from the standard library to write “Hello World!” to the terminal window. The program starts on line 15 by declaring a variable of type Buffer from the bytes package, which is initialized to its zero value. On line 16 a byte slice is created and initialized with the string "Hello". The byte slice is passed into the Write method and becomes the initial content for the buffer.
Line 20 uses the Fprintf function from the fmt package to append the string "World!" to the buffer. Let’s look at the declaration of the Fprintf function.
// Fprintf formats according to a format specifier and writes to w. It
// returns the number of bytes written and any write error encountered.
func Fprintf(w io.Writer, format string, a ...interface{})
                                                     (n int, err error)
What’s important to note is the first parameter of the Fprintf function. It accepts values from types that implement the io.Writer interface. This means that the Buffer type from the bytes package must implement this interface since we’re able to pass the address of a variable of that type through. In the source code for the bytes package, we should then find the Write method declared for the Buffer type.
// Write appends the contents of p to the buffer, growing the buffer
// as needed. The return value n is the length of p; err is always
// nil. If the buffer becomes too large, Write will panic with ...
func (b *Buffer) Write(p []byte) (n int, err error) {
    b.lastRead = opInvalid
    m := b.grow(len(p))
    return copy(b.buf[m:], p), nil
}
Listing 8.40 shows the current implementation of the Write method for the Buffer type that implements the io.Writer interface. Because of the implementation of this method, we can pass pointers of type Buffer as the first parameter to Fprintf. We use the Fprintf function in our example to append the string "World!" to the internal buffer of the Buffer type variable via the implementation of the Write method.
Let’s review the last line of listing 8.37, which writes the entire buffer to stdout.
22 // Write the content of the Buffer to the stdout device.
23     // Passing the address of a os.File value for io.Writer.
24     b.WriteTo(os.Stdout)
25 }
On line 24 of listing 8.37, the contents of the Buffer type variable are written to stdout using the WriteTo method. This method accepts a value that implements the io.Writer interface. In our program we pass the value of the Stdout variable from the os package.
var (
    Stdin  = NewFile(uintptr(syscall.Stdin), "/dev/stdin")
    Stdout = NewFile(uintptr(syscall.Stdout), "/dev/stdout")
    Stderr = NewFile(uintptr(syscall.Stderr), "/dev/stderr")
)
The declaration of these variables comes from the type returned by the NewFile function.
// NewFile returns a new File with the given file descriptor and name.
func NewFile(fd uintptr, name string) *File {
    fdi := int(fd)
    if fdi < 0 {
        return nil
    }
    f := &File{&file{fd: fdi, name: name}}
    runtime.SetFinalizer(f.file, (*file).close)
    return f
}
As you can see in listing 8.43, the NewFile function returns a pointer of type File. This is the type of the Stdout variable. Since we can pass pointers of this type as a parameter to the WriteTo method, it must implement the io.Writer interface. In the source code for the os package, we should find the Write method.
// Write writes len(b) bytes to the File.
// It returns the number of bytes written and an error, if any.
// Write returns a non-nil error when n != len(b).
func (f *File) Write(b []byte) (n int, err error) {
    if f == nil {
        return 0, ErrInvalid
    }
    n, e := f.write(b)
    if n < 0 {
        n = 0
    }
    if n != len(b) {
        err = io.ErrShortWrite
    }

    epipecheck(f, e)

    if e != nil {

        err = &PathError{"write", f.name, e}
    }
    return n, err
}
Sure enough, listing 8.44 shows the implementation of the io.Writer interface for pointers of type File. Look again at line 24 from listing 8.37.
22     // Write the content of the Buffer to the stdout device.
23     // Using the io.Writer implementation for os.File.
24     b.WriteTo(os.Stdout)
25 }
You see that the WriteTo method is able to write the contents of the buffer to stdout which results in the string "Hello World!" being displayed on our terminal window. The method will use the implementation of the Write method from the File type via the interface value.
This example shows the beauty of interfaces and the power they bring to the language. Thanks to the implementation of the interface by both the bytes.Buffer and os.File types, we were able to reuse functionality in the standard library and have these types work together to implement a solution. Next let’s look at an example that’s a bit more practical.
A command-line tool called curl can be found on both Linux and Mac OS X systems. The tool allows you to specify a URL, and it will perform an HTTP request and save the content. By using the http, io, and os packages, you can write your own version of curl in just a few lines of code.
Let’s take a look at an example that implements a basic version of curl.
01 // Sample program to show how to write a simple version of curl using
02 // the io.Reader and io.Writer interface support.
03 package main
04
05 import (
06     "io"
07     "log"
08     "net/http"
09     "os"
10 )
11
12 // main is the entry point for the application.
13 func main() {
14     // r here is a response, and r.Body is an io.Reader.
15     r, err := http.Get(os.Args[1])

16     if err != nil {
17         log.Fatalln(err)
18     }
19
20     // Create a file to persist the response.
21     file, err := os.Create(os.Args[2])
22     if err != nil {
23         log.Fatalln(err)
24     }
25     defer file.Close()
26
27     // Use MultiWriter so we can write to stdout and
28     // a file on the same write operation.
29     dest := io.MultiWriter(os.Stdout, file)
30
31     // Read the response and write to both destinations.
32     io.Copy(dest, r.Body)
33     if err := r.Body.Close(); err != nil {
34         log.Println(err)
35     }
36 }
Listing 8.46 shows a very bare-bones implementation of curl that can be used to download, display, and save the content of any HTTP Get request. The example will write the response to a file and to stdout at the same time. To keep the example small, the program doesn’t check for valid command-line arguments nor provide switches for advanced options.
On line 15 the program takes the first argument from the command line and performs an HTTP Get. If the first argument is a URL and there are no errors, the variable r contains the response. On line 21 we open a file based on the second command-line parameter. If we’re successful in opening the file, then on line 25 we schedule the closing of the file with the defer statement.
Since we want to write the content of the request to both stdout and to our file, on line 29 we combine the file and stdout values together into a single io.Writer value by using the MultiWriter function from the io package. On line 33 we use the Copy function from the io package to read the content from the response body and to write that to both destinations. With one call to Copy, thanks to the value provided by the MultiWriter function we can use a single call that writes the content to both destinations.
Thanks to the support already provided by the io package and the implementation of the io.Writer and io.Reader interfaces by the http and os packages, we don’t need to write any code to perform these lower-level functions. We can leverage everything that already exists and just focus on the problem we’re trying to solve. If we support these interfaces with our own types, we get a huge amount of functionality for free.
There’s an incredible amount of functionality that can be found in the io package, and it can all be accessed through values from types that implement the io.Writer and io.Reader interfaces. Other packages such as the http package follow a similar pattern, declaring interfaces as part of the packages API and providing support for using the io package as well. It’s worth your time to explore what’s provided by the standard library and how it’s implemented—not only to save you from reinventing the wheel, but also to learn idiomatic Go from the language designers for your own packages and APIs.