In this chapter
In chapter 2 you got an overview of the syntax and language structure of Go. Now you’ll dive deeper into how code is organized into packages and how you interact with those packages. Packages are a critical concept in Go. The idea is to separate semantic units of functionality into different packages. When you do this, you enable code reuse and control the use of the data inside each package.
Before we get into the particulars, you should already be familiar with the command prompt or system shell, and you should have Go installed according to the guidelines in the preface of this book. If you’re ready, let’s start by understanding what a package is and why it’s important in the Go ecosystem.
All Go programs are organized into groups of files called packages, so that code has the ability to be included into other projects as smaller reusable pieces. Let’s look at the packages that make up Go’s http functionality in the standard library:
net/http/
    cgi/
    cookiejar/
        testdata/
    fcgi/
    httptest/
    httputil/
    pprof/
    testdata/
These directories contain a series of related files with the .go extension, and provide clear separation of smaller units of code relating to the implementation of HTTP servers, clients, and utilities to test and profile them. For example, the cookiejar package contains code related to storing and retrieving cookies from a web session. Each package can be imported and used individually so that developers can import only the specific functionality that they need. If you’re implementing an HTTP client, you only need to import the http package.
All .go files must declare the package that they belong to as the first line of the file excluding whitespace and comments. Packages are contained in a single directory. You may not have multiple packages in the same directory, nor may you split a package across multiple directories. This means that all .go files in a single directory must declare the same package name.
The convention for naming your package is to use the name of the directory containing it. This has the benefit of making it clear what the package name is when you import it. If we continue with our example from the net/http package, all the files contained within the http directory are a part of the http package. When naming your packages and their directories, you should use short, concise, lowercase names, because they will be typed often while you’re developing. The packages under net/http are great examples of concise names such as cgi, httputil, and pprof.
Keep in mind that a unique name is not required, because you import the package using its full path. Your package name is used as the default name when your package is imported, but it can be overridden. This is beneficial when you need to import multiple packages with the same name. We’ll discuss how this is done in section 3.2.
The package name main has special meaning in Go. It designates to the Go command that this package is intended to be compiled into a binary executable. All of the executable programs you build in Go must have a package called main.
When the main package is encountered by the compiler, it must also find a function called main(); otherwise a binary executable won’t be created. The main() function is the entry point for the program, so without one, the program has no starting point. The name of the final binary will take the name of the directory the main package is declared in.
The Go documentation uses the term command frequently to refer to an executable program—like a command-line application. This can be confusing for new Go developers who are reading the documentation. Remember that in Go, a command is any executable program, in contrast to a package, which generally means an importable semantic unit of functionality.
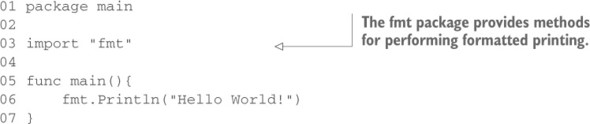
Go ahead and try it out. First start by creating a file called hello.go inside GOPATH/ src/hello/, and type the contents of listing 3.1 into it. This is the traditional Hello World! application again, but as you look at it, pay attention to the package declaration and import statements.
Don’t forget that you can get more details on a package by visiting http://golang.org/pkg/fmt/ or running godoc fmt from your terminal.
Once you’ve saved the file, you can run the command go build from within the GOPATH/src/hello/ directory. When it completes, you should see a binary file. On Unix, Linux, and Mac OS X this file will be named hello, whereas on Windows it will be called hello.exe. You can now run this application and see Hello World! printed to your console.
Had you named the package something other than main, like hello for instance, you’d have been telling the compiler this is just a package, not a command.
01 package hello
02
03 import "fmt"
04
05 func main(){
06     fmt.Println("Hello, World!")
07 }
Now that we’ve looked at the organization of code into packages, we’ll take a look at how to import these individual packages so that you can access the code contained within them. The import statement tells the compiler where to look on disk to find the package you want to import. You import packages by using the keyword import, which tells the compiler that you want to reference the code contained within the package at that file location. If you need to import more than one package, the idiomatic way of doing so is to wrap the import statements in an import block, as demonstrated here.

Packages are found on disk based on their relative path to the directories referenced by the Go environment. Packages in the standard library are found under where Go is installed on your computer. Packages that are created by you or other Go developers live inside the GOPATH, which is your own personal workspace for packages.
Let’s take a look at an example. If Go was installed under /usr/local/go and your GOPATH was set to /home/myproject:/home/mylibraries, the compiler would look for the net/http package in the following order:

The compiler will stop searching once it finds a package that satisfies the import statement. The important thing to remember is that the Go installation directory is the first place the compiler looks and then each directory listed in your GOPATH in the order that they’re listed.
If the compiler searches your GOPATH and never finds the package that you’ve referenced, you’ll get an error when you try to run or build your program. You’ll see how to use the go get command to fix those problems later in this chapter.
There’s a huge trend toward sharing code via distributed version control systems (DVCS) such as sharing sites like GitHub, Launchpad, and Bitbucket. The Go tooling has built-in support for fetching source code from these sites and others. The import path can be used by the Go tooling to determine where the code you need fetched is on the network.
import "github.com/spf13/viper"
When you try to build a program with this import path, the go build command will search the GOPATH for this package location on disk. The fact that it represents a URL to a repository on GitHub is irrelevant as far as the go build command is concerned. When an import path contains a URL, the Go tooling can be used to fetch the package from the DVCS and place the code inside the GOPATH at the location that matches the URL. This fetching is done using the go get command. go get will fetch any specified URL or can be used to fetch the dependencies a package is importing that are go-gettable. Since go get is recursive, it can walk down the source tree for a package and fetch all the dependencies it finds.
What happens when you need to import multiple packages with the same name? For example, you could need a network/convert package for converting data that’s read from a network and a file/convert package for converting data read from text files. When this is the case, both of these packages can be imported by using named imports. This is performed by giving one of the packages a new name to the left of the import statement.
As an example, let’s say you were already using the fmt package that comes as part of the standard library. Now you need to import a package named fmt that you had created as part of your own project. You can import your own fmt package by renaming the import, as demonstrated in the next listing.
01 package main
02
03 import (
04     "fmt"
05     myfmt "mylib/fmt"
06 )
07
08 func main() {
09     fmt.Println("Standard Library")
10     myfmt.Println("mylib/fmt")
11 }
The Go compiler will fail the build and output an error whenever you import a package that you don’t use. The Go team considers this a feature to eliminate code bloat from packages that are imported but not used. Although this feature is occasionally annoying, the Go team has put a great deal of effort into making decisions to prevent some of the problems that you encounter in other languages. You don’t want to have an unnecessarily large binary, filled with unused libraries, and they feel that if it’s worth the compiler telling you about, it’s worth failing the build. Anyone who has compiled a large C program knows just how hard it can be to pinpoint the things that matter in a sea of compiler warnings.
Sometimes you may need to import a package that you don’t need to reference identifiers from. You’ll see why this might be useful in the next section. When this is the case, you can use the blank identifier _ to rename an import.
The _ (underscore character) is known as the blank identifier and has many uses within Go. It’s used when you want to throw away the assignment of a value, including the assignment of an import to its package name, or ignore return values from a function when you’re only interested in the others.
Each package has the ability to provide as many init functions as necessary to be invoked at the beginning of execution time. All the init functions that are discovered by the compiler are scheduled to be executed prior to the main function being executed. The init functions are great for setting up packages, initializing variables, or performing any other bootstrapping you may need prior to the program running.
An example of this is database drivers. They register themselves with the sql package when their init function is executed at startup because the sql package can’t know about the drivers that exist when it’s compiled. Let’s look at an example of what an init function might do.
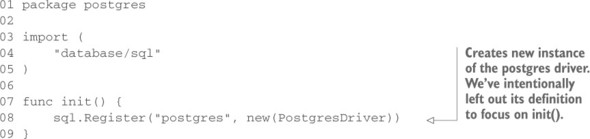
This code lives inside your pretend database driver for the PostgreSQL database. When a program imports this package, the init function will be called, causing the database driver to be registered with Go’s sql package as an available driver.
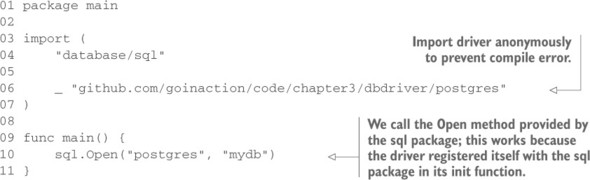
In the program that we write using this new database driver, we’ll use the blank identifier to import the package so the new driver is included with the sql package. As stated earlier, you can’t import a package that you aren’t using, so renaming the import with the blank identifier allows the init function to be discovered and scheduled to run without the compiler issuing an error about unused imports.
Now we can tell the sql.Open method to use this driver.
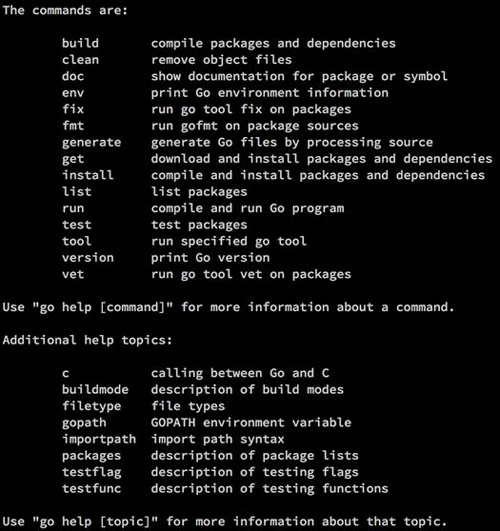
We’ve been working with the go tool for a few chapters now, but we haven’t explored all it can do. Let’s dive a little deeper into this diminutively named powerhouse and explore more of its capabilities. From a shell prompt, type the go command with no arguments:
$ go
As you can see in figure 3.1, there are a lot of features buried in the go tooling.
Looking through the list, you can see that there really is a compiler in there; it’s used by the build command. The build and clean commands do exactly what you’d expect them to do. Try them now using the source code from listing 3.2:
go build hello.go
You might not want that file hanging around when it’s time to check your code into source control. To get rid of it, use the clean command:
go clean hello.go
After calling clean, the executable program is gone. Let’s take a closer look at some of the features of the go tool, and ways that you can save time when you’re using it. For the next examples, we’ll use the sample code in the following listing.
01 package main
02
03 import (
04     "fmt"
05     "io/ioutil"
06     "os"
07
08     "github.com/goinaction/code/chapter3/words"
09 )
10
11 // main is the entry point for the application.
12 func main() {
13     filename := os.Args[1]
14
15     contents, err := ioutil.ReadFile(filename)
16     if err != nil {
17         fmt.Println(err)
18         return
19     }
20
21     text := string(contents)
22
23     count := words.CountWords(text)
24     fmt.Printf("There are %d words in your text. \n", count)
25 }
If you’ve downloaded the source code for the book, this package should be at GOPATH/src/github.com/goinaction/code/chapter3/words. Make sure you have it there to follow along.
Most of the commands that are part of the Go tooling take a package specifier as an argument. Look closer at the commands we’ve just used, and you’ll see one of the shortcuts built into the tooling. You can omit the filename of the source code file that you want to build, and the go tool will default to the current package:
go build
Building a package is a common practice, and the package can also be specified directly:
go build github.com/goinaction/code/chapter3/wordcount
You can also specify wildcards in your package specifiers. Three periods in your package specifier indicate a pattern matching any string. For example, the following command will build every package under the chapter3 directory:
go build github.com/goinaction/code/chapter3/...
Instead of a package specifier, you can also use a path shortcut as an argument to most of the Go commands. For example, you could achieve the same effect with these two commands:
go build wordcount.go
go build .
To execute this program, you need to run the wordcount or wordcount.exe program that was created after the build. But there’s a different command that can perform both operations in a single call:
go run wordcount.go
The go run command both builds and executes the program contained in wordcount.go, which saves a lot on typing.
You’ll use the go build and go run commands the most when you’re developing. Let’s take a look at a few of the other available commands and see what they can do.
You’ve seen how to compile and run your Go programs using the convenient go tool. But that handy little developer tool has a lot of other tricks hidden inside.
It won’t write code for you, but once you’ve written some code, the vet command will check your code for common errors. Let’s look at the types of errors vet can catch:
Let’s look at a mistake many new Go developers make. The fmt.Printf function is a great way to produce formatted output, but the function requires you to remember all the different format specifiers. The following listing is an example.
01 package main
02
03 import "fmt"
04
05 func main() {
06     fmt.Printf("The quick brown fox jumped over lazy dogs", 3.14)
07 }
This program inserts the floating-point number 3.14, but there’s no placeholder in the formatted string. If you run go vet against this source code, you get the following message:
go vet main.go

main.go:6: no formatting directive in Printf call
The go vet tool won’t keep you from making huge errors in logic, or from creating buggy code. However, as you can see from the last example, it does catch some common errors quite nicely. It’s a great idea to get in the habit of running go vet on your code base before you commit it to a source repository.
The fmt command is a favorite in the Go community. Instead of arguing about where curly braces should go, or whether to use tabs or spaces when you indent, the fmt tool makes these decisions moot by applying a predetermined layout to Go source code. To invoke this code formatter, type go fmt followed by a file or package specification. The fmt command will automatically format the source code files you specify and save them. Here’s a before-and-after snapshot of a few lines of code run through go fmt:
if err != nil {
    return err
}
After running go fmt on this code, you’ll get the following:
if err != nil {
return err
}
Many Go developers configure their development environment to perform a go fmt on save or before committing to a code repository. Do yourself a favor and configure this right now.
There’s another tool that will make your Go development process easier. Go has two ways to deliver documentation to developers. If you’re working at a command prompt, you can use the go doc command to print documentation directly to your terminal session. You can view a quick reference for a command or package without leaving your terminal. But if a browsable interface is more your speed, you can use the godoc program to start a web server with a clickable index of Go packages. The godoc web server gives you a fully navigable web version of the documentation for all the Go source code installed in your system.
If you’re the kind of developer who has a text editor open and a terminal session open right next to it (or a text editor open in your terminal session), then go doc is going to be your tool of choice. The first time you need to read a Unix tar file from your Go application, you’ll be happy that you can access the documentation for the archive/tar package by simply typing this:
go doc tar
Running this command produces the following output, directly to the terminal:
PACKAGE DOCUMENTATION

package tar // import "archive/tar"

Package tar implements access to tar archives. It aims to cover most of the
variations, including those produced by GNU and BSD tars.

References:

    http://www.freebsd.org/cgi/man.cgi?query=tar&sektion=5
    http://www.gnu.org/software/tar/manual/html_node/Standard.html
    http://pubs.opengroup.org/onlinepubs/9699919799/utilities/pax.html
var ErrWriteTooLong = errors.New("archive/tar: write too long") ...
var ErrHeader = errors.New("archive/tar: invalid tar header")
func FileInfoHeader(fi os.FileInfo, link string) (*Header, error)
func NewReader(r io.Reader) *Reader
func NewWriter(w io.Writer) *Writer
type Header struct { ... }
type Reader struct { ... }
type Writer struct { ... }
You can skim through the documentation and find the information you need without breaking your workflow.
The Go documentation is also available in a browsable format. Sometimes it’s easier to get the whole picture of a package or function when you can click around and see all the related details. For those cases, you’ll want to use godoc as a web server. If you prefer to get your documentation from a web browser in a clickable format, then this will be your favorite way to get to the documentation.
To start your own documentation server, type the following command into a terminal session:
godoc -http=:6060
This command instructs godoc to start a web server on port 6060. If you open your web browser and navigate to http://localhost:6060, you’ll see a web page with documentation for both the Go standard libraries and any Go source that lives in your GOPATH.
If the documentation in figure 3.2 looks familiar to you, it’s because a slightly modified version of godoc is serving up the documentation for the Go website. To navigate to the documentation for a specific package, just click the Packages link at the top of the page.
The best part of Go’s documentation tool is that it works for your code, too. If you follow simple conventions while writing your code, it will automatically include your comments in the Go documentation generated by godoc.
To be included in the godoc generated documentation, your code needs to be documented by adding comments that follow a specific convention. We won’t go through the whole convention in this chapter, but we’ll hit the highlights.
Start by adding comments directly above the identifiers you want to document. This works for packages, functions, types, and global variables. Comments can be started using either two slashes, or using the slash-asterisk style.
// Retrieve connects to the configuration repository and gathers
// various connection settings, usernames, passwords. It returns a
// config struct on success, or an error.
func Retrieve() (config, error) {
    // ... omitted
}
In this example, we show the idiomatic way to document a function in Go. The documentation for the function immediately precedes the function and is written in complete sentences. If you want to add a large body of text to document your package, include a file called doc.go that declares the same package as your project, and put your package introduction as a comment before the package declaration:
/*
    Package usb provides types and functions for working with USB
    devices.  To connect to a USB device start by creating a new USB
    connection with NewConnection
    ...
*/
package usb
This package documentation will be shown before any type or function documentation is displayed for your package. It also demonstrates using the slash-asterisk type of comment. You can read more about creating good documentation for your code by searching for golang documentation in Google.
Modern developers don’t code in a vacuum, and the Go tooling recognizes and embraces this fact. The concept of packages extends beyond your local development environment, thanks to the go tool. Let’s look at a few conventions to follow in order to be a good citizen in a distributed development environment.
Once you start cranking out awesome Go code, you’re probably going to want to share that code with the rest of the Go community. It’s really easy as long as you follow a few simple steps.
When you’re using go get, you specify the full path to the package that should be imported. This means that when you create a repository that you intend to share, the package name should be the repository name, and the package’s source should be in the root of the repository’s directory structure.
A common mistake that new Go developers make is to create a code or src directory in their public repository. Doing so will make the package’s public import longer. Instead, just put the package source files at the root of the public repository.
It’s common in Go to see packages that are relatively small by the standards of other programming languages. Don’t be afraid to make a package that has a small API or performs only a single task. That’s normal and expected.
Just like any other open source repository, people will look at your code to gauge the quality of it before they try it out. You need to be running go fmt before checking anything in. It makes your code readable and puts everyone on the same page when reading source code.
Go developers use godoc to read documentation, and http://godoc.org to read documentation for open source packages. If you’ve followed go doc best practices in documenting your code, your packages will appear well documented when viewed locally or online, and people will find it easier to use.
The community has been hard at work since the release of Go 1.0 to provide Go tooling that makes life easier for developers. Many of these tools focus on helping with dependency management. The most popular tools today are godep by Keith Rarick, vendor by Daniel Theophanes, and a tool by Gustavo Niemeyer called gopkg.in, which helps package authors publish different versions of their packages.
As a call to action, with version 1.5 the Go language team started to experiment with new build options and features to provide better internal tooling support for dependency management. While we wait today to see where these experiments lead, there are existing tools that provide the ability to manage, build, and test Go code in a reproducible way.
Community tools such as godep and vendor have solved the dependency problem by using a technique called vendoring and import path rewriting. The idea is to copy all the dependencies into a directory inside the project repo, and then rewrite any import paths that reference those dependencies by providing the location inside the project itself.
$GOPATH/src/github.com/ardanstudios/myproject
    |-- Godeps
    |   |-- Godeps.json
    |   |-- Readme
    |   |-- _workspace
    |       |-- src
    |           |-- bitbucket.org
    |           |-- ww
    |           |   |-- goautoneg
    |           |       |-- Makefile
    |           |       |-- README.txt
    |           |       |-- autoneg.go
    |           |       |-- autoneg_test.go
    |           |-- github.com
    |               |-- beorn7
    |                   |-- perks
    |                       |-- README.md
    |                       |-- quantile

    |                           |-- bench_test.go
    |                           |-- example_test.go
    |                           |-- exampledata.txt
    |                           |-- stream.go
    |
    |-- examples
    |-- model
    |-- README.md
    |-- main.go
Listing 3.9 shows a typical source tree when using godep to vendor the dependencies for a project. You can see how godep created a directory called Godeps. The source code for the dependencies that the tooling vendored is located inside another set of directories called _workspace/src.
Next, if you look at the import statements that are declared inside of main.go for these dependencies, you’ll see that some things needed to change.
01 package main
02
03 import (
04     "bitbucket.org/ww/goautoneg"
05     "github.com/beorn7/perks"
06 )
01 package main
02
03 import (
04     "github.ardanstudios.com/myproject/Godeps/_workspace/src/
                                             bitbucket.org/ww/goautoneg"
05     "github.ardanstudios.com/myproject/Godeps/_workspace/src/
                                                github.com/beorn7/perks"
06 )
Before the dependencies were vendored, the import statements used the canonical path for the package. The code was physically located on disk within the scope of GOPATH. After vendoring, import path rewriting became necessary to reference the packages, which are now physically located on disk inside the project itself. You can see these imports are very large and tedious to use.
With vendoring, you have the ability to create reproducible builds, since all the source code required to build the binary is housed inside the single project repo. One other benefit of vendoring and import path rewriting is that the project repo is still go-gettable. When go get is called against the project repo, the tooling can find each package and store the package exactly where it needs to be inside the project itself.
Gb is a whole new class of build tool being developed by members of the Go community. Gb takes a different approach to solving the reproducible-build problem, which starts with the understanding that wrapping the Go tooling is not an option.
The philosophy behind gb stems from the idea that Go doesn’t have reproducible builds because of the import statement. The import statement drives go get, but import doesn’t contain sufficient information to identify which revision of a package should be fetched any time go get is called. The possibility that go get can fetch a different version of code for any given package at any time makes supporting the Go tooling in any reproducible solution complicated and tedious at best. You saw some of this tediousness with the large import paths when using godep.
This understanding resulted in the creation of the gb build tool. Gb doesn’t wrap the Go tooling, nor does it use GOPATH. Gb replaces the Go tooling workspace metaphor with a project-based approach. This has natively allowed vendoring without the need for rewriting import paths, which is mandated by go get and a GOPATH workspace.
Let’s look at how the last project could be converted into a gb project.
/home/bill/devel/myproject ($PROJECT)
|-- src
|   |-- cmd
|   |   |-- myproject
|   |   |   |-- main.go
|   |-- examples
|   |-- model
|   |-- README.md
|-- vendor
    |-- src
        |-- bitbucket.org
        |   |-- ww
        |       |-- goautoneg
        |       |-- Makefile
        |       |-- README.txt
        |       |-- autoneg.go
        |       |-- autoneg_test.go
        |-- github.com
            |-- beorn7
                |-- perks
                |-- README.md
                |-- quantile
                |-- bench_test.go
        |-- example_test.go
        |-- exampledata.txt
        |-- stream.go
A gb project is simply a directory on disk that contains a subdirectory named src/. The symbol $PROJECT refers to the root directory on disk where the src/ directory is located and is only used as a shortcut for describing the location on disk for the project. $PROJECT is not an environmental variable that needs to be set. In fact, gb requires no environmental variables to be set at all.
Gb projects differentiate between the code you write and the code your code depends on. The code your code depends on is called vendored code. A gb project makes a clear distinction between your code and vendored code.
$PROJECT/src/
$PROJECT/vendor/src/
One of the best things about gb is that there’s no need for import path rewriting. Look at the import statements that are declared inside of main.go—nothing needs to change to reference the vendored dependencies.
01 package main
02
03 import (
04     "bitbucket.org/ww/goautoneg"
05     "github.com/beorn7/perks"
06 )
The gb tool will look inside the $PROJECT/vendor/src/ directory for these imports if they can’t be located inside the $PROJECT/src/ directory first. The entire source code for the project is located within a single repo and directory on disk, split between the src/ and vendor/src/ subdirectories. This, in conjunction with no need to rewrite import paths and the freedom to place your project anywhere you wish on disk, makes gb a popular tool in the community to develop projects that require reproducible builds.
One thing to note: a gb project is not compatible with the Go tooling, including go get. Since there’s no need for GOPATH, and the Go tooling doesn’t understand the structure of a gb project, it can’t be used to build, test, or get. Building and testing a gb project requires navigating to the $PROJECT directory and using the gb tool.
gb build all
Many of the same features that are supported by the Go tooling are supported in gb. Gb also has a plugin system to allow the community to extend support. One such plugin is called vendor, which provides conveniences to manage the dependencies in the $PROJECT/vendor/src/ directory, something the Go tooling does not have today. To learn more about gb, check out the website: getgb.io.