You’ve reached the very last chapter of the book. Congratulations! In this chapter, we will continue with three more unfinished projects so that you’ll have something to work on once you have finished reading the book. The first project in this chapter will be a simple guessing game, except that we’ll set up a web server to do it. The second project is a laser pointer that runs away when you try to touch it. And, finally, we will finish up with a GUI to navigate and view the files on your computer. Let’s get started!
The fourth unfinished project is a word-guessing game. A regular word-guessing game on the command line is extremely simple, and at this point, you could probably make one of those in your sleep. So, to make things more interesting, we are going to make a guessing game that takes place over a web server instead.
To make this, we will need to use one of Rust’s web frameworks. Rust has three main web frameworks as of 2023, although there are many more out there. Let’s quickly summarize the main three:
Rocket—One of the first web frameworks, Rocket is quite slick and uses a lot of macro magic. The documentation is also especially nice.
Actix Web—Lots of features and maintainers and extremely fast. Generally, the larger the project, the more likely that Actix is the right choice.
Axum—The newest of the three but part of the Tokio project so there is a lot of collaboration between Axum and Tokio.
For us, the decision is simple. We are making a small project, so let’s see which of the three is the quickest to compile:
Axum has the smallest number of compilation units by far, so we will use it.
For our first code, we will put together a server with a few paths and see whether they work as expected. After typing cargo run for this code, the server will begin running locally, and you can go to http:/./localhost:8080/ to see the responses it gives. A full explanation of how Axum works is impossible in a small amount of space, but here is how to quickly start a project with Axum:
First, use axum::Router::new() to start a router, which handles the paths that will be used to take requests.
Add .route() to give the router a path, followed by an HTTP method (such as get) and then an async function to handle the request.
So, if you type .route("/", get(function_name)), it will create a route at http:/./localhost:8080/ that takes a get. A get is the most basic HTTP request; it is the request used whenever you view a webpage. You probably make hundreds of get requests through your browser and phone every day.
Another example of a route is .route("/guessing_game", get(function_ name)), which would take get requests at http:/./localhost:8080/guessing_ game. But if this server were hosted at http://yourwebsite.com instead, it would take requests at http://yourwebsite.com/guessing_game.
After the routes are set, put the router inside another method that binds the router to an address, which, in our case, is 127.0.0.1:8080. In our address, 127.0.0.1 is called the localhost and represents your own computer on your own network, and 8080 is a port number.
After this, you call the async .serve() method, which returns a Future that holds a Server, but the Future doesn’t return until the server shuts down. In other words, it runs forever by default.
And two more things to know before we get to the code:
Axum uses types called extractors that are used to handle requests. In our case, we will use the simplest one called a Path<String>. A Path<String> holds a String of the path it is given after the router address. So, if we access the server at 127.0.0.1:8080/guessing_game/my_guess and there is a route at 127.0.0.1:8080/guessing_game, the Path<String> extractor will give us a String that holds "my_guess".
Handling a route in Axum requires an async fn, which includes async closures. We’ll try both.
That was a lot of information! Everything will make much more sense once we look at some code. Let’s put together a really simple server now. First, let’s add some dependencies inside Cargo.toml:
[dependencies]
axum = "0.7.2"
fastrand = "2.0.1"
tokio = { version = "1.35", features = ["macros", "rt-multi-thread"] }
The fastrand crate is similar to rand but a bit smaller and simpler, so we’ll give it a try here.
use axum::{extract::Path, routing::get};

async fn double(Path(input): Path<String>) -> String {                     ①
    match input.parse::<i32>() {                                           ②
        Ok(num) => format!("{} times 2 is {}!", num, num * 2),
        Err(e) => format!("Uh oh, weird input: {e}")
    }
}

#[tokio::main]
async fn main() {
    let app = axum::Router::new()
        .route("/", get(|| async { "The server works!" }))                 ③
        .route(                                                            ④
            "/game/:guess",
            get(|Path(guess): Path<String>| async move { format!("The guess
            ➥is {guess}") }),
        )
        .route("/double/:number", get(double));                            ⑤

    axum::Server::bind(&"127.0.0.1:8080".parse().unwrap())
        .serve(app.into_make_service())
        .await
        .unwrap();

}
① The signature here may look a bit odd, but it is just deconstructing the input inside the function signature. Axum uses this syntax a lot, so we’ll copy it.
② Nothing else in this function is particularly surprising: it tries to parse a string into an i32 and doubles it if it can.
③ This first route just lets us know that the server works, and we handle the response inside an async closure.
④ For the second route, we will also use an async function. The colon in :guess means to pass in whatever is after /game/ to the function under the variable name guess. This time, we need async move because we want the function to take ownership of guess. Then we will return the guess to the user.
⑤ For the third route, we will use the previous doubling function. Here, as well, we pass in the path as the variable number, but inside the function itself, it will have a different name.
Now let’s run the server and test some of its output. If you try the following paths in your browser, you should see the following output:
Response from path: http:/ /localhost:8080
The server works!
Response from path: http:/ /localhost:8080/thththth
This localhost page can't be found
No webpage was found for the web address: http:/ /localhost:8080/thththth
HTTP ERROR 404
Response from path: http:/ /localhost:8080/double/10
10 times 2 is 20!
Response from path: http:/ /localhost:8080/double/TEN
Uh oh, weird input: invalid digit found in string
Response from path: http:/ /localhost:8080/double/9879879879879
Uh oh, weird input: number too large to fit in target type
Response from path: http:/ /localhost:8080/game/MyGuess
The guess is MyGuess
So far, so good. The server recognizes the routes we give it and is handling our input property at the /double path. The next task is to put together the guessing game.
To stay focused on one task at a time, let’s forget about Axum for a moment, put our guessing game together, and run it on the command line. Nothing in the following code will be difficult for you, so you won’t need any preparation to understand. One good read through the code with notes on the side should do it:
const RANDOM_WORDS: [&str; 6] =
    ["MB", "Windy", "Gomes", "Johnny", "Seoul", "Interesting"];            ①

#[derive(Clone, Debug, Default)]                                           ②
struct GameApp {
    current_word: String,
    right_guesses: Vec<char>,
    wrong_guesses: Vec<char>,
}

enum Guess {                                                               ③
    Right,
    Wrong,
    AlreadyGuessed,
}

impl GameApp {
    fn start(&mut self) {                                                  ④
        self.current_word = RANDOM_WORDS[fastrand::usize(..RANDOM_WORDS.len())].to_lowercase();
        self.right_guesses.clear();
        self.wrong_guesses.clear();
    }
    fn check_guess(&self, guess: char) -> Guess {                          ⑤
        if self.right_guesses.contains(&guess) || self.wrong_guesses.contains(&guess) {
            return Guess::AlreadyGuessed;
        }
        match self.current_word.contains(guess) {
            true => Guess::Right,
            false => Guess::Wrong,
        }
    }
    fn print_results(&self) {                                              ⑥
        let output = self
            .current_word
            .chars()
            .map(|c| {
                if self.right_guesses.contains(&c) {
                    c
                } else {
                    '*'
                }
            })
            .collect::<String>();
        println!("{output}");
    }
    fn take_guess(&mut self, guess: String) {                              ⑦
        match guess.chars().count() {
            0 => println!("What are you doing? Please guess something."),
            1 => {
                let the_guess = guess.chars().next().unwrap();

                match self.check_guess(the_guess) {
                    Guess::AlreadyGuessed => {
                        println!("You already guessed {the_guess}!")
                    }
                    Guess::Right => {
                        self.right_guesses.push(the_guess);
                        println!("Yes, it contains a {the_guess}!")
                    }
                    Guess::Wrong => {
                        self.wrong_guesses.push(the_guess);
                        println!("Nope, it doesn't contain a {the_guess}!")
                    }
                }
                self.print_results();
                println!(
                    "Already guessed: {}",
                    self.wrong_guesses.iter().collect::<String>()
                );
            }
            _ => {                                                         ⑧
                if self.current_word == guess {
                    println!("You guessed right, it's {}!",
                    ➥self.current_word);
                } else {
                    println!(
                        "Bzzt! It's not '{guess}', it's {}.\nTime to move
                        ➥on to another word!",
                        self.current_word
                    );
                }
                self.start();                                              ⑨
            }
        }
    }
}

fn main() {
    let mut app = GameApp::default();
    app.start();

    loop {
        println!("Guess the word!");
        let mut guess = String::new();
        std::io::stdin().read_line(&mut guess).unwrap();                   ⑩
        app.take_guess(guess.trim().to_lowercase());
    }
}
① Six random words: the author’s four cats, city of residence, and a final random word
② The game app is pretty simple, too. Later on, we’ll be able to make it a static because both Vec::new() and String::new() are const functions, as we learned in chapter 16.
③ Three things can happen when a letter is chosen: it can be right, wrong, or already guessed.
④ Every time .start() is called, the app will choose a new word and clear its data. The fastrand::usize(..RANDOM_WORDS.len())] part will choose a random usize index up to the length of RANDOM_WORDS. Note that we also made the word lowercase.
⑤ The check_guess() function lets us know what sort of guess has been given. If the letter is already in right_guesses or wrong_guesses, it has been guessed already. If not, it is either a right guess or a wrong guess.
⑥ This method just prints the character if the letter is within right_guesses or a * otherwise. If the random word is “school” and the user has guessed l and o, it will print ***ool.
⑦ Finally, we have the main method that handles a guess from the user. If the guess is one character in length, it is a letter guess; if it is more than one character in length, it assumes that the user is trying to guess the whole word.
⑧ We have already checked to see whether the length is 0 or 1, so anything else will have to be longer. When this happens, the stakes are higher: either the user wins or loses right away.
⑨ Since the user either wins or loses, the game will reset no matter what.
⑩ Finally, don’t forget to .trim() the user’s guess and make it lowercase.
Now, it’s time to join these two together. How do we do this? Because, at the moment, the guessing game is inside main(), and our functions to handle requests only provide us a Path<String>, not a reference to any app:
async fn handle_request(Path(input): Path<String>) -> String {
}
All we have is a variable called input that holds a String. How do we get to the app from here?
The proper way on Axum to get access to a struct like our GameApp is through a method called .with_state() (http://mng.bz/xjZ8) that allows functions inside Axum’s router to access structs like our game app. Besides the Axum documentation, Axum’s version 0.6 announcement in 2022 (http://mng.bz/Jd9z) also has some simple examples.
For our quick example, however, we can make our GameApp into a static. One reason is that we don’t have the space in this chapter to get into Axum’s internal details; also, our game app is so simple that everything is on one screen.
If you decide to continue developing the example into a server for real work, one good place to start would be doing away with the global static and replacing it with the .with_state() method. Doing so makes a project much easier to test as it begins to grow.
So let’s make our app into a static item. That’s pretty easy because (as we learned in chapter 16) all of the following methods are const fn and thus don’t require an allocation:
static GAME: Mutex<GameApp> = Mutex::new(GameApp {
    current_word: String::new(),
    right_guesses: vec![],
    wrong_guesses: vec![]
});
And then when a guess comes in on the server, we’ll pick it up through a new function called get_res_from_static() that will pass on the String to the GameApp, which will do its work and finally return a String as the route’s output:
    let app = axum::Router::new()
        .route("/", get(|| async { "The server is running well!" }))
        .route("/game/:guess", get(get_res_from_static));
And what does the get_res_from_static() function look like? It’s extremely simple. It locks the Mutex to gain mutable access to static GAME and calls its .take_guess() method:
fn get_res_from_static(guess: String) -> String {
    GAME.lock().unwrap().take_guess(guess)
}
Finally, the only changes we have left to make are for the println! statements to be replaced with format! so that a String can be returned that will be the response from the server. Instead of printing each piece of information as we get it, we’ll have to build a String and use .push_str() to add the information every step of the way, which will finally return the String at the end so that the user can see it.
The full code now looks like this:
use axum::{extract::Path, routing::get};
use std::sync::Mutex;

const RANDOM_WORDS: [&str; 6] =
    ["MB", "Windy", "Gomes", "Johnny", "Seoul", "Interesting"];

static GAME: Mutex<GameApp> = Mutex::new(GameApp {
    current_word: String::new(),
    right_guesses: vec![],
    wrong_guesses: vec![],
});

#[derive(Clone, Debug)]
struct GameApp {
    current_word: String,
    right_guesses: Vec<char>,
    wrong_guesses: Vec<char>,
}

enum Guess {
    Right,
    Wrong,
    AlreadyGuessed,
}

async fn get_res_from_static(Path(guess): Path<String>) -> String {
    GAME.lock().unwrap().take_guess(guess)
}

impl GameApp {
    fn restart(&mut self) {
        self.current_word =
        ➥RANDOM_WORDS[fastrand::usize(..RANDOM_WORDS.len())]
            .to_lowercase();
        self.right_guesses.clear();
        self.wrong_guesses.clear();
    }
    fn check_guess(&self, guess: char) -> Guess {
        if self.right_guesses.contains(&guess) ||
        ➥self.wrong_guesses.contains(&guess) {
            return Guess::AlreadyGuessed;
        }
        match self.current_word.contains(guess) {
            true => Guess::Right,
            false => Guess::Wrong,
        }
    }
    fn results_so_far(&self) -> String {
        let mut output = String::new();
        for c in self.current_word.chars() {
            if self.right_guesses.contains(&c) {
                output.push(c)
            } else {
                output.push('*')
            }
        }
        output
    }
    fn take_guess(&mut self, guess: String) -> String {
        let guess = guess.to_lowercase();
        let mut output = String::new();
        match guess {
            guess if guess.chars().count() == 1 => {
                let the_guess = guess.chars().next().unwrap();

                match self.check_guess(the_guess) {
                    Guess::AlreadyGuessed => {
                        output.push_str(&format!("You already guessed
                        ➥{the_guess}!\n"));
                    }
                    Guess::Right => {
                        self.right_guesses.push(the_guess);
                        output.push_str(&format!("Yes, it contains a
                        ➥{the_guess}!\n"));
                    }
                    Guess::Wrong => {
                        self.wrong_guesses.push(the_guess);
                        output.push_str(&format!("Nope, it doesn't contain
                        ➥a {the_guess}!\n"));
                    }
                }
                output.push_str(&self.results_so_far());
            }
            guess => {
                if self.current_word == guess {
                    output.push_str(&format!("You guessed right, it's {}!
                    ➥Let's play again!", self.current_word));
                } else {
                    output.push_str(&format!(
                        "Bzzt! It's not {guess}, it's {}.\nTime to move on
                        ➥to another word!",
                        self.current_word
                    ));
                }
                self.restart();
            }
        }
        output
    }
}

#[tokio::main]
async fn main() {
    GAME.lock().unwrap().restart();

    let app = axum::Router::new()
        .route("/", get(|| async { "The server is running well!" }))
        .route("/game/:guess", get(get_res_from_static));

    axum::Server::bind(&"127.0.0.1:8080".parse().unwrap())
        .serve(app.into_make_service())
        .await
        .unwrap();
}
This has been our longest example so far, but a basic web server and a game in just 105 lines of code isn’t too bad!
What are some possible next steps now that the guessing game is done?
As previously mentioned, replace the global static with .with_state() as recommended by Axum. You’ll notice that the method will pass on the struct immutably, so you will have to use an Arc<Mutex> on the parameters to change their values.
Try implementing the same thing with one of the two other web frameworks to see whether you have a preferred style. The three main web frameworks feel pretty similar to each other much of the time. For example, Rocket also allows accessing a struct through a type called State (https://api.rocket.rs/v0.5/rocket/struct.State.html).
Try deploying the app online! Deployment is beyond the scope of this book, but a search for “deploy axum server” shows a lot of possibilities.
Right now, the server holds a single game, so if more than one person accesses the server at the same time, they will get some pretty confusing output. You could try a crate like axum_sessions (https://docs.rs/axum-sessions/latest/axum_sessions/) to create a proper session per user. Or, for something quick and hacky, you could have the main route at "/" give a random suffix to the URL for the user to play the game that only lasts for a short period of time. For example, a user who visits the main address would get a URL like http:/ /localhost:8080/w8ll2/game/ that only they would know. Or you might have a better idea to make this work.
Combine the server with the graphical interface that we will learn in the very next section!
Thus far, this book has only focused on making code for humans to use, but it’s time to make something for our cats (or other pets?). Making a moving red dot that looks like a laser pointer should be enough to entertain them. This can be done through the egui crate, which is a GUI that allows us to add buttons, graphics, charts, and more. Making the dot move in random directions and at random speeds will be the key to making this laser pointer interesting.
egui is pretty straightforward after learning ratatui, as drawing widgets on the screen is pretty similar: you draw them by calling methods on a struct that is passed into a closure. But let’s start one step at a time, starting with the dependencies in Cargo.toml:
[dependencies]
egui = "0.21.0"
eframe = "0.21.3"
fastrand = "2.0.0"
The eframe crate is the crate used to compile and run egui apps. You will almost always use egui and eframe together in this way.
Here is the minimum you will need to run an egui app on your computer:
Create a struct to hold your state: numbers, strings, whatever you need to access when the app is running.
Implement the eframe App trait (https://docs.rs/eframe/latest/eframe/trait.App.html) for your app struct. This trait has a required method called update() that is called continuously when running an egui app. This method is essentially the same as the loop we used in the ratatui example in the last chapter.
Inside main(), use the eframe::run_native() method, which runs the app on your computer (which is why it is called native). Into this, you pass in a Box<dyn FnOnce(&CreationContext<'_>) -> Box<dyn App>>;. The Box<dyn App> is the app struct that we implemented the App trait for. The CreationContext part can be accessed once the app starts up and can be used for long-term settings like adding fonts or anything you don’t want to happen every loop.
To get a sense of what all that means when put together, let’s build a quick app that displays a few widgets:
#[derive(Default)]
struct NothingApp {                                                      ①
    number: i32,
    text: String,
    code: String,
}

impl NothingApp {
    fn new(_cc: &eframe::CreationContext<'_>) -> Self {                  ②
        Self {
            number: 0,
            text: String::from("Put some text in here!"),
            code: String::from(
                r#"fn main() {
    println!("Hello, world!");
}"#,
            ),
        }
    }
}

impl eframe::App for NothingApp {                                        ③
    fn update(&mut self, ctx: &egui::Context, _frame: &mut eframe::Frame) {
        egui::CentralPanel::default().show(ctx, |ui| {                   ④
            if ui.button("Counter up").clicked() {                       ⑤
                self.number += 1
            }
            if ui.button("Counter down").clicked() {
                self.number -= 1
            }

            ui.label(format!("The counter is: {}", self.number));

            ui.text_edit_multiline(&mut self.text);
            ui.code_editor(&mut self.code);
        });
    }
}

fn main() {                                                              ⑥
    let native_options = eframe::NativeOptions::default();
    let _ = eframe::run_native(
        "My egui App",
        native_options,
        Box::new(|cc| Box::new(NothingApp::new(cc))),
    );
}
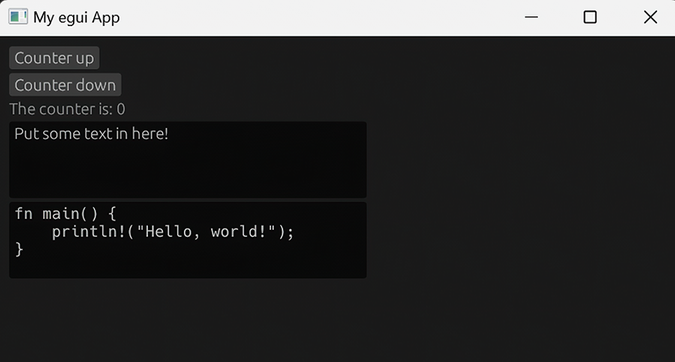
① This app will hold a number that can be increased or decreased by clicking on buttons, some text for a text editor widget, plus more text for a code text editor widget. All of these widgets are built into egui.
② Here, we make a method that creates our app, and to follow the eframe::run_native() method, it needs to take a CreationContext. We don’t have any need for it, though.
③ And now for the App trait, which is where all of the update logic goes. This is where you spend the majority of your time when developing an egui app.
④ App layouts start with a panel such as a CentralPanel or SidePanel. Inside the panel, we have access to the ui struct (https://docs.rs/egui/latest/egui/struct.Ui.html), which has a ton of methods to create widgets.
⑤ And now we call some methods on the ui struct to create some widgets. First, we will make two buttons that change the number when they are clicked, then a label to display some text, and then a text editor area and a code editor area.
⑥ Finally comes the main() function, on which we call the run_native() method and add our app.
Now if you type cargo run, the code will start compiling. Once the compiling is done, a screen similar to figure 24.1 should suddenly pop up! You should be able to click the buttons to change the value of the counter and type inside the two boxes.
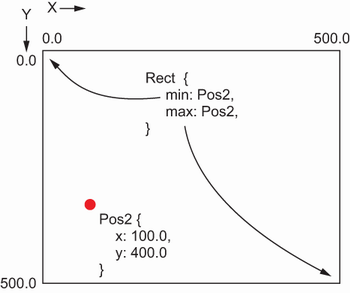
Now that we have some understanding of egui, it’s time to put together our laser pointer. To do this, first we have to visualize the screen that the laser will be floating around on. The screen is a rectangle with an x-axis and a y-axis. If we have a screen that is 500.0 pixels by 500.0 pixels, the edge of the x-axis goes from top left at 0.0 to the top right at 500.0. And the edge of the y-axis starts at the top left at 0.0 to the bottom left at 500.0.
egui has two structs here called a Pos2 and a Rect that help us work with the screen dimensions. A Pos2 is simply a point in space:
pub struct Pos2 {
    pub x: f32,
    pub y: f32,
}
And a Rect holds two points: the point at the top left and the point at the bottom right. These are inclusive ranges, as can be seen by the RangeInclusive struct on the documentation (https://docs.rs/egui/latest/egui/struct.Rect.html) for Rect.
pub struct Rect {
    pub min: Pos2,
    pub max: Pos2,
}
If you put these all together, you get a setup like figure 24.2. You can see where x and y start and end, as well as a Pos2 located 100.0 pixels to the right and 400.0 pixels down.
egui also has a struct called a Vec2, which looks exactly like a Pos2. But instead of representing a single point, the x in Vec2 represents how many pixels to the right, and the y represents how many pixels down:
pub struct Vec2 {
    pub x: f32,
    pub y: f32,
}
With that in our minds, let’s start building the laser pointer!
use eframe::egui;
use egui::{Vec2, Color32, Sense, Pos2};

#[derive(Default)]
struct LaserPointer {                                                     ①
    position: Pos2
}

impl LaserPointer {
    fn new(_cc: &eframe::CreationContext<'_>) -> Self {
        Self {
            position: Pos2 { x: 0.0, y: 0.0 }                             ②
        }
    }
}

impl eframe::App for LaserPointer {
   fn update(&mut self, ctx: &egui::Context, _frame: &mut eframe::Frame) {
       egui::CentralPanel::default().show(ctx, |ui| {

        let rect = ctx.screen_rect();                                     ③
        let screen_size = Vec2 {                                          ④
            x: rect.width(),
            y: rect.height()
        };
        let (response, painter) =
    ui.allocate_painter(screen_size, Sense::hover());                     ⑤
        if response.hovered() {                                           ⑥
            let Pos2 {x, y} = self.position;                              ⑦
            let Pos2 {x: x2, y: y2} = ctx.pointer_hover_pos().unwrap_or_default();

            if (x - x2).abs() < 10.0 && (y - y2).abs() < 10.0 {           ⑧
                if fastrand::bool() {
                    self.position.x += fastrand::f32() * 20.0;
                } else {
                    self.position.x -= fastrand::f32() * 20.0;
                }
                if fastrand::bool() {
                    self.position.y += fastrand::f32() * 20.0;
                } else {
                    self.position.y -= fastrand::f32() * 20.0;
                }
            }
        }
        self.position.x += 0.5;                                           ⑨
        self.position.y += 0.5;
        let radius = 10.0;
        painter.circle_filled(self.position, radius, Color32::RED);       ⑩
       });
   }
}

fn main() {
    let native_options = eframe::NativeOptions::default();
let _ = eframe::run_native(
        "My egui App",
        native_options,
        Box::new(|cc| Box::new(LaserPointer::new(cc))),
    );
}
① The LaserPointer is just a dot, so all we need is a Pos2 to represent it.
② We’ll put it at the top left corner to begin with.
③ The ctx variable lets us work with the context of our app, which includes information like screen size. The screen_rect() method gives us a Rect.
④ And now we’ll make a Vec2 out of the Rect because the next method is going to need it.
⑤ This next method is pretty interesting. It takes in a screen size (a Vec2) as well as a Sense. Sense is an enum that lets it know what sort of user input to react to, such as clicking, dragging, hovering, and so on. Let’s go with hover. The method returns two things: a Response and a Painter.
⑥ Now we can tell the app what to do when the Response notices that the mouse is hovering. Here is where we add the laser pointer logic!
⑦ First, we’re going to try to make the laser pointer run away when the mouse arrow gets too close. To do that, we get the position of the laser pointer and then use the pointer_hover_pos() method to get the position of the mouse arrow.
⑧ And then, in these lines, we’ll instruct the laser pointer to move in a random direction if the mouse pointer is within 10.0 pixels. The fastrand::bool() method randomly returns true or false, and based on that, it will go either forward or backward by up to 20.0 pixels.
⑨ Then we’ll move the laser pointer across and down by 0.5 pixels per loop. We’ll develop this in the next section.
⑩ Finally, we’ll draw the actual laser pointer, which is a circle. It gets a radius of 10.0 and a color of Red.
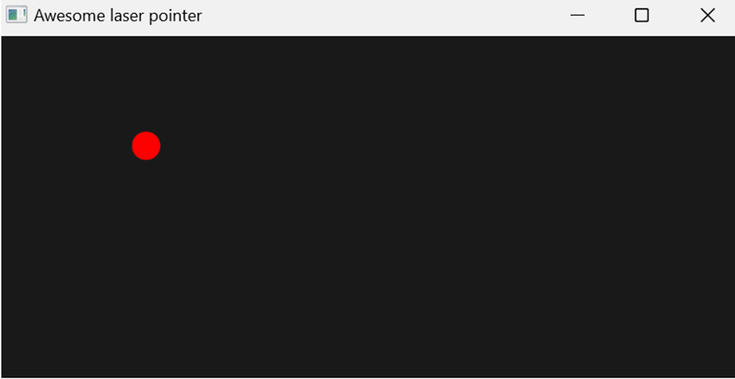
Once all this is done, you should see something that looks like figure 24.3. The laser pointer will move steadily across and down whenever you hover the mouse over the screen, and if the mouse pointer gets too close, it will jump away. At this point, your cat might already be entertained by it, but we can make it better!
Our next task is to make the laser pointer move without needing the mouse pointer to hover over the screen and to move as randomly as possible. Without the random movement, a cat will quickly get bored with it.
Here are some of the changes we will make:
Speed—The laser pointer will have a few speeds that will change randomly. Sometimes it will be still, other times it will move slowly, and other times it will move fast or CrazyFast.
Random movement—How do we make the pointer move in random directions? There are many ways to do it, but one easy way to do it is to give the pointer an invisible target that it heads toward every time it moves. The target will change from time to time as well.
Looping without mouse hover—At the moment, our app only loops whenever a hover event is detected, which means we would have to keep moving our mouse around to get the laser pointer to do anything. Fortunately, egui has a method called request_repaint() that lets the app logic loop without needing to detect an event from the user. All we have to do is stick this method into the .update() method.
Moving random movement logic—Moving a lot of the random movement logic over to the LaserPointer’s methods so that the code doesn’t look so cluttered.
With all these changes made, the code now looks like the following:
use eframe::egui;
use egui::{Color32, Pos2, Rect, Sense, Vec2};

#[derive(Default, Clone, Copy)]
struct LaserPointer {
    x: f32,                                              ①
    y: f32,
    speed: Speed,
    imaginary_target: Pos2,
}

#[derive(Clone, Copy, Default)]                          ②
enum Speed {
    #[default]
    Still,
    Slow,
    Fast,
    CrazyFast,
}

impl From<LaserPointer> for Pos2 {                       ③
    fn from(pointer: LaserPointer) -> Self {
        Pos2 {
            x: pointer.x,
            y: pointer.y,
        }
    }
}

impl LaserPointer {
    fn random_movement(&mut self, amount: f32) {         ④
        if fastrand::bool() {
            self.x += fastrand::f32() * amount;
        } else {
            self.x -= fastrand::f32() * amount;
        }
        if fastrand::bool() {
            self.y += fastrand::f32() * amount;
        } else {
            self.y -= fastrand::f32() * amount;
        }
    }
    fn try_change_speed(&mut self) {                     ⑤
        use Speed::*;
        if fastrand::f32() > 0.98 {
            self.speed = match fastrand::u8(0..3) {
                0 => Still,
                1 => Slow,
                2 => Fast,
                _ => CrazyFast,                          ⑥
            }
        }
    }
    fn try_change_target(&mut self, rect: Rect) {
        let bottom_right = rect.max;
        if fastrand::f32() > 0.98 {
            self.imaginary_target = Pos2 {
                x: fastrand::f32() * bottom_right.x,
                y: fastrand::f32() * bottom_right.y,
            }
        }
    }
    fn change_speed(&self) -> f32 {
        match self.speed {
            Speed::Still => 0.0,
            Speed::Slow => 0.05,
            Speed::Fast => 0.1,
            Speed::CrazyFast => 0.3,
        }
    }
    fn move_self(&mut self) {                             ⑦
        let x_from_target = self.imaginary_target.x - self.x;
        let y_from_target = self.imaginary_target.y - self.y;
        self.x += fastrand::f32() * x_from_target * self.change_speed();
        self.y += fastrand::f32() * y_from_target * self.change_speed();
    }
}

impl LaserPointer {
    fn new(_cc: &eframe::CreationContext<'_>) -> Self {
        Self {
            x: 50.0,
            y: 50.0,
            speed: Speed::default(),
            imaginary_target: Pos2 { x: 50.0, y: 50.0 },
        }
    }
}

impl eframe::App for LaserPointer {
    fn update(&mut self, ctx: &egui::Context, _frame: &mut eframe::Frame) {
        ctx.request_repaint();
        egui::CentralPanel::default().show(ctx, |ui| {    ⑧
            self.try_change_speed();
            self.try_change_target(rect);
            self.move_self();

            let rect = ctx.screen_rect();
            let screen_size = Vec2 {
                x: rect.width(),
                y: rect.height()
            };
            let (_, painter) = ui.allocate_painter(screen_size,
            ➥Sense::hover());                            ⑨
            let LaserPointer { x, y, .. } = self;
            let Pos2 { x: x2, y: y2 } =
            ➥ctx.pointer_hover_pos().unwrap_or_default();

            if (*x - x2).abs() < 20.0 && (*y - y2).abs() < 20.0 {
                self.random_movement(50.0);
            }
            painter.circle_filled(Pos2::from(*self), 20.0, Color32::RED);
        });
    }
}

fn main() {
    let native_options = eframe::NativeOptions::default();
    let _ = eframe::run_native(
        "Awesome laser pointer",
        native_options,
        Box::new(|cc| Box::new(LaserPointer::new(cc))),
    );
}
① We could have kept the Pos2 struct to represent the laser pointer’s position, but holding an x and a y instead of a Pos2 makes the code a bit cleaner.
② Nothing about this enum is too difficult. Note the #[default] attribute, though, which was added fairly recently to Rust!
③ Implementing From here isn’t essential, but it helps the following code be a bit cleaner.
④ This method now handles the random laser pointer movement when the mouse arrow gets too close.
⑤ We don’t want the speed to change too frequently (cats get bored when a laser pointer moves too quickly), so we’ll use a random f32 from 0.0 to 1.0 and only change when the number is greater than 0.98. In practice, this will mean a speed change every few seconds. The following try_change_ target() changes the invisible target for the pointer in the same way.
⑥ Note that we used _ here because the compiler doesn’t know that the random number will only go up to 3. Alternatively, we could have used 3 on this line and then added _ below and the unreachable! macro.
⑦ Finally, we have this method to move the laser pointer once every loop. One of the speeds is 0.0, though, so it will stay absolutely still in that case.
⑧ With all of these methods added, the final code is much cleaner.
⑨ The laser pointer moves on its own now, and we are checking to see whether the mouse arrow is close to the laser pointer or not, so we don’t need to use the response returned from allocate_painter() anymore.
With these changes made, the laser pointer should now make some pretty erratic movements. Sometimes it will stay still, other times it will move slowly, and other times it will suddenly jump across the screen. See whether your cat or other pet likes it!
The laser pointer is probably the most complete of the six unfinished projects in these last two chapters, but here are a few ideas for further development:
The laser pointer uses an invisible random target to move. Why not draw that as well? Not only would it look interesting, but it could also help you test and refine the laser pointer’s movement.
Cats react differently to different types of laser pointers. Some enjoy a pointer that stays still for a while because it lets them imagine the thrill of catching it before they pounce. Others, usually kittens, prefer a wild pointer that moves as fast as possible. Could you add some settings to the laser pointer to allow the user to pick between different types of movement?
The next project also uses egui to make a directory and file navigator. Why not stick the laser pointer inside that app, too, so that your cat can try to catch it while you work with the files on your computer?
Try checking out some other popular GUI crates at https://www.areweguiyet.com/. Some popular crates include Yew, Iced, and Dioxus.
Check out the egui web demo (https://www.egui.rs/#demo) to get a feel for all of the possibilities that egui offers. The page includes a link to the source code, so you can copy and paste what you need to get started.
The last unfinished project in the book will be a simple navigator that lets you look through the directories on your computer and view the files inside. This project will also use egui because we still have only made some simple graphics with egui but haven’t tried making a more complete UI with it.
Before we begin working with egui again, first we need to take a look at a few types and methods in the standard library that we haven’t seen yet for working with directories and files:
std::env::current_dir(), which gives you the current directory. It returns the directory in the form Result<PathBuf>.
PathBuf, which is similar to a String but is made for working with file and directory paths. A PathBuf has both .push() and .pop() methods, but they work with parts of a path instead of a char. For example, if we are inside the directory "/playground" and use the .pop() method, the directory will now be "/".
std::fs::read_dir(), which returns a Result<ReadDir>. A ReadDir is an iterator over the contents inside a directory.
Each entry inside a ReadDir is an io::Result<DirEntry>. A DirEntry holds the information that we are finally looking for that can be accessed through methods like .file_name(), path(), .file_type(), and .metadata().
Let’s put this all together in a quick example that takes a look at the directories inside the Playground:
fn main() {
let mut current_dir = std::env::current_dir().unwrap();
println!("Current directory: {current_dir:?}");
let mut read_dir = std::fs::read_dir(¤t_dir).unwrap();
println!("{read_dir:?}");
let first = read_dir.nth(1).unwrap().unwrap(); ①
println!("Path: {:?} Name: {:?}", first.path(), first.file_name());
current_dir.pop(); ②
println!("Now moved back to: {current_dir:?}");
let mut read_dir = std::fs::read_dir(¤t_dir).unwrap();
println!("{read_dir:?}");
let first = read_dir.nth(1).unwrap().unwrap(); ③
println!("Path: {:?} Name: {:?}", first.path(), first.file_name());
}
① Let’s take a look at the second item inside the directory. Note the two unwraps here: the .nth() method might return None, while inside is an io::Result<DirEntry>. Some of the information we can get includes the path name and filename, so let’s print them out and see.
② Use .pop() to move back a directory.
③ We’ll do the same for the second item inside the root directory.
The output should look like this:
Current directory: "/playground"
ReadDir("/playground")
Path: "/playground/.bashrc" Name: ".bashrc"
Now moved back to: "/"
ReadDir("/")
Path: "/mnt" Name: "mnt"
None of this code was probably all that surprising: it’s just a lot of methods for working with directories and files. These methods all return Results because they all have the possibility of failure.
Now that we know how to work with directories and directory entries, let’s try putting the app together. We learned how to add buttons on egui during the last section, so we can add a button for each item we find inside a directory and .push() to the PathBuf whenever it is clicked. And on the top, we can add another button that holds ".." that will move back one directory. This part is easy: just .pop() from the PathBuf whenever it is clicked.
We will also use a struct called RichText, which in egui allows you to create text with extra formatting options such as color.
Putting all this together gives us the following code:
use std::{
    env::current_dir,
    fs::read_dir,
    path::PathBuf,
};

use eframe::egui;
use egui::{Color32, RichText};                                         ①

struct DirectoryApp {                                                  ②
    current_dir: PathBuf,
}

impl DirectoryApp {
    fn new(_cc: &eframe::CreationContext<'_>) -> Self {
        Self {
            current_dir: current_dir().unwrap(),                       ③
        }
    }
}

impl eframe::App for DirectoryApp {
    fn update(&mut self, ctx: &egui::Context, _frame: &mut eframe::Frame) {
        egui::CentralPanel::default().show(ctx, |ui| {
            if ui.button(" .. ").clicked() {                           ④
                self.current_dir.pop();
            }
            let read_dir = read_dir(&self.current_dir).unwrap();       ⑤
            for entry in read_dir.flatten() {                          ⑥
                let metadata = entry.metadata().unwrap();              ⑦
                let name = entry.file_name().into_string().unwrap();
                if metadata.is_dir() {                                 ⑧
                    if ui
                        .button(RichText::new(&name).color(Color32::GRAY))
                        .clicked()
                    {
                        self.current_dir.push(&name);
                    }
                } else if metadata.is_file() {
                    if ui
                        .button(RichText::new(&name).color(Color32::GOLD))
                        .clicked()
                    {}                                                 ⑨
                } else {
                    ui.label(name);                                    ⑩
                }
            }
        });
    }
}

fn main() {
    let native_options = eframe::NativeOptions::default();
    let _ = eframe::run_native(
        "File explorer",
        native_options,
        Box::new(|cc| Box::new(DirectoryApp::new(cc))),
    );
}
① RichText is used in egui if you want to change the text of a widget, and Color32 allows us to choose a color.
② The app so far holds a PathBuf that we will use .push() and .pop() on.
③ This is a good example of where we might want to keep .unwrap()—or turn it into .expect()—because if there is a problem getting the current directory on startup, the whole app should crash to allow us to try to fix what’s wrong.
④ This part is pretty easy! Make a button and .pop() when it is clicked.
⑤ Now we are going to work through the directory information. Look at all the unwraps! Each one of these methods returns a Result.
⑥ Note that here we are using .flatten() to ignore anything inside the read_dir() method that returns an Err.
⑦ We get the metadata and file/directory name. With the metadata we can see whether we have a file or a directory.
⑧ We’ll make buttons with different text depending on whether we have a file or a directory. If we have a directory, clicking the button will .push() to the PathBuf and move us into that directory.
⑨ If we have a file, we should print it out. But let’s think about that in the next section.
⑩ If the entry isn’t a file or a directory, let’s print out a label to show what it is.
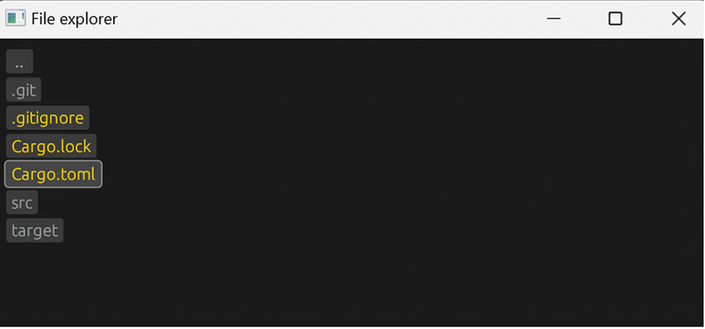
Running this code, you should see an app like the one in figure 24.4. Directories show up in gray letters, and clicking on them will show you the content inside. Clicking on .. will take you up a directory. But the files themselves in gold lettering don’t do anything when you click on them.
And since we are still using .unwrap() everywhere, sometimes when you click a button the program will crash with some sort of system error. Here's one error that you might see:
thread 'main' panicked at 'called `Result::unwrap()` on an `Err` value: Os
➥{ code: 5, kind: PermissionDenied, message: "Access is denied." }',
➥src\main.rs:112:56
But so far so good! Now let’s develop the app a little bit more and make sure that it can never crash.
We need to clean up most of the unwraps in the code and add the option to display the content of files that the user clicks on. When a file is clicked on, the app will need to know the address of the file, but we don’t want to change the current_dir to do that. One way would be to create a clone of current_dir and then push the filename in the next line, but there is a quicker way to do it: a PathBuf can be built from an array or Vec. The PathBuf documentation gives an example of this:
let path: PathBuf = [r"C:\", "windows", "system32.dll"].iter().collect();
After that comes the TextEdit that we saw in the last example. We can set the app to hold a String called file_content and then check whether it’s empty. If it’s not, we’ll pull up a SidePanel (in addition to the existing CentralPanel) to display it there. egui tends to change the size of panels when the app is being used, so to prevent this from happening, we’ll use the same screen_rect() method from the last example to get the size of the screen. This can then be passed into the panel with a method called .min_width() and then again to the TextEdit with its method called .desired_ width().
Here is the final code after all of these changes have been made:
use std::{
    env::current_dir,
    fs::{read_dir, read_to_string},
    path::PathBuf,
};

use eframe::egui;
use egui::{Color32, RichText, TextEdit};

struct DirectoryApp {
    file_content: String,
    current_dir: PathBuf,
}

impl DirectoryApp {
    fn new(_cc: &eframe::CreationContext<'_>) -> Self {
        Self {
            file_content: String::new(),
            current_dir: current_dir().unwrap(),
        }
    }
}

impl eframe::App for DirectoryApp {
    fn update(&mut self, ctx: &egui::Context, _frame: &mut eframe::Frame) {
        egui::CentralPanel::default().show(ctx, |ui| {
            if ui.button(" .. ").clicked() {
                self.current_dir.pop();
            }
            if let Ok(read_dir) = read_dir(&self.current_dir) {            ①
                for entry in read_dir.flatten() {
                    if let Ok(metadata) = entry.metadata() {
                        if metadata.is_dir() {
                            if let Ok(dir_name) =
                            ➥entry.file_name().into_string() {
                                if ui
                                    .button(RichText::new(&dir_name)
                                    ➥.color(Color32::GRAY))
                                    .clicked()
                                {
                                    self.current_dir.push(&dir_name);
                                }
                            }
                        } else if metadata.is_file() {
                            if let Ok(file_name) =
                            ➥entry.file_name().into_string() {
                                if ui
                                   .button(RichText::new(&file_name)
                                   ➥.color(Color32::GOLD))
                                    .clicked()
                                {
                                    if let Some(current_dir) =
                                    ➥self.current_dir.to_str() {
                                        let file_loc: PathBuf =            ②
                                            [current_dir,
                                            ➥&file_name].iter().collect();
                                        let content =
                                        ➥read_to_string(file_loc)
                                            .unwrap
                                            ➥_or_else(|e| e.to_string()); ③
                                        self.file_content = content;
                                    }
                                }
                            }
                        } else {
                            ui.label(format!("{:?}", metadata.file_type()));
                        }
                    }
                }
            }
        });

        let width = ctx.screen_rect().max.x / 2.0;
        if !self.file_content.is_empty() {    #C
            egui::SidePanel::right("Text viewer")
                .min_width(width)
                .show(ctx, |ui| {
                    ui.add(TextEdit::multiline(&mut
                    ➥self.file_content).desired_width(width));
                });
        }
    }
}

fn main() {
    let native_options = eframe::NativeOptions::default();
    let _ = eframe::run_native(
        "File explorer",
        native_options,
        Box::new(|cc| Box::new(DirectoryApp::new(cc))),
    );
}
① The unwraps have been removed, but egui’s update() method doesn’t return a Result, so we can’t use the question mark operator. The if let syntax is helpful here.
② Here is the part with the new PathBuf to get the contents of the file if a file button has been clicked. We then use read_to_string() to create a String to hold the file content. If there is an error, it will show the error information instead of the file content.
③ Finally, this part displays a new panel on the side if the app holds any file content.
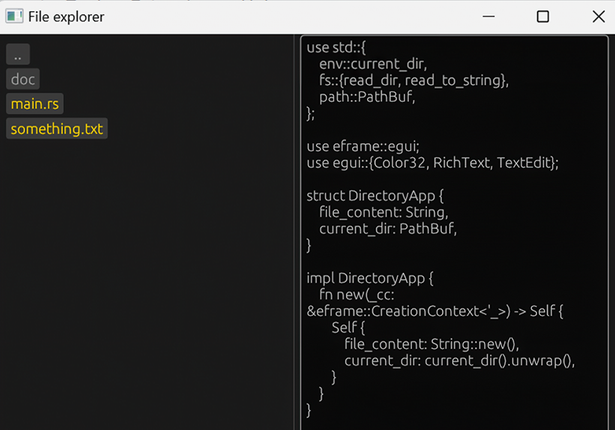
With this code, we now have a crash-free app that runs exceptionally fast. It might even be faster than the file explorer on your computer. Figure 24.5 shows a screenshot of the app showing the same code being used to run it.
You probably have a few ideas of your own for how to develop this app further. But here are some other ideas to think about:
If a directory has a lot of files in it, you will see buttons go well past the height of the screen, but no scroll bar appears. Can you find out how to add a scroll bar in egui?
The panel on the right appears when a file is clicked, but there is no way to remove it again. You could use a regular button, a radio button, a selectable label, or something else to allow the user to make the text on the right disappear.
The typing area in the panel on the right lets you copy the whole text to allow you to save it separately, but there is no way to save the content. You could add a way to do this, as well as keep track of whether text has been changed. You could also keep track of whether a file has been changed to ask the user whether the changes should be saved or not.
The code uses a lot of if let. This is good for error handling when you can’t return a Result, but the indentation in the code is pretty deep. You could reduce the indentation by making a method for the app to do some of this work. For example, the method could look through the current directory and return a Vec of an enum called something like DirectoryContent that has Dir, File, and Other variants.
Errors are being handled, but error information isn’t being displayed in most places. Most users might not care to know about this, but you could add a check box to open a panel that displays error info for users who want to keep a close watch on the output of every method that returns a Result.
And with that, we have reached the end of the sixth unfinished project.
And we have also reached the end of Learn Rust in a Month of Lunches! Hopefully, your month of lunches was a pleasant one that has given you the knowledge and confidence to start writing your own tools and projects in Rust. It will be interesting to see what further developments happen with these unfinished projects by you, the reader, or what else you end up creating on your own.
Finally, hopefully you have come to see Rust as a language that is complex in a good way, a language that is always watching your back to make sure that problems are taken care of before you run your code, not after.
Rust is used in enterprise software and even inside Windows and the Linux kernel, but it is a fantastic language for small tools like these as well. It only takes 50 to 100 lines of code to put a tool together that is quite usable, and Rust’s type correctness and error handling can guarantee that crashes will not happen.
As of 2024, Rust has a lot of impressive web frameworks, and no one framework is the One Framework to Rule Them All. Be sure to find the right one that fits your needs and preferences as a developer.
The same goes with Rust’s GUI frameworks, which are already quite impressive but without one single crate that stands above the rest.
Rust has a few websites that track the progress of crates in certain domains, all of which have the form “Are we . . . yet?” Some examples are https://arewegameyet.rs for game development, https://www.arewewebyet.org for web development, and https://www.arewelearningyet.com for machine learning. The full list of these tracking web pages can be seen at https://wiki.mozilla.org/Areweyet.
Curious which Rust version is coming next and when? Check out http://whatrustisit.com.
You are awesome for having read all the way to the end of the book!!!