You made it to the last part of the book, well done! J.R.R. Tolkien, the author of Lord of the Rings, wrote quite a few stories that he never finished during his lifetime. These were completed by his son and published under the name Unfinished Tales.
These last two chapters are a sort of Unfinished Tales for you, the developer, to pick up and develop on your own. Each chapter contains three unfinished projects for you to pick up yourself and keep developing. They are finished in the sense that they all work: you can just type cargo run and start using them. But they are meant to be as short as possible, and that means they only have the most basic functionality. After that, it’s up to you to keep working on them if you feel like it.
These two chapters also use quite a few new crates because the crates used for command-line interfaces (CLIs) and graphical user interfaces (GUIs) are best learned through real use on a computer. The crates used in this chapter won’t work on the Playground because they require access to system resources and the ability to do things like take user input in real time and open new windows.
Each of the working code samples for these six unfinished projects will be about 75 to 100 lines long. While short, that’s still a bit too long for us to look at the entire code every time a new line is added. Instead, the code development will be divided into four steps:
Step 2 will involve developing the code and will have most of the work.
Step 3 will finish up with some further development and cleanup of the code.
Finally, step 4 will contain some ideas for you to develop the projects further.
The first unfinished project is a typing tutor. It takes a text file and displays it, and the user’s job is to type the text that is displayed. The user will be able to see where the text has been typed wrong, and the typing tutor will display how well the user did after the test is over. You can do a search for “typing test” online to see what sort of functionality this small app will aim for.
This first project uses Crossterm (https://docs.rs/crossterm/latest/crossterm/), a crate that lets you detect and react to user input as it happens. The user input that Crossterm lets you see includes keyboard, mouse, screen resizing, and more, but we only need to monitor the keyboard input. Another nice thing about Crossterm is its size, as it only brings in 22 dependencies and will compile in just a few seconds.
The name Crossterm, by the way, comes from the fact that Rust crates used to be built almost exclusively for Unix/Linux back when the language was still small. Crossterm was the first terminal library that was a crossover, containing support for both Unix and Windows.
The dependencies for this project are pretty simple. Just add this to your Cargo.toml file:
[dependencies]
crossterm = "0.26.1"
Crossterm has a function called read() that is used to see user input, so let’s put it in a loop and see what happens. Try running this code and typing Hi!:
use crossterm::event::read;

fn main() {
    loop {
        println!("{:?}", read().unwrap());
    }
}
The output includes both pressing keys and releasing keys, so it will depend somewhat on how you type, but it will probably look something like this:
Key(KeyEvent { code: Char('H'), modifiers: SHIFT, kind: Press, state: NONE
➥})
Key(KeyEvent { code: Char('i'), modifiers: NONE, kind: Press, state: NONE
➥})
Key(KeyEvent { code: Char('h'), modifiers: NONE, kind: Release, state: NONE
➥})
Key(KeyEvent { code: Char('i'), modifiers: NONE, kind: Release, state: NONE
➥})
Key(KeyEvent { code: Char('!'), modifiers: SHIFT, kind: Press, state: NONE
➥})
Key(KeyEvent { code: Char('1'), modifiers: NONE, kind: Release, state: NONE
➥})
Here, the user pressed 'H' with shift, then pressed 'i'. Then the user released 'h' (no shift anymore), then released 'i', then pressed '!', and then released '1' (that is, the ! but without the shift).
If you type more slowly and deliberately, it will look like this:
Key(KeyEvent { code: Char('H'), modifiers: SHIFT, kind: Press, state: NONE
➥})
Key(KeyEvent { code: Char('h'), modifiers: NONE, kind: Release, state: NONE
➥})
Key(KeyEvent { code: Char('i'), modifiers: NONE, kind: Press, state: NONE
➥})
Key(KeyEvent { code: Char('i'), modifiers: NONE, kind: Release, state: NONE
➥})
Key(KeyEvent { code: Char('!'), modifiers: SHIFT, kind: Press, state: NONE
➥})
A look through the documentation shows that Key seen in the previous output comes from an enum called Event, which includes events such as Key, Mouse, and Resize:
pub enum Event {
    FocusGained,
    FocusLost,
    Key(KeyEvent),
    Mouse(MouseEvent),
    Paste(String),
    Resize(u16, u16),
}
We only care about Key events, so we can use an if let to react to Key events and ignore the rest.
The Key variant inside Event contains a KeyEvent struct:
pub struct KeyEvent {
    pub code: KeyCode,
    pub modifiers: KeyModifiers,
    pub kind: KeyEventKind,
    pub state: KeyEventState,
}
Let’s see which parameters in the KeyEvent struct we care about:
code—This contains information on which key was pressed. We definitely want to use this to .push() to or .pop() to our String, which keeps track of what the user has typed so far.
modifiers—This refers to whether the user is pressing keys such as Shift, CTRL, and so on. But the code parameter gives us the correct capital or lowercase character on its own, so we don’t need to think about modifiers.
kind—We definitely care about kind because KeyEventKind includes Press and Release. We don’t want to add or pop every time the character releases a key, just when the user presses one.
state—This parameter holds a lot of extra possible state information (like whether caps lock is on) that we don’t need to worry about.
Now it’s time to pull in a file for the user to try to type. Make a file called typing.txt and put some text—any text—in there. For our output, we’ll assume that the file says "Hi, can you type this?". We can use the read_to_string() function that we learned in chapter 18 to read the file and put the contents into a String, and we’ll make a String called user_input that holds everything the user has typed. And then we’ll print out both Strings one after another. The code is now as follows:
use crossterm::{
    event::{read, Event, KeyCode, KeyEventKind},
};
use std::fs::read_to_string;

fn main() {
    let file_content = read_to_string("typing.txt").unwrap();
    let mut user_input = String::new();

    loop {
        println!("{file_content}");
        println!("{user_input}_");              ①
        if let Event::Key(key_event) = read().unwrap() {
            if key_event.kind == KeyEventKind::Press {
                match key_event.code {
                    KeyCode::Backspace => {
                        user_input.pop();
                    }
                    KeyCode::Esc => break,      ②
                    KeyCode::Char(c) => {
                        user_input.push(c);
                    }
                    _ => {}
                }
            }
        }
    }
}
① The underscore shows the user where the cursor is.
② This allows the user to escape the program without having to do an ugly Ctrl-C.
The output looks pretty good! As the user types away, the String to type against and the current input are both showing up. The output now looks like this as you type:
Hi, can you type this?
_
Hi, can you type this?
H_
Hi, can you type this?
Hi_
Hi, can you type this?
Hi_
Hi, can you type this?
Hi_
Hi, can you type this?
Hi,_
Hi, can you type this?
Hi,_
Hi, can you type this?
Hi, _
Hi, can you type this?
Hi, _
Hi, can you type this?
Hi, c_
So far, so good, but the output quickly fills up the screen and makes it look messy pretty quickly. And you can probably imagine how much worse it would look if we had to type a longer text. Let’s do something about that!
The next steps are as follows:
We want to clear the screen each time a key is pressed. Crossterm has a macro called execute! that takes a writer (like stdout) and a command. Crossterm commands are simple structs named after what they do: Clear, ScrollDown, SetSize, SetTitle, EnableLineWrap, and so on. We will use Clear, which holds an enum called ClearType that offers a number of ways to clear the screen. We want to clear the whole screen, so we will pass in a Clear(ClearType::All). Putting all this together, the whole line will look like this:
execute!(stdout(), Clear(ClearType::All));
Instead of just printing out the user input, we can use what we learned in chapter 8 to .zip() together an iterator of the content to type and another iterator of the user’s output. With that, we can compare each character against the other. If they are the same, we will print out the letter, and if they are different (in other words, if the user types the wrong key), we will print out a * instead.
We can calculate the letters typed correctly when the user presses enter to finish the typing test. This is pretty easy and involves another .zip() as previously discussed.
We can replace some .unwrap() calls with the question mark operator.
Finally, we’ll put together a quick App struct that will hold the two strings. This will make main() a bit nicer to read.
use crossterm::{
    event::{read, Event, KeyCode, KeyEventKind},
    execute,
    terminal::{Clear, ClearType},
};
use std::{fs::read_to_string, io::stdout};

struct App {
    file_content: String,
    user_input: String,
}

impl App {
    fn new(file_name: &str) -> Result<Self, std::io::Error> {
        let file_content = read_to_string(file_name)?;
        Ok(Self {
            file_content,
            user_input: String::new(),
        })
    }
}

fn main() -> Result<(), std::io::Error> {
    let mut app = App::new("typing.txt")?;

    loop {
        println!("{}", app.file_content);
        for (letter1, letter2) in app.user_input.chars().zip(app.file_content.chars()) {
            if letter1 == letter2 {
                print!("{letter2}");
            } else {
                print!("*");
            }
        }
        println!("_");
        if let Event::Key(key_event) = read()? {
            if key_event.kind == KeyEventKind::Press {
                match key_event.code {
                    KeyCode::Backspace => {
                        app.user_input.pop();
                    }
                    KeyCode::Esc => break,
                    KeyCode::Char(c) => {
                        app.user_input.push(c);
                    }
                    KeyCode::Enter => {
                        let total_chars = app.file_content.chars().count();
                        let total_right = app
                            .user_input
                            .chars()
                            .zip(app.file_content.chars())
                            .filter(|(a, b)| a == b)
                            .count();
                        println!("You got {total_right} out of {total_chars}!");
                        return Ok(());
                    }
                    _ => {}
                }
            }
            execute!(stdout(), Clear(ClearType::All))?;
        }
    }
    Ok(())
}
The output now when using the typing app should look pretty simple—something like this:
Hi, can you type this?
Hi, can**** type thi_
In this case, the user has typed the first characters correctly, made four mistakes, and is now two characters away from finishing the test. The output is pretty clean, but there’s a lot you might want to add to the app now.
Now that the basic functionality for the typing tutor works, here are some ideas to continue developing it:
Check the time it took to pass the test and give the user the typing speed in words per minute. Chapter 17 should help you out here if you are unsure where to start.
Use a crate like ansi_term (https://crates.io/crates/ansi_term) to show incorrect entries in red instead of just an asterisk.
Right now, user_input still increases in length if the user keeps typing after reaching the end of the test. The extra characters aren’t displayed, but if, for example, you are 10 characters over, you will need to hit backspace 10 times to see the output change again. How would you keep user_input from getting longer than the file_content string?
Implement accented characters. What if you have a typing test in another language? Can you set up the test so that the character can use dead keys (like e + ' to show é) instead of needing to switch keyboard layouts?
Add more text samples. Maybe use the functionality in the next project to bring in Wikipedia article summaries to use as typing tests.
The French novel La Disparition is a book without a single instance of the letter e. To help someone else do the same, could you remake the typing tutor into an app that removes any word that contains the letter e as the user types?
The second unfinished project quickly pulls up the summary of a Wikipedia article. Getting started on this project is pretty easy because Wikipedia has an API that doesn’t require registration or a key to use. One of the endpoints on the Wikipedia API gives a summary and some other information for any article, which should be perfect for us. The output from that API is a bit too messy to paste into this book, but you can see a sample output by pasting the following link into your browser and changing PAGE_NAME_HERE to any article name you can think of:
https://en.wikipedia.org/api/rest_v1/page/summary/PAGE_NAME_HERE
The dependencies for this project are pretty easy because we already know how to use crossterm, and we learned to use reqwest in chapter 19. Putting these two together gives us 105 compiling units. Compiling shouldn’t take too long, but if you want to reduce compiling time, you can choose a crate called ureq (https://docs.rs/ureq/latest/ureq/), which is smaller and simpler than reqwest. Here are the dependencies:
[dependencies]
reqwest = { version = "0.11.16", features = ["blocking"] }
crossterm = "0.26.1"
We can start with something similar to the code in the typing tutor. We’ll have an App struct with a string called user_input that grows and shrinks as before, except that pressing Enter will search Wikipedia. The first code looks like this:
use crossterm::{
    event::{read, Event, KeyCode, KeyEventKind},
    execute,
    terminal::{Clear, ClearType},
};
use reqwest::blocking::get;
use std::io::stdout;

#[derive(Debug, Default)]
struct App {
    user_input: String
}

const URL: &str = "https://en.wikipedia.org/api/rest_v1/page/summary";

fn main() {
    let mut app = App::default();

    loop {
        if let Event::Key(key_event) = read().unwrap() {
            if key_event.kind == KeyEventKind::Press {
                execute!(stdout(), Clear(ClearType::All)).unwrap();
                match key_event.code {
                    KeyCode::Backspace => {
                        app.user_input.pop();
                        println!("{}", app.user_input);
                    }
                    KeyCode::Esc => app.user_input.clear(),
                    KeyCode::Enter => {
                        println!("Searching Wikipedia...");
                        let req = get(format!("{URL}/{}", app.user_input))
                        ➥.unwrap();
                        let text = req.text().unwrap();
                        println!("{text}");
                    }
                    KeyCode::Char(c) => {
                        app.user_input.push(c);
                        println!("{}", app.user_input);
                    }
                    _ => {}
                }
            }
        }
    }
}
Easy enough! If we type a nonsense word and press Enter, we get a nice error message:
{"type":"https://mediawiki.org/wiki/HyperSwitch/errors/not_found","title":"
➥Not found.","method":"get","detail":"Page or revision not found.",
➥"uri":"/en.wikipedia.org/v1/page/summary/Nthonthoe"}
And if we type a real word like Calgary, we get a massive JSON response that is a little too big to fit here. The response from Wikipedia’s servers is definitely coming in, but we should tidy it up somehow.
The JSON response has a lot of properties that we don’t need like "thumbnail", "wikibase_item", and "revision", but three properties inside it look useful to us: title, description, and extract. Let’s make a struct with those three properties. Then, to deserialize into the struct as we learned in chapter 17, we are going to want to bring in the serde and serde_json crates.
[dependencies]
reqwest = { version = "0.11.16", features = ["blocking"] }
crossterm = "0.26.1"
serde = { version = "1.0.160", features = ["derive"] }
serde_json = "1.0.96"
By giving our struct the Deserialize trait and using serde_json::from_str() function to convert from JSON, we have a much nicer output:
use crossterm::{
    event::{read, Event, KeyCode, KeyEventKind},
    execute,
    terminal::{Clear, ClearType},
};
use serde::Deserialize;
use std::io::stdout;

#[derive(Debug, Deserialize, Default)]
struct App {
    user_input: String
}

#[derive(Debug, Deserialize, Default)]
struct CurrentArticle {
    title: String,
    description: String,
    extract: String
}

const URL: &str = "https://en.wikipedia.org/api/rest_v1/page/summary";

fn main() {
    let mut app = App::default();

    loop {
        if let Event::Key(key_event) = read().unwrap() {
            if key_event.kind == KeyEventKind::Press {
                execute!(stdout(), Clear(ClearType::All)).unwrap();
                match key_event.code {
                    KeyCode::Backspace => {
                        app.user_input.pop();
                        println!("{}", app.user_input);
                    }
                    KeyCode::Esc => app.user_input.clear(),
                    KeyCode::Enter => {
                        println!("Searching Wikipedia...");
                        let req = get(format!("{URL}/{}", app.user_input))
                        ➥.unwrap();
                        let text = req.text().unwrap();
                        let as_article: CurrentArticle =
    serde_json::from_str(&text).unwrap();
                        println!("{as_article:#?}");
                    }
                    KeyCode::Char(c) => {
                        app.user_input.push(c);
                        println!("{}", app.user_input);
                    }
                    _ => {}
                }
            }
        }
    }
}
Okay, let’s type Interlingue (that’s the name of a language) and hit Enter. Quite readable! The output will now look like this:
Searching Wikipedia...
CurrentArticle {
    title: "Interlingue",
    description: "International auxiliary language created 1922",
    extract: "Interlingue, originally Occidental, is an international
    ➥auxiliary language created in 1922 and renamed in 1949. Its creator,
    ➥Edgar de Wahl, sought to achieve maximal grammatical regularity and
    ➥natural character. The vocabulary is based on pre-existing words from
    ➥various languages and a derivational system which uses recognized
    ➥prefixes and suffixes.",
}
Now, let’s improve the output and do some refactoring. The easiest place to start is by removing the calls to .unwrap() and replacing them with the question mark operator. We could use the anyhow crate, but let’s practice the Box<dyn Error> method that we learned in chapter 13. We can move some code out of main into a method for our App called .get_article(), which will return a Result<(), Box<dyn Error>>, which means that main() will return a Result<(), Box<dyn Error>>, too, because it is also using the question mark operator. Also, implementing Display for our App struct will make the output look much nicer.
The code after these changes is as follows:
use crossterm::{
    event::{read, Event, KeyCode, KeyEventKind},
    execute,
    terminal::{Clear, ClearType},
};
use reqwest::blocking::get;
use serde::{Deserialize, Serialize};
use std::{error::Error, io::stdout};

#[derive(Debug, Serialize, Deserialize, Default)]
struct CurrentArticle {
    title: String,
    description: String,
    extract: String,
}

#[derive(Debug, Default)]
struct App {
    current_article: CurrentArticle,
    search_string: String,
}

impl App {
    fn get_article(&mut self) -> Result<(), Box<dyn Error>> {
        let text = get(format!("{URL}/{}", self.search_string))?.text()?;
        if let Ok(article) = serde_json::from_str::<CurrentArticle>(&text) {
            self.current_article = article;
        }
        Ok(())
    }
}

impl std::fmt::Display for App {
    fn fmt(&self, f: &mut std::fmt::Formatter<'_>) -> std::fmt::Result {
        write!(
            f,
            "
                    Searching for: {}

Title: {}
------------
Description: {}
------------
{}",
            self.search_string,
            self.current_article.title,
            self.current_article.description,
            self.current_article.extract
        )
    }
}

const URL: &str = "https://en.wikipedia.org/api/rest_v1/page/summary";

fn main() -> Result<(), Box<dyn Error>> {
    let mut app = App::default();

    loop {
        println!("{app}");
        if let Event::Key(key_event) = read()? {
            if key_event.kind == KeyEventKind::Press {
                match key_event.code {
                    KeyCode::Backspace => {
                        app.search_string.pop();
                    }
                    KeyCode::Esc => app.search_string.clear(),
                    KeyCode::Enter => app.get_article()?,
                    KeyCode::Char(c) => {
                        app.search_string.push(c);
                    }
                    _ => {}
                }
            }
            execute!(stdout(), Clear(ClearType::All))?;
        }
    }
}
Now the output looks pretty clean!
                    Searching for: Interlingue

Title: Interlingue
------------
Description: International auxiliary language created 1922
------------
Interlingue, originally Occidental, is an international auxiliary language
➥created in 1922 and renamed in 1949. Its creator, Edgar de Wahl,
➥sought to achieve maximal grammatical regularity and natural
➥character. The vocabulary is based on pre-existing words from various
➥languages and a derivational system which uses recognized prefixes and
➥suffixes.
Let’s think about what could be developed with this app now that the basic functionality works:
The output is pretty clean now, but nothing is displayed when the user searches for a page that doesn’t exist. What error info should be displayed to help the user know what to do when something goes wrong? What about other errors like a broken internet connection?
You will be able to make the output even nicer after we finish the next project, which uses a crate that lets you put together terminal interfaces that look almost graphical.
Wikipedia is available in more languages than just English. How could you add an option to let the user switch languages?
The third project we will make is a text- or terminal-based user interface (TUI) that holds a stopwatch and a clock. In the previous examples, we used Crossterm on its own, which worked well enough. But there are crates that allow you to put together a terminal-based app that looks surprisingly nice. These are fairly popular because they are quick to compile, extremely responsive, and run inside the same terminal window we use to cargo run our programs.
The main crate for TUIs in Rust is called ratatui (https://docs.rs/ratatui/latest/ratatui/), which, in fact, uses crossterm on its backend. To be precise, the main crate is/was known as tui, but the owner of the crate ran out of time to maintain the crate (real life will do that to you sometimes; https://github.com/fdehau/tui-rs/issues/654), and it was forked under the new name ratatui. The original tui works just fine, but ratatui is being actively maintained and has new features added, so we will go with ratatui.
NOTE We will use version 0.21 of ratatui, which is more or less the same as the original tui crate, but at the time of publication ratatui has reached version 0.24 with quite a few new features added! By the time you read this book, there may be even more.
Every GUI and TUI crate has its own preferred method for building user interfaces, meaning that the quickest way to get started is to look for a working example. Inside ratatui is a Terminal that holds a backend, such as the crossterm backend. There is also a method called .draw() to draw the output on the screen, which we will run in a loop. Inside this method is a closure, which provides a struct on which we can use methods to create widgets and then call .render_widget() to display them.
Inside every loop, we will create a Layout, give it a direction (horizontal or vertical), set the size of each part of the layout by giving them constraints, and then split the layout into parts based on the total screen size. We want a simple horizontal app split 50% each way, so it will be set up as follows. Note the builder pattern here:
let layout = Layout::default()
    .direction(Direction::Horizontal)
    .constraints([Constraint::Percentage(50), Constraint::Percentage(50)])
    .split(f.size());             ①
let stopwatch_area = layout[0];
let utc_time_area = layout[1];
① The f is a struct called a Frame that the closure gives us access to. The f is a variable name and could be any other name as well.
With this code, we have split up the layout, but we haven’t made anything to display yet. To display something, we can choose among some of the widgets that ratatui offers, such as BarChart, Block, Dataset, Row, Table, Paragraph, and so on. A Paragraph lets us display some text, and we can put it inside a Block, which is the base widget used to give other widgets a border. All together it looks like this:
let stopwatch_block = Block::default().title("Stopwatch").borders(Borders::ALL);
stopwatch_text = Paragraph::new("First block").block(stopwatch_block);
And then finally comes the .render_widget() method, which takes a widget and an area:
f.render_widget(stopwatch_text, stopwatch_area);
That was quite a bit of typing, but nothing too complex: we are just instructing the TUI what to display. Let’s put it all together now:
use std::io::stdout;
use ratatui::{
    backend::CrosstermBackend,
    layout::{Constraint, Direction, Layout},
    widgets::{Block, Borders, Paragraph},
    Terminal,
};

fn main() {
    let stdout = stdout();
    let backend = CrosstermBackend::new(stdout);
    let mut terminal = Terminal::new(backend).unwrap();             ①

    loop {
        terminal
            .draw(|f| {
                let layout = Layout::default()
                    .direction(Direction::Horizontal)
                    .constraints([Constraint::Percentage(50), Constraint::
                    ➥Percentage(50)])
                    .split(f.size());
                let stopwatch_area = layout[0];
                let utc_time_area = layout[1];

                let stopwatch_block = Block::default().title("Stopwatch").bord
     ➥ers(Borders::ALL);
                let utc_time_block = Block::default().title("UTC time").bord
                ➥ers(Borders::ALL);

                let stopwatch_text = Paragraph::new("I'm a stopwatch").block
                ➥(stopwatch_block);
                let utc_text = Paragraph::new("Hi I'm in London").block(utc_
                ➥time_block);

                f.render_widget(stopwatch_text, stopwatch_area);
                f.render_widget(utc_text, utc_time_area);

            })
            .unwrap();
        std::thread::sleep(std::time::Duration::from_millis(20));   ②
        terminal.clear().unwrap();                                  ③
    }
}
① The ratatui Terminal takes a crossterm backend.
② The terminal is going to loop as fast as it possibly can, so let’s put it to sleep each time to keep the screen from flickering. Using .sleep() can be a bad idea in complex and async code, but we are just running a little terminal app on a single thread.
③ Ratatui has a convenience method called .clear(), so we don’t need to use a crossterm command to clear the screen anymore.
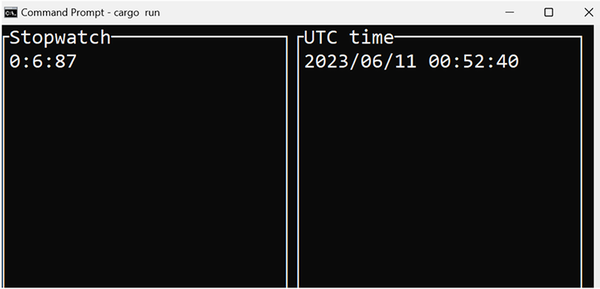
If you run the code now, you should see a pretty nice-looking terminal interface (figure 23.1). It isn’t doing anything at the moment, but you can resize the window and watch how the display changes. This is a lot slicker than just using crossterm!
It’s now time to start implementing the clock and stopwatch. We’ve used the chrono crate before in chapter 17, so this should not be too hard. Getting the current UTC datetime is quite easy:
chrono::offset::Utc::now();
Printing this out will look something like this:
2023-06-10T04:13:05.169920165Z
That output isn’t too readable. Fortunately, the DateTime struct in chrono has a method called .format() that lets us specify how we want it to look. This method takes a &str that recognizes tokens after a % sign, such as %Y to display the year, %H to display the hour, and so on (http://mng.bz/A8Gp). Let’s give it a try:
chrono::offset::Utc::now().format("%Y/%m/%d %H:%M:%S")
Now the output is much better:
2023/06/10 04:18:46
For the stopwatch, we are going to have to think a bit. A stopwatch should have three states:
Running—In this state, we should see the time passing as the seconds and milliseconds go by.
Stopped—In this state, we should see the seconds and milliseconds that passed when we stopped it.
That sounds like an enum with three variants. Fortunately, the state changes are easy: if the user presses a key, the stopwatch starts running. Another key press stops it, and the stopwatch shows the time that passed. Finally, another key resets it, bringing it back to a “not started” state.
The last thing to figure out is how to display the time. This isn’t too hard either, thanks to the Instant struct we learned to use in chapter 17. When the stopwatch starts, it should hold an Instant::now(), and as it runs or it has stopped, it should use .elapsed().millis() on the Instant to see how much time has passed in milliseconds.
Following this, all we need to do is to “pull off” the minutes, the seconds, and the milliseconds—in that order. For example, if the stopwatch stops and 70,555 milliseconds have passed, the code should do the following steps:
One minute has 60,000 milliseconds. See how many minutes have passed: 70,555 / 60,000 = 1 minute.
Subtract the minutes in milliseconds: 70,555 − 1 * 60,000 = 10,555 milliseconds left.
One second has 1,000 milliseconds. See how many seconds have passed: 10,555 / 1,000 = 10 seconds.
Subtract the seconds in milliseconds: 10,555 − 10 * 1,000 = 555 milliseconds left.
Finally, divide the milliseconds by 10 to get the split seconds (hundredths of a second).
When you put all that together, our Stopwatch struct will handle the logic like this:
    fn new() -> Self {
        Self {
            now: Instant::now(),
            state: StopwatchState::NotStarted,
            display: String::from("0:00:00"),
        }
    }
    fn get_time(&self) -> String {
        use StopwatchState::*;
        match self.state {
            NotStarted => String::from("0:00:00"),
            Running => {
                let mut elapsed = self.now.elapsed().as_millis();
                let minutes = elapsed / 60000;        ①
                elapsed -= minutes * 60000;           ②
                let seconds = elapsed / 1000;         ③
                elapsed -= seconds * 1000;
                let split_seconds = elapsed / 10;
                format!("{minutes}:{seconds}:{split_seconds}")
            }
            Done => self.display.clone(),
        }
    }
① Here, we see how many full minutes there are to display
② Then we subtract these minutes in milliseconds from the total time elapsed.
③ Then we repeat with the next largest unit, seconds. And so on.
With the stopwatch logic out of the way, we now have a working clock and stopwatch to play around with.
The last new entry to the code is the poll() method inside crossterm, which we will use instead of read(). Using read() waits until a user event takes place, but we want the stopwatch to run even if nobody is pressing any keys. The poll() method lets you specify a Duration to wait for an event. In our case, we will enter 0 for the Duration. Doing so will let us quickly check for a key event every loop, followed by redrawing the screen.
Here is the code we have so far:
use std::{
    io::stdout,
    time::Instant,
};

use crossterm::event::{poll, read, Event, KeyCode, KeyEventKind};
use ratatui::{
    backend::CrosstermBackend,
    layout::{Constraint, Direction, Layout},
    widgets::{Block, Borders, Paragraph},
    Terminal,
};

struct Stopwatch {
    now: Instant,
    state: StopwatchState,
    display: String,
}

enum StopwatchState {
    NotStarted,
    Running,
    Done,
}

impl Stopwatch {
    fn new() -> Self {
        Self {
            now: Instant::now(),
            state: StopwatchState::NotStarted,
            display: String::from("0:00:00"),
        }
    }
    fn get_time(&self) -> String {
        use StopwatchState::*;
        match self.state {
            NotStarted => String::from("0:00:00"),
            Running => {
                let mut elapsed = self.now.elapsed().as_millis();
                let minutes = elapsed / 60000;
                elapsed -= minutes * 60000;
                let seconds = elapsed / 1000;
                elapsed -= seconds * 1000;
                let split_seconds = elapsed / 10;
                format!("{minutes}:{seconds}:{split_seconds}")
            }
            Done => self.display.clone(),
        }
    }
    fn next_state(&mut self) {
        use StopwatchState::*;
        match self.state {
            NotStarted => {
                self.now = Instant::now();
                self.state = Running;
            }
            Running => {
                self.display = self.get_time();
                self.state = Done;
            }
            Done => self.state = NotStarted,
        }
    }
}

fn main() {
    let stdout = stdout();
    let backend = CrosstermBackend::new(stdout);
    let mut terminal = Terminal::new(backend).unwrap();
    let mut stopwatch = Stopwatch::new();

    loop {
        if poll(std::time::Duration::from_millis(0)).unwrap() {
            if let Event::Key(key_event) = read().unwrap() {
                if let (KeyCode::Enter, KeyEventKind::Press) = (key_event.co
                ➥de, key_event.kind) {
                    stopwatch.next_state();
                }
            }
        }

        terminal
            .draw(|f| {
                let layout = Layout::default()
                    .direction(Direction::Horizontal)
                    .constraints([Constraint::Percentage(50), Constraint::Pe
                    ➥rcentage(50)])
                    .split(f.size());
                let stopwatch_area = layout[0];
                let utc_time_area = layout[1];

                let stopwatch_block = Block::default().title("Stopwatch").bo
                ➥rders(Borders::ALL);
                let utc_time_block = Block::default()
                    .title("UTC time")
                    .borders(Borders::ALL);

                let stopwatch_text = Paragraph::new(stopwatch.get_time()).bl
                ➥ock(stopwatch_block);
                let utc_text = Paragraph::new(chrono::offset::Utc::now().for
                ➥mat("%Y/%m/%d %H:%M:%S").to_string())
                    .block(utc_time_block);

                f.render_widget(stopwatch_text, stopwatch_area);
                f.render_widget(utc_text, utc_time_area);
            })
            .unwrap();
        std::thread::sleep(std::time::Duration::from_millis(20));
        terminal.clear().unwrap();
    }
}
The output on your screen should now look like figure 23.2.
The code is working quite well, so let’s focus on cleaning it up. As always, we can replace calls to .unwrap() with the question mark operator. Let’s practice with anyhow this time by returning a Result<(), anyhow::Error> inside main(). The dependencies inside Cargo.toml should now look like this:
[dependencies]
anyhow = "1.0.71"
chrono = "0.4"
crossterm = "0.26.1"
ratatui = "0.21"
So what else should we clean up?
The builder pattern in ratatui makes it easy to set up an app, but it is also quite wordy. Let’s do some general readability cleanup, too, while we are at it. Instead of calling Block::default().title and so on twice inside main, we can put together a quick helper function that takes a &str and returns a Block. The same will go for the call to generate a formatted UTC time, which makes the line in main really long. This can be a helper function, too.
This sort of readability cleanup is a personal decision, but a good general rule is that helper functions can be good for readability as long as the important information can be seen in the first function. However, too many helper functions can be bad for readability. Writing a helper function that calls another helper function and then another helper function can help each function be nice and small, but it will take a lot of clicking for the reader of your code to finally find out exactly what is being done. Imagining yourself reading your own code one year later is a good way to decide how to refactor your code for readability.
In any case, here is what our code looks like now with some cleanup done:
use std::{io::stdout, thread::sleep, time::Duration, time::Instant};
use chrono::offset::Utc;
use crossterm::event::{poll, read, Event, KeyCode, KeyEventKind};
use ratatui::{
    backend::CrosstermBackend,
    layout::{Constraint, Direction, Layout},
    widgets::{Block, Borders, Paragraph},
    Terminal,
};

struct Stopwatch {
    now: Instant,
    state: StopwatchState,
    display: String,
}

enum StopwatchState {
    NotStarted,
    Running,
    Done,
}

impl Stopwatch {
    fn new() -> Self {
        Self {
            now: Instant::now(),
            state: StopwatchState::NotStarted,
            display: String::from("0:00:00"),
        }
    }
    fn get_time(&self) -> String {
        use StopwatchState::*;
        match self.state {
            NotStarted => String::from("0:00:00"),
            Running => {
                let mut elapsed = self.now.elapsed().as_millis();
                let minutes = elapsed / 60000;
                elapsed -= minutes * 60000;
                let seconds = elapsed / 1000;
                elapsed -= seconds * 1000;
                let split_seconds = elapsed / 10;
                format!("{minutes}:{seconds}:{split_seconds}")
            }
            Done => self.display.clone(),
        }
    }
    fn next_state(&mut self) {
        use StopwatchState::*;
        match self.state {
            NotStarted => {
                self.now = Instant::now();
                self.state = Running;
            }
            Running => {
                self.display = self.get_time();
                self.state = Done;
            }
            Done => self.state = NotStarted,
        }
    }
}

fn block_with(input: &str) -> Block {
    Block::default().title(input).borders(Borders::ALL)
}

fn utc_pretty() -> String {
    Utc::now().format("%Y/%m/%d %H:%M:%S").to_string()
}

fn main() -> Result<(), anyhow::Error> {
    let stdout = stdout();
    let backend = CrosstermBackend::new(stdout);
    let mut terminal = Terminal::new(backend)?;
    let mut stopwatch = Stopwatch::new();

    loop {
        if poll(Duration::from_millis(0))? {
            if let Event::Key(key_event) = read()? {
                if let (KeyCode::Enter, KeyEventKind::Press) = (key_event
                ➥.code, key_event.kind) {
                    stopwatch.next_state();
                }
            }
        }

        terminal.draw(|f| {
            let layout = Layout::default()
                .direction(Direction::Horizontal)
                .constraints([Constraint::Percentage(50), Constraint::Percen
                ➥tage(50)])
                .split(f.size());

            let stopwatch_area = layout[0];
            let utc_time_area = layout[1];

            let stopwatch_block = block_with("Stopwatch");
            let utc_time_block = block_with("Time in London");

            let stopwatch_text = Paragraph::new(stopwatch.get_time()).block(
            ➥stopwatch_block);
            let utc_text = Paragraph::new(utc_pretty()).block(utc_time_block
            ➥);

            f.render_widget(stopwatch_text, stopwatch_area);
            f.render_widget(utc_text, utc_time_area);
        })?;
        sleep(Duration::from_millis(20));
        terminal.clear()?;
    }
}
There’s quite a bit that you might want to add to this app. Here are some ideas:
The stopwatch outputs numbers like 0:9:1 but also numbers like 0:10:14, which is two characters longer. Can you make the display look cleaner than this?
Add some more cities in different time zones and line them up underneath the time in London.
The ratatui crate lets you build other widgets, such as charts. You could try using a free API like open-meteo (https://open-meteo.com/) to get the weather information for a location, displayed in a nice chart form.
The stopwatch continues to run even if the window is not visible, so it is using system resources even when you aren’t looking at it. The Event enum inside crossterm includes events called FocusGained and FocusLost that could let you avoid redrawing the screen when the user isn’t looking at the app.
The stopwatch returns a String every time the app loops, but much of the time, it is only showing the default time or the time when it was stopped. Could it be worth it to find a way to not allocate memory when the stopwatch is in a NotStarted or Done state?
Hopefully, you enjoyed these first three projects! Ideally, they should give you both a sense of satisfaction and a desire to keep working on and improving them. The next chapter is the very last chapter of the book and will continue with another three projects for you to keep developing. See you there!
Crates to make CLI apps are a great way to start making your own projects. They are responsive and quick to compile, and not much can go wrong.
GUIs and TUIs have structs with a lot of configuration options, which makes them an ideal place to use Default and the builder pattern.
Even a simple CLI can use a lot of system resources if it is set up to loop and check for user input. Solutions to this include short sleeps and monitoring user events (like FocusLost and FocusGained), only redrawing when the visual state has changed, and so on.
The Rust ecosystem is still fairly new. New crates pop up all the time, while older crates sometimes stop being maintained and are forked under new names.