Figure 18.1 You can think of Cargo as this ship holding all of the external crates together in the same place.
cargo doc, Rust’s documentation toolWe have seen that it is possible to learn almost anything in Rust just using the Playground. But if you have read this far in the book, you probably already have Rust installed on your computer. And there are always things that you can’t do with the Playground, such as working with files or writing code in more than just one file. Some other things that are best done on your computer for are user input and command-line arguments. But most important is that with Rust on your computer, you can use external crates. We have already learned a few crates, but the Playground only has access to the most popular ones. With Rust on your computer, you can use any external crate at all. The tool that binds this all together is called Cargo, Rust’s package manager.
One of the largest selling points of Rust is that pretty much everyone uses Cargo to build and manage their projects. Using Cargo gives Rust projects a common structure that makes it easy to work with external code written by multiple people at the same time. To understand why Cargo is found almost everywhere in Rust code, let’s first see what writing Rust is like without it.
The Rust compiler is called rustc and is what does the actual compiling. A Rust file ends with an .rs. Technically, you can compile programs on your own with commands like rustc main.rs, but it quickly gets annoying.
But let’s give it a try. Make a new directory and create a new file called test.rs. Then put something simple in like this:
fn main() {
    println!("Does this work?");
}
After that, type rustc test.rs. You should see a file called test.exe. That’s your program! Now just type test, and you should see something like this:
c:\nothing>test
Does this work?

c:\nothing>
Not bad! But how do you handle bringing in external code? If we want a random number, we will probably use the rand crate:
use rand::{thread_rng, Rng};

fn main() {
    let mut rng = thread_rng();
    println!("Today's lucky number: {}", rng.gen::<u8>());
}
But no luck. A lonely compiler doesn’t know what to do with this sudden rand keyword:
error[E0432]: unresolved import `rand`
 --> test.rs:1:5
  |
1 | use rand::{thread_rng, Rng};
  |     ^^^^ maybe a missing crate `rand`?
  |
  = help: consider adding `extern crate rand` to use the `rand` crate
It is just as confused even if we add extern crate rand as it suggests:
error[E0463]: can't find crate for `rand`
 --> test.rs:1:1
  |
1 | extern crate rand;
  | ^^^^^^^^^^^^^^^^^^ can't find crate
Technically, you can type rustc –help and start looking around for the right way to link external code. But nobody does this when building programs with Rust because there is a package manager and build tool called Cargo that takes care of all of this. Cargo uses rustc to compile, too; it automates the process to make it a nearly painless experience.
One note about the name: it’s called cargo because when you put crates together, you get cargo. A crate is a wooden box that you see on ships or trucks (figure 18.1), but you remember that every Rust project is also called a crate. When you put them together you get the whole cargo. So cargo comes from the idea of putting all the crates together to make a full project.
Figure 18.1 You can think of Cargo as this ship holding all of the external crates together in the same place.
You can see this when you use Cargo to run a project. To start a project in Cargo, type cargo new and its name. For example, you could type cargo new my_project. A directory will be created with the same name, inside of which is Cargo.toml and a directory called /src for the code. Inside this directory is main.rs, which is where you start writing your code. If you want to write a library (i.e., code that is meant for others to use), add --lib to the end of the command. Then Rust will create a lib.rs instead of main.rs in the /src directory.
With a new project started, let’s add rand = "0.8.5" to Cargo.toml, as we learned previously, and write some code to randomly choose between eight letters:
use rand::seq::SliceRandom;     ①

fn main() {
    let my_letters = vec!['a', 'b', 'c', 'd', 'e', 'f', 'g', 'h'];
    let mut rng = rand::thread_rng();
    for _ in 0..6 {
        print!("{} ", my_letters.choose(&mut rng).unwrap());
    }
}
① This is a blanket trait that lets us use a method called .choose() for slices, so we need to bring it into scope to use it.
This will print something like b c g h e a. But let’s first see what Cargo does before the program starts running. To use Cargo to both build and run a program, type cargo run. But there is quite a bit of output during compiling, too. It will look something like this:
   Compiling rand_core v0.6.4
   Compiling rand_chacha v0.3.1
   Compiling rand v0.8.5
   Compiling random_test v0.1.0 (C:\rust\random_test)
    Finished dev [unoptimized + debuginfo] target(s) in 2.61s
     Running `target\debug\random_test.exe`
It looks like Cargo didn’t just bring in a single crate called rand, but some others, too. That’s because we need rand for our crate, but rand also has code that needs other crates, too. Cargo will find all the crates we need and put them together. In our case, we only had a few, but on other projects, you may have 200, 600, or sometimes even more crates to bring in. In this case, the program took 2.61 seconds to compile, but this time will, of course, vary.
Compiling time is where you can see the tradeoff for Rust: compiling ahead of time is one reason why Rust is so fast, but you have to wait while Rust compiles your code. However, Rust does use incremental compilation. Incremental compilation means that when you make a change to your code, Rust will only recompile the changes, not the whole program. In our case, imagine that we add the letter i to my_letters and type cargo run again:
let my_letters = vec!['a', 'b', 'c', 'd', 'e', 'f', 'g', 'h', 'i'];
In this case, the crates such as rand_core are already brought in so they don’t get recompiled, and the whole process is a lot quicker:
   Compiling random_test v0.1.0 (C:\rust\random_test)
    Finished dev [unoptimized + debuginfo] target(s) in 0.55s
     Running `target\debug\random_test.exe`
f h i d e d
This time, it only took 0.55 seconds. So, to speed up your development time, try typing cargo build every time you add an external crate as you work on your code. Rust will compile your code in the background as you work, and every cargo build or cargo run thereafter will be a faster incremental compilation.
Rust optimizes (speeds up) its code in a number of ways, such as by turning generic functions and types into concrete ones. For example, here is some simple generic code that you might write:
use std::fmt::Display;

fn print_and_return<T: Display>(input: T) -> T {
    println!("You gave me {input} and now I will give it back.");
    input
}

fn main() {
    let my_name = print_and_return("Windy");
    let small_number = print_and_return(9.0);
}
This function can take anything with Display, so we gave it a &str and next gave it an f64, both of which implement Display. However, (unseen to us) the compiler changes generic functions to concrete ones for each type that it will use, which allows the program to be faster at run time.
So when it looks at the first part with "Windy" (a &str), it doesn’t just produce a fn print_and_return<T: Display>(input: T) -> T to use at run time. Instead, it turns it into something like fn print_and_return_str(input: &str) -> &str. It does the same on the next line with the input 9.0, turning the function into something like fn print_and_return_f64(input: f64) -> f64. All this is done during compile time. This is why generic functions take (slightly) longer to compile because the compiler generates a concrete function for each different type to be used at run time.
You’ll sometimes see this called a specialized definition or monomorphization. That is, when the compiler turns the generic function above into something like fn print_ and_return_f64(input: f64) -> f64, it has turned the generic function into a function that is specialized to the f64 type. And monomorphism, which is a Greek term for “single form-ism,” means that the function is now concrete and only has a single form. When we write a generic function, it is polymorphic (“multiple form”) because it can take on a lot of different forms in practice. The compiler then takes these generic functions, specializing them to the input type, and turns them into monomorphic (“single form”) functions.
Thankfully, you don’t have to think about any of this to write your code—the compiler does it all without showing you. But it’s nice to know some of the reasons why Rust takes a while to compile but runs really fast once the compiling is done.
One more thing: the makers of Rust work hard on lowering compile time because compile time is one of Rust’s largest pain points. However, almost every version of Rust compiles a bit faster than the previous version, and Rust today compiles much faster than it did a few years ago. If you are curious about some of these details, check out this blog by a Rust developer who writes about recent compiler improvements in a pretty readable way: https://nnethercote.github.io/.
Here are the most basic commands about Cargo to know:
cargo build will build your program as an executable so you can run it. You’ll find the executable inside the /target folder.
cargo build --release and cargo run --release will do the same but in release mode. You will usually use release mode when your code is finally done and you want it to be as optimized as possible. In release mode, Rust will take even longer to compile, but it is worth it because the compiler uses everything it knows to make it faster. Release mode is actually a lot faster than regular mode, which is called Debug mode because it compiles quicker and has more debug information. The regular cargo build is called a “debug build” and cargo build --release is called a “release build.” A debug build will go inside the /target/debug folder and release build inside the /target/release folder.
cargo check is the fastest way to check your code. It’s like compiling, except that it won’t actually build the program, which is why it doesn’t take as long. If you are in the middle of some coding and just curious whether your program will compile, use cargo check.
The best way to see the difference between debug and release mode is to look at a small function like this that uses a loop that runs 1,000 times:
pub fn add() -> i32 {
    let mut sum = 0;
    for _ in 0..1000 {
        sum += 1
    }
    sum
}
You’ll notice that the code is asking the computer to do a lot of work (looping 1,000 times), but the code is pretty simple. Even humans can look at this and know what the final output will be. Rust can do this sometimes, too.
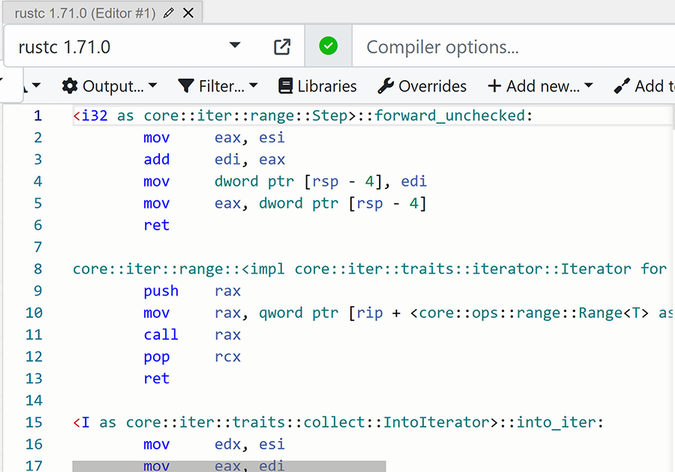
In Debug mode, the compiler will quickly put the code together to run this loop at run time, as well as add some debug info. The focus in debug mode is on compiling quickly and helping the developer. You can see this if you paste this function into the website Godbolt (https://rust.godbolt.org/), which shows the assembly code generated. For this function, you’ll see 100+ lines of code generated. Even if you don’t know any assembly, you’ll notice that the compiler is generating the code needed to run the loop. Figure 18.2 shows there are a lot of terms like Iterator, Range, into_iter, PartialOrd, and so on, so quite a bit of code relating to iterators and comparing numbers.
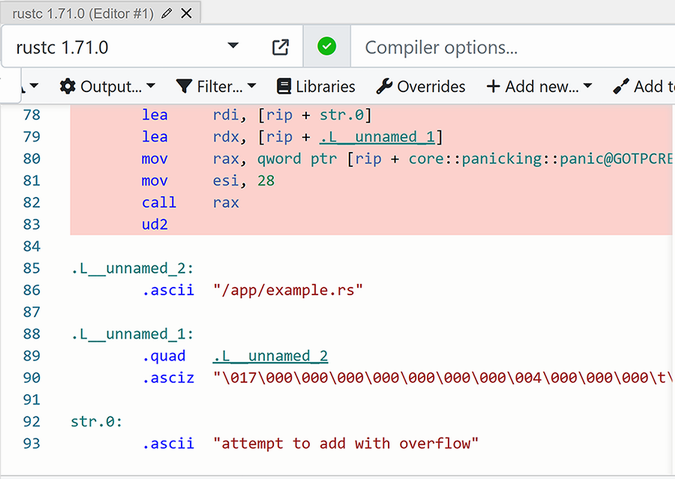
You can see the debug info at the end of the file, too, such as an error message in case the number overflows and the program needs to panic (figure 18.3).
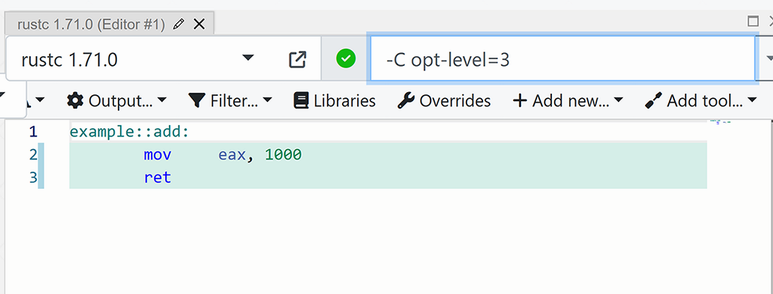
Now, here comes the fun part: release mode. Click on the triangle on the top right next to Compiler Options, select -C opt-level=val, and change val to 3 (3 is the optimization level for release builds). The compiler will then try to optimize as much as possible (figure 18.4)—and now the assembly is only three lines long!
The compiler has spent some extra time in release mode to analyze the loop and sees that it will always return 1,000. So why bother adding any extra code at run time? That is essentially how optimization at compile time works. If you choose to spend the extra time to compile in release mode, the compiler will have the extra time to analyze the code and shorten it as much as possible.
Here are some more Cargo commands:
cargo clippy will run clippy. It takes less time than cargo run and has all the opinions from clippy on how to improve your code.
cargo build --timings (or cargo run --timings) will generate a nice report in HTML that shows you how long each crate took when compiling.
By the way, the --release part of the command is called a “flag.” That means extra information in a command.
Let’s finish up this section with a few more useful Cargo commands:
cargo clean removes everything that was generated during the previous times that you compiled your code. When you add crates to Cargo.toml, the computer will download all the files it needs, which can take a lot of space (often a few gigabytes). If you don’t want them on your computer anymore, type cargo clean. This also cleans up any artifacts (the binaries and related files) generated when compiling your code. You can see this in action, as the /target folder will disappear when you type cargo clean.
cargo add followed by a crate name will add the latest version of an external crate to your Cargo.toml file (you can add it to Cargo.toml directly too).
cargo doc will build the documentation for your code. We’ll learn about cargo doc in just a few pages.
Now that we have Rust installed, we can work with user input. Generally, there are two ways to do this: while the program is running through stdin (that is, through the user’s keyboard) and before the program runs through command line arguments.
The easiest way to take input from the user is with std::io::stdin. This is pronounced “standard in,” which in this case is the input from the keyboard. With the stdin() function, you can get a Stdin struct, which is a handle to this input and has a method called .read_line() that lets you read the input to a &mut String. Here is a simple example of that, which is a loop that continues forever until the user presses the x key. It sort of works, but not quite in the right way. If you are feeling adventurous, try running the code yourself on your computer and think about why it doesn’t quite work as expected:
use std::io;

fn main() {
    println!("Please type something, or x to escape:");
    let mut input_string = String::new();

    while input_string != "x" {
        input_string.clear();                               ①
        io::stdin().read_line(&mut input_string).unwrap();  ②
        println!("You wrote {input_string}");
    }
    println!("See you later!");
}
① First, clear the String during every loop. Otherwise, it will just get longer and longer.
② Then use read_line to read the input from the user into read_string.
Please type something, or x to escape:
something
You wrote something

Something else
You wrote Something else

x
You wrote x

x
You wrote x
It takes our input and gives it back, and it even knows that we typed x. But it doesn’t exit the program. The only way to get out is by closing the window or by typing Ctrl + C to shut the program down. Did you notice the space after the output that says, “You wrote x”? That’s a hint. Let’s change the {} to {:?} in println!() to see whether there is any more more information. Doing this shows us what is going on:
Please type something, or x to escape:
something
You wrote "something\r\n"
Something else
You wrote "Something else\r\n"
x
You wrote "x\r\n"
x
You wrote "x\r\n"
Ah ha! This is because the keyboard input is actually not just something; it is something and the Enter key. When pressing Enter, Windows will add a \r\n (a carriage return and a new line), while other operating systems will add a \n (new line). In either case, we aren’t getting a simple x output when we press x to exit the program.
There is an easy method to fix this called .trim(), which removes all the whitespace. Whitespace, by the way, is defined as any of these characters (https://doc.rust-lang.org/reference/whitespace.html):
U+0009 (horizontal tab, '\t')
U+000A (line feed, '\n')
U+000B (vertical tab)
U+000C (form feed)
U+000D (carriage return, '\r')
U+0020 (space, ' ')
U+0085 (next line)
U+200E (left-to-right mark)
U+200F (right-to-left mark)
U+2028 (line separator)
U+2029 (paragraph separator)
Using .trim() will turn x\r\n (or x\n) into just x. Now it works:
use std::io;

fn main() {
    println!("Please type something, or x to escape:");
    let mut input_string = String::new();

    while input_string.trim() != "x" {
        input_string.clear();
        io::stdin().read_line(&mut input_string).unwrap();
        println!("You wrote {input_string}");
    }
    println!("See you later!");
}
Please type something, or x to escape:
something
You wrote something

Something
You wrote Something

x
You wrote x

See you later!
The std::io module has a lot of other structs (https://doc.rust-lang.org/std/io/index.html#structs) and methods if you need finer control over user input and program output.
With that quick introduction to user input done, let’s take a look at another type of user input: input that happens before the program even starts.
Rust has another kind of user input called std::env::Args. This Args struct holds what the user types when starting the program, known as command-line arguments. There is actually always at least one Arg in a program, no matter what the user types. Let’s write a program that only prints them using std::env::args() to see what it is:
fn main() {
    println!("{:?}", std::env::args());
}
If we type cargo run, it prints something like this:
Args { inner: ["target\\debug\\rust_book.exe"] }
You can see that Args will always give you the name of the program, no matter what.
Let’s give it more input and see what it does. Try typing cargo run but with some extra words. It gives us
Args { inner: ["target\\debug\\rust_book.exe", "but", "with", "some",
➥"extra", "words"] }
So it looks like every word after cargo run is recognized and can be accessed via this args() method. When we look at the documentation for Args (https://doc.rust-lang.org/std/env/struct.Args.html), we see that it implements IntoIterator, which is quite convenient. So we can just put it in a for loop:
use std::env::args;

fn main() {
    let input = args();
    for entry in input {
        println!("You entered: {}", entry);
    }
}
You entered: target\debug\rust_book.exe
You entered: but
You entered: with
You entered: some
You entered: extra
You entered: words
Since the first argument is always the program name, you will often want to skip it. We can do that with the .skip() method that all iterators have:
use std::env::args;

fn main() {
    let input = args();
    input.skip(1).for_each(|item| {
        println!(
            "You wrote {item}, which in capital letters is {}",
            item.to_uppercase()
        );
    })
}
You wrote but, which in capital letters is BUT
You wrote with, which in capital letters is WITH
You wrote some, which in capital letters is SOME
You wrote extra, which in capital letters is EXTRA
You wrote words, which in capital letters is WORDS
We can do more with these command line arguments inside our program besides print them. They are just strings, so it is easy enough to check to see if any arguments have been entered, and match on them if an argument is found. Here’s a small example that either makes letters big (capital) or small (lowercase):
use std::env::args;

enum Letters {
    Capitalize,
    Lowercase,
    Nothing,
}

fn main() {
    let mut changes = Letters::Nothing;
    let input = args().collect::<Vec<_>>();

    if let Some(arg) = input.get(1) {
        match arg.as_str() {
            "capital" => changes = Letters::Capitalize,
            "lowercase" => changes = Letters::Lowercase,
            _ => {}
        }
    }

    for word in input.iter().skip(2) {
      match changes {
        Letters::Capitalize => println!("{}", word.to_uppercase()),
        Letters::Lowercase => println!("{}", word.to_lowercase()),
        _ => println!("{}", word)
      }
    }
}
Let’s look at some examples of input. Try to imagine what will be printed out.
Input: cargo run please make capitals:
In this case, it will look at index 1, which is please. This input please doesn’t match capital or lowercase, so it will print out the remaining words without any change:
make capitals
In this case, it will match as before, but there is nothing after index 1 to print out, so there is no output.
Now, let’s look at some arguments from a user who is starting to figure out how the program works:
Input: cargo run capital I think I understand now
I
THINK
I
UNDERSTAND
NOW
Input: cargo run lowercase Does this work too?
does
this
work
too?
In practice, command-line arguments are used in a pretty similar way for most command-line interfaces (CLIs). An example of this is cargo run --help, which Cargo recognizes as a request to print out a menu to help the user know which commands are available. The main crate used by Rust users to work with command-line arguments is known as clap (CLAP = Command Line Argument Parser; https://docs.rs/clap/latest/clap/), which is highly recommended if you are putting together a CLI that needs to take in a lot of different types of arguments and flags.
Besides Args, there are also Vars, which are environment variables. Those can be seen when using std::env::args() and are the basic settings for the operating system and program that the user didn’t type in. These variables will include information like URLs.
Even the simplest program will have a lot of environment variables that vary by computer. Using std::env::vars() allows you to see them all as a (String, String) (a key and a value). Let’s take a look at what the Vars on the Rust Playground look like:
fn main() {
    for (key, value) in std::env::vars() {
        println!("{key}: {value}");
    }
}
CARGO: /playground/.rustup/toolchains/stable-x86_64-unknown-linux-gnu/bin/cargo
CARGO_HOME: /playground/.cargo
CARGO_MANIFEST_DIR: /playground
CARGO_PKG_AUTHORS: The Rust Playground
CARGO_PKG_DESCRIPTION:
CARGO_PKG_HOMEPAGE:
CARGO_PKG_LICENSE:
CARGO_PKG_LICENSE_FILE:
CARGO_PKG_NAME: playground
CARGO_PKG_REPOSITORY:
CARGO_PKG_VERSION: 0.0.1
CARGO_PKG_VERSION_MAJOR: 0
CARGO_PKG_VERSION_MINOR: 0
CARGO_PKG_VERSION_PATCH: 1
CARGO_PKG_VERSION_PRE:
DEBIAN_FRONTEND: noninteractive
HOME: /playground
HOSTNAME: 637927f45315
LD_LIBRARY_PATH: /playground/target/debug/build/libsqlite3-sys-
➥7c00a5831fa0c673/out:/playground/target/debug/build/ring-
➥c92344ea3efaac76/out:/playground/target/debug/deps:/playground/target
➥/debug:/playground/.rustup/toolchains/stable-x86_64-unknown-linux-
➥gnu/lib/rustlib/x86_64-unknown-linux-gnu/lib:/playground
➥/.rustup/toolchains/stable-x86_64-unknown-linux-gnu/lib
➥PATH: /playground/.cargo/bin:/usr/local/sbin:/usr/local/bin:/usr
➥/sbin:/usr/bin:/sbin:/bin
PLAYGROUND_EDITION: 2021
PLAYGROUND_TIMEOUT: 10
PWD: /playground
RUSTUP_HOME: /playground/.rustup
RUSTUP_TOOLCHAIN: stable-x86_64-unknown-linux-gnu
RUST_RECURSION_COUNT: 1
SHLVL: 1
SSL_CERT_DIR: /usr/lib/ssl/certs
SSL_CERT_FILE: /usr/lib/ssl/certs/ca-certificates.crt
USER: playground
_: /usr/bin/timeout
Environment variables can also be set while a program is running using std::env::set_var(). The following code will add an extra key and value for each existing key and value, except with an exclamation mark at the end:
fn main() {
    for (mut key, mut value) in std::env::vars() {
        key.push('!');
        value.push('!');
        std::env::set_var(key, value);
    }
    for (key, value) in std::env::vars() {
        println!("{key}: {value}");
    }
}
The output will show that there are now twice as many environment variables, half of which have exclamation marks everywhere. Here is part of the output:
CARGO!: /playground/.rustup/toolchains/stable-x86_64-unknown-linux-gnu/bin/cargo!
CARGO_HOME!: /playground/.cargo!
CARGO_MANIFEST_DIR!: /playground!
CARGO_PKG_AUTHORS!: The Rust Playground!
Now, let’s take a look at a more real example of set_var().
Programs often send logging information to an external service that displays the data in a nice format that makes it easy to understand. Most logging in Rust uses the RUST_LOG environment variable to keep track of how detailed logs should be. The five main logging levels are
You can see these logging levels in crates like env_logger (https://docs.rs/env_logger/latest/env_logger/).
Services are generally first deployed to a Dev environment for developers to work on and test, in which case RUST_LOG will be set to DEBUG, or maybe even TRACE. Then, when the developers are more confident in the service, they will move it to Prod (production), which will probably use a quieter logging level like INFO—but not always.
The following code represents a case where an app starting up will first check for RUST_LOG, and if nothing is set, will check to see if some other environment variable (we’ll call it "LOGGER_URL") shows a url to send logging information to. If the LOGGER_URL matches the dev url, it will assume that the logging level is DEBUG, and if LOGGER_URL matches the prod url, it will assume that the logging level is INFO. And if neither of these can be found, then RUST_LOG will be set to INFO:
use std::env;
const DEV_URL: &str = "www.somedevurl.com";
const PROD_URL: &str = "www.someprodurl.com";

fn main() {
    match std::env::var("RUST_LOG") {
        Ok(log) => println!("Logging at {log} level"),
        Err(_) => match std::env::var("LOGGER_URL") {
            Ok(url) if url == DEV_URL => {
                println!("Dev url indicated, defaulting to debug");
                env::set_var("RUST_LOG", "DEBUG");
            }
            Ok(url) if url == PROD_URL => {
                println!("Prod url indicated, defaulting to info");
                env::set_var("RUST_LOG", "INFO");
            }
            _ => {
                println!("No valid url indicated, defaulting to info");
                env::set_var("RUST_LOG", "INFO");
            }
        },
    }
}
If run on the Playground, you will see this output, showing that the environment variable hasn’t been set:
No valid url indicated, defaulting to info
You probably didn’t find this section particularly difficult. Working with user input usually involves more thinking about how your software works than writing code that you need to work hard at to compile. There are, of course, many other forms of user input. The last two chapters of the book include working with instantaneous user input (e.g., keyboard presses), so feel free to take a look at those chapters if you are curious and want to know now.
With Rust installed on the computer, we can now start working with files. You will notice that a lot of this code involves working with Results. This makes sense, as many things can go wrong when it comes to working with files. A file might not even exist, maybe the computer can’t read it, or you might not have permission to access it. All of these possible things that can go wrong make the ? operator really handy when working with files.
Let’s try working with files for the first time. The std::fs module contains methods for working with files, and with the std::io::Write trait in scope, you can write to them. With that, we can use .write_all() to write into the file. Here is a simple example that creates a file and writes some data to it:
use std::fs;
use std::io::Write;

fn main() -> std::io::Result<()> {
    let mut file = fs::File::create("myfilename.txt")?;    ①
    file.write_all(b"Let's put this in the file")?;        ②
    Ok(())
}
① Creates a file with this name. Be careful! If you have a file with this name already, it will be deleted.
② Files take bytes, so don’t forget the b in front.
Then, if you click on the new file myfilename.txt, you can see the Let's put this in the file text inside.
We don’t even need to use two lines to do this, though, thanks to the question mark operator. It will pass on the result we want if it works, kind of like when you chain methods on an iterator:
use std::fs;
use std::io::Write;

fn main() -> std::io::Result<()> {
    fs::File::create("myfilename.txt")?
        .write_all(b"Let's put this in the file")?;
    Ok(())
}
In fact, there is also a function that does both of these things together. It’s called std::fs::write(). Inside it, you give it the file name you want and the content you want to put inside. Again, careful! It will delete everything in that file if it already exists. It even lets you write a &str without b in front because write() takes anything that implements AsRef<[u8]> and str implements AsRef<[u8]>:
pub fn write<P: AsRef<Path>, C: AsRef<[u8]>>(path: P, contents: C) -> Result<()>
use std::fs;

fn main() -> std::io::Result<()> {
    fs::write("calvin_with_dad.txt",
"Calvin: Dad, how come old photographs are always black and white? Didn't they have color film back then?
Dad: Sure they did. In fact, those photographs are in color. It's just the world was black and white then.")?;
    Ok(())
}
Opening a file is just as easy as creating one. You just use open() instead of create(). After that (if the program finds your file), you can use methods like read_to_ string(), which lets you read the contents of a file into a String. It looks like this:
use std::fs;
use std::fs::File;
use std::io::Read;                                                    ①

fn main() -> std::io::Result<()> {
     fs::write("calvin_with_dad.txt",
"Calvin: Dad, how come old photographs are always black and white? Didn't
➥they have color film back then?
Dad: Sure they did. In fact, those photographs are in color. It's just the
➥world was black and white then.")?;

    let mut calvin_file = File::open("calvin_with_dad.txt")?;         ②
    let mut calvin_string = String::new();                            ③
    calvin_file.read_to_string(&mut calvin_string)?;                  ④
    calvin_string.split_whitespace().for_each(|word| print!("{} ",
           word.to_uppercase()));                                     ⑤
    Ok(())
}
① This is to use the function .read_to_string().
③ This String will hold the contents of the file.
④ Reads the file into the String using the read_to_string method
⑤ Now that we have it as a String, we’ll capitalize the whole thing just for fun.
CALVIN: DAD, HOW COME OLD PHOTOGRAPHS ARE ALWAYS BLACK AND WHITE? DIDN'T
➥THEY HAVE COLOR FILM BACK THEN? DAD: SURE THEY DID. IN FACT, THOSE
➥PHOTOGRAPHS ARE IN COLOR. IT'S JUST THE WORLD WAS BLACK AND WHITE
➥THEN.
What if we only want to create a file if there is no other file with the same name? This would let us avoid deleting any existing files when trying to make a new one. The std::fs module has a struct called OpenOptions that lets us do this, along with other custom behavior.
Interestingly, we’ve been using OpenOptions all this time and didn’t even know it. The source code for File::open() shows us the OpenOptions struct being used to open a file:
pub fn open<P: AsRef<Path>>(path: P) -> io::Result<File> {
        OpenOptions::new().read(true).open(path.as_ref())
    }
That looks familiar! It’s the builder pattern that we learned in chapter 15. The same pattern shows up inside the File::create() method:
pub fn create<P: AsRef<Path>>(path: P) -> io::Result<File> {
    OpenOptions::new().write(true).create(true).truncate(true).open(path.as_ref
    ➥())
    }
So, it looks like OpenOptions has a lot of methods to set whether to carry out certain actions when working with files. If you go to the documentation page for OpenOptions (https://doc.rust-lang.org/std/fs/struct.OpenOptions.html), you can see all the methods that you can choose from. Most take a bool:
.append()—To add to the content that’s already there instead of deleting.
.create_new()—Only creates a file if it’s not there already, failing otherwise.
.read()—Set this to true if you want it to be able to read a file.
.truncate()—Set this to true if you want to cut the file content to 0 (delete the contents) when you open it.
Then, at the end, you use .open() with the filename, and that will give you a Result.
Since Rust 1.58, you can access this OpenOptions struct directly from File through a method called options(). In the next example, we will make an OpenOptions with File::options(). Then we will give it the ability to write. After that, we’ll set .create_ new() to true and try to open the file we made. It won’t work, which is what we want:
use std::fs::{write, File};

fn main() -> std::io::Result<()> {
    write("calvin_with_dad.txt",
"Calvin: Dad, how come old photographs are always black and white? Didn't
➥they have color film back then?
Dad: Sure they did. In fact, those photographs are in color. It's just the
➥world was black and white then.")?;

    let calvin_file = File::options()
        .write(true)
        .create_new(true)
        .open("calvin_with_dad.txt")?;
    Ok(())
}
The error shows us that the file already exists, so the program exits with an error:
Error: Os { code: 80, kind: AlreadyExists, message: "The file exists." }
Next, let’s try using .append() so we can write to an existing file. We’ll also use the write! macro this time, which is yet another option available to us. We saw this macro before when implementing Display for our structs:
use std::fs::{read_to_string, write, File};
use std::io::Write;

fn main() -> std::io::Result<()> {
    write("calvin_with_dad.txt",
"Calvin: Dad, how come old photographs are always black and white? Didn't
➥they have color film back then?
Dad: Sure they did. In fact, those photographs are in color. It's just the
➥world was black and white then.")?;

    let mut calvin_file = File::options()
        .append(true)
        .read(true)
        .open("calvin_with_dad.txt")?;
    calvin_file.write_all(b"Calvin: Really?\n")?;
    write!(&mut calvin_file, "Dad: Yep. The world didn't turn color until
    ➥sometime in the 1930s...\n")?;
    println!("{}", read_to_string("calvin_with_dad.txt")?);
    Ok(())
}
Thanks to the ability to append, the file now holds a bit more of the conversation between Calvin and his dad:
Calvin: Dad, how come old photographs are always black and white? Didn't
➥they have color film back then?
Dad: Sure they did. In fact, those photographs are in color. It's just the
➥world was black and white then.
Calvin: Really?
Dad: Yep. The world didn't turn color until sometimes in the 1930s...
Finally, Rust has a convenient macro called include_str! that simply pulls the contents of a file into a &'static str at compile time—right into the binary. If the file can’t be found, the program won’t compile. This next sample will simply take the contents of main.rs and print it out:
fn main() {
    // Text, text, text
    let main = include_str!("main.rs");
    println!("Here's what main.rs looks like:\n\n{main}");
}
So the include_str! macro not only gives compile-time checking and a file conveniently located in memory but also increases the size of the binary. For example, try copying the contents of Bram Stoker’s Dracula (https://www.gutenberg.org/files/345/345-h/345-h.htm) into a file, use include_str!(), and then type cargo build. The file size inside the target/debug directory should be about 999 KB. But if you use std::fs::read_to_string() instead, you will have to access the file and handle the error (or unwrap) at run time, but the file size should be a much smaller 166 KB. In other words, the include part of the name of the macro refers to including the content inside the binary:
fn main() {
    let content = include_str!("dracula.txt");                          ①
    // let content = std::fs::read_to_string("dracula.txt").unwrap();   ②
}
As you can see, opening and writing to files isn’t particularly difficult. Just be careful that you don’t end up deleting existing files when creating a new one. Starting with File::options() is good default behavior to make sure that you are reviewing how you want your program to react when it comes across files with the same name.
You might have noticed that Rust documentation looks almost the same whether the code is from the standard library or someone else’s external crate. The left side of the documentation shows structs and traits, code examples are on the right, and so on in pretty much every crate you can find. This is because you can automatically make documentation just by typing cargo doc, and this convenience leads to almost everyone using it.
Even making a project with just a simple struct or two can help you learn about traits in Rust. For example, here are two structs that do almost nothing and nothing else:
pub struct DoesNothing {}
pub struct PrintThing {}

impl PrintThing {
    pub fn prints_something() {
        println!("I am printing something");
    }
}
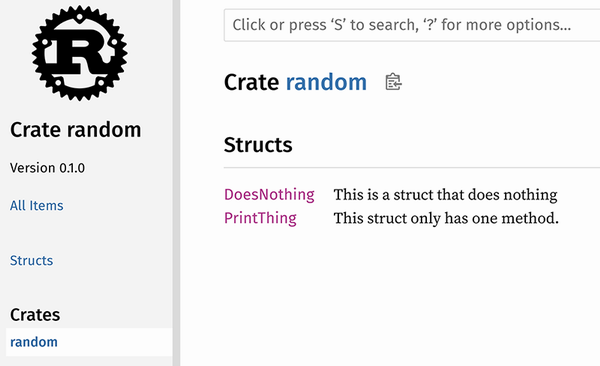
With just two empty structs and one method, you would think that cargo doc would generate just the struct names and one method. But if you type cargo doc --open (--open will open up the documentation in your browser once it is done), you can see a lot more information than you expected. The front page looks like figure 18.5, which does look fairly empty.
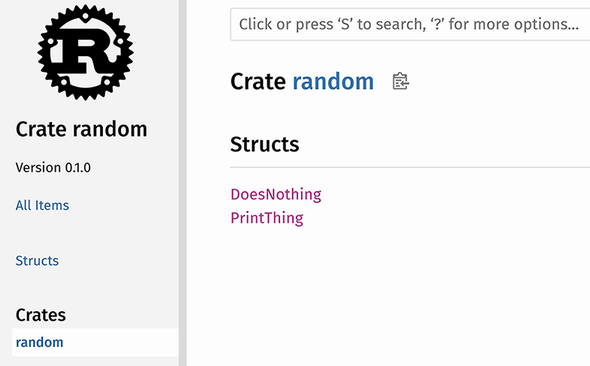
Figure 18.5 Cargo doc makes your documentation look professional even if all you did was make two empty structs.
But if you click on one of the structs, it will show you a lot of traits that you didn’t think were there. If you click on the DoesNothing struct, it will show us quite a few traits even though we didn’t type a single word of code to implement them. First, we see a number of traits that are automatically implemented:
Auto Trait Implementations
impl RefUnwindSafe for DoesNothing
impl Send for DoesNothing
impl Sync for DoesNothing
impl Unpin for DoesNothing
impl UnwindSafe for DoesNothing
And after that come some blanket implementations, which we learned about in the last chapter:
Blanket Implementations
impl<T> Any for T where T: 'static + ?Sized,
impl<T> Borrow<T> for T where T: ?Sized,
impl<T> BorrowMut<T> for T where T: ?Sized,
impl<T> From<T> for T
impl<T, U> Into<U> for T where U: From<T>,
impl<T, U> TryFrom<U> for T where U: Into<T>,
impl<T, U> TryInto<U> for T where U: TryFrom<T>
Then, if we add some documentation comments with /// you can see them when you type cargo doc. Here is the same code with a few comments above each struct and method:
/// This is a struct that does nothing
pub struct DoesNothing {}

/// This struct only has one method.
pub struct PrintThing {}

impl PrintThing {
    /// This function just prints a message.
    pub fn prints_something() {
        println!("I am printing something");
    }
}
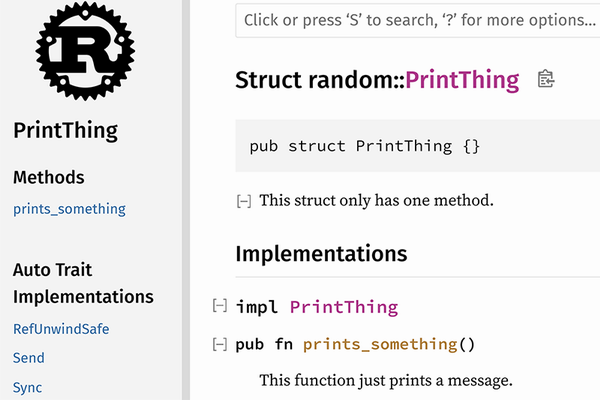
These comments will now show up in the documentation (figure 18.6).
When you click on PrintThing, it will show this struct’s methods as well (figure 18.7).
cargo doc is particularly nice when using a lot of external code. Because these crates are all on different websites, it can take some time to search them all. But if you use cargo doc, you will have them all in the same place on your hard drive. If you don’t want to document all the external code, you can pass in a --no-deps (no dependencies) flag, which will only compile your code.
Cargo is one of the main reasons for Rust’s popularity as a language, and after this chapter, you can probably see why. It allows you to start a project, build your code, document it, check it, add external crates, and much more. With Rust and Cargo installed by now, we were also able to take in user input and command-line arguments for the first time and work with files.
With Rust installed, we can also start to do HTTP requests, and in the next chapter, we will do just that with the reqwest crate that we first saw in the last chapter. Not only will we learn how the crate works, but it will also give us our first introduction to async Rust: Rust code that doesn’t block its thread while doing some work. We’ll also learn how to use feature flags to only take in part of an external crate, allowing us to shorten compile time a little.
Use cargo check when building your code to see if it compiles, and cargo run to test it out. Don’t forget that it won’t be optimized for speed unless you build with the --release flag!
If you are curious whether code is being optimized, try using Godbolt on different optimization levels. Even without knowing assembly, you can get a general sense of what is happening on a lower level.
Debug printing a String will give more insight into what actual input is being passed in when working with user input. Display output looks cleaner but may hide some important information.
Args are arguments passed in on the command line, while Vars are the environment variables that have to do with overall configuration. An example of an argument is --open for cargo doc, and an example of an environment variable is RUST_BACKTRACE that we saw in chapter 14.
Be sure to take extra care when working with files, and use File::options() unless you are absolutely sure that no files will be unknowingly deleted when creating a new one.
Make use of the cargo doc --open command a lot if you are writing open source code for other people to use. This will show you right away how well documented your code is to someone reading it for the first time.