Figure 14.1 Files that aren’t declared don’t exist as far as Rust is concerned...
As your code grows, you’re going to want to think about its structure. The more you write, the more you’ll find that some code belongs in its own space, separate from other bits of code. You’ll also want to start testing your code as it grows because even Rust’s strict compiler can’t protect you from logic errors. Tests also help to remind you when you change your code if something has gone wrong. Writing tests can be a bit boring at times, but, in general, the more tests you have to catch problems, the better. We’ll also learn test-driven development (TDD), which means to write the tests before you write any code! In TDD, you write your tests, which will all fail. Only then, you write your code to make the tests pass one by one until finally everything works the way you intended.
First, we are going to learn about where to put your code, what parts to make pub (available to others to use), and so on. Every time you write code in Rust, you are writing it in a crate. A crate is the file, or files, that go together for your code. (It also has a few other files to manage the project, but we’ll look at those later.) Inside the file you write, you can also make modules using the keyword mod. In other programming languages, a module is often known as a namespace. A module is a space for functions, structs, and anything else that you think belongs inside its own space. Here are some reasons to use a module:
Building your code—It helps you think about the general structure of your code and remember what code goes where. This can be important as your code gets larger and larger.
Defining names and keeping types from conflicting with other types with similar or the same names—One good example is the standard library that has three traits that are each called CommandExt. But looking at the modules they belong to, it is quite clear why they all have the same name: they end with linux::process::Command- Ext, unix::process::CommandExt, and windows::process::CommandExt.
Reading your code—People can understand your code more easily. For example, the name std::collections::HashMap tells you that it’s in std inside the module collections. This gives you a hint that maybe there are more collection types inside collections that you can try.
Privacy—Everything inside a module starts out as private. Modules themselves are also private unless you make them public. Doing this lets you keep users from using types and functions directly. This idea is sometimes called encapsulation: keeping things that are private in their own “capsules” and limiting access to them.
You can probably see already why you might want to use modules as your code grows. So let’s make one and see what it looks like.
To make a module, just write mod and start a code block with {}. We will make a module called print_things that has some printing-related functions:
mod print_things {
    use std::fmt::Display;

    fn prints_one_thing<T: Display>(input: T) {
        println!("{input}");
    }
}

fn main() {}
You can see that we wrote use std::fmt::Display; inside print_things because a module is a separate space. If you wrote use std::fmt::Display; on the very top outside of the print_things module, the code wouldn’t compile because it wouldn’t be able to find the path to the Display trait.
We also can’t call this function from main() yet. Without the pub keyword in front of fn it will stay private and inaccessible, so the code will not compile:
mod print_things {
    use std::fmt::Display;

    fn prints_one_thing<T: Display>(input: T) {
        println!("{}", input)
    }
}

fn main() {
    use print_things::prints_one_thing;

    prints_one_thing(6);
    prints_one_thing("Trying to print a string...".to_string());
}
error[E0603]: function `prints_one_thing` is private
  --> src\main.rs:10:30
   |
10 |     use crate::print_things::prints_one_thing;
   |                              ^^^^^^^^^^^^^^^^ private function
   |
note: the function `prints_one_thing` is defined here
  --> src\main.rs:4:5
   |
4  |     fn prints_one_thing<T: Display>(input: T) {
   |     ^^^^^^^^^^^^^^^^^^^^^^^^^^^^^^^^^^^^^^^^^
It’s easy to understand that the function prints_one_thing is private. The error message helpfully shows us with src\main.rs:4:5 where to find the function. This is helpful because you can write mods not just in one file but over a lot of files as well.
The solution to this is easy: we can just write pub fn instead of fn and now everything works:
mod print_things {
    use std::fmt::Display;

    pub fn prints_one_thing<T: Display>(input: T) {
        println!("{}", input)
    }
}

fn main() {
    use print_things::prints_one_thing;

    prints_one_thing(6);
    prints_one_thing("Trying to print a string...".to_string());
}
6
Trying to print a string...
The pub keyword works a little differently depending on what you are making public. Let’s see what the differences are.
There are small differences in what the pub keyword does depending on whether it is in front of a struct, enum, trait, or module. These differences make sense when you think about them. They are as follows:
pub for a struct—pub makes the struct public, but the parameters are still private. To make a parameter public, you have to write pub for it, too. The same rule applies to tuple structs, too, so to make a pub Email(String) fully public, you would have to write pub Email(pub String). So a pub Email(String) is a type called Email which the user can use, but they can’t use .0 to access the String inside. (In the next chapter, we will learn about a popular trait called Deref that lets you use inner methods, like all the methods for String in this case, while keeping a type’s parameters private.)
pub for an enum or trait—Everything becomes public. For a trait, this means every method in the trait, and for an enum, this means every variant of the enum. This makes sense because traits are about giving the same behavior to something. And enums are about choosing between variants, and you need to see them all to choose them.
pub for a module—A top-level module will be pub by default inside its own crate (as we saw in the previous example) but won’t be accessible from outside without pub. And modules inside modules all need pub to be public.
The Rust reference (http://mng.bz/XqGa) sums this up quite well in a single sentence: “By default, everything is private, with two exceptions: items in a pub Trait are public by default; Enum variants in a pub enum are also public by default.”
To demonstrate, let’s make a struct called Billy inside print_things. This struct will be almost all public, but not quite. The struct itself is public, so it will say pub struct Billy. Inside, it will have a name and times_to_print. The parameter name will not be public because we don’t want the user to be able to choose any name but Billy. But the user can select the number of times to print, so that part will be public. It looks like this:
mod print_things {

    #[derive(Debug)]
    pub struct Billy {                               ①
        name: String,
        pub times_to_print: u32,
    }

    impl Billy {
        pub fn new(times_to_print: u32) -> Self {    ②
            Self {
                name: "Billy".to_string(),           ③
                times_to_print,
            }
        }
        pub fn print_billy(&self) {
            for _ in 0..self.times_to_print {
                println!("{}", self.name);
            }
        }
    }
}

fn main() {
    use print_things::*;

    let my_billy = Billy::new(3);                    ④
    my_billy.print_billy();
}
① Billy, the struct, is public, but the parameter name inside it is private.
② The user needs to use new() to create a Billy. The user can only change the number of times_to_print.
③ We choose the name; the user can’t. No Billy struct can have any name but Billy.
④ Now we use *, which imports everything from the module print_things.
"Billy"
"Billy"
"Billy"
By the way, the * to import everything is called the glob operator. Glob stands for global—in other words, everything.
Inside a mod, you can create other modules. A child module (a module inside a module) can always use anything inside a parent module. You can see this in the next example where we have a mod city inside a mod province inside a mod country.
You can think of the structure like this: even if you are in a country, you might not be in a province (or state, or prefecture). And even if you are in a province, you might not be in a city. But if you are in a certain city, you are guaranteed to be in its province and in its country.
Two other things to pay attention to here are crate:: and super::. If you start a path to a type or function with crate::, it starts from the beginning—from the outside to the inside. But if you are inside a module, you can use super:: to move up one module. (As we learned before, the word super itself means “above,” like in “superior.”) Pay close attention to the city module. Inside this module, we are calling the same function twice, one using the path that starts from crate:: and the other using super:: two times to go up two modules. Those are simply two ways to call the same thing:
mod country {                                                         ①
    fn print_country(country: &str) {                                 ②
        println!("We are in the country of {country}");
    }
    pub mod province {                                                ③
        fn print_province(province: &str) {                           ④
            println!("in the province of {province}");
        }
        pub mod city {                                                ⑤
            pub fn print_city(country: &str, province: &str, city: &str) {

                crate::country::print_country(country);               ⑥
                super::super::print_country(country);

                crate::country::province::print_province(province);   ⑦
                super::print_province(province);
                println!("in the city of {city}");
            }
        }
    }
}

fn main() {
    country::province::city::print_city("Canada", "New Brunswick", "Moncton");
}
① The top level module doesn’t need pub.
④ This function isn’t pub either.
⑤ This module and the function it holds are both pub.
⑥ The path to the print_country function can be written from the crate level moving down or from the current location moving up using the keyword super.
⑦ Here’s one more example of writing the same thing either from the crate level down or current level up.
Try to follow the flow of the code and imagine what the output will be if you run this code sample.
The interesting part is that print_city() can access print_province() and print_country(). That’s because mod city is inside the other modules. It doesn’t need pub in front of print_province() to use it. And that makes sense: a city doesn’t need to do anything to be inside a province and inside a country.
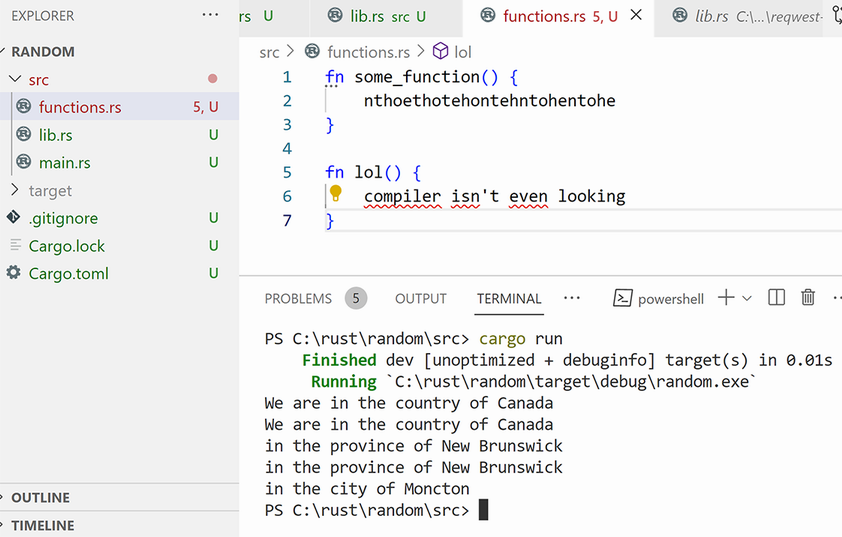
Here is the output (see figure 14.1):
We are in the country of Canada
We are in the country of Canada
in the province of New Brunswick
in the province of New Brunswick
in the city of Moncton
When putting together your own project, the general setup looks like this: a main.rs file for the main function and related code and a lib.rs file. which is the library to hold types, functions, and so on that aren’t related to the main running of the software you are building. Of course, nothing is stopping you from putting everything inside main.rs if you really want.
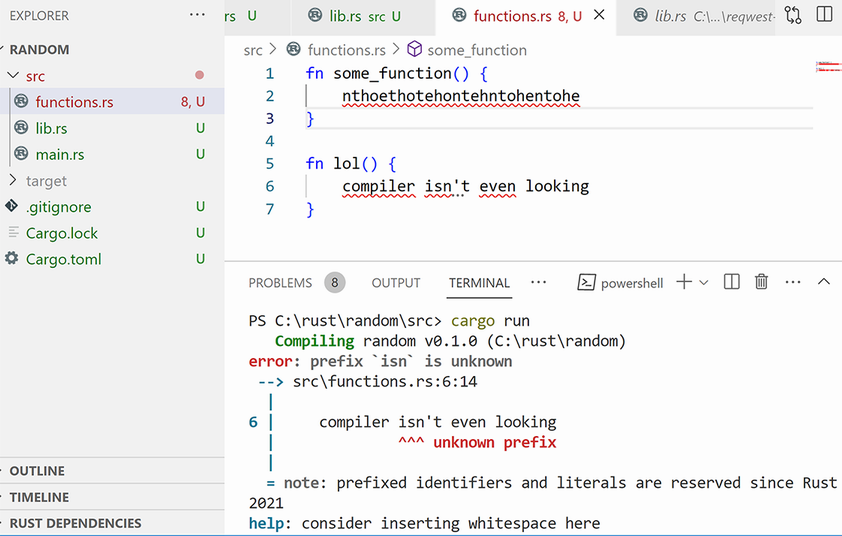
Something interesting happens when creating separate files (for example, a file called functions.rs): Rust won’t even notice them! You can write all sorts of garbage inside this new file and—although your IDE might notice—the program will compile without any problems.
To have Rust notice them, go to lib.rs and declare them using the mod keyword. So if you make a functions.rs file, you have to type mod functions; inside lib.rs. Otherwise, Rust won’t see it. But once the file has been declared, Rust will see it, and it won’t compile the code anymore if there is a problem with it (see figure 14.2).
We will look more at structuring a project in chapter 18, where we will learn about Rust on the computer instead of just in the Playground. But, for now, let’s leave it at that and learn how to write tests.
Testing is a good subject to learn now that we understand modules. Testing your code is easy in Rust because you can write tests right next to your code. You can create separate test files if you want, but you don’t have to if you don’t want to. Let’s look at the easiest way to start testing.
The easiest way to start testing is to add #[test] above a function. Here is a simple one:
#[test]
fn two_is_two() {
    assert_eq!(2, 2);
}
But if you try to run it in the Playground with the Run button, it gives an error: error[E0601]: `main` function not found in crate `playground`. That’s because you don’t use Run for tests; you use Test. To run this in the Playground, click on ··· next to RUN on the top left and change it to TEST. Now if you click on it, it will run all of your tests. In this case, it will just be one. (If you have Rust installed already, you will type cargo test to do this instead of cargo run or cargo check.)
Also, you don’t use a main() function for tests: they go outside. You can outright delete the main() function and still run tests.
Here is the output of the previous test:
running 1 test
test two_is_two ... ok

test result: ok. 1 passed; 0 failed; 0 ignored; 0 measured; 0 filtered out
One other point to note: test functions can’t take any arguments. So this won’t compile:
#[test]
fn test_that_wont_work(input: i32) {}
The compiler message is as clear as day: error: functions used as tests can not have any arguments. A test function is pretty similar to main() in this way.
So, how does the compiler know that the test passed? It’s pretty simple: if a test function does not panic, then it is a pass, and if it does panic, then it’s a failure. The assert_eq! macro will panic if the two arguments inside it don’t match, or you can use other ways to panic upon failure: .unwrap(), .expect(), the panic! macro, and so on.
The output for a passing test is pretty boring, so let’s see what happens when it panics.
Let’s change assert_eq!(2, 2) to assert_eq!(2, 3) and see what we get. When a test fails, you get a lot more information:
running 1 test
test two_is_two ... FAILED

failures:

---- two_is_two stdout ----
thread 'two_is_two' panicked at src/lib.rs:3:5:
assertion `left == right` failed
  left: 2
 right: 3
note: run with `RUST_BACKTRACE=1` environment variable to display a backtrace


failures:
    two_is_two

test result: FAILED. 0 passed; 1 failed; 0 ignored; 0 measured; 0 filtered
➥out; finished in 0.00s
assert_eq!(left, right) and assert!(bool) are probably the most common ways to test a function in Rust. For assert_eq!, if the left and right sides don’t match, it will panic and show that the values are different: left has 2 but right has 3.
The output for the assert! macro is almost the same:
#[test]
fn two_is_two() {
    assert!(2 == 3);
}
running 1 test
test two_is_two ... FAILED

failures:

---- two_is_two stdout ----
thread 'two_is_two' panicked at src/lib.rs:3:1:
assertion failed: 2 == 3
note: run with `RUST_BACKTRACE=1` environment variable to display a backtrace


failures:
    two_is_two

test result: FAILED. 0 passed; 1 failed; 0 ignored; 0 measured; 0 filtered
➥out; finished in 0.00s
So what does RUST_BACKTRACE=1 mean? This is a setting on your computer that you can use to get a lot more detail when an assertion fails. These settings are known as environment variables. We will learn more about them in chapter 18, but, in the meantime, just remember that they can be found using the function std::env::var(). Let’s use this function to take a look at the default value for RUST_BACKTRACE:
fn main() {
    println!("{:?}", std::env::var("RUST_BACKTRACE"));
}
By default, that will print Err(NotPresent). But in the Playground, it’s easy to enable: click ··· next to STABLE and set backtrace to ENABLED. Or you can use the function set_var() to do the same thing: std::env::set_var("RUST_BACKTRACE", "1"); If you do that, it will give you a lot more information:
running 1 test
test two_is_two ... FAILED

failures:

---- two_is_two stdout ----
thread 'two_is_two' panicked at src/lib.rs:3:5:
assertion failed: 2 == 3
stack backtrace:
   0: rust_begin_unwind
             at /rustc/a28077b28a02b92985b3a3faecf92813155f1ea1/library/std/
             ➥src/panicking.rs:597:5
   1: core::panicking::panic_fmt
             at /rustc/a28077b28a02b92985b3a3faecf92813155f1ea1/library/core/
             ➥src/panicking.rs:597:5src/panicking.rs:72:14
   2: core::panicking::panic
             at /rustc/a28077b28a02b92985b3a3faecf92813155f1ea1/library/core/
             ➥src/panicking.rs:597:5src/panicking.rs:127:5
   3: playground::two_is_two
             at ./src/lib.rs:3:5
   4: playground::two_is_two::{{closure}}
             at ./src/lib.rs:2:17
   5: core::ops::function::FnOnce::call_once
             at /rustc/a28077b28a02b92985b3a3faecf92813155f1ea1/library/core/
             ➥src/panicking.rs:597:5src/ops/function.rs:250:5
   6: core::ops::function::FnOnce::call_once
             at /rustc/a28077b28a02b92985b3a3faecf92813155f1ea1/library/core/
             ➥src/panicking.rs:597:5src/ops/function.rs:250:5
note: Some details are omitted, run with `RUST_BACKTRACE=full` for a verbose
➥src/panicking.rs:597:5 backtrace.


failures:
    two_is_two

test result: FAILED. 0 passed; 1 failed; 0 ignored; 0 measured; 0 filtered
➥src/panicking.rs:597:5 out; finished in 0.05s
You don’t need to use a backtrace unless you really can’t find where the problem is. But, luckily, you don’t need to understand it all either. If you read from the bottom to the top, you will soon come across where the error happens: it’s on line 4 where it says playground—that’s where it talks about your code. Here’s that part again:
   4: playground::two_is_two
             at ./src/lib.rs:3:5
   5: playground::two_is_two::{{closure}}
             at ./src/lib.rs:2:1
You’ll also notice that the message tells us that we can set "RUST_BACKTRACE=full" for a “verbose backtrace” (a detailed backtrace). This used to be the default backtrace on Rust until it was improved with the less complicated output we just saw.
The verbose backtrace output is so verbose that it would take up a full page in this book. The Playground doesn’t have a button to enable a verbose backtrace, but we can use std::env::set_var() to set it. Give this code a try if you want to see just how verbose it is:
#[test]
fn two_is_two() {
    std::env::set_var("RUST_BACKTRACE", "full");
    assert!(2 == 3);
}
The output is indeed verbose: it’s about four times longer!
Now let’s turn backtrace off again and return to regular tests.
Now, we’ll start writing multiple tests. Let’s put a few simple functions together, followed by test functions to make sure that they work. Here are a few:
fn return_two() -> i8 {
    2
}
#[test]
fn it_returns_two() {
    assert_eq!(return_two(), 2);
}

fn return_six() -> i8 {
    4 + return_two()
}
#[test]
fn it_returns_six() {
    assert_eq!(return_six(), 6)
}
running 2 tests
test it_returns_two ... ok
test it_returns_six ... ok

test result: ok. 2 passed; 0 failed; 0 ignored; 0 measured; 0 filtered out
Rust programmers often put their tests in their own modules. To do this, use the mod keyword to create a new module and add #[cfg(test)] above it (remember: cfg means “configure”). This attribute tells Rust not to compile it unless you are testing. You also need to continue to write #[test] above each test. This is because later on, when you install Rust, you can do more complicated testing. You will be able to run one test, or all of them, or run a few. Also, don’t forget to write use super::*; because the test module needs access to the functions above it. Now, it will look like this:
fn return_two() -> i8 {
    2
}
fn return_six() -> i8 {
    4 + return_two()
}

#[cfg(test)]
mod tests {
    use super::*;

    #[test]
    fn it_returns_six() {
        assert_eq!(return_six(), 6)
    }
    #[test]
    fn it_returns_two() {
        assert_eq!(return_two(), 2);
    }
}
This is the way you will usually see testing done in Rust and in other languages, too. You write your code first, then want to make sure that it behaves in the way it should, and then write some tests. This is probably human nature since the desire to create and the desire to get work done is so strong. But you can also do it the other way around by writing the tests first! Let’s take a look at how that works.
You might see the words test-driven development (TDD) when reading about Rust or another language. TDD is a bit unique, and some people like it while others prefer something else (so it’s up to you how to test your own code).
TDD means writing tests first, all of which will fail! Only then you start writing the code. Then you start writing the code and keep doing that until all the tests pass. The tests then stay to show you if something goes wrong when you add to and rewrite your code later on. This is pretty easy in Rust because the compiler gives a lot of information about what to fix. Let’s write a small example of test-driven development and see what it looks like.
Let’s imagine a calculator that takes user input as a String. To make the example as simple as possible, we’ll only let the calculator subtract (we’ll call it the Subtractor). If the user writes "5 - 6", it should return -1; if the user writes "15 - 6 - 7", it should return 2; if the user writes "1 -- 1", it should return 2, and so on. And because we are using TDD, we will start with test functions before a single line of code is written.
We won’t write the Subtractor yet, but we still need to give it a bit of thought so we can write tests that it will need to pass. The plan is to use a single function called math() to do everything. It will return an i32 (we won’t use floats).
For our Subtractor, the following five tests seem reasonable:
Simple operation with one minus sign: "1 - 2" should return -1.
Simple operation with two minus signs: "1 - - 1" should return 2.
Spaces and characters after the last number should be ignored: "18 - 9 -9-- ---" should return 0.
If the input doesn’t contain a number, a space, or a minus sign, the program should panic: "7 - seven" should panic.
The absolute minimum code to make the tests is to have an empty Subtractor struct and a .math() method that returns an i32. For the .math() method, we’ll just have it return a random number like 6—we’ll think about it later. The first code looks like this:
struct Subtractor;

impl Subtractor {
    fn math(&mut self, input: &str) -> i32 {
        6
    }
}

#[test]
fn one_minus_two_is_minus_one() {
    let mut calc = Subtractor;               ①
    assert_eq!(calc.math("1 - 2"), -1);
}
#[test]
fn one_minus_minus_one_is_two() {
    let mut calc = Subtractor;
    assert_eq!(calc.math("1 - -1"), 2);
}
#[test]
fn three_minus_three_minus_three_minus_minus_three_is_zero() {
    let mut calc = Subtractor;
    assert_eq!(calc.math("3-3-3--3"), 0);
}
#[test]
fn eighteen_minus_nine_minus_nine_is_zero_even_with_characters_on_the_end() {
    let mut calc = Subtractor;
    assert_eq!(calc.math("18  - 9     -9-----"), 0);
}
#[test]
#[should_panic]                              ②
fn panics_when_characters_not_right() {
    let mut calc = Subtractor;
    calc.math("7 - seven");
}
① So far, there’s nothing to mutate in Subtractor, but we plan to have it hold input and parse numbers, so it will be mutable from the start.
② Note that this test is annotated with #[should_panic]. If it doesn’t panic, that’s a failure.
The first part of the test output simply tells us which tests passed or not:
running 5 tests
test eighteen_minus_nine_minus_nine_is_zero_even_with_characters_on_the_end
➥... FAILED
test nine_minus_three_minus_three_minus_three_is_zero ... FAILED
test one_minus_two_is_minus_one ... FAILED
test one_minus_minus_one_is_two ... FAILED
test panics_when_characters_not_right - should panic ... FAILED
Along with that is information per failed test on why it failed, such as thread 'tests ::one_minus_two_is_minus_one' panicked at src/lib.rs:10:5: assertion left == right` failed. We haven’t started the .math() method yet, so this output is still of no use to us.
You can also see that function names in tests are usually quite descriptive, like one_minus_two_is_minus_one. You can probably imagine why: as your code grows, you might end up making 10s or even 100s of tests, and descriptive test names let you understand right away which tests have failed.
Now it’s time to think about how to make the Subtractor. First, we will accept any number, the minus symbol, and empty spaces. We can represent this with a const called OKAY_CHARACTERS that contains all the possible input. To check input, we can use .chars() on the const to make an iterator of characters and .any() to panic with an error message if any characters aren’t contained in OKAY_CHARACTERS.
Now, the code before the tests looks like this:
const OKAY_CHARACTERS: &str = "1234567890- ";

struct Subtractor;

impl Subtractor {
    fn math(&mut self, input: &str) -> i32 {
            if input
            .chars()
            .any(|character| !OKAY_CHARACTERS.contains(character))
        {
            panic!("Please only input numbers, -, or spaces.");
        }
        6
    }
}
Running the tests gives us this result:
running 5 tests
test one_minus_minus_one_is_two ... FAILED
test one_minus_two_is_minus_one ... FAILED
test panics_when_characters_not_right - should panic ... ok
test six_minus_three_minus_three_minus_minus_three_is_zero ... FAILED
test eighteen_minus_nine_minus_nine_is_zero_even_with_characters_on_the_end
➥... FAILED
One test succeeded! Our .math() method will only accept proper input now. That was the easiest part. Now it’s time to actually put the Subtractor together.
The first step in putting the Subtractor together is to think about what the .math() method should return and how. Instead of returning a 6 every time, it should return some total. To start, we’ll concentrate on the following:
We’ll give the Subtractor struct a parameter called total, which starts at zero.
First, we’ll remove any spaces from the input and trim the input string so that any spaces or minus signs at the end are ignored. That leaves only numbers and the minus sign as possible characters.
We’ll then go through each character and match on it. If it’s a number, we’ll push it into a parameter (a String) called num_to_parse. If we see a minus sign, we will know that the number is done. For example, for the input "55-7", we would push a 5, then push another 5, and then see a minus sign and know that the number is done. In that case, we’ll parse num_to_parse into an i32 and subtract it from the total.
Since total starts at 0 and num_to_parse is an empty String, we might as well implement Default for our Subtractor.
As for double minus signs, we’ll think about that later. Let’s just try to get one more test to pass.
const OKAY_CHARACTERS: &str = "1234567890- ";

#[derive(Default)]
struct Subtractor {
    total: i32,
    num_to_parse: String,
}

impl Subtractor {
    fn math(&mut self, input: &str) -> i32 {
            if input
            .chars()
            .any(|character| !OKAY_CHARACTERS.contains(character))
        {
            panic!("Please only input numbers, -, or spaces.");
        }

        let input = input
            .trim_end_matches(|x| "- ".contains(x))    ①
            .chars()
            .filter(|x| *x != ' ')
            .collect::<String>();

        for character in input.chars() {
            match character {
                '-' => {
                    let num = self.num_to_parse.parse::<i32>().unwrap();
                    self.total -= num;
                    self.num_to_parse.clear();
                }
                number => self.num_to_parse.push(number),
            }
        }
        self.total
    }
}

#[test]
fn one_minus_two_is_minus_one() {                      ②
    let mut calc = Subtractor::default();
    assert_eq!(calc.math("1 - 2"), -1);
}
#[test]
fn one_minus_minus_one_is_two() {
    let mut calc = Subtractor::default();
    assert_eq!(calc.math("1 - -1"), 2);
}
#[test]
fn three_minus_three_minus_three_minus_minus_three_is_zero() {
    let mut calc = Subtractor::default();
    assert_eq!(calc.math("3-3-3--3"), 0);
}
#[test]
fn eighteen_minus_nine_minus_nine_is_zero_even_with_characters_
➥on_the_end() {
    let mut calc = Subtractor::default();
    assert_eq!(calc.math("18  - 9     -9-----"), 0);
}
#[test]
#[should_panic]
fn panics_when_characters_not_right() {
    let mut calc = Subtractor::default();
    calc.math("7 - seven");
}
① .trim_end_matches() removes anything that matches at the end of a &str.
② The tests are the same except that we are using Default to make the Subtractor now.
NOTE .trim_end_matches() and .trim_start_matches() used to be .trim_ right_matches() and .trim_left_matches(). But people noticed that some languages go from right to left (Persian, Hebrew, etc.) so right and left didn’t always mean end and start. You might still see the other names in really old Rust code.
The tests won’t change from here on, so we won’t include the test code in the code samples anymore. Happily, one more test passes!
running 5 tests
test eighteen_minus_nine_minus_nine_is_zero_even_with_characters_on_the_end
➥... FAILED
test one_minus_minus_one_is_two ... FAILED
test panics_when_characters_not_right - should panic ... ok
test three_minus_three_minus_three_minus_minus_three_is_zero ... FAILED
test one_minus_two_is_minus_one ... ok
We still haven’t made the Subtractor smart enough to know that a minus sign can also mean to add, so three tests have still failed. But interestingly, two of the tests have given us an unexpected hint for what to do next. Here is the error:
---- one_minus_minus_one_is_two stdout ----
thread 'one_minus_minus_one_is_two' panicked at src/lib.rs:22:44:
called `Result::unwrap()` on an `Err` value: ParseIntError { kind: Empty }
The code is still simple enough that we can imagine what is happening here. In this test, the input is "1 - -1". The spaces and needless input at the end are removed, turning the input to "1--". If we follow the logic, here is what the program is doing:
Sees a minus sign, parses num_to_parse, adds it to the total.
Sees a minus sign, parses num_to_parse...ah ha! It’s trying to parse a number that doesn’t exist.
We can fix this with a quick check to see whether num_to_parse is empty or not. Change the scope that starts with for character in input.chars() to the following:
        for character in input.chars() {
            match character {
                '-' => {
                    if !self.num_to_parse.is_empty() {
                        let num = self.num_to_parse.parse::<i32>().unwrap();
                        self.total -= num;
                        self.num_to_parse.clear();
                    }
                }
                number => self.num_to_parse.push(number),
            }
        }
With that done, three tests still fail. But at least we are not trying to parse an empty string anymore, and the ParseIntErrors are gone. And it was thanks to the tests that we noticed this.
Up next, we will tell the Subtractor when it should add and when it should subtract. Fortunately, this isn’t too hard: one minus sign means subtract, two minus signs means to add, three means to subtract, and so on. We could count the number of minus signs, but there is a way that is both easier to use and to read: use an enum. We will make an enum called Operation with two variants: Add and Subtract. The Subtractor will default to Add, and every time it sees a minus sign, it will simply switch.
const OKAY_CHARACTERS: &str = "1234567890- ";

#[derive(Default)]
struct Subtractor {
    total: i32,
    num_to_parse: String,
    operation: Operation,
}

#[derive(Default)]
enum Operation {
    #[default]                                                    ①
    Add,
    Subtract,
}

impl Subtractor {
    fn switch_operation(&mut self) {
        self.operation = match self.operation {
            Operation::Add => Operation::Subtract,
            Operation::Subtract => Operation::Add,
        }
    }
    fn math(&mut self, input: &str) -> i32 {
        if input
            .chars()
            .any(|character| !OKAY_CHARACTERS.contains(character))
        {
            panic!("Please only input numbers, -, or spaces.");
        }

        let input = input
            .trim_end_matches(|x| "- ".contains(x))
            .chars()
            .filter(|x| *x != ' ')
            .collect::<String>();

        for character in input.chars() {
            match character {
                '-' => {
                    if !self.num_to_parse.is_empty() {
                        let num = self.num_to_parse.parse::<i32>().unwrap();
                        match self.operation {
                            Operation::Add => self.total += num,
                            Operation::Subtract => self.total -= num
                        }
                        self.operation = Operation::Add;          ②
                        self.num_to_parse.clear();                ②
                    }
                    self.switch_operation();
                }
                number => self.num_to_parse.push(number),
            }
        }
        self.total
    }
}
① Since Rust 1.62 (released July 2022), you can now pick a default variant for an enum, as long as it is a "unit enum variant" (has no data in it). You do it by using the #[derive(Default)] attribute on top and then #[default] over the default variant.
② These two lines restore the Subtractor to the default now that the operation is over.
Interestingly, now only one test passes! Let’s look at the failures closely (left = test output, right = expected output). See whether you can tell what they all have in common:
Input: "18  - 9     -9--  ---"
left: 9, right: 0

Input: "1 - 2"
left: 1, right: -1

Input: "1 - -1"
left: 1, right: 2

"3-3-3--3"
left: -3, right: 0
Ah, yes, they are all ignoring the last number. At the very end of our iterator through self.input, we always have a final number but just push it to self.num_to_parse and end the program without adding or subtracting it. To fix this, we can just check at the end whether num_to_parse is empty or not, and if it isn’t empty, we can add to or subtract from the total. Since that operation will use the same code as before, we can make a method called .do_operation() so that we aren’t duplicating code.
And after doing this, the tests pass. Here is the final code:
const OKAY_CHARACTERS: &str = "1234567890- ";

#[derive(Default)]
struct Subtractor {
    total: i32,
    num_to_parse: String,
    operation: Operation,
}

#[derive(Default)]
enum Operation {
    #[default]
    Add,
    Subtract,
}

impl Subtractor {
    fn switch_operation(&mut self) {
        self.operation = match self.operation {
            Operation::Add => Operation::Subtract,
            Operation::Subtract => Operation::Add,
        }
    }

    fn do_operation(&mut self) {
        let num = self.num_to_parse.parse::<i32>().unwrap();
        match self.operation {
            Operation::Add => self.total += num,
            Operation::Subtract => self.total -= num,
        }
        self.operation = Operation::Add;
        self.num_to_parse.clear();
    }

    fn math(&mut self, input: &str) -> i32 {
        if input
            .chars()
            .any(|character| !OKAY_CHARACTERS.contains(character))
        {
            panic!("Please only input numbers, -, or spaces.");
        }

        let input = input
            .trim_end_matches(|x| "- ".contains(x))
            .chars()
            .filter(|x| *x != ' ')
            .collect::<String>();

        for character in input.chars() {
            match character {
                '-' => {
                    if !self.num_to_parse.is_empty() {
                        self.do_operation();
                    }
                    self.switch_operation();
                }
                number => self.num_to_parse.push(number),
            }
        }
        if !self.num_to_parse.is_empty() {
            self.do_operation();
        }
        self.total
    }
}
Success! And now that the tests pass, we could start refactoring the code a bit. We could return a Result instead of panicking or make some small methods to make the code cleaner. But this section is only about testing, so we’ll leave it the way it is.
You can see that there is a back-and-forth process in TDD. It’s something like this:
First, you write all the tests you can think of. They will all fail because you haven’t written the code yet to make them pass.
Then you start writing the code. The tests will start to pass, and eventually, they will all pass.
You add the tests, and your tests grow as you go. The more tests you have, the more times your code gets checked.
Of course, tests don’t check everything, and it is wrong to think that “passing all tests” equals “the code is perfect.” At the end of the day, a test only checks what the human programmer thinks should be checked. But tests are also great for when you change your code. Say you change your code later on and run the tests. If one of them doesn’t work, you will know what to fix. This is especially important when working on a team or writing code that someone else might have to manage one day.
In this chapter, we’ve learned about structuring and testing your project, and we haven’t even needed to install Rust yet! This will be good practice for later on in the book when it’s time to move on to Rust installed on your computer. But in the meantime, we have a lot of Rust left that can be learned on the Playground. In the next chapter, we will learn some interesting patterns, plus a popular trait called Deref that gives you all the methods from someone else’s type inside your types for free!
Putting your code into modules is a good way to start thinking about what parts of your types should be made public.
Since Rust makes everything private by default, you can simply use the pub keyword whenever you need it to compile your code. Or you can rewrite your code if you don’t want to give access to your type’s parameters.
A test function is similar to main() because it takes no arguments.
Use #[cfg(test)] over test code to let the compiler know that it doesn’t need to compile it unless you are doing tests. You can still keep the test code close to your other code, just don’t forget the annotation.
Test-driven development is great if you already know what you want your final product to look like. It can also help if you sort of know what you want your final product to look like. As you write the tests, you will get a clearer and clearer picture of what you are trying to make.
With TDD, all tests will fail in the beginning. Write as many as you can think of and then start writing the code to make them pass.