This chapter is a bit of a break after the last two, with Box being the only really new concept. But Box is one of the most important types in Rust because it makes a lot of things possible that otherwise wouldn’t be, especially when working with traits. You’ll be glad to know it! To start off the chapter, though, we will relax a bit and learn how to read documentation, which in Rust is always generated in the same way. This is nice because once you get used to reading documentation in Rust, you will be able to understand the documentation for anyone else’s code. We’ll also learn about attributes, which are the small pieces of code that start with a # that you see above a type (like #[derive(Debug)], for example) or at the beginning of a file.
It’s important to know how to read documentation in Rust so you can understand what other people write. As the saying goes, reading other people’s code is just as important as writing your own. Fortunately, Rust excels here, too, because Rust documentation is always put together in the same way. In chapter 18, we’ll look at the tool that makes documentation in more detail, but if you have Rust installed and can’t wait to try it out, type cargo doc—-open in any directory that has your Rust code. It will put the documentation together and open it up in your browser like magic! If you have Cargo installed already, check out the documentation (https://doc.rust-lang.org/cargo/commands/cargo-doc.html) for other flags to add to the cargo doc command.
The cargo doc tool is used to make the documentation for the standard library and just about everything else, so you only need to learn how to read Rust documentation once. Let’s look at some things you need to know when reading Rust documentation.
We previously saw that assert_eq! is used when adding guarantees inside your code. If you put two items inside the macro, the program will panic if they are not equal. Here is a simple example where we need an even number:
fn main() {
    prints_number(56);
}

fn prints_number(input: i32) {
    assert_eq!(input % 2, 0);                          ①
    println!("The number is not odd. It is {input}");
}
① The variable number must be even. If the number % 2 is not 0, it panics.
The number is not odd. It is 56,
which shows that it satisfied the assert_eq! macro by returning true, and thus, the program did not panic.
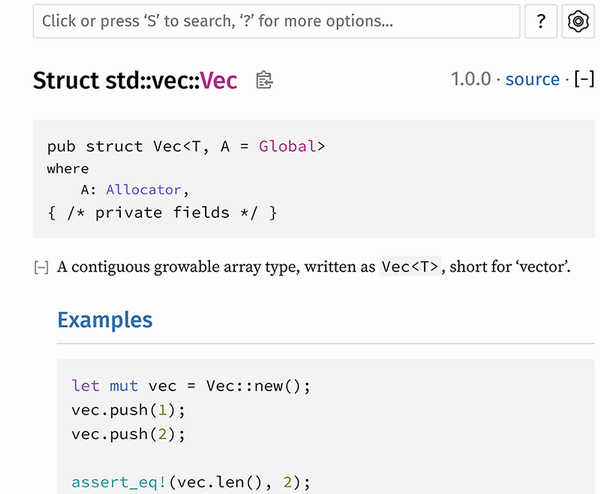
Maybe you don’t have any plans to use assert_eq! in your code, but it is everywhere in Rust documentation. Otherwise, you would need to use println! and have readers actually run your code to see the output. Plus, you would require Display or Debug for anything you needed to print. That’s why documentation has assert_eq! everywhere. The following example comes from the std::vec::Vec documentation (https://doc.rust-lang.org/std/vec/struct.Vec.html), which shows how to use a Vec:
fn main() {
    let mut vec = Vec::new();
    vec.push(1);
    vec.push(2);

    assert_eq!(vec.len(), 2);
    assert_eq!(vec[0], 1);

    assert_eq!(vec.pop(), Some(2));
    assert_eq!(vec.len(), 1);

    vec[0] = 7;
    assert_eq!(vec[0], 7);

    vec.extend([1, 2, 3].iter().copied());

    for x in &vec {
        println!("{}", x);
    }
    assert_eq!(vec, [7, 1, 2, 3]);
}
In such examples, you can think of assert_eq!(a, b) as saying, “At this point, a and b will be the same.” Now, look at the same example with annotations on the right that show what it actually means:
fn main() {
    let mut vec = Vec::new();
    vec.push(1);
    vec.push(2);

    assert_eq!(vec.len(), 2);             ①
    assert_eq!(vec[0], 1);                ②

    assert_eq!(vec.pop(), Some(2));       ③
    assert_eq!(vec.len(), 1);             ④

    vec[0] = 7;
    assert_eq!(vec[0], 7);                ⑤

    vec.extend([1, 2, 3].iter().copied());

    for x in &vec {
        println!("{}", x);
    }
    assert_eq!(vec, [7, 1, 2, 3]);        ⑥
}
② Now the value of vec[0] is 1.
③ When you use .pop() here, it returns Some(2).
⑤ Now the value of vec[0] is 7.
⑥ Now vec contains [7, 1, 2, 3].
Because assert_eq! will panic if the two items aren’t equal, you can also run the code, and if it doesn’t panic, you know that the items inside are correct. We will see a lot more of this macro in chapter 15, which is devoted to testing.
The search bar always shows up at the top of the page in Rust documentation and shows you results as you type. When you go down a page, you can’t see the search bar anymore, but if you press the S key on the keyboard, it will take you back up to the top. So, pressing S anywhere lets you search right away (see figure 13.1).
Usually, the code for a method, struct, etc., will not be shown in full. You don’t usually need to see the full source to know how it works, and the full code can be confusing. Also, items that aren’t pub won’t show up in the documentation. But if you do want to see everything, you can always click [src]. For example, on the page for String, you can see this signature for with_capacity():
pub fn with_capacity(capacity: usize) -> String
Okay, so you put a number in, and it gives you a String. That’s easy, but maybe we are curious and want to see more. How does it actually work? If you click [src], you can see the full code:
pub fn with_capacity(capacity: usize) -> String {
    String { vec: Vec::with_capacity(capacity) }
}
Interesting! This shows us that String is a kind of Vec. Actually, the type String is a vector of u8 bytes, which is interesting to know. You didn’t need to know that to use the with_capacity() method, so the entire code is only shown if you click [src]. Thus, clicking [src] is a good idea if the document doesn’t have much detail and you want to know more.
Let’s take a look at the source code for another type we recently learned, Cell. In chapter 10, we learned that the .get() method for Cell only works when the inner type implements Copy. It’s fine to remember this directly, but if we look at the documentation (https://doc.rust-lang.org/src/core/cell.rs.html#435), it becomes even clearer:
impl<T: Copy> Cell<T> {
    pub fn get(&self) -> T {
        // Function details...
    }

    pub fn update<F>(&self, f: F) -> T
    where
        F: FnOnce(T) -> T,
    {
        // Function details...
    }
}
Cell also only lets you .clone() if the inner type is Copy:
impl<T: Copy> Clone for Cell<T> {
    fn clone(&self) -> Cell<T> {
        Cell::new(self.get())
    }
}
Interesting! So these methods don’t exist if the inner type doesn’t implement Copy because they are written in separate impl blocks that start with impl<T: Copy>, thus requiring T to be Copy to be used.
Looking at the source details of the code can help you remember in a more interesting and effective way than just repeating that “Cell’s .get() and .update() and .clone() methods only work if the inner type implements Copy.”
The important part of the documentation for a trait is “Required Methods” on the left. If you see that a trait has required methods, you will probably have to write the method yourself. For example, for Iterator, you need to write the .next() method. For From, you need to write the from() method. However, some traits can be implemented with just an attribute, as we see in #[derive(Debug)]. Debug needs the .fmt() method, but usually, you just use #[derive(Debug)] unless you want to do it yourself. That’s why the page on std::fmt::Debug says, “Generally speaking, you should just derive a Debug implementation.”
Let’s look at attributes in more detail. An attribute is a small piece of code that the compiler interprets in different ways. They are not always easy to create, but they are very easy to use. Some attributes are built into the language, some are used to derive traits (like #[derive(Debug)]), and some are for configuring tools (the previously mentioned cargo doc is one example of a tool).
If you write an attribute with just #, it will affect the code on the next line. But if you write it with #!, it will affect everything in the file.
An attribute with a # is called an outer attribute because it stands outside of the item that follows it. An attribute with a #! is called an inner attribute because it affects everything inside its file. An inner attribute needs to be placed at the very top of the file or module it is used in. Files and modules are another subject we will learn in chapter 15. For now, just remember this easy rule: put inner attributes at the very top!
And in any case, the compiler will complain if you don’t put inner attributes above everything else. For example, if you run
fn empty_function() {}

#![allow(dead_code)]
the compiler will tell you exactly what is wrong and the reason why:
error: an inner attribute is not permitted in this context
 --> src/lib.rs:3:1
  |
3 | #![allow(dead_code)]
  | ^^^^^^^^^^^^^^^^^^^^
  |
  = note: inner attributes, like `#![no_std]`, annotate the item enclosing
  ➥them, and are usually found at the beginning of source files
  = note: outer attributes, like `#[test]`, annotate the item following them
Let’s look at some attributes you will see a lot.
#[allow(dead_code)] and #[allow(unused_variables)]. If you write code that you don’t use, Rust will still compile, but it will let you know. For example, here is a struct with nothing in it and one variable. We don’t use either of them:
struct JustAStruct {}

fn main() {
    let some_char = 'ん';
}
If you write this, Rust will remind you that you didn’t use them:
warning: unused variable: `some_char`
 --> src\main.rs:4:9
  |
4 |     let some_char = 'ん';
  |         ^^^^^^^^^ help: if this is intentional, prefix it with an
  ➥underscore: `_some_char`
  |
  = note: `#[warn(unused_variables)]` on by default

warning: struct is never constructed: `JustAStruct`
 --> src\main.rs:1:8
  |
1 | struct JustAStruct {}
  |        ^^^^^^^^^^^
  |
  = note: `#[warn(dead_code)]` on by default
We know that you can write an _ before the name to make the compiler be quiet:
struct _JustAStruct {}

fn main() {
    let _some_char = 'ん';
}
But you can also use attributes. You’ll notice in the message that it uses #[warn(unused_variables)] and #[warn(dead_code)]. In our code, JustAStruct is dead code, and some_char is an unused variable. The opposite of warn is allow, so we can write this and it will not say anything:
#![allow(dead_code)]
#![allow(unused_variables)]

struct Struct1 {}                                        ①
struct Struct2 {}                                        ①
struct Struct3 {}                                        ①
struct Struct4 {}                                        ①
struct Struct5 {}                                        ①

fn main() {
    let char1 = 'ん';                                    ②
    let char2 = ';';                                     ②
    let some_str = "I'm just a regular &str";            ②
    let some_vec = vec!["I", "am", "just", "a", "vec"];  ②
}
② Creates four variables. We don’t use any of them but the compiler is quiet.
You can combine these two into a single attribute if you want the compiler to be quiet about everything that isn’t being unused: #![allow(unused)].
Of course, dealing with dead code and unused variables is important. But sometimes, you want the compiler to be quiet for a while. Or you might need to show some code or teach people Rust and don’t want to confuse them with compiler messages.
#[derive(TraitName)] lets you derive some traits for structs and enums that you create. This works with many common traits that can be automatically derived. Some, like Display, can’t be automatically derived because Display is meant for a nice, human-readable display, and that requires a human to decide how to do it. So this won’t work:
#[derive(Display)]
struct HoldsAString {
    the_string: String,
}

fn main() {
    let my_string = HoldsAString {
        the_string: "Here I am!".to_string(),
    };
}
The error message will tell you that:
error: cannot find derive macro `Display` in this scope
 --> src\main.rs:2:10
  |
2 | #[derive(Display)]
  |
For traits that you can automatically derive, you can put in as many as you like. Let’s give HoldsAString seven traits in a single line, just for fun, even though at the moment it only needs one. You see this practice a lot in Rust:
#[derive(Debug, PartialEq, Eq, Ord, PartialOrd, Hash, Clone)]
struct HoldsAString {
    the_string: String,
}

fn main() {
    let my_string = HoldsAString {
        the_string: "Here I am!".to_string(),
    };
    println!("{:?}", my_string);
}
Also, you can make a struct Copy if (and only if) it also implements Clone and if fields all implement Copy. HoldsAString has String, which is not Copy, so you can’t use #[derive(Copy)] for it. But for this struct, you can:
#[derive(Clone, Copy)]
struct NumberAndBool {
    number: i32,                         ①
    true_or_false: bool                  ②
}

fn does_nothing(input: NumberAndBool) {}

fn main() {
    let number_and_bool = NumberAndBool {
        number: 8,
        true_or_false: true
    };

    does_nothing(number_and_bool);
    does_nothing(number_and_bool);       ③
}
② bool is also Copy, so no problem.
③ This would Err if it didn’t have Copy.
#[cfg()] is another attribute that stands for configuration and tells the compiler things like whether to run code or not. You usually see it like this: #[cfg(test)]. You use that when writing test functions so that it knows not to compile and run them unless you are testing. Then you can have tests next to your code, but the compiler will ignore them unless you tell it not to. We will learn about testing in the next chapter.
One other example of the cfg attribute is #[cfg(target_os = "windows")]. With that, you can tell the compiler to run the code only on Windows, or Linux, or anything else.
#![no_std] is an interesting attribute that tells Rust not to bring in the standard library. That means you don’t have Vec, String, and anything else in the standard library. You will see this in code for small devices that don’t have much memory or space and thus can only use the stack, never the heap.
#[non_exhaustive], when placed above a type, lets the compiler know that it may have more variants or fields in the future. This is used almost entirely with enums. These enums can still be used by anyone, but when matching on a #[non_ exhaustive] enum created by someone else, you will have to include a final check after all the variants just in case a new one is added in the future.
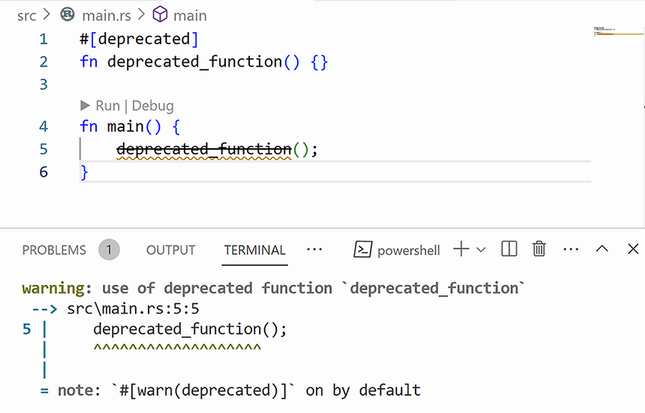
#[deprecated] lets you mark an item, usually a function, as deprecated (not used anymore). This attribute won’t stop people from using the function, but it will give a warning. Letting people still use the old item makes sense because a new item or type might be completely different, and people using your code might have to do some work to figure it out. Here is the easiest way to give this attribute a try:
#[deprecated]
fn deprecated_function() {}

fn main() {
    deprecated_function();
}
As expected, we get a warning that the function is deprecated, but the code compiles and runs:
warning: use of deprecated function `deprecated_function`
  --> src/main.rs:17:5
   |
17 |     deprecated_function();
   |     ^^^^^^^^^^^^^^^^^^^
   |
   = note: `#[warn(deprecated)]` on by default
Inside an IDE you’ll probably see special highlighting for these functions, like a strikethrough, to make it clear that they are deprecated. Figure 13.2 shows what the previous code looks like inside Visual Studio Code.
You can add a note inside the deprecated attribute to give some more information. Usually, such a note is used to advise the user which function to use instead or to warn that it will be entirely removed later. Here is a quick example of a deprecated function with a note:
#[deprecated(note = "Always panics for some reason, not sure why. Please
➥use new_function instead")]
fn old_function() {
    panic!();
    println!("Works well");
}

fn new_function() {
    println!("Works well");
}

fn main() {
    old_function();
}
As expected, the program gives the full message and then panics:
warning: use of deprecated function `old_function`: Always panics for some
➥reason, not sure why. Please use new_function instead
  --> src/main.rs:14:5
   |
14 |     old_function();
   |     ^^^^^^^^^^^^
   |
   = note: `#[warn(deprecated)]` on by default
You can see many more attributes in the documentation (https://doc.rust-lang.org/reference/attributes.html).
So far, this chapter has been fairly passive, with learning about reading documentation and using attributes that are already built in. We will now turn to a type that you will use actively and probably quite frequently: Box. Let’s see what makes a Box special and often even necessary.
A Box is a type of pointer and a very convenient type in Rust. When you use a Box, you can put a variable’s data on the heap instead of the stack. To make a new Box, use Box::new() and put the item inside. Let’s put an i32 inside a Box and see what happens:
fn just_takes_a_variable<T>(item: T) {}       ①

fn main() {
    let my_number = 1;                        ②
    just_takes_a_variable(my_number);
    just_takes_a_variable(my_number);         ③

    let my_box = Box::new(1);                 ④
    just_takes_a_variable(my_box.clone());    ⑤
    just_takes_a_variable(my_box);
}
③ Using this function twice is not a problem because it’s Copy.
⑤ ithout .clone(), the second function would produce an error because Box does not implement Copy.
Hmm, so what’s the point of that? Let’s find out.
At first, it is hard to imagine where to use it, but let’s start with the basics of how Box works. You can think of a Box as sort of like a reference, except that it owns its data.
We learned that & is used for str because the compiler doesn’t know the size of a str: it can be any length. But the & reference is always the same length, so the compiler can use it. Box is similar, but it owns the data. Also, you can use * on a Box to get to the value, just like with &:
fn main() {
    let my_box = Box::new(1);     ①
    let an_integer = *my_box;     ②
}
A Box is called a “smart pointer” because it is like a & reference (a kind of pointer) but can do more things.
You can also use a Box to create structs with the same struct inside. These are called recursive, which means that inside struct A is maybe another struct A. You can’t do this in Rust (the compiler will tell you).
But if you want to create a recursive struct, you can use a Box. Let’s make a simple struct called a Holder that might hold another Holder inside itself. Here’s what happens if you try without a Box:
struct Holder {
    next_holder: Option<Holder>,
}
You can see that when making a Holder, you can choose to give it a Some<Holder> (another Holder) or None. Because you can choose None, you can make a Holder that doesn’t always need another Holder inside. For example, you might want to make a Holder that has a Some(Holder), which itself holds a Some(Holder), but finally ends with None. However, this won’t compile!
struct Holder {
    next_holder: Option<Holder>
}

fn main() {
    let x = Holder {
        next_holder: Some(Holder {
            next_holder: Some(Holder { next_holder: None }),
        }),
    };
}
It won’t compile because the compiler doesn’t know the size:
error[E0072]: recursive type `Holder` has infinite size
 --> src/main.rs:1:1
  |
1 | struct Holder {
  | ^^^^^^^^^^^^^
2 |     next_holder: Option<Holder>,
  |                         ------ recursive without indirection
  |
help: insert some indirection (e.g., a `Box`, `Rc`, or `&`) to break the
➥cycle
  |
2 |     next_holder: Option<Box<Holder>>,
  |                         ++++      +
You can see that the error even suggests trying a Box and shows us exactly how to write it. So, let’s put a Box around Holder:
struct Holder {
    item: Option<Box<Holder>>,
}
fn main() {}
The compiler is now fine with the Holder because everything is behind a Box, and the compiler knows the size of a Box. Now we can use Box::new() to put the next Holder inside, and the code we tried previously will now work:
#[derive(Debug)]
struct Holder {
    next_holder: Option<Box<Holder>>
}

fn main() {
    let x = Holder {
        next_holder: Some(Box::new(Holder {
            next_holder: Some(Box::new(Holder { next_holder: None })),
        })),
    };

    println!("{x:#?}");
}
Holder {
    next_holder: Some(
        Holder {
            next_holder: Some(
                Holder {
                    next_holder: None,
                },
            ),
        },
    ),
}
Even with a type as simple as this, the code looks a bit complicated, and Rust does not use recursiveness very much.
If you are coming from another programming language, you may now be thinking that a Box can help you make a linked list in Rust, but be warned: Rust’s strict rules on borrowing and ownership make this a pain. In fact, there is a whole book online (https://rust-unofficial.github.io/too-many-lists/) that explains just what a pain it is to write a linked list in Rust. Nevertheless, if you are curious, give the book a read. It is a good example of a common pattern in other languages that simply does not work in Rust without a lot of pain.
A Box also lets you use drop() on it because it’s on the heap. That can be convenient sometimes.
So, Boxes let you put data on the heap, and you can make recursive types with them, and you could use one to make a data structure (that doesn’t fit Rust very well). But none of this explains why Boxes are so popular in Rust. Let’s finally get to the main reason, which is that Boxes are very useful, even necessary sometimes, when dealing with traits. Let’s see how that works.
We know that we can write traits in generic functions like in this example:
use std::fmt::Display;

struct DoesntImplementDisplay {}

fn displays_it<T: Display>(input: T) {
    println!("{}", input);
}
This code only takes something with Display, so it can’t accept our struct DoesntImplementDisplay. But it can take in a lot of others like String that do implement Display.
You also saw that we can use impl Trait to return other traits or closures. A Box can be used in a similar way. You can use a Box because, otherwise, the compiler won’t know the size of the value. This example with a bunch of different structs and enums shows that a trait can be used on something of any size:
use std::mem::size_of;                    ①

trait JustATrait {}                       ②

enum EnumOfNumbers {
    I8(i8),
    AnotherI8(i8),
    OneMoreI8(i8),
}
impl JustATrait for EnumOfNumbers {}

struct StructOfNumbers {
    an_i8: i8,
    another_i8: i8,
    one_more_i8: i8,
}
impl JustATrait for StructOfNumbers {}

enum EnumOfOtherTypes {
    I8(i8),
    AnotherI8(i8),
    Collection(Vec<String>),
}
impl JustATrait for EnumOfOtherTypes {}

struct StructOfOtherTypes {
    an_i8: i8,
    another_i8: i8,
    a_collection: Vec<String>,
}
impl JustATrait for StructOfOtherTypes {}

struct ArrayAndI8 {
    array: [i8; 1000],                    ③
    an_i8: i8,
    in_u8: u8,
}
impl JustATrait for ArrayAndI8 {}

fn main() {
    println!(
        "{}, {}, {}, {}, {}",
        size_of::<EnumOfNumbers>(),
        size_of::<StructOfNumbers>(),
        size_of::<EnumOfOtherTypes>(),
        size_of::<StructOfOtherTypes>(),
        size_of::<ArrayAndI8>(),
    );
}
① This function gives the size of a type.
② We will implement this on everything.
③ This one will be very large.
When we print the size of these, we get 2, 3, 32, 32, 1002. Each one of these clearly has a different size. So, if you were to write a function that returns a JustATrait, it would give an error:
fn returns_just_a_trait() -> JustATrait {
    let some_enum = EnumOfNumbers::I8(8);
    some_enum
}
error[E0746]: return type cannot have an unboxed trait object
  --> src\main.rs:53:30
   |
53 | fn returns_just_a_trait() -> JustATrait {
   |                              ^^^^^^^^^^ doesn't have a size known at
   ➥compile-time
And this is true because the size could be 2, 3, 32, 1002, or anything else. So, we put it in a Box instead. Here we also add the keyword dyn. dyn shows that you are talking about a trait, not a struct or anything else.
The technical term is dynamic dispatch, which is like generics, except Rust accesses the type at run time, not compile time. That’s where the dyn comes from.
Dynamic means “moving,” and dispatch means “sending” or “passing on.” The opposite of dynamic dispatch is static (i.e., not moving) dispatch. Static dispatch happens when the compiler turns a generic type into a concrete type before run time, so nothing is moving: the types have been made concrete before the program even started. So, you can change the function to this:
trait JustATrait {}

enum EnumOfNumbers {
    I8(i8),
    AnotherI8(i8),
    OneMoreI8(i8),
}
impl JustATrait for EnumOfNumbers {}


fn returns_just_a_trait() -> Box<dyn JustATrait> {
    let some_enum = EnumOfNumbers::I8(8);
    Box::new(some_enum)
}
And now it works because on the stack is a Box, and the compiler knows the size of a Box.
NOTE Box<T> is 8 bytes, Box<&T> (a reference) is also 8 bytes, but a Box<[T]> (a slice) is 16 bytes. Why is that? It’s because a slice can be any size (any length), so the Box needs to store the length, too, and that takes 8 more bytes. If it doesn’t need to know the length, it just stores the memory address, and that’s just 8 bytes, not 16. In either case, the compiler knows the size and will be happy with it.
You see dynamic dispatch a lot in the form Box<dyn Error> because, as we saw in previous chapters, sometimes you have to work with more than one possible error. Let’s learn about how that works now.
To make an official error type, you have to implement std::error::Error. That part is easy because the Error trait doesn’t have any required methods: just write impl std::error::Error {}. But errors also need Debug and Display so they can give information about the problem. You can see this in the signature for the trait, which is pub trait Error: Debug + Display.
Debug is easy with #[derive(Debug)], but Display needs the fmt() method. We learned how to implement Display back in chapter 7.
Let’s quickly create two error types to explore how implementing Error works. The code looks like this:
use std::error::Error;
use std::fmt;

#[derive(Debug)]
struct ErrorOne;

impl Error for ErrorOne {}                                          ①

impl fmt::Display for ErrorOne {
    fn fmt(&self, f: &mut fmt::Formatter) -> fmt::Result {
        write!(f, "You got the first error!")
    }
}


#[derive(Debug)]
struct ErrorTwo;

impl Error for ErrorTwo {}

impl fmt::Display for ErrorTwo {
    fn fmt(&self, f: &mut fmt::Formatter) -> fmt::Result {
        write!(f, "You got the second error!")
    }
}

fn returns_errors(input: u8) -> Result<String, Box<dyn Error>> {    ②
    match input {
        0 => Err(Box::new(ErrorOne)),                               ③
        1 => Err(Box::new(ErrorTwo)),
        _ => Ok("Looks fine to me".to_string()),                    ④
    }

}

fn main() {

    let vec_of_u8s = vec![0_u8, 1, 80];                             ⑤

    for number in vec_of_u8s {
        match returns_errors(number) {
            Ok(input) => println!("{}", input),
            Err(message) => println!("{}", message),
        }
    }
}
① ErrorOne is now an error type with Debug as long as it has Display as well. Now it’s time to implement Display.
② This function will return either a String or an Error. By returning a Box<dyn Error>, we can return a Box that holds anything that implements the Error trait.
③ Don’t forget to put it in a Box.
You got the first error!
You got the second error!
Looks fine to me
If we didn’t have a Box<dyn Error> and wrote this, we would have a problem:
fn returns_errors(input: u8) -> Result<String, Error> {
    match input {
        0 => Err(ErrorOne),
        1 => Err(ErrorTwo),
        _ => Ok("Looks fine to me".to_string()),
    }
}
21  | fn returns_errors(input: u8) -> Result<String, Error> {
    |                                 ^^^^^^^^^^^^^^^^^^^^^ doesn't have a
    ➥size known at compile-time
This is not surprising because we know that a trait can be implemented on many things, and chances are the error types will have different sizes. Even in this case, where ErrorOne and ErrorTwo have the same size, it still isn’t allowed because Rust is concerned with type safety, not just size.
NOTE When you use types behind a trait in this way, they are called trait objects. A trait object represents some type that implements a trait but does not show you what the concrete object is. In other words, you have access to the type’s implementation of a trait but not the concrete type itself. Not knowing the concrete type is called type erasure because the concrete type is erased: the function only says it’s some type that has this trait. It could be almost anything.
Sometimes, you don’t care to know the exact type. All errors can be printed, so you can, of course, just print them out:
fn handle_error_inside_function() {
    println!("{:?}", "seven".parse::<i32>());
}

fn main() {
    handle_error_inside_function();
}
This says Err(ParseIntError { kind: InvalidDigit }). Good enough.
Or you might know the error type if it panics. The following example shows a function with two types of possible errors: an error when parsing into an i32 and an error when parsing into an f64. Then we try to add them together and return them as an f64. But two possible errors could happen, so we will return a Result<f64, Box<dyn Error>>. Then we use the question mark operator, see what happens, and then unwrap:
use std::error::Error;

fn parse_numbers(int: &str, float: &str) -> Result<f64, Box<dyn Error>> {
    let num_1 = int.parse::<i32>()?;
    let num_2 = float.parse::<f64>()?;
    Ok(num_1 as f64 + num_2)
}

fn main() {
    let my_number = parse_numbers("8", "ninepointnine").unwrap();
}
The error message tells us what it is:
thread 'main' panicked at 'called Result::unwrap() on an Err value:
➥ParseFloatError { kind: Invalid }', src/main.rs:10:57.
But what if you have some dyn Error trait objects and don’t know their exact type but want to know? Let’s imagine the worst error possible. We’ll derive Error for it, as well as Debug and Display, but make the error messages tell the user nothing about what actually went wrong. We can even make Debug extra terrible by implementing it manually. Implementing Debug in this way looks a bit similar to Display but uses a method called .debug_struct() to do it. Just like Display, you can find an example in the documentation and just change it a bit, which is what we will do here:
use std::fmt;

enum MyError {
    TooMuchStuff,
    CantConnect,
    NoUserRegistered,
    SomethingElse,
}

impl std::error::Error for MyError {}

impl fmt::Display for MyError {
    fn fmt(&self, f: &mut fmt::Formatter<'_>) -> Result<(), fmt::Error> {
        write!(f, "Wouldn't you like to know...")
    }
}

impl fmt::Debug for MyError {
    fn fmt(&self, f: &mut fmt::Formatter<'_>) -> fmt::Result {
        f.debug_struct("Lol not telling you what went wrong").finish()
    }
}

fn main() {
    let err = MyError::TooMuchStuff;
    println!("{err}");
    println!("{err:?}");
}
Wouldn't you like to know...
Lol not telling you what went wrong
If this were a dyn Error trait object, you’d never know what it was. Even if the messages were good, you still might want to get the concrete type back and do a match over the enum: TooMuchStuff, CantConnect, and so on. Just having a String printed out sometimes isn’t enough. Fortunately, there is a method called downcasting that lets us try to turn a trait object back into a concrete type.
The Error trait lets us downcast through a method called .downcast() (and .downcast_ref() and .downcast_mut()). You can use this method to try to turn a dyn Error trait object back into an error type. We’ll use our unhelpful error and pick one more at random from the standard library. Let’s go with RecvError, which can be returned from the channels that we learned to use in the last chapter. Then we’ll try downcasting them.
In this example, we’ll make a function that gives a boxed MyError if it gets true and a boxed RecvError if it gets false. But these two error types will show up as trait objects with the signature Box<dyn Error>, and you won’t know the exact error type unless you downcast (or .downcast_ref() or .downcast_mut()) them:
use std::sync::mpsc::RecvError;
use std::error::Error;
use std::fmt;

enum MyError {
    TooMuchStuff,
    CantConnect,
    NoUserRegistered,
    SomethingElse,
}

impl std::error::Error for MyError {}

impl fmt::Display for MyError {                                           ①
    fn fmt(&self, f: &mut fmt::Formatter<'_>) -> Result<(), fmt::Error> {
        write!(f, "Wouldn't you like to know...")
    }
}

impl fmt::Debug for MyError {
    fn fmt(&self, f: &mut fmt::Formatter<'_>) -> fmt::Result {
        f.debug_struct("Lol not telling you what went wrong")
            .finish()
    }
}

fn give_error_back(is_tru: bool) -> Box<dyn Error> {                      ②
    if is_true {
        Box::new(MyError::TooMuchStuff)
    } else {
        Box::new(RecvError)
    }
}
① Here again, MyError is the worst error type possible. Neither Display nor Debug have any useful information at all. As a Box<dyn Error> trait object, you won’t even know that the type name is MyError.
② This function returns one of the two errors as a Box<dyn Error> trait object. The concrete types aren’t known.
fn main() {
    let errs = [true, false, false, true]
        .into_iter()
        .map(|boolean| give_error_back(boolean))
        .collect::<Vec<_>>();
    println!("{errs:#?}");

    for err in errs.iter() {
        if let Some(my_error) = err.downcast_ref::<MyError>() {       ①
            println!("Got a MyError!");                               ②
        } else if let Some(parse_error) = err.downcast_ref::<RecvError>() {
            println!("Got a RecvError!");
        }
    }
}
① We’ll use the .downcast_ref() method because .iter() gives us references.
② Now that the error types are concrete again, we could match on the enum or do anything we want with it—same as with any other concrete type. It’s not a trait object anymore.
[
    Lol not telling you what went wrong,
    RecvError,
    RecvError,
    Lol not telling you what went wrong,
]
Got a MyError!
Got a RecvError!
Got a RecvError!
Got a MyError!
You can see that the first time we printed the errors, they were Box<dyn Error> trait objects, which means that they have the Error trait and Debug and Display (because Error requires these two), but we don’t know anything more about them. After that, we used .downcast_ref() to try to turn them into a MyError and a RecError and got the concrete objects back.
Hopefully, Rust feels a lot friendlier to you by the end of this chapter. We’ve learned to read Rust’s documentation and can now look through the source code in the standard library to find extra information on the types we already know. We also now have a general sense for attributes, including some of the most widely used ones. Maybe most importantly, we now understand why Box is used so much in Rust. The next chapter builds on this one as we learn to structure our code and test it to prove that it does what it should. Get ready to see the assert_eq! macro a lot!
Clicking on the [src] button in documentation is a great habit to get into. You’ll get more insight into how other code works even if you don’t understand everything yet.
The assert_eq! macro is everywhere in documentation to show the reader the values of variables at certain points in the code.
A Box is a smart pointer that points to data on the heap. A Box owns its data.
Using a Box<dyn trait> lets you “erase” a type. The type inside the Box is still concrete, but when inside the Box, it can only be used as a trait object. In other words, you can only use its trait methods.
You can downcast a trait object back to a concrete type as long as you know what concrete type it might be. You can only try downcasting to one type at a time.
Static dispatch happens at compile time, during which the compiler turns generic types into concrete ones. Dynamic dispatch happens during run time.
Any type can implement Error, but a type can be of any size. To satisfy the compiler when returning errors, you can return a Box<dyn Error> instead.