
From traitString or a &str in a functionWe’ve touched on traits a little bit here and there in the book so far, but now it’s time to give them some needed attention. Understanding traits and how they work will let us give traits to our own types and even make our own.
We have seen traits before: Debug, Copy, and Clone are all traits. The easiest way to think of traits is as powers or qualifications. If a type has a trait, it can do things it couldn’t do before. Also, if a type has a trait, you can guarantee to the compiler that it can do something—no matter what type it is.
To give a trait to a type, you have to implement that trait for that type. “Type X implements Trait Y” means that Type X definitely has the methods of Trait Y. Type X can have its own separate methods, too, and Type X might implement other traits as well. A human equivalent would be that Person X might decide to take the bar exam to become a lawyer. But Person X might have other qualifications, too, and might have other personal skills, such as being able to type really fast.
Rust uses a special syntax called attributes to automatically implement traits like Debug because they are so common. That’s what happens when you write #[derive(Debug)]: you are automatically implementing the Debug trait. So, all you need to do to implement that trait is this:
#[derive(Debug)]
struct MyStruct {
    number: usize,
}
You can manually implement Debug yourself, too, if you want to, but most of the time, people are happy with using derive to do it.
But other traits are more difficult for the compiler to guess, so you can’t use derive to implement them. Those traits need to be manually implemented with the impl keyword. A good example is the Add trait (found at std::ops::Add), which is used to add two things. Any type that implements the Add trait can use the + operator to add. But Rust can’t guess how you want to add things, so you have to tell it. Take this struct, for example:
struct ThingsToAdd {
    first_thing: u32,
    second_thing: f32,
}
It has a u32 and an f32 inside it. If you want to add a ThingsToAdd to another ThingsToAdd, how do you want to do it? Do you want to
Add first_thing to the other first_thing and second_thing to the other second_thing to return a new ThingsToAdd?
Turn both properties into a String and stick them next to each other?
Rust can’t guess what you want, which is why there is no way to use #[derive(Add)] to give a type the Add trait.
Before we derive other traits, let’s first look at how to make a trait. The important thing to remember about traits is that they are about behavior. To make a trait, write trait and then create some methods for it:
struct Dog {                    ①
    name: String,
}

struct Parrot {                 ②
    name: String,
}

trait DogLike {                 ③
    fn bark(&self) {            ④
        println!("Woof woof!");
    }
    fn run(&self) {             ⑤
        println!("The dog is running!");
    }
}

impl DogLike for Dog {}         ⑥
impl DogLike for Parrot {}      ⑦

fn main() {
    let rover = Dog {
        name: "Rover".to_string(),
    };

    let brian = Parrot {
        name: "Brian".to_string(),
    };

    rover.bark();               ⑧
    rover.run();                ⑨
    brian.bark();               ⑩
}
① A simple struct—an Animal only has a name
③ The dog trait gives some functionality
⑥ Now, Animal has the trait DogLike.
⑦ Anything else can implement DogLike, too.
⑩ Brian the parrot learned to bark, too.
Woof woof!
The dog is running!
Woof woof!
Now, if we were to call brian.run(); on the previous code, it would print The dog is running! even though we are calling the method on a Parrot. What if you don’t want to print The dog is running? Can you do that?
The answer is yes, but you have to have the same signature. That means it needs to take the same things and return the same things. For example, we can change the method .run(), but we have to follow the signature. The signature says
fn run(&self) {
    println!("The dog is running!");
}
fn run(&self) means “fn run() takes &self and returns nothing.” So you can’t return something different like this:
fn run(&self) -> i32 {
    5
}
Rust will tell you that the signature is wrong. The method always has to return nothing, but now it’s returning an i32:
   = note: expected fn pointer `fn(&Animal)`
              found fn pointer `fn(&Animal) -> i32`
struct Parrot {
    name: String,
}

trait DogLike {
    fn bark(&self) {                                       ①
        println!("Woof woof!");
    }
    fn run(&self) {                                        ②
        println!("The dog is running!");
    }
}

impl DogLike for Parrot{                                   ③
    fn run(&self) {
        println!("{} the parrot is running!", self.name);  ④
    }
}

fn main() {
    let brian = Parrot {
        name: "Brian".to_string(),
    };

    brian.bark();
    brian.run();
}
③ We’re implementing the trait ourselves and writing the run method the way we want to.
④ This is the interesting part. The trait itself can’t call self.name because it doesn’t know which types will implement it and whether they have a name property or not. But we know that Parrot has a name property, so we can use it here.
Now it prints Brian the parrot is running! This is okay because we are returning () or nothing, which is what the method signature tells us to do.
You need to be able to write your own methods for a trait because you never know what type might use it. In fact, you can just write the function signature when making a trait. Many traits write most of their methods like this.
Now, when you do that, the user will have to write the function. Let’s try that. We will change .bark() and .run() to fn bark(&self); and fn run(&self);. These methods are now incomplete, which means that any type implementing them must write out the methods themselves:
struct Animal {
    name: String,
}

trait DogLike {
    fn bark(&self);    ①
    fn run(&self);
}

impl DogLike for Animal {
    fn bark(&self) {
        println!("{}, stop barking!!", self.name);
    }
    fn run(&self) {
        println!("{} is running!", self.name);
    }
}

fn main() {
    let rover = Animal {
        name: "Rover".to_string(),
    };

    rover.bark();
    rover.run();
}
① The method .bark() says it needs a &self and returns nothing. .run() says it needs a &self and returns nothing. So now we have to write them ourselves.
So when you create a trait, you must think: “Which methods should I write? And which ones should the user write?” If you think most users will use the methods the same way every time, it makes sense for you to write a default method inside the trait. But if you think that users will use the methods differently every time, write the signature.
So now that you know how to impl a trait, let’s try implementing someone else’s trait for your own type: the Display trait. First, we will make a simple struct:
struct Cat {
    name: String,
    age: u8,
}

fn main() {
    let mr_mantle = Cat {
        name: "Reggie Mantle".to_string(),
        age: 4,
    };
}
Now we want to print mr_mantle. The Debug trait is easy to derive:
#[derive(Debug)]
struct Cat {
    name: String,
    age: u8,
}

fn main() {
    let mr_mantle = Cat {
        name: "Reggie Mantle".to_string(),
        age: 4,
    };
    println!("Mr. Mantle is a {mr_mantle:?}");
}
But Debug print is not exactly the prettiest way to print. Here is what the output for our Cat struct looks like:
Mr. Mantle is a Cat { name: "Reggie Mantle", age: 4 }
So we should implement Display for Cat if we want to display it exactly the way we want. In the documentation for the Display trait (https://doc.rust-lang.org/std/fmt/trait.Display.html), we can see the general information for Display, along with one example. Here is the example that it gives:
use std::fmt;

struct Position {
    longitude: f32,
    latitude: f32,
}

impl fmt::Display for Position {
    fn fmt(&self, f: &mut fmt::Formatter<'_>) -> fmt::Result {
        write!(f, "({}, {})", self.longitude, self.latitude)
    }
}
Some parts of the previous code we don’t understand yet, like what <'_> and this f variable are doing. But the Position struct is pretty easy to understand: it is just two f32s. We also understand that self.longitude and self.latitude are the fields in the struct.
Maybe we can take this code for our struct and change the code to self.name and self.age. Also, the write! macro looks a lot like println!, so it is pretty familiar. Let’s steal the code and change it a bit. We’ll change
write!(f, "({}, {})", self.longitude, self.latitude)
write!(f, "{} is a cat who is {} years old.", self.name, self.age)
Now the code to implement Display for our Cat struct looks like this:
use std::fmt;

struct Cat {
    name: String,
    age: u8,
}

impl fmt::Display for Cat {
    fn fmt(&self, f: &mut fmt::Formatter<'_>) -> fmt::Result {
        write!(f, "{} is a cat who is {} years old", self.name, self.age)
    }
}
Let’s add a fn main() and print our Cat out:
use std::fmt;

struct Cat {
    name: String,
    age: u8,
}

impl fmt::Display for Cat {
  fn fmt(&self, f: &mut fmt::Formatter<'_>) -> fmt::Result {
      write!(f, "{} is a cat who is {} years old", self.name, self.age)
  }
}

fn main() {
    let mr_mantle = Cat {
        name: "Reggie Mantle".to_string(),
        age: 4,
    };
    println!("{mr_mantle}");
}
Success! We can use {} to print our Cat, which gives us the output Reggie Mantle is a cat who is 4 years old. This looks much better.
Sometimes implementing a trait gives you some extra, unexpected benefits. For example, if you implement Display for a type, you get the ToString trait for free, which gives you the .to_string() method that we already know. If you want to turn your type into a String, simply implement Display. (The reason is that ToString uses a blanket implementation, which means that it implements itself on any type that has Display. We’ll learn how to do blanket implementations later.)
We could do something like this, where we pass reggie_mantle to a function that wants a String or anything else:
use std::fmt;
struct Cat {
    name: String,
    age: u8,
}

impl fmt::Display for Cat {
    fn fmt(&self, f: &mut fmt::Formatter<'_>) -> fmt::Result {
        write!(f, "{} is a cat who is {} years old", self.name, self.age)
    }
}

fn print_excitedly(input: String) {
    println!("{input}!!!!!");
}

fn main() {
    let mr_mantle = Cat {
        name: "Reggie Mantle".to_string(),
        age: 4,
    };

    print_excitedly(mr_mantle.to_string());         ①
    println!(
        "Mr. Mantle's String is {} letters long.",  ②
        mr_mantle.to_string().chars().count()
    );
}
① Turns Mr. Mantle into a String and passes it into this function
② Turns Mr. Mantle into chars and counts them. Be sure to use .chars().count() and not .len() unless you know each character will only be 1 byte in length!
Reggie Mantle is a cat who is 4 years old!!!!!
Mr. Mantle's String is 41 letters long.
The thing to remember about traits is that they are about the shared behavior of something. How does your struct or enum act? What can it do? And how can you easily show that your type, and other types, all have this behavior? That’s what traits are for. If you think of some of the traits we’ve seen so far, they are all about behavior: Copy is something that a type can do. Display is also something that a type can do. ToString is another trait, and it’s also something that a type can do: it can change into a String. And with these traits, we can prove that any type that implements them will all have these abilities.
The trait examples have been pretty simple so far. Let’s look at some examples of where we might actually want to make our own traits.
Let’s look at another example that is even more connected to just behavior. We’ll imagine a fantasy game with some simple characters. One is a Monster; the other two are Wizard and Ranger. There is a Monster that just has health so we can attack it, and the other two don’t have anything yet. But we made two traits. One is called FightClose and lets you fight up close. The other is FightFromDistance, which lets you fight from far away. Only Ranger can use FightFromDistance. Let’s try putting that together to see what it looks like:
trait FightClose {
    fn attack_with_sword(&self, opponent: &mut Monster) {
        opponent.health -= 10;
        println!(
            "Sword attack! Your opponent has {} health left.",
            opponent.health
        );
    }
    fn attack_with_hand(&self, opponent: &mut Monster) {
        opponent.health -= 2;
        println!(
            "Hand attack! Your opponent has {} health left.",
            opponent.health
        );
    }
}
impl FightClose for Wizard {}
impl FightClose for Ranger {}

trait FightFromDistance {
    fn attack_with_bow(&self, opponent: &mut Monster, distance: u32) {
        if distance < 10 {
            opponent.health -= 10;
            println!(
                "Bow attack! Your opponent has {} health left.",
                opponent.health
            );
        }
    }
    fn attack_with_rock(&self, opponent: &mut Monster, distance: u32) {
        if distance < 3 {
            opponent.health -= 4;
        }
        println!(
            "Rock attack! Your opponent has {} health left.",
            opponent.health
        );
    }
}impl FightFromDistance for Ranger {}

fn main() {
    let radagast = Wizard {};
    let aragorn = Ranger {};

    let mut uruk_hai = Monster { health: 40 };

    radagast.attack_with_sword(&mut uruk_hai);
    aragorn.attack_with_bow(&mut uruk_hai, 8);
}
Sword attack! Your opponent has 30 health left.
Bow attack! Your opponent has 20 health left.
We pass &self inside traits all the time, but we can’t do much with it right now. That’s because Rust doesn’t know what type is going to use it. It could be a Wizard, it could be a Ranger, it could be a new struct called Toefocfgetobjodd, or anything else. So far, these traits are better as regular methods because at least we would have access to a concrete &self and not just a &self that represents some type that will implement the trait.
If the type inside a trait’s definition can be anything, what can we do to make &self more useful? It would be nice to get some idea of what types will use it and what they can do. To give it some functionality, we can add trait bounds (necessary traits) to the signature. If we want to print with {:?}, for example, we need Debug. You can add it to the trait by writing it after : (a colon). Now our code looks like this:
use std::fmt::Debug;

struct Monster {
    health: i32,
}

#[derive(Debug)]                         ①
struct Wizard {
    health: i32,
}
#[derive(Debug)]
struct Ranger {
    health: i32,
}

trait DisplayHealth {
    fn health(&self) -> i32;
}

trait FightClose: Debug {                ②
    fn attack_with_sword(&self, opponent: &mut Monster) {
        opponent.health -= 10;
        println!(
            "Sword attack! Opponent's health: {}. You are now at: {:?}",
            opponent.health, self        ③
        );
    }
    fn attack_with_hand(&self, opponent: &mut Monster) {
        opponent.health -= 2;
        println!(
            "Hand attack! Opponent's health: {}.  You are now at: {:?}",
            opponent.health, self
        );
    }
}
impl FightClose for Wizard {}
impl FightClose for Ranger {}

trait FightFromDistance: Debug {
    fn attack_with_bow(&self, opponent: &mut Monster, distance: u32) {
        if distance < 10 {
            opponent.health -= 10;
            println!(
                "Bow attack! Opponent's health: {}. You are now at: {:?}",
                opponent.health, self
            );
        }
    }
    fn attack_with_rock(&self, opponent: &mut Monster, distance: u32) {
        if distance < 3 {
            opponent.health -= 4;
        }
        println!(
            "Rock attack! Opponent's health: {}.  You are now at: {:?}",
            opponent.health, self
        );
    }
}
impl FightFromDistance for Ranger {}

fn main() {
    let radagast = Wizard { health: 60 };
    let aragorn = Ranger { health: 80 };

    let mut uruk_hai = Monster { health: 40 };

    radagast.attack_with_sword(&mut uruk_hai);
    aragorn.attack_with_bow(&mut uruk_hai, 8);
}
① Wizard and Ranger implement Debug. They also have a property called health now.
② With this bound, any type needs Debug first to implement FightClose. They are guaranteed to have the Debug trait.
③ With that guarantee, we can use {:?} to print out &self.
Sword attack! Opponent's health: 30. You are now at: Wizard { health: 60 }
Bow attack! Opponent's health: 20. You are now at: Ranger { health: 80 }
In a real game, it might be better to rewrite this for each type because You are now at: Wizard { health: 60 } looks funny. Or you could require Display instead of just Debug. Methods inside traits are usually simple because you don’t know what type is going to use it. You can’t write things like self.0 += 10, for example. But this example shows that we can use other traits inside a trait we are writing, and that helps.
You might have noticed that the trait methods need a Monster, which is a concrete type. That might be a bit limiting unless we only have a single Monster struct for our whole game. You could rewrite the methods so that instead of a Monster, it takes any type that implements a trait called TakeDamage, for example.
Let’s do that with generics. We’ll make a trait called MonsterBehavior. We’ll give it a method .take_damage(), and another one called .display_self(). It looks like this:
trait MonsterBehavior: Debug {
    fn take_damage(&mut self, damage: i32);
    fn display_self(&self) {
        println!("The monster is now: {self:?}");
    }
}
You’ll notice three things here:
It’s written MonsterBehavior: Debug, so to implement this trait, a type needs to have Debug. That’s because we want to Debug print it.
The .take_damage() method isn’t written out because we have no idea how to do it. Will a struct have a .health parameter or something else to do this? No idea. But it takes a &mut self so it can be changed and a damage: i32, which shows what the damage is. With that information, we can implement it for Monster, and others can implement it for their types, too.
We write out the .display_self() method because we know a type will at least have Debug. But if you implement it for a type that has Display, you can print it out that way. Or maybe you want to implement it differently, too—it’s your choice.
use std::fmt::Debug;

trait MonsterBehavior: Debug {
    fn take_damage(&mut self, damage: i32);
    fn display_self(&self) {
        println!("The monster is now: {self:?}");
    }
}

#[derive(Debug)]
struct Monster {
    health: i32,
}

impl MonsterBehavior for Monster {                                        ①
    fn take_damage(&mut self, damage: i32) {
        self.health -= damage;
    }
}

#[derive(Debug)]
struct Wizard {
    health: i32,
}
#[derive(Debug)]
struct Ranger {
    health: i32,
}

trait FightClose {                                                        ②
    fn attack_with_sword<T: MonsterBehavior>(&self, opponent: &mut T) {
        println!("You attack with your sword!");
        opponent.take_damage(10);                                         ③
        opponent.display_self();                                          ④
    }

    fn attack_with_hand<T: MonsterBehavior>(&self, opponent: &mut T) {    ⑤
        println!("You attack with your hand!");
        opponent.take_damage(2);
        opponent.display_self();
    }
}
impl FightClose for Wizard {}
impl FightClose for Ranger {}

trait FightFromDistance: Debug {
    fn attack_with_bow<T: MonsterBehavior>(&self, opponent: &mut T,
    ➥distance: u32) {
        println!("You attack with your bow!");
        if distance < 10 {
            opponent.take_damage(10);
        } else {
            println!("Too far away!");
        }
        opponent.display_self();
    }
    fn attack_with_rock<T: MonsterBehavior>(&self, opponent: &mut T,
    ➥distance: u32) {
        println!("You attack with a rock!");
        if distance < 3 {
            opponent.take_damage(4);
        } else {
            println!("Too far away!");
        }
        opponent.display_self();
    }
}
impl FightFromDistance for Ranger {}

fn main() {
    let radagast = Wizard { health: 60 };
    let aragorn = Ranger { health: 80 };

    let mut uruk_hai = Monster { health: 40 };

    radagast.attack_with_sword(&mut uruk_hai);
    aragorn.attack_with_bow(&mut uruk_hai, 8);
}
① We implement the trait for Monster.
② And now the opponents are all &mut T, and T is guaranteed to implement MonsterBehavior.
④ And we can call this one, too.
⑤ And so on, for the rest of the code
You attack with your sword!
The monster is now: Monster { health: 30 }
You attack with your bow!
The monster is now: Monster { health: 20 }
Interestingly, a trait doesn’t need to have any methods at all. That’s because even a trait that doesn’t have any methods can still be used as a trait bound. In other words, the trait must be implemented even though it doesn’t add any new functionality.
Imagine you are going to court, and you need a good lawyer to do fn argue_in_court() for you. Your bounds for this function would probably be Lawyer and Experienced. Any type of person could do the function as long as they have these two traits: they are “bound” to have them. That means that any type that you want to pass into argue_in_court() will need to impl Lawyer and impl Experienced first. This is basically the same as the bar exam in real life: courts have the “trait bound” that only people who have passed the bar exam can act as lawyers. And any “type” (any person) who wants to be one will have to “implement” this before they can argue as lawyers in a court.
So trait bounds can be really easy because a trait doesn’t need any methods or anything at all. Let’s rewrite our previous code in a somewhat different way. (We’ll use the concrete Monster struct again to make it simple.) This time, our trait doesn’t have any methods, but instead, we have other functions that require traits to use:
use std::fmt::Debug;

struct Monster {
    health: i32,
}

#[derive(Debug)]
struct Wizard {
    health: i32,
}
#[derive(Debug)]
struct Ranger {
    health: i32,
}

trait Magic {}                            ①
trait FightClose {}                       ②
trait FightFromDistance {}

impl FightClose for Ranger {}
impl FightClose for Wizard {}
impl FightFromDistance for Ranger {}      ③
impl Magic for Wizard {}                  ④

fn attack_with_bow<T>(pc: &T, opponent: &mut Monster, distance: u32)
where
    T: FightFromDistance + Debug,
{
    if distance < 10 {
        opponent.health -= 10;
        println!(
            "Bow attack! Opponent's health: {}.  You are now at: {pc:?}",
            opponent.health
        );
    }
}

fn attack_with_sword<T>(pc: &T, opponent: &mut Monster)
where
    T: FightClose + Debug,
{
    opponent.health -= 10;
    println!(
        "Sword attack! Opponent's health: {}. You are now at: {pc:?}",
        opponent.health
    );
}

fn fireball<T>(pc: &T, opponent: &mut Monster, distance: u32)
where
    T: Magic + Debug,
{
    if distance < 15 {
        opponent.health -= 20;
        println!(
            "A massive fireball! Opponent's health: {}. You are now at:
            ➥{pc:?}",
            opponent.health
        );
    }
}

fn main() {
    let radagast = Wizard { health: 60 };
    let aragorn = Ranger { health: 80 };

    let mut uruk_hai = Monster { health: 40 };

    attack_with_sword(&radagast, &mut uruk_hai);
    attack_with_bow(&aragorn, &mut uruk_hai, 8);
    fireball(&radagast, &mut uruk_hai, 8);
}
① No methods for any of these traits! They are just trait bounds.
③ But only Ranger gets FightFromDistance.
This prints almost the same thing:
Sword attack! Opponent's health: 30. You are now at: Wizard { health: 60 }
Bow attack! Opponent's health: 20.  You are now at: Ranger { health: 80 }
A massive fireball! Opponent’s health: 0. You are now at: Wizard { health: 60 } So you can see there are many ways to do the same thing when you use traits. It all depends on what makes the most sense for the program that you are writing.
The more examples of traits you see, the easier it is to get a feel for how they work. So let’s finish up the overview of traits in this chapter by imagining a whole bunch of imaginary traits and how they might work. We’ll look at their names and then think about which types should implement them.
First, sometimes, people who use other languages look at traits and think that they are just like classes or interfaces. (If you don’t know what classes or interfaces are, don’t worry—Rust doesn’t have them.) And while traits do look like classes, it’s easier to think of them as qualifications. Let’s think of a few:
Now let’s imagine some structs. Which of those three traits does it make sense for them to implement?
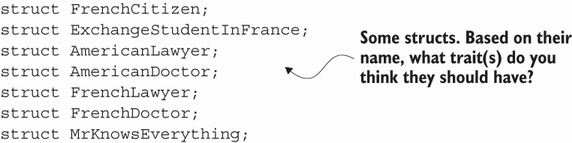
Let’s start implementing the French trait for the following types.

Next is the trait called LawyerSkill. Which types should implement it?

Can some of them work as doctors? Looks like it. So let’s give the MedicalSkill trait to those types.

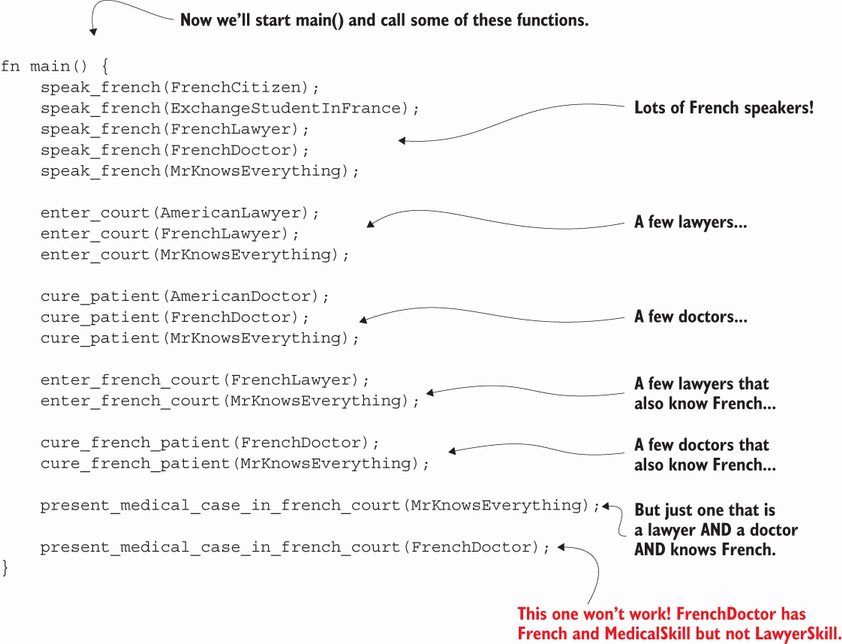
Now let’s make some functions and use these traits as bounds. We don’t care what type goes in, as long as it implements the right trait (or traits).

Now everything will match up, and the compiler won’t complain.
That was a lot of comparisons and examples! Traits can take a long time to get used to, so the more comparisons and examples, the better. Now that you have an idea of how traits work, the next step is to start looking at real traits you’ll use a lot in your code. Let’s start by looking at how to implement one of the main traits you will use in Rust.
From is a very convenient trait to use, and you know this because you have seen it so much already. With From, you can make a String from a &str, but you can make many types from many other types. For example, Vec uses From for 18 (!) types. Here are the ones we know:
From<&'_ [T]>
From<&'_ mut [T]>
From<&'_ str>
From<&'a Vec<T>>
From<[T; N]>
From<BinaryHeap<T>>
From<String>>
From<Vec<T>>
From<VecDeque<T>>
You can see these implementations on the left side of the documentation for Vec (https://doc.rust-lang.org/std/vec/struct.Vec.html). That’s a lot of Vec::from() that we haven’t tried yet! Let’s experiment with some of these and see what happens. We will try making a Vec from [T; N], the generic name for an array (the technical term is const generics., which we will learn more about in chapter 16). T stands for type, and N stands for number), plus a String and a &str:
fn main() {
    let array_vec = Vec::from([8, 9, 10]);
    println!("Vec from array: {array_vec:?}");

    let str_vec = Vec::from("What kind of Vec am I?");
    println!("Vec from str: {str_vec:?}");

    let string_vec = Vec::from("What will a String be?".to_string());
    println!("Vec from String: {string_vec:?}");
}
Vec from array: [8, 9, 10]
Vec from str: [87, 104, 97, 116, 32, 107, 105, 110, 100, 32, 111, 102, 32,
➥86, 101, 99, 32, 97, 109, 32, 73, 63]
Vec from String: [87, 104, 97, 116, 32, 119, 105, 108, 108, 32, 97, 32, 83,
➥116, 114, 105, 110, 103, 32, 98, 101, 63]
The first one is no surprise: a Vec from an array of three numbers shows the three numbers. But the Vecs from &str and String are all bytes! If you look at the signature for Vec from &str and String, you can see that they return a Vec<u8>. Here is the full code, which is quite simple:
    fn from(string: String) -> Vec<u8> {
        string.into_bytes()
    }
You can see that From is quite simple: all you have to do is choose two types and decide which one you want to turn into the other. After that, it’s completely up to you how to make it happen. In this case, the creators of the standard library decided that it would be convenient to implement From<String> for Vec<u8>. Let’s try implementing From with our own types.
We’ll make two structs and then implement From for one of them. One struct will be City, and the other will be Country. We want to be able to write this code: let country_name = Country::from(vector_of_cities).
#[derive(Debug)]
struct City {
    name: String,
    population: u32,
}

impl City {
    fn new(name: &str, population: u32) -> Self {        ①
        Self {
            name: name.to_string(),
            population,
        }
    }
}
#[derive(Debug)]
struct Country {
    cities: Vec<City>,                                   ②
}

impl From<Vec<City>> for Country {
    fn from(cities: Vec<City>) -> Self {
        Self { cities }                                  ③
    }
}
impl Country {
    fn print_cities(&self) {                             ④
        for city in &self.cities {                       ⑤
            println!(
                "{:?} has a population of {:?}.",
                city.name, city.population
            );
        }
    }
}
fn main() {
    let helsinki = City::new("Helsinki", 631_695);
    let turku = City::new("Turku", 186_756);

    let finland_cities = vec![helsinki, turku];          ⑥
    let finland = Country::from(finland_cities);         ⑦

    finland.print_cities();
}
① Nothing special here—just a convenience function that will do the .to_string() part for us
③ And here is our implementation of From. Pretty simple!
④ Prints the cities in a Country
⑤ Here we use & because City isn’t a Copy type.
"Helsinki" has a population of 631695.
"Turku" has a population of 186756.
While reading this section, you might have gotten some ideas for implementing From on some other types you know in the standard library. But you’re not always allowed to! Let’s find out why.
You can imagine that From would be easy to implement on types you didn’t create like Vec, i32, and so on. But hold on, there’s one rule that Rust has about this. It’s called the orphan rule:
That’s because if anyone could implement anyone’s trait on anyone’s type, you could never keep a single type consistent. Maybe you created a type for others to use that you planned to impl Display on later, but someone else already did it in their own way! Now, other people are using your code in a way you didn’t intend. If one person imports it from your code, it will display in one way, but if imported from somewhere else, it will display in another. Or it could be a much more serious problem, like if your type is used for cryptographic security and you want very tight control over how it is used. A company might use your type, thinking it is the one you made, but it was actually your type plus a number of changes made by other people without asking you. The orphan rule prevents that.
So what’s the best way to get around the orphan rule? The easiest way is to wrap someone else’s type in a tuple struct, thereby creating an entirely new type. This is called the newtype idiom, and we will learn that now.
Let’s look at the so-called newtype idiom. It is actually quite simple: wrap someone else’s type in a tuple struct. Let’s imagine that we want a type called File, which, for the moment, will only contain a String:
struct File(String);     ①

fn main() {
    let my_file = File(String::from("I am file contents"));
    let my_string = String::from("I am file contents");
}
① File is a wrapper around String.
Because this is now a new type, it doesn’t have any of the traits that String has. So the compiler will refuse to compare a File with a String, even though File has a String inside:
struct File(String);

fn main() {
    let my_file = File(String::from("I am file contents"));
    let my_string = String::from("I am file contents");
    println!("{}", my_file == my_string);                 ①
}
① Cannot compare File with String.
If you want to compare the String inside, you can use my_file.0:
struct File(String);

fn main() {
    let my_file = File(String::from("I am file contents"));
    let my_string = String::from("I am file contents");
    println!("{}", my_file.0 == my_string);              ①
}
① This time we are comparing a String with a String, so the code compiles and prints true.
This type doesn’t have any traits, so you can implement them yourself in the same way you do for any of your types—with #[derive] or manually using an impl block:
#[derive(Clone, Debug)]
struct File(String);

impl std::fmt::Display for File {
    fn fmt(&self, f: &mut std::fmt::Formatter<'_>) -> std::fmt::Result {
        let as_bytes = format!("{:?}", self.0.as_bytes());               ①
        write!(f, "{as_bytes}")
    }
}

fn main() {
    let file = File(String::from("I am file contents"));
    println!("{file:?}");
    println!("{file}");
}
① Maybe we’d like a File by default to print by showing the bytes inside. We can make a String using the format! macro and then use that as output.
Now, our new type has its own traits, and it’s sort of like implementing our own traits on String itself, since File is just a wrapper around a String. Here is the output:
File("I am file contents")
[73, 32, 97, 109, 32, 102, 105, 108, 101, 32, 99, 111, 110, 116, 101, 110,
➥116, 115]
So when you use the File type here, you can clone it and Debug print it, but it doesn’t have the methods of String unless you use .0 to get to the String inside it. We can use .0 to access the String inside here, but that’s because we are making the File type ourselves. In other people’s code, you could only access .0 if it’s marked pub for public, and most of the time, people don’t make everything pub. We will learn more about structuring code and using the pub keyword in chapter 14.
There is also a trait called Deref that lets you automatically use all the methods of the type inside, which, in this case, would be a convenient way to let people use the methods for the String inside without using pub to give them access to the String itself. We will learn about this in chapter 15.
Finally, let’s finish off the chapter with another trait you’ll find useful: AsRef.
Sometimes you want a function that can take both a String and a &str. You can do this with the AsRef trait, which is used to give a reference from one type to another type. You can think of it as a sort of cheap version of From: instead of converting from one type to another, you do a cheap conversion from one reference to another. Here is how the standard library describes it:
Used to do a cheap reference-to-reference conversion. [...] If you need to do
    a costly conversion it is better to implement From with type &T or write
    a custom function.
We don’t need to think too deeply about this trait now (we aren’t going to implement it for anything), but here is the important part: both String and str implement AsRef<str>. Here is how they do it:
impl AsRef<str> for str {
    fn as_ref(&self) -> &str {
        self
    }
}

impl AsRef<str> for String {
    fn as_ref(&self) -> &str {
        self
    }
}
You can see that it takes &self and gives a reference to the other type, and in this case, they both return a &str. This means if you have a generic type T in your function, you can say that it needs AsRef<str> and then treat it as a &str inside the function.
Let’s start thinking about using it with a generic function. We’ll start with a function that tries to print its input but won’t work yet:
fn print_it<T>(input: T) {
    println!("{}", input);
}

fn main() {
    print_it("Please print me");
}
Rust gives an error: error[E0277]: T doesn't implement std::fmt::Display. So we will require T to implement Display:
use std::fmt::Display;

fn print_it<T: Display>(input: T) {
    println!("{}", input);
}

fn main() {
    print_it("Please print me");
}
Now the function works and prints Please print me. That works well enough, but T can still be too many things. It can be an i8, an f32, and anything else with Display. We would rather take something that is a String or a &str, not just anything that implements Display. So we change T: Display to T: AsRef<str>. Now the function won’t accept types like i8, and it almost works:
fn print_it<T: AsRef<str>>(input: T) {
    println!("{}", input)
}

fn main() {
    print_it("Please print me");
    print_it("Also, please print me".to_string());
    // print_it(7);             ①
}
Here is the error: error[E0277]: `T` doesn't implement `std::fmt::Display`.
We got this error because T is a type that implements AsRef<str>, but T itself isn’t a type that implements Display. But we can turn it into a reference to a str, thanks to the AsRef trait. To do that, call the trait’s method: .as_ref(). Because it is being given a &str, and &str implements Display, the compiler is happy with our code:
fn print_it<T: AsRef<str>>(input: T) {
    println!("{}", input.as_ref())
}

fn main() {
    print_it("Please print me");
    print_it("Also, please print me".to_string());
}
This prints what we wanted to see:
Please print me
Also, please print me
You can see that traits are a big subject in Rust—we spent the whole chapter on them! They always require some thought. If Rust is your first programming language, you will need to learn how they work and when to use them. But you may need to do almost as much work if Rust isn’t your first programming language because there might be some unlearning involved. Many people from other languages look at traits and think, “Oh, this is the same as a class” or “Oh, this is the same as an interface.” But traits are different and require you to sit down and think about them for a while.
The next chapter has a lot of new concepts to learn, too. You’ll learn about iterators, which let you operate on every item in a collection. And you’ll learn about closures, which are quick functions that don’t need to have a name.
If you have a lot of types and want them all to have the same methods, write a trait.
Types that implement a trait will all be different. But they are all guaranteed to have the trait’s methods.
In the same way, every person who speaks a language will be different. But they are all guaranteed to know the language.
You can implement your traits on other people’s types. You can implement other people’s traits on your types. But you can’t implement other people’s traits on other people’s types.
The From trait is pretty easy, and you see it everywhere. Check the code source if you’re curious how it’s done for any particular type.
Taking an AsRef<str> is a convenient way to take both a String and a &str in a function.