Continuing the work we did in the previous chapter, we’ll write a CLI tool for the API service we wrote. Using a CLI tool, we’ll demonstrate another way to interact asynchronously in Rust by making HTTP requests with a separate service (which we also wrote). Our CLI tool will provide a convenient way to interact with our todo app backend (the API service). We’ll use Rust’s async features to showcase the basics of writing async Rust from the client side of a client-server relationship.
Writing CLI tools is one way to use software to solve problems for us, and building tools is how we avoid repetition, mistakes, and time wasted doing tasks computers are better suited for. Most versions of the Unix philosophy (which has several variations) include the “do one thing and do it well” tenet, which we’ll apply to our CLI tool. We’ll also make it easy to pipe the output from our CLI into another tool (another point from the Unix philosophy), making it possible to string commands together.
We’ll continue working with the Tokio runtime, and for making HTTP requests, we’ll once again use the hyper library, which provides an implementation of HTTP (for both servers and clients). I will also introduce a new crate, called clap (https://crates.io/crates/clap), which provides structured and type-safe command-line parsing.
It should be noted there is a higher-level HTTP client library called reqwest (https://crates.io/crates/reqwest), which is similar to the Python Requests library, but for Rust. However, we’ll stick with hyper because it’s lower level; therefore, we can learn a bit more about how things work by using it directly, as opposed to using reqwest, which wraps the hyper library. In practice, you’d probably be better off using reqwest (which provides a more convenient and user-friendly API). Table 10.1 shows the API service dependencies.
Table 10.1 API service dependencies
For your convenience, you can install everything from table 10.1 in a one-shot, copy-pastable command as follows:
cargo add clap --features derive
cargo add colored_json
cargo add hyper --features client,http1,tcp,stream
cargo add serde
cargo add serde_json
cargo add tokio --features macros,rt-multi-thread,io-util,io-std
cargo add yansi
After running these commands, your Cargo.toml will look like the following listing.
Listing 10.1 API client Cargo.toml
[package]
name = "api-client"
version = "0.1.0"
edition = "2021"

# See more keys and their definitions at https://doc.rust-lang.org/cargo/
➥ reference/manifest.html

[dependencies]
clap = { version = “4.3.10”, features = [“derive”] }
colored_json = “3.2.0”
hyper = { version = “0.14.27”, features = [“client”, “http1”, “tcp”,
➥ “stream”] }
serde = “1.0.166”
serde_json = “1.0.100”
tokio = { version = “1.29.1”, features = [“macros”, “rt-multi-thread”,
➥ “io-util”, “io-std”] }
yansi = “0.5.1”
Now that we’ve specified our dependencies, we’ll discuss the design of our command-line interface (CLI).
Our CLI will be very straightforward; we’re going to map our five CRUD plus list commands to CLI commands, which will do exactly what you expect, as shown in table 10.2.
We’ll return the response directly from the API by printing to the standard output, and for JSON responses, we’ll pretty-print them for readability. This will enable piping the command to another tool (such as jq), while also making the output human readable.
The clap library lets us build command-based CLIs, with either positional arguments or optional parameters. Clap will automatically generate help output (which we can obtain with the help command), and we can have parameters that apply to either the top-level command or one of the subcommands. Clap will take care of parsing arguments and handling errors in the case of incorrect or invalid arguments, provided we define the types correctly. Once clap’s parsing is complete, we’re left with a struct (which we define) that contains all the values parsed from the command-line arguments. Let’s go ahead and dive into the code by looking at how we define the interface using clap.
Clap’s API uses the derive macro in addition to some procedural macros to declare an interface. We want to use the command-based interface, which we can enable with clap using the #[command] macro, as shown in the following listing, where we define our CLI.
Listing 10.2 Top-level CLI definition for clap from src/main.rs
#[derive(Parser)]                   ❶
struct Cli {
    /// Base URL of API service     ❷
    url: hyper::Uri,                ❸

    #[command(subcommand)]          ❹
    command: Commands,              ❺
 }
❶ We derive clap::Parser for our CLI, which lets us parse the arguments from the command line using the Cli struct.
❷ Notice the triple slash ///, which clap will parse as a help string for this argument (which is the API service URL).
❸ For the first argument, we parse directly into the hyper::Uri struct because it implements FromStr, which clap utilizes.
❹ Our second argument is a subcommand, which we denote with the #[command()] macro.
❺ This includes our subcommand (the second argument), which we’ll define next.
For the top-level CLI, we’ve defined two positional arguments: the base URL for our API service and the subcommand (one of create, read, update, delete, or list). We haven’t defined the commands yet, so we’ll do that in the following listing.
Listing 10.3 CLI subcommands definition from src/main.rs
#[derive(Subcommand, Debug)]          ❶
enum Commands {                       ❷
    /// List all todos
    List,
    /// Create a new todo
    Create {
        /// The todo body
        body: String,
    },
    /// Read a todo
    Read {
        /// The todo ID
        id: i64,
    },

    /// Update a todo
    Update {
        /// The todo ID
        id: i64,
        /// The todo body
        body: String,
        /// Mark todo as completed
        #[arg(short, long)]           ❸
        completed: bool,
    },
    /// Delete a todo
    Delete {
        /// The todo ID
        id: i64,
    },
}
❶ We derive clap::Subcommand here to use this as a subcommand.
❷ Note that we use an enum because we can only select one command at a time.
❸ For this Boolean argument, we’ll make it optional using an argument switch instead of a positional argument.
Notice how we’ve introduced arguments for our commands, but the preceding List variant does not require any arguments. After we implement main() in the next section, we can run our CLI with cargo run --help, which will print out a help message like this (note that the arguments need to come after the double-dash “- -” when using cargo run):
Usage: api-client <URL> <COMMAND>

Commands:
  list    List all todos
  create  Create a new todo
  read    Read a todo
  update  Update a todo
  delete  Delete a todo
  help    Print this message or the help of the given subcommand(s)

Arguments:
  <URL>  Base URL of API service

Options:
  -h, --help  Print help
Each subcommand will also print its own help, for example, with cargo run --help create or cargo run --create --help:
Create a new todo

Usage: api-client <URL> create <BODY>

Arguments:
  <BODY>  The todo body

Options:
  -h, --help  Print help
Nice! We can move on to implementing the commands now.
The type-safe API provided by clap makes it incredibly easy to handle each command and its arguments. We can match each variant in our Commands enum and process the command accordingly. Before we handle each command, there’s some boilerplate to parse the CLI arguments and the base URL.
Listing 10.4 CLI argument-parsing boilerplate from src/main.rs
#[tokio::main]

async fn main() -> Result<(), Box<dyn std::error::Error + Send + Sync>> {
    let cli = Cli::parse();                                               ❶

    let mut uri_builder = Uri::builder();                                 ❷
    if let Some(scheme) = cli.url.scheme() {                              ❸
        uri_builder = uri_builder.scheme(scheme.clone());
    }
    if let Some(authority) = cli.url.authority() {                        ❹
        uri_builder = uri_builder.authority(authority.clone());
    }
}
❶ Call Cli::parse() to parse the CLI arguments in main() into our Cli struct.
❷ Parse the base URL into its parts, and we’ll add them into a new hyper::Uri builder.
❸ Extract the base URL scheme (i.e., http or https).
❹ Extract the base URL authority (i.e., localhost or 127.0.0.1).
In the preceding code, we break the base URL into its parts, although, notably, we choose to ignore the path of the base URL. You might want to allow specifying a prefix base and append each request URL to the prefix, but for this example, we ignore the path.
Now, let’s look at the code to handle each command.
Listing 10.5 CLI command handling from src/main.rs
match cli.command {
    Commands::List => {
        request(
            uri_builder.path_and_query("/v1/todos").build()?,
            Method::GET,
            None,
        )
        .await
    }
    Commands::Delete { id } => {
        request(
            uri_builder
                .path_and_query(format!("/v1/todos/{}", id))
                .build()?,
            Method::DELETE,
            None,
        )
        .await
    }
    Commands::Read { id } => {
        request(
            uri_builder
                .path_and_query(format!("/v1/todos/{}", id))
                .build()?,
            Method::GET,
            None,
        )
        .await
    }
    Commands::Create { body } => {
        request(
            uri_builder.path_and_query("/v1/todos").build()?,
            Method::POST,
            Some(json!({ "body": body }).to_string()),
        )
        .await
    }
    Commands::Update {
        id,
        body,
        completed,
    } => {
        request(
            uri_builder
                .path_and_query(format!("/v1/todos/{}", id))
                .build()?,
            Method::PUT,
            Some(json!({"body":body,"completed":completed}).to_string()),
        )
        .await
    }
}
For each command, we call the request() function (which we haven’t defined yet), where we pass the request URI, the HTTP method, and an optional JSON request body. We use the uri_builder defined in listing 10.4 to build the URI.
Because Rust is strict about always handling each variant from the enum, we can confidently assert that we’ve dealt with every command case and their parameters (provided we correctly defined them all in the Commands enum). Now, we can go ahead and implement the HTTP requests.
We put a lot of thought into defining the commands and arguments, so now, executing the actual requests against the API is very easy. We have all the pieces we need (the URI, HTTP method, and an optional request body), so all we need to do is execute the actual request. We can do this in one single function, shown in the following listing.
Listing 10.6 CLI request execution from src/main.rs
async fn request(
    url: hyper::Uri,
    method: Method,
    body: Option<String>,
) -> Result<(), Box<dyn std::error::Error + Send + Sync>> {
    let client = Client::new();

    let mut res = client
        .request(
            Request::builder()
                .uri(url)
                .method(method)
                .header("Content-Type", "application/json")          ❶
                .body(body.map(|s| Body::from(s))
                .unwrap_or_else(|| Body::empty()))?,                 ❷
        )
        .await?;

    let mut buf = Vec::new();                                        ❸
    while let Some(next) = res.data().await {                        ❹
        let chunk = next?;
        buf.extend_from_slice(&chunk);                               ❺
    }
    let s = String::from_utf8(buf)?;                                 ❻

    eprintln!("Status: {}", Paint::green
    ➥ (res.status()));                                              ❼
    if res.headers().contains_key(CONTENT_TYPE) {
        let content_type = res.headers()[CONTENT_TYPE].to_str()?;
        eprintln!("Content-Type: {}", Paint::green
        ➥ (content_type));                                          ❽
        if content_type.starts_with("application/json") {
            println!("{}", &s.to_colored_json_auto()?);              ❾
        } else {
            println!("{}", &s);                                      ❿
        }
    } else {
        println!("{}", &s);                                          ⓫
    }

    Ok(())                                                           ⓬
 }
❶ Assume the request body is always JSON if present.
❷ If a request body was provided, we include it. Otherwise, we send an empty request.
❸ We’ll use a Vec as a buffer to handle the incoming chunked response.
❹ We read one chunk of the response at a time, appending each to our buffer.
❺ Each time a new chunk comes in, the chunk is appended to the buffer.
❻ Once all of the response has been read, we create a UTF-8 string from the buf, consuming it without requiring a copy.
❼ We print the response status to standard error and use the yansi crate to print with ANSI colors.
❽ If we have a Content-Type header in the response, we’ll print that to standard output.
❾ If the content type is JSON, then we use the colored_json crate to pretty-print the JSON to the standard output.
❿ If the content type is not JSON, print the output as a plain string to the standard output.
⓫ If there’s no Content-Type header in the response, print the output as a plain string to the standard output.
⓬ If we reach this point, the request succeeded, so we return unit.
Note how our request always prints the response body to standard output, but we print the request status and content type header to standard error. Separating the response body and metadata allows us to pipe the output of our command into another tool.
In listing 10.6, we return a Result and make heavy use of the ? operator. Additionally, we’re relying on trait objects by using Box<dyn std::error::Error + Send + Sync> as the error return type. This is a convenient but somewhat lazy way of handling errors. For this particular case, it makes sense to keep it simple (i.e., the KISS principle), but if we were to find ourselves in a situation where we want more complex error-handling logic or want to customize our error logging or error message handling, we’d probably want to create our own error type and use the From trait to transform the errors.
Additionally, our main() function, shown in listing 10.4, returns the same Result<(), Box<dyn std::error::Error + Send + Sync>> type. Therefore, we can make use of the ? operator through the whole program, and it will correctly surface the errors.
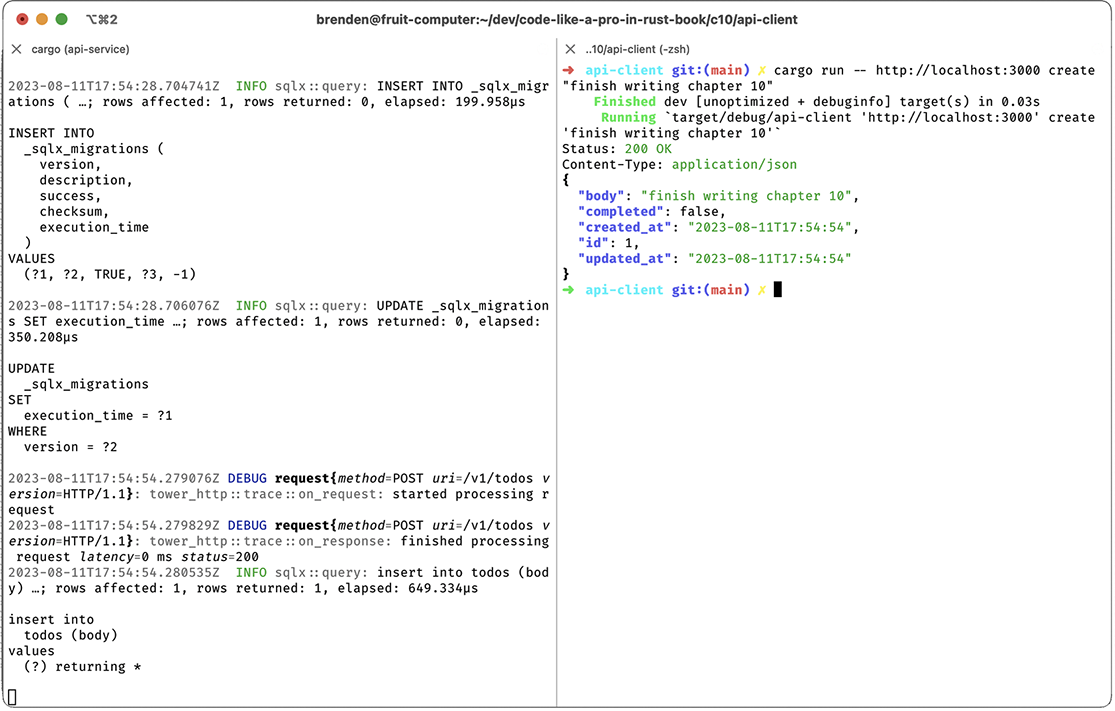
Finally, let’s test our CLI by running it against our API service from the previous chapter. In the following examples, I’ll open a split terminal with the API service on the left-hand side. On the right-hand side, I’ll run the CLI we just wrote to demonstrate each command. First, we’ll create a new todo with cargo run --http://localhost:3000 create "finish writing chapter 10", shown in figure 10.1.
Figure 10.1 Creating a todo with our CLI
Nice! Notice the nicely formatted output with colors (in the e-book). Let’s try the other four commands, starting with cargo run --http://localhost:3000 list, shown in figure 10.2.
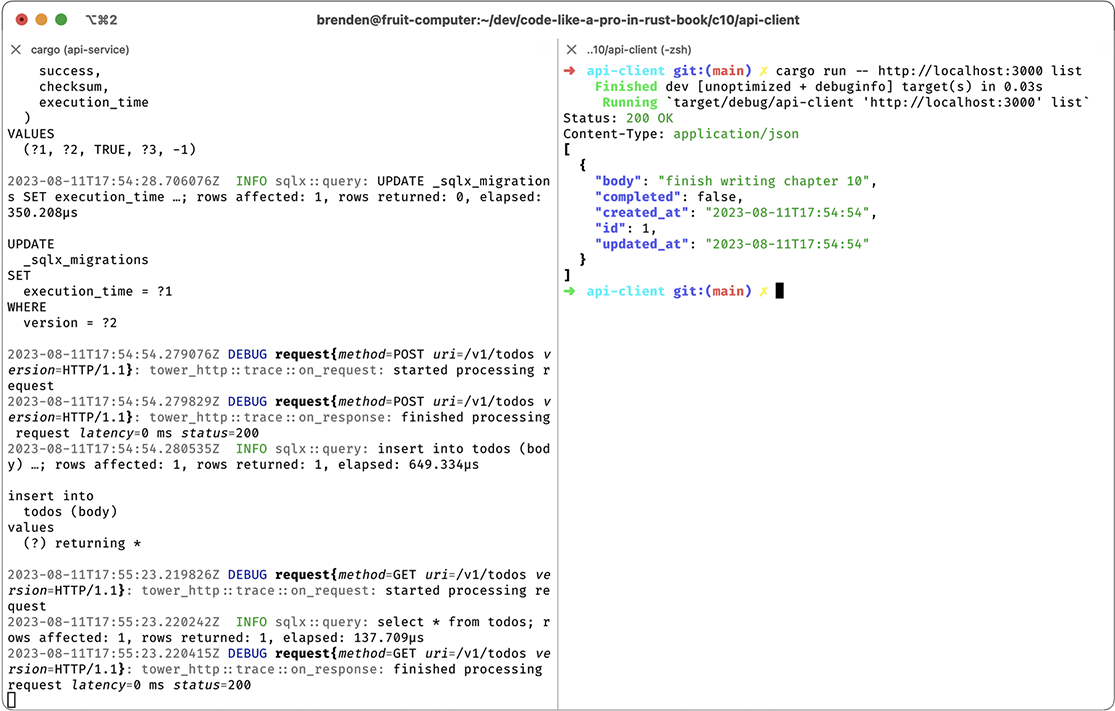
Figure 10.2 Listing todos with our CLI
Next, we’ll update the todo. We do this by changing the body and marking it as completed with cargo run - http://localhost:3000 update 1 "finish writing chapter 10" --completed, shown in figure 10.3.
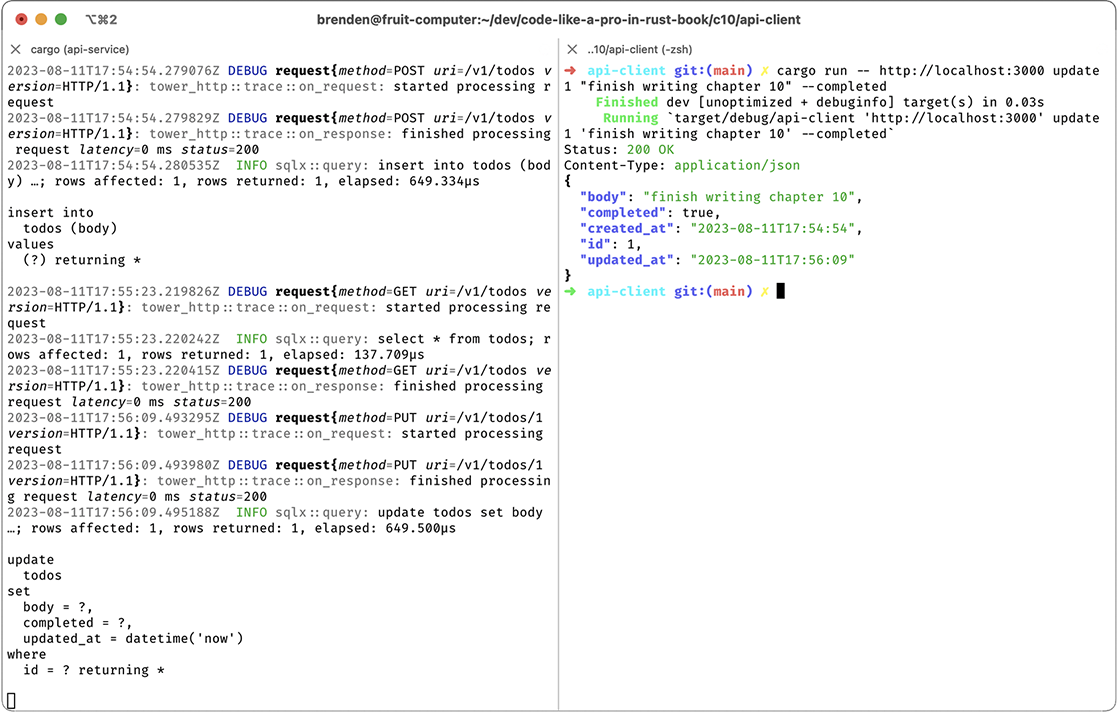
Figure 10.3 Updating a todo with our CLI
Let’s read back our updated todo. We’ll use cargo run --http://localhost:3000 read 1, shown in figure 10.4.
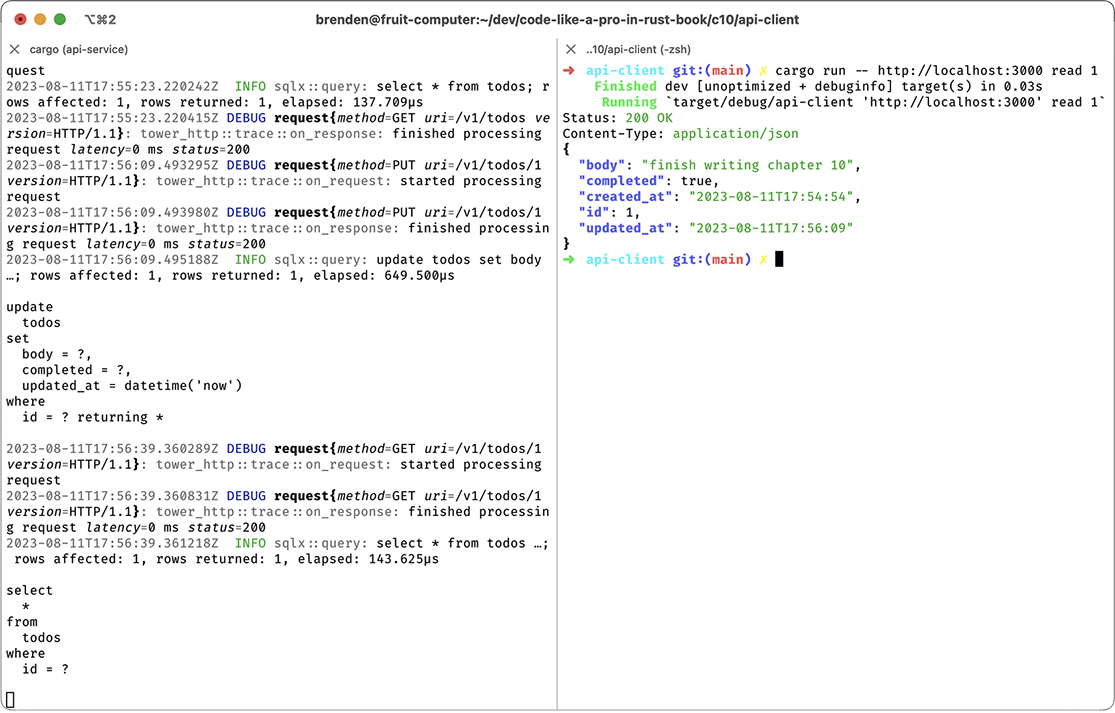
Figure 10.4 Reading a todo with our CLI
We can also test piping our CLI output into another command, such as jq, using the command cargo run --http://localhost:3000 read 1 | jq '.body'. This will select the body field from our JSON output, shown in figure 10.5.
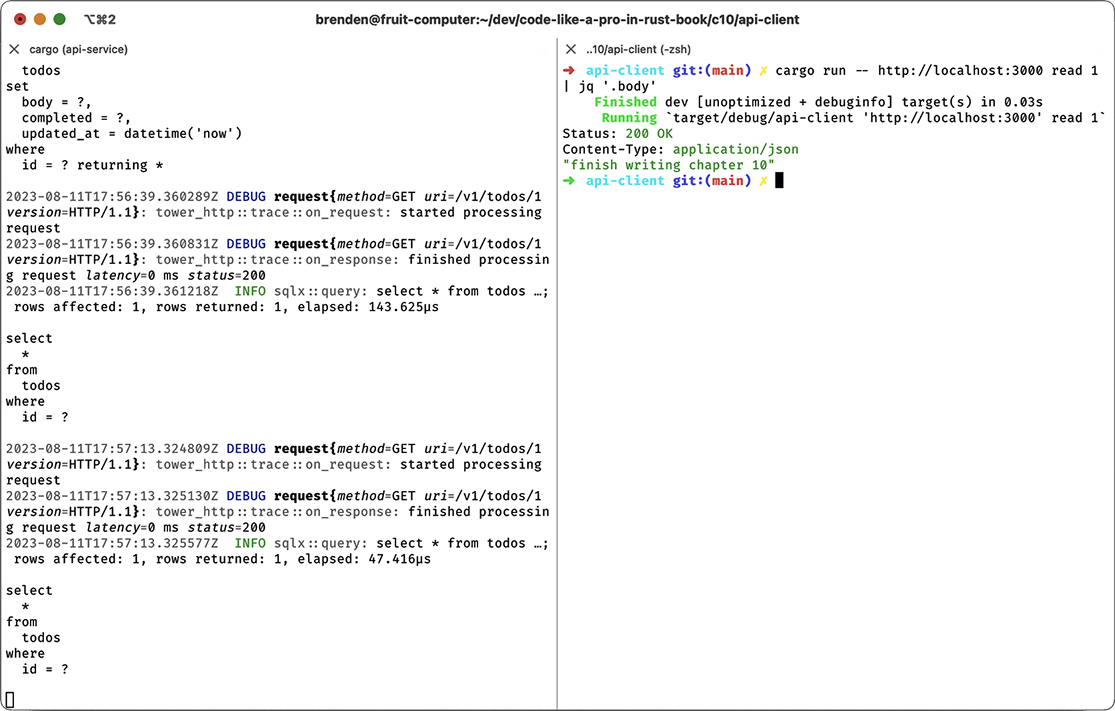
Figure 10.5 Piping our CLI output to jq
Note how Cargo conveniently prints its output to standard error (instead of standard output), so we can still use pipes with cargo run --.... Finally, let’s delete our todo with cargo run --http://localhost:3000 delete 1, shown in figure 10.6.
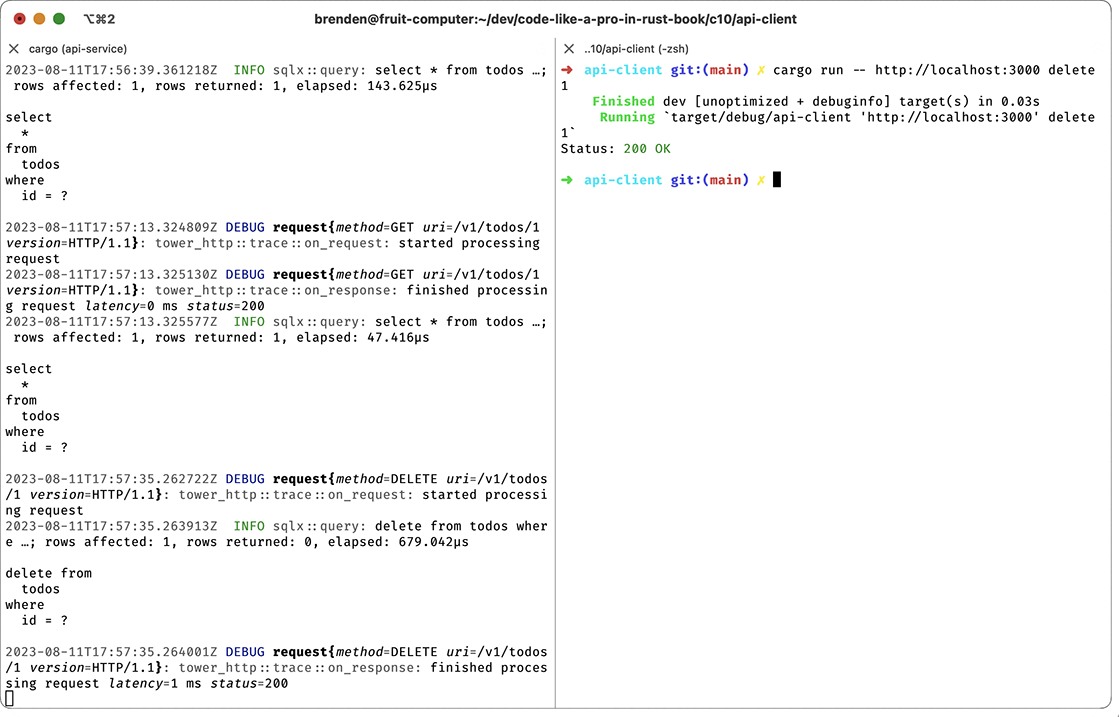
Figure 10.6 Deleting a todo with our CLI
That wraps up the demonstration of the CLI for our API. You can use this code as a template or starting point for any of your future projects, although as an exercise for the reader, I’d recommend swapping the hyper crate for reqwest.
Writing robust CLI tools in Rust is delightfully simple; using type-safe APIs (such as clap) for parsing CLI arguments makes it surprisingly easy to make great tools remarkably fast.
Thanks to Rust’s rich crate ecosystem, we don’t have to do much work to add rich features to our CLI, such as well-formatted, human-readable output. We get much of this for free using the yansi and colored_json crates.
The hyper HTTP library is a low-level HTTP implementation in Rust that provides both a client and server API; however, in practice, you’d want to use higher-level APIs for HTTP: axum for HTTP servers and reqwest for HTTP clients.
If you don’t want to worry about handling errors yourself, you can utilize trait objects with Box<dyn std::error::Error + Send + Sync> as an error type, which works, provided all error types you encounter implement std::error::Error. Several crates also provide this functionality, such as thiserror (https://crates.io/crates/thiserror) and Anyhow (https://crates.io/crates/anyhow).