
In this chapter, we will put much of what we’ve learned in the previous chapters into practice by building a web service with async Rust. For completeness, we’ll write an API client in chapter 10.
I’ll focus mainly on the final code and spend less time discussing syntax, boilerplate, and alternative implementations. I’m confident you will get the most value from a complete working example. Much of the “how to” content on the internet (and elsewhere) tends to omit many of the full-picture implementation details and gloss over many complexities, so I will do my best to point out what’s missing from this example and where to go from here. I will not discuss the subjects of deployment, load balancing, state management, cluster management, or high availability in depth because they are outside the scope of this book and not directly related to the Rust language.
At the end of this chapter, we’ll have built a web API service that uses a database for state management to provide the critical features of nearly every web service in existence: creating, reading, updating, deleting, and listing items in a database. We’ll model a “todo” CRUD app because this is a commonly used example for teaching purposes. Afterward, you can use this as a template or starter project for future development. Let’s dive in!
While writing this book, we’ve seen the async Rust landscape change quite a bit, especially with regard to the tools and libraries available for working with async Rust. The changes have largely been positive, and, in particular, I’m quite impressed with the progress of Tokio and its related projects.
For writing a web service, my recommendation is to use the axum framework, which is part of the larger Tokio project. The axum framework is somewhat minimal—as far as web frameworks go—but it packs a big punch, thanks to its flexible API and mostly macro-free implementation. It’s relatively easy to integrate with other libraries and tools, and the simple API makes it quick and easy to get started. axum is based on Tower (https://github.com/tower-rs/tower), a library that provides abstractions for building networked services, and hyper (https://hyper.rs/), which provides an HTTP client and server implementation for both HTTP/1 and HTTP/2 (the book HTTP/2 in Action (Barry Pollard; https://www.manning.com/books/http2-in-action) provides a deep dive into the specifics of HTTP/2).
The best thing about axum is that it doesn’t impose much on you in terms of patterns or practices. It does require that you learn the Tower library, if you wish to get into the nitty-gritty details, but for simple tasks, this is not necessary. A basic web service can be stood up quickly without needing to spend a great deal of time learning the web framework before writing a web service. For production services, axum includes support for tracing and metrics, which only require a small amount of configuration to enable.
For our web service, we’ll follow a typical web tier architecture, which consists of at least three components: a load balancer, the web service itself, and a stateful service (i.e., a database). We’re not going to implement a load balancer (we’ll assume one already exists or is provided), and for the database, we’ll use SQLite, but in practice, you’d likely want to use a SQL database, such as PostgreSQL. The architecture is shown in figure 9.1.
Figure 9.1 Web service architecture
As shown in the diagram, our API service can scale horizontally by simply adding more instances of the service. Each instance of our API service receives requests from the load balancer and talks independently to the database for storing and retrieving state.
Our application should accept its configuration from the environment, so we’ll pass configuration parameters using environment variables. We could use command-line parsing or a config file instead, but environment variables are very convenient, especially when deploying in contexts such as cluster orchestration systems. In our case, we’re only going to use a couple of configuration parameters: one to specify the database and another to configure logging. We’ll discuss these parameters later.
The configuration for each instance of our API service will be identical in most cases, though there might be special circumstances in which you want to specify parameters that are unique to each service instance, such as locality information or an IP address to bind to. In practice, we typically bind to the 0.0.0.0 address, which binds to all interfaces and effectively delegates the job of handling details to the OS networking stack (and can be configured as needed).
For our service, we’ll model a basic todo app. You may have encountered the todo app before, and for this, we’re only going to implement create, read, update, and delete (CRUD) endpoints for the todos and a listing endpoint. We’ll also add liveness and readiness health check endpoints. We’ll place our API routes under the /v1 path, as shown in table 9.1.
For the read, update, and delete paths, we use a path parameter for the ID of each todo, which is denoted in the preceding paths with the :id token. We’ll add liveness and readiness health check endpoints, as shown in table 9.2.
Table 9.2 API service health check endpoints
Now that we’ve described the API, let’s look at the tools and libraries we’ll use to build it in the next section.
We’ll rely on existing crates to do much of the heavy lifting for our service. We don’t need to write much code at all—most of what we’ll do involves gluing existing components together to build our service. However, we have to pay close attention to how we combine the different components, but lucky for us, Rust’s type system makes that easy by telling us when it’s wrong, with compiler errors.
We can initialize the project with cargo new api-server, after which we can start adding the crates we need with cargo add .... The crates we need and their features are listed in table 9.3.
Table 9.3 API service dependencies
Note Dependency versions are not listed in table 9.3. These can be found in Cargo.toml from the source code listings for this book.
For dependencies with features, you can use the --feature flag with cargo add. For example, to add axum with the default features, we run cargo add axum, and for SQLx, we run cargo add sqlx --features runtime-tokio-rustls,sqlite,chrono,macros. You can also simply copy the Cargo.toml from the book’s source code for this project.
You may also want to try the sqlx-cli (https://crates.io/crates/sqlx-cli) tool, which can be installed with cargo install sqlx-cli. This tool allows you to create databases, run migrations, and drop databases. Once installed, run sqlx --help for more information. This tool is not required to run the code, but it’s useful if you want to do more with SQLx.
For your convenience, you can install everything from table 9.3 in a one-shot, “copy-pastable” command as follows:
cargo add axum
cargo add chrono --features serde
cargo add serde --features derive
cargo add serde_json
cargo add sqlx --features runtime-tokio-rustls,sqlite,chrono,macros
cargo add tokio --features macros,rt-multi-thread
cargo add tower-http --features trace,cors
cargo add tracing
cargo add tracing-subscriber --features env-filter
cargo install sqlx-cli
After running these commands, your Cargo.toml will look like the following listing.
Listing 9.1 API service Cargo.toml
[package]
name = "api-service"
version = "0.1.0"
edition = "2021"

# See more keys and their definitions at https://doc.rust-lang.org/cargo/
➥ reference/manifest.html

[dependencies]
axum = "0.6.18"
chrono = { version = "0.4.26", features = ["serde"] }
serde = { version = "1.0.164", features = ["derive"] }
serde_json = "1.0.99"
sqlx = { version = "0.6.3", features = ["runtime-tokio-rustls", "sqlite",
➥ "chrono", "macros"] }
tokio = { version = "1.28.2", features = ["macros", "rt-multi-thread"] }
tower-http = { version = "0.4.1", features = ["trace", "cors"] }
tracing = "0.1.37"
tracing-subscriber = { version = "0.3.17", features = ["env-filter"] }
With our dependencies set up, we can dive into writing the code.
Note In practice, you’d likely add and change the dependencies as you go, so don’t take this as a suggestion that you need to set up all the dependencies ahead of time. As I like to say, software is soft, so never avoid modifying it to your taste (including the examples I provide).
Our application entry point in main.rs contains a small amount of boilerplate and the necessary setup for our application. Within it, we’ll do the following:
Let’s start by taking a look at our main() function.
Listing 9.2 API service main() function from src/main.rs
#[tokio::main]
async fn main() {
    init_tracing();                                            ❶

    let dbpool = init_dbpool().await
        .expect("couldn’t initialize DB pool");                ❷

    let router = create_router(dbpool).await;                  ❸

    let bind_addr = std::env::var("BIND_ADDR")
        .unwrap_or_else(|_| "127.0.0.1:3000".to_string());     ❹

    axum::Server::bind(&bind_addr.parse().unwrap())            ❺
        .serve(router.into_make_service())                     ❻
        .await
        .expect("unable to start server")
}
❶ Initializes the tracing and logging for our service and its dependencies
❸ Creates the core application service and its routes
❹ Fetches the binding address from the environment variable BIND_ADDR or uses the default value of 127.0.0.1:3000
❺ Parses the binding address into a socket address
❻ Creates the service and starts the HTTP server
Our main() doesn’t contain much, and we have to dig deeper to understand what’s going on. Before we do that, it should be noted that we’re using Tokio’s tokio::main macro to initialize the Tokio runtime, which hides a bit of complexity for us, such as setting the number of worker threads.
Tip Tokio will read the TOKIO_WORKER_THREADS environment variable, and if provided, it will set the number of worker threads to the value defined.
For more complex scenarios, you may want to manually instantiate the Tokio runtime and configure it accordingly using tokio::runtime::Builder.
Moving on, let’s take a look at the tracing initialization in init_tracing().
Listing 9.3 API service init_tracing() function in src/main.rs
fn init_tracing() {
    use tracing_subscriber::{
        filter::LevelFilter, fmt, prelude::*, EnvFilter
    };

    let rust_log = std::env::var(EnvFilter::DEFAULT_ENV)                   ❶
        .unwrap_or_else(|_| "sqlx=info,tower_http=debug,info".to_string());

    tracing_subscriber::registry()                                         ❷
        .with(fmt::layer())                                                ❸
        .with(
            EnvFilter::builder()                                           ❹
                .with_default_directive(LevelFilter::INFO.into())
                .parse_lossy(rust_log),
        )
        .init();
}
❶ Fetches the RUST_LOG environment variable, providing a default value if it’s not defined
❷ Returns the default global registry
❸ Adds a formatting layer, which provides human-readable trace formatting
❹ Constructs an environment filter, with the default log level set to info or using the value provided by RUST_LOG otherwise
Initializing the tracing is important if we want to see useful log messages. We probably don’t want to turn on all tracing messages, just the traces that are useful, so we explicitly enable the debug level messages for tower_http::*, and info-level messages for sqlx::*. We could also add our own traces, but the ones included in the crates we’re using are more than sufficient for our needs.
Determining which traces to enable can be a little tricky, but we can turn on all the traces by setting RUST_LOG=trace. This can generate a lot of logging output, so don’t try this in production environments if you don’t need to. EnvFilter is compatible with env_logger, which is used by many other Rust crates, so we can maintain compatibility and familiarity within the Rust ecosystem.
For our state management, we’ll use a connection pool to obtain a connection to the database. The connection pool allows us to acquire and reuse connections to the database without needing to create a new connection for each request, which provides us a nice little optimization. The connection pool settings are database specific and can be configured as needed, but for this example, we’ll stick with the default parameters. Additionally, the pooling is nice but not entirely necessary because we’re using SQLite (as opposed to a network-connected database, like MySQL or PostgreSQL), which operates within the same process on background threads managed by the SQLite library. Let’s look at init_dbpool() in the following listing.
Listing 9.4 API service init_dbpool() function in src/main.rs
async fn init_dbpool() -> Result<sqlx::Pool<sqlx::Sqlite>, sqlx::Error> {
    use sqlx::sqlite::{SqliteConnectOptions, SqlitePoolOptions};
    use std::str::FromStr;

    let db_connection_str =
        std::env::var("DATABASE_URL")
        .unwrap_or_else(|_| "sqlite:db.sqlite".to_string());      ❶

    let dbpool = SqlitePoolOptions::new()
        .connect_with(SqliteConnectOptions::from_str(&db_connection_str)?
        .create_if_missing(true))                                 ❷
        .await
        .expect("can’t connect to database");

    sqlx::migrate!()                                              ❸
        .run(&dbpool)                                             ❹
        .await
        .expect("database migration failed");

    Ok(dbpool)
}
❶ We’ll try to read the DATABASE_URL environment variable or default to sqlite:db.sqlite if not defined (which opens a file called db.sqlite in the current working directory).
❷ When we connect to the database, we ask the driver to create the database if it doesn’t already exist.
❸ After we’ve connected to the DB, we run any necessary migrations.
❹ We can pass our newly created DB pool directly to SQLx, which will obtain a connection from the pool.
Databases are a complex topic and well outside the scope of this book, but I’ll summarize what’s happening in the preceding code listing:
The connection string is pulled from the DATABASE_URL environment variable, defaulting to sqlite:db.sqlite, which opens the db.sqlite file in the current working directory. You could (theoretically) support multiple database drivers, but you would need to carefully adjust your SQL statements, depending on which driver is specified in DATABASE_URL. In practice, you should just pick one database and make sure your code works with that because each database has its quirks and differences, even if they are, technically speaking, the same language of SQL.
We let the SQLite driver create the database upon connection by setting create_if_missing(true) on SqliteConnectOptions. SQLx will generate a CREATE DATABASE IF NOT EXISTS ... for us, so we don’t have to worry about creating the database. This is provided for convenience and should be relatively harmless, but you might not want to do this in all contexts.
SQLx provides a migration API, which I won’t go into too much detail about, but if you’ve used any other web frameworks, you’ve likely seen something similar. It’s your responsibility to write the migrations, but SQLx can apply them for you. You need to make sure they’re correct, idempotent, and (optionally) provide both the up (create) and down (destroy) migrations if you want to enable forward and backward migrations.
Creating the database and running migrations are stateful and destructive operations. We’re mutating the database, and if you make a mistake or typo, there is no magic undo button (unless you design that yourself). This is not something to be alarmed about—just something you should be aware of—because you never want to inadvertently apply a migration to a database you don’t intend (like testing migrations against a production database before the code is ready for production). In the next section, we’ll discuss the data model and how we interact with the database.
We’re keeping this service simple by only modeling one kind of data: a todo item. Our todos only need two fields: a body (i.e., the todo item), which is just a text string, and a Boolean field to mark whether an item is completed. We could simply delete a todo once it’s completed, but it might be nice to keep completed todos around if we want to look back at the old (completed) todos. We’ll include a timestamp for the creation date and the time the todo was last updated. You might also want a third timestamp, the time at which an item is completed, but we’ll keep this example simple.
Let’s write the SQL schema for our todos table.
Listing 9.5 API service SQL schema from migrations/20230701202642_todos.sql
CREATE TABLE IF NOT EXISTS todos (
    id INTEGER PRIMARY KEY AUTOINCREMENT NOT NULL,
    body TEXT NOT NULL,
    completed BOOLEAN NOT NULL DEFAULT FALSE,
    created_at TIMESTAMP NOT NULL DEFAULT CURRENT_TIMESTAMP,
    updated_at TIMESTAMP NOT NULL DEFAULT CURRENT_TIMESTAMP
);
I won’t go into too much detail, as the SQL itself is fairly self-explanatory. I want to note a couple of details, however:
We rely on SQLite to provide a primary key for us and automatically increment the ID when a new record is created, such that we don’t reuse any IDs. We could use something like a UUID instead, which would introduce another layer of complexity to validate that any UUID we create is actually unique. PostgreSQL supports UUID primary keys in recent versions, and some versions of MySQL-compatible DBs support them as well.
We provide a default value for every column except the text body of the todo. This means we can create a new todo with only one piece of data: the text body of the todo.
The updated_at column will be updated by our Rust code, as opposed to using a SQL trigger (or some other method). You may prefer to use a trigger here, and I’ll leave that as an exercise for the reader. The main advantage of using a trigger is that you can always execute plain SQL queries, and the updated_at column will be updated accordingly.
Our CREATE TABLE ... statement will be added as a migration, so when the database is first initialized and migrations are executed, the table will be created. We’ll use the SQLx CLI to create the migration:
$ sqlx migrate add todos
# ...
This command creates a file called migrations/20230701202642_todos.sql, which we’ve populated with the SQL code from listing 9.5.
We’re now ready to write the Rust code to model our todos in Rust and interact with the database. We’ll support five operations: create, read, update, delete, and list. These are the default table stakes CRUD operations that you generally get out of the box and that you will encounter many times over if you spend much time working with web frameworks.
Let’s look at our Todo struct.
Listing 9.6 API service Todo struct from src/todo.rs
#[derive(Serialize, Clone, sqlx::FromRow)]    ❶
pub struct Todo {
    id: i64,
    body: String,
    completed: bool,
    created_at: NaiveDateTime,                ❷
    updated_at: NaiveDateTime,
}
❶ We’re deriving the Serialize trait from the serde crate and sqlx::FromRow, which allows us to get a Todo from a SQLx query.
❷ We use the chrono::NaiveDateTime type to map SQL timestamps into Rust objects.
There isn’t a lot to see for the Todo struct itself, so we’ll jump into the impl blocks, which get more interesting. We’ll first look at the listing and reading code.
Listing 9.7 API service Todo struct impl read block from src/todo.rs
impl Todo {
    pub async fn list(dbpool: SqlitePool) -> Result<Vec<Todo>, Error> {
        query_as("select * from todos")                                    ❶
            .fetch_all(&dbpool)
            .await
            .map_err(Into::into)
    }
    pub async fn read(dbpool: SqlitePool, id: i64) -> Result<Todo, Error> {
        query_as("select * from todos where id = ?")                       ❷
            .bind(id)
            .fetch_one(&dbpool)
            .await
            .map_err(Into::into)
    }
}
❶ Selects all todos from the todos table
❷ Selects one todo from the todos table with a matching id field
In this code, we have two methods: list() and read(). Each method applies the action you’d expect by executing a query against the database. The only real difference between list() and read() is the number of records returned and the fact that we need to select by ID when reading a single record. Now, let’s look at the following listing, which shows the write impl block.
Listing 9.8 API service Todo struct impl write block from src/todo.rs
impl Todo {
    pub async fn create(
        dbpool: SqlitePool,
        new_todo: CreateTodo,                                             ❶
    ) -> Result<Todo, Error> {
        query_as("insert into todos (body) values (?) returning *")       ❷
            .bind(new_todo.body())
            .fetch_one(&dbpool)                                           ❸
            .await
            .map_err(Into::into)
    }
    pub async fn update(
        dbpool: SqlitePool,
        id: i64,
        updated_todo: UpdateTodo,                                         ❹
    ) -> Result<Todo, Error> {
        query_as(
            "update todos set body = ?, completed = ?, \
            updated_at = datetime(‘now’) where id = ? returning *",       ❺
        )
        .bind(updated_todo.body())                                        ❻
        .bind(updated_todo.completed())
        .bind(id)
        .fetch_one(&dbpool)                                               ❼
        .await
            .map_err(Into::into)
    }
    pub async fn delete(dbpool: SqlitePool, id: i64) -> Result<(), Error> {
        query("delete from todos where id = ?")                           ❽
            .bind(id)
            .execute(&dbpool)                                             ❾
            .await?;
        Ok(())                                                            ❿
    }
}
❶ We’ve added a new type here, CreateTodo, which we haven’t defined yet. It contains the todo body, which we need to create a todo.
❷ We use the returning * SQL clause to retrieve the record immediately after it’s inserted.
❸ We execute the query with fetch_one() because we expect this to return one row.
❹ We’ve added another new type here, UpdateTodo, which contains the two fields we allow to be updated.
❺ Once again, we’re using the returning * SQL clause to retrieve the updated record immediately. Notice how we set the updated_at field to the current date and time.
❻ Each value is bound in the order they’re declared within the SQL statement, using the ? token to bind values. This syntax varies, depending on the SQL implementation.
❼ We expect to fetch one row when this query is executed.
❽ The delete is destructive; nothing is left to return if it succeeds.
❾ Here, we use execute() to execute the query, which is used for queries that don’t return records.
❿ We return unit upon success (i.e., no previous errors).
The code for each action is quite similar, so let’s discuss some of the shared behaviors:
We assume any errors will result in the sqlx::Error being returned by the query execution, which we map to our own error type using the From trait—we apply this trait by using .map_err(Into::into). The From and Into traits are reciprocal, so we can call the Into::into trait method on the error only by using map_err().
Every query except the delete action returns one or more records, and because we derived sqlx::FromRow for Todo (as previously noted), we can let SQLx map the type for us.
We need to pass a handle to the database pool (we could also pass a connection directly) to execute each operation.
When we use bind() to bind values to the SQL statement, we need to pay attention to the order of the values because they’re bound in the order they’re specified. Some SQL drivers let you use identifiers to bind values, but SQLite does not.
Let’s take a quick look at the CreateTodo and UpdateTodo structs, which we introduced in listing 9.8. First, let’s examine CreateTodo.
Listing 9.9 API service CreateTodo struct from src/todo.rs
#[derive(Deserialize)]
pub struct CreateTodo {
    body: String,
}

impl CreateTodo {
    pub fn body(&self) -> &str {
        self.body.as_ref()
    }
}
Notice how the only method we provide is an accessor for the body field. This is because we’re relying on Deserialize to create the struct, which we derived at the top. We don’t need to construct a CreateTodo; we just need to deserialize it when we receive one in an API call.
Next, let’s look at UpdateTodo.
Listing 9.10 API service UpdateTodo struct from src/todo.rs
#[derive(Deserialize)]
pub struct UpdateTodo {
    body: String,
    completed: bool,
}

impl UpdateTodo {
    pub fn body(&self) -> &str {
        self.body.as_ref()
    }

    pub fn completed(&self) -> bool {
        self.completed
    }
}
UptadeTodo is nearly the same as CreateTodo, except we have two fields: body and completed. Once again, we rely on the serde library to construct the object for us.
That’s it for the data model. Now, we’ll move on to defining the API routes in the next section.
We’ve already designed our API, so all we need to do is declare the routes using axum’s Router. If you’ve used any other web frameworks, this code will look quite familiar, as it consists of the same components: a request path (with optional parameters), a request method, the request handler, the state we require for our handlers, and any additional layers for our service.
Let’s go ahead and look at the code in the following listing from router.rs, which defines the service and its router.
Listing 9.11 API service router from src/router.rs
pub async fn create_router(
    dbpool: sqlx::Pool<sqlx::Sqlite>,                                 ❶
) -> axum::Router {
    use crate::api::{
        ping, todo_create, todo_delete, todo_list, todo_read, todo_update,
    };
    use axum::{routing::get, Router};
    use tower_http::cors::{Any, CorsLayer};
    use tower_http::trace::TraceLayer;

    Router::new()
        .route("/alive", get(|| async { "ok" }))                      ❷
        .route("/ready", get(ping))                                   ❸
        .nest(
            "/v1",                                                    ❹
            Router::new()
                .route("/todos", get(todo_list).post(todo_create))    ❺
                .route(
                    "/todos/:id",
                    get(todo_read).put(todo_update)
                    ➥ .delete(todo_delete),
                ),                                                    ❻
        )
        .with_state(dbpool)                                           ❼
        .layer(CorsLayer::new().allow_methods(Any)
        ➥ .allow_origin(Any))                                        ❽
        .layer(TraceLayer::new_for_http())                            ❾
}
❶ The database pool is passed into the router, which takes ownership.
❷ Our liveness health check merely returns a 200 status with the body ok.
❸ Our readiness health check makes a GET request with the ping() handler.
❹ The API routes are nested under the /v1 path.
❺ Here, we permit two methods for the /v1/todos path—either GET or POST—which call the todo_list() and todo_create() handlers, respectively. We can change the methods together using a handy fluent interface.
❻ The path parameter :id maps to the todo’s ID. GET, PUT, or DELETE methods for /v1/todos/:id map to todo_read(), todo_update(), and todo_delete, respectively.
❼ We hand the database connection pool off to the router to be passed into handlers as state.
❽ A CORS layer is added to demonstrate how to apply CORS headers.
❾ We need to add the HTTP tracing layer from tower_http to get request traces.
axum::Router is the core abstraction of the axum web framework, which allows us to declare the routes and their handlers as well as mix in layers from other services, such as tower_http. Although this example is quite basic, you can get very far building upon what I’ve demonstrated here, as it will cover a significant portion of use cases. For practical purposes, you would need to consult the axum documentation at https://docs.rs/axum/ to go more in depth in the framework and its features. Let’s move on to implementing the API route handlers.
The final puzzle piece is the API route handlers, which we’ll discuss now. Let’s start by looking at the ping() handler for the readiness check because it’s the most basic handler.
Listing 9.12 API service ping handler from src/api.rs
pub async fn ping(
    State(dbpool): State<SqlitePool>,          ❶
) -> Result<String, Error> {
    use sqlx::Connection;

    let mut conn = dbpool.acquire().await?;    ❷
    conn.ping()                                ❸
        .await
        .map(|_| "ok".to_string())             ❹
        .map_err(Into::into)                   ❺
}
❶ The State extractor gives us the database connection pool from the axum state.
❷ We need to acquire a connection from the database pool first.
❸ The ping() method will check if the database connection is OK. In the case of SQLite, this checks that the SQLite background threads are alive.
❹ Upon success, ping() returns unit, so we just map it to the string ok, which is returned as our response.
❺ We use the From trait to map sqlx::Error to our own error types.
In ping(), I’ve introduced a new concept from the axum framework called extractors. In short, an extractor is anything that implements the axum::extract::FromRequest or axum::extract::FromRequestParts traits, but we can also use one of the extractors that axum provides for use, which include the following:
axum::extract::State—Extracts the global application state, which is supplied to the router with .with_state(), like we saw in listing 9.11 for the database pool.
axum::extract::Path—Extracts path parameters, such as the id parameter we included in our routes.
axum::extract::Json—Extracts the body of a request as a JSON object and deserializes it using the serde crate.
The axum framework provides several other extractors, and you can also create your own by implementing the extractor traits.
Moving on, let’s get into the most import bits: the todo API route handlers.
Listing 9.13 API service todo handlers from src/api.rs
pub async fn todo_list(
    State(dbpool): State<SqlitePool>,
) -> Result<Json<Vec<Todo>>, Error> {                   ❶
    Todo::list(dbpool).await.map(Json::from)            ❷
}

pub async fn todo_read(
    State(dbpool): State<SqlitePool>,
    Path(id): Path<i64>,                                ❸
) -> Result<Json<Todo>, Error> {
    Todo::read(dbpool, id).await.map(Json::from)
}

pub async fn todo_create(
    State(dbpool): State<SqlitePool>,
    Json(new_todo): Json<CreateTodo>,                   ❹
) -> Result<Json<Todo>, Error> {
    Todo::create(dbpool, new_todo).await.map(Json::from)
}

pub async fn todo_update(
    State(dbpool): State<SqlitePool>,
    Path(id): Path<i64>,
    Json(updated_todo): Json<UpdateTodo>,               ❺
) -> Result<Json<Todo>, Error> {
    Todo::update(dbpool, id, updated_todo).await.map(Json::from)
}

pub async fn todo_delete(
    State(dbpool): State<SqlitePool>,
    Path(id): Path<i64>,
) -> Result<(), Error> {
    Todo::delete(dbpool, id).await
}
❶ Note how we’re returning a JSON object of Vec<Todo> or, possibly, an error.
❷ The Todo::list() method returns a plain Vec<Todo>, so we map that to a Json object using Json::from, which relies on the Serialize trait we derived for Todo.
❸ A path parameter, which we access using the Path extractor. axum takes care of mapping the ID from the /v1/todos/:id router path to the named parameter in a type-safe manner.
❹ Here, we introduce the CreateTodo struct, which we’re getting from the request body using the Json extractor, which uses the Deserialize implementation we derived using the serde crate.
❺ The UpdateTodo struct, which we’re getting from the request body using the Json extractor, which uses the Deserialize implementation we derived using the serde crate.
The code for our API handlers is quite small. Because we’ve already done most of the hard work; at this point, it’s just about defining the inputs and outputs for each of our handlers. axum will only match requests against handlers that have valid extractors for their given request path and method, and it does so in a way that’s type safe, so we don’t have to think too hard about whether our handlers will work once the code successfully compiles. This is the beauty of Rust and type safety.
Note To bring ourselves back down to earth, it should be noted that this API is designed in a way that’s quite rigid. For example, you don’t allow for optional fields in any of the endpoints—you can only provide exactly the fields required or else the service will return an error. In most cases, this is fine, but as an exercise for the reader, you may want to try making the completed field (for example) optional on PATCH or update requests. If you only need to modify one particular field, it seems reasonable that the API would gracefully handle only the fields that are specified—does it not?
We now have a fully functioning API service, with the main CRUD endpoints completed. We need to discuss one more topic—error handling—and then we can run some tests to see how this baby works.
Before I jump into error handling, let’s quickly discuss how responses are handled in axum. Out of the box, axum will handle converting basic types (unit, String, Json, and axum::http::StatusCode) into HTTP responses. It does this by providing an implementation of the axum::response::IntoResponse trait for the most common response types. If you need to convert your type into a response, you must either transform it into something that implements IntoResponse or implement IntoResponse yourself, which we’ll demonstrate in the next section.
For error handling, I’ve kept things very simple. We’ll define one enum called Error in error.rs.
Listing 9.14 API service Error enum from src/error.rs
#[derive(Debug)]
pub enum Error {
    Sqlx(StatusCode, String),   ❶
    NotFound,                   ❷
}
❶ We’ll convert errors from sqlx::Error into an HTTP status code and message.
❷ Error::NotFound is what we’ll use to conveniently map responses to HTTP 404s.
Note We’re treating 404s (not found) as errors, but 404s are also a normal HTTP response that doesn’t necessarily indicate an error. For convenience, we’re treating anything that’s not a 200 status code as an error.
There is not much to see with our error type. Next, we need to define the From trait for sqlx::Error, which converts SQLx errors to our error type.
Listing 9.15 API service From implementation for sqlx::Error from src/error.rs
impl From<sqlx::Error> for Error {
    fn from(err: sqlx::Error) -> Error {
        match err {
            sqlx::Error::RowNotFound => Error::NotFound,   ❶
            _ => Error::Sqlx(
                StatusCode::INTERNAL_SERVER_ERROR,         ❷
                err.to_string(),                           ❸
            ),
        }
    }
}
❶ For queries that can’t find matching rows, we return an HTTP 404.
❷ For all other SQLx errors, we return an HTTP 500.
❸ We include the string returned by the SQLx error in the response body of our 500s.
Our From<sqlx::Error> for Error implementation is quite simple: we only handle one case as special, which is the RowNotFound case. For that, we map it to an HTTP 404, which is more helpful than returning a generic 500 error.
Next, we need to make it possible for axum to use our error type as a response, and for that, we’ll implement IntoResponse for Error.
Listing 9.16 API service From implementation for sqlx::Error from src/error.rs
impl IntoResponse for Error {
    fn into_response(self) -> Response {
        match self {
            Error::Sqlx(code, body) => (code, body).into_response(),    ❶
            Error::NotFound => StatusCode::NOT_FOUND.into_response(),   ❷
        }
    }
}
❶ Pull the status code and response body out, and then call into_response() on a tuple of (StatusCode, String) because axum provides an implementation of IntoResponse for us.
❷ Call into_response() on StatusCode::NOT_FOUND, which gives us an empty HTTP 404 response.
You may notice in the preceding code that we don’t even bother constructing a Response, as required by IntoResponse. Thanks to the implementations provided by axum, we merely delegate the response construction to axum using an existing implementation of IntoResponse. This is a neat trick that requires minimal effort on our part. The only case where you wouldn’t want to do this is when the default implementation involves a costly conversion and you have enough information to optimize it better.
Let’s run our service and make sure it behaves as expected. When it’s started with cargo run, we’ll see output similar to what’s shown in figure 9.2. The logging output we see in the figure shows the queries from SQLx at startup, which includes running the migrations. We aren’t required to run the migrations automatically, but this is convenient for testing. In a production service, you would likely not run migrations automatically.
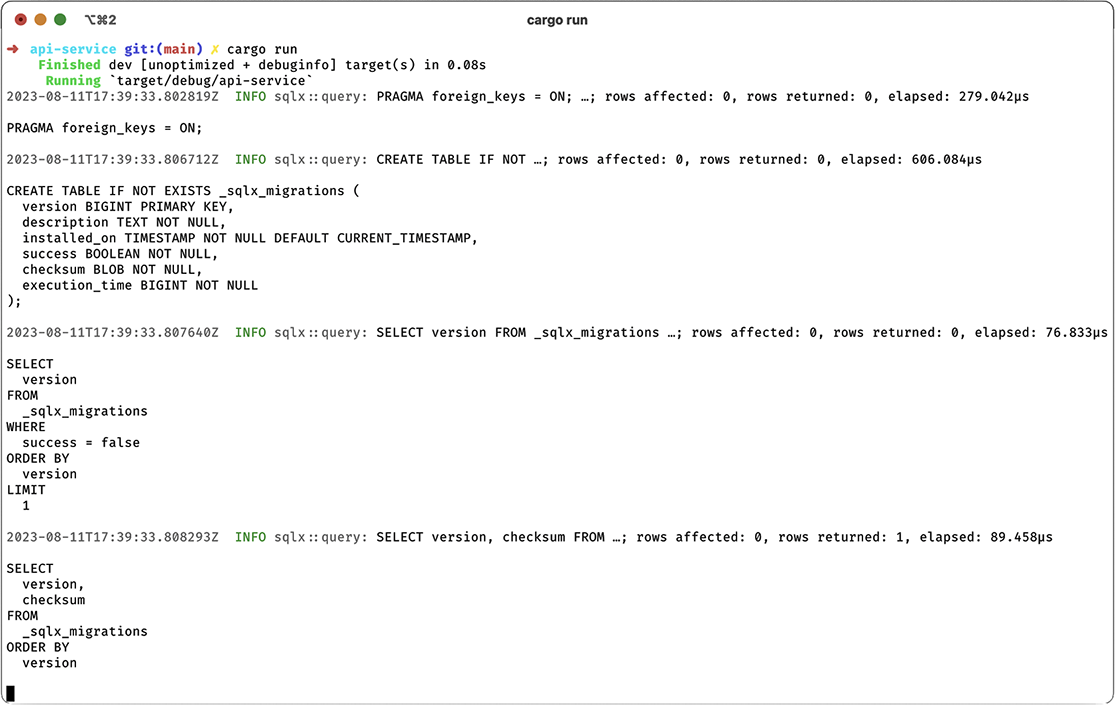
Figure 9.2 Running the API service
We need to test our API, but first, let’s ensure the health check endpoints work as expected. For these tests, I will use the HTTPie (https://httpie.io/) tool, but you could just as easily use curl or another CLI HTTP client.
I’ll run http 127.0.0.1:3000/alive followed by http 127.0.0.1:3000/ready, which will generate an HTTP GET request against each endpoint, with the result shown in figure 9.3. In the output shown in the figure, we see the logging output of our service on the left side and the output from HTTPie on the right side. So far, everything looks good; we can see the HTTP status code is 200 for each request, the request body is simply ok, and the CORS headers are present as expected.
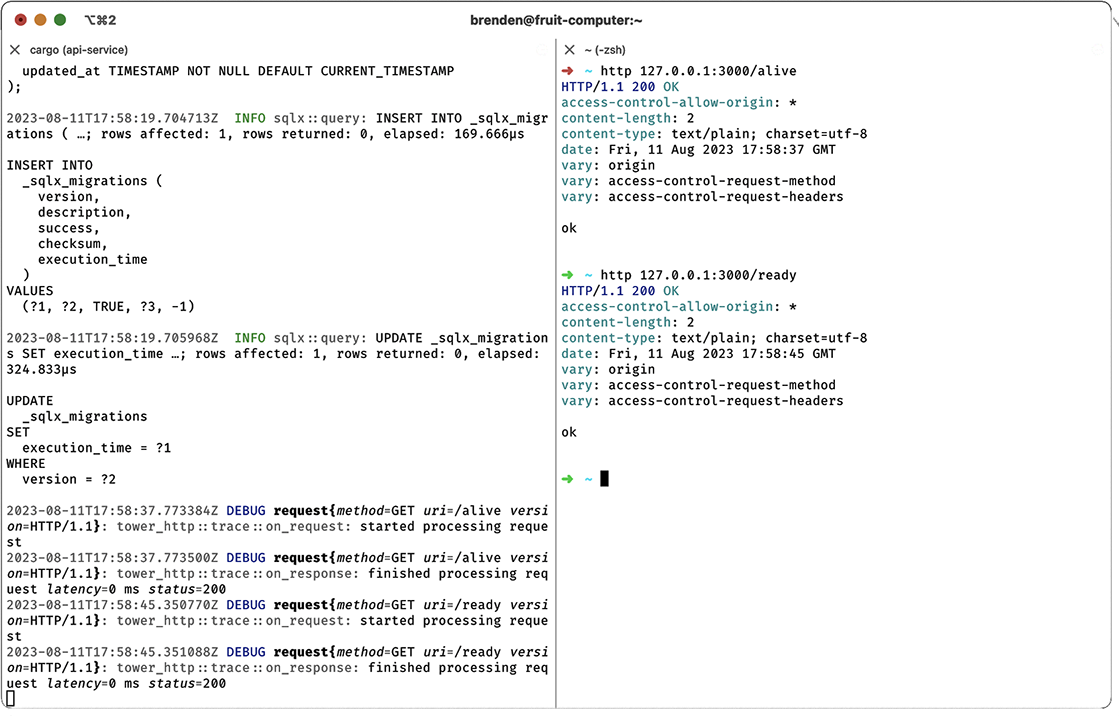
Figure 9.3 Checking service health
Now, it’s time to create a todo. For this, we’ll make an HTTP POST request with http post 127.0.0.1:3000/v1/todos body=‘wash the dishes’, as shown in figure 9.4.
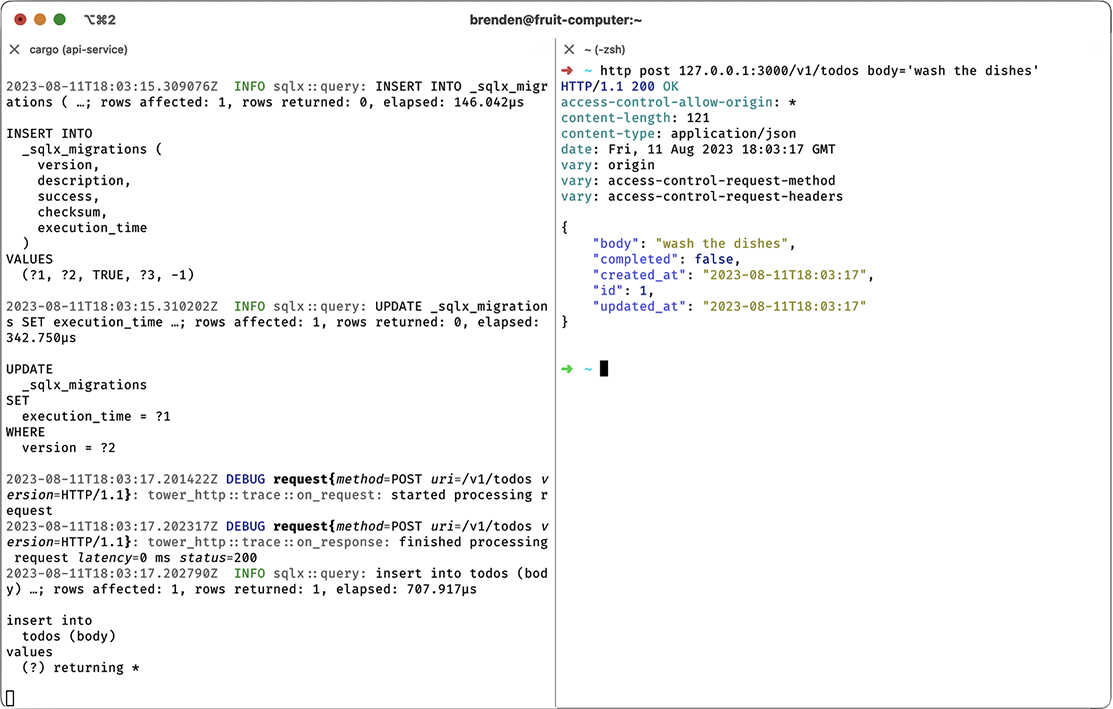
Figure 9.4 Creating a todo with POST
Now, let’s test the HTTP GET methods for the read and list endpoints with http 127.0.0.1:3000/v1/todos/1 (read) and http 127.0.0.1:3000/v1/todos (list), as shown in figure 9.5. Note how the first request (for a specific resource) returns just the todo object, and the second request (to list all resources) returns a list of objects. So far, so good. Next, let’s test the PUT method to update our todo by marking it as completed with http put 127.0.0.1:3000/v1/todos/1 body=‘wash the dishes’ completed:=true, as shown in figure 9.6.
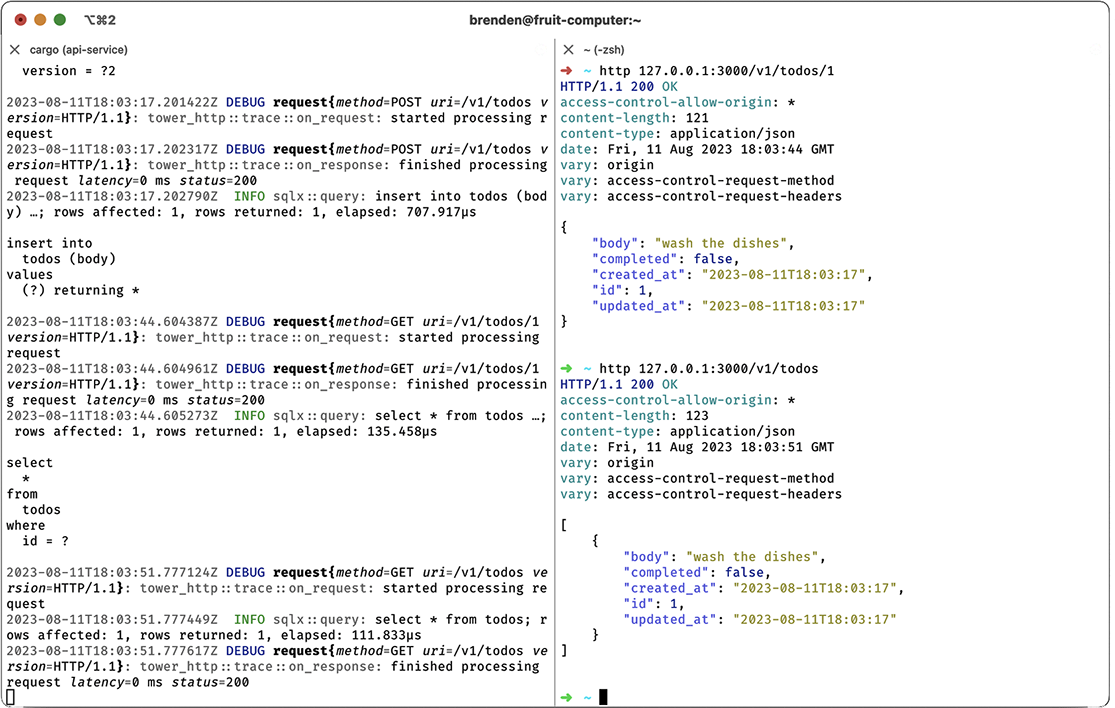
Figure 9.5 Reading todos with GET
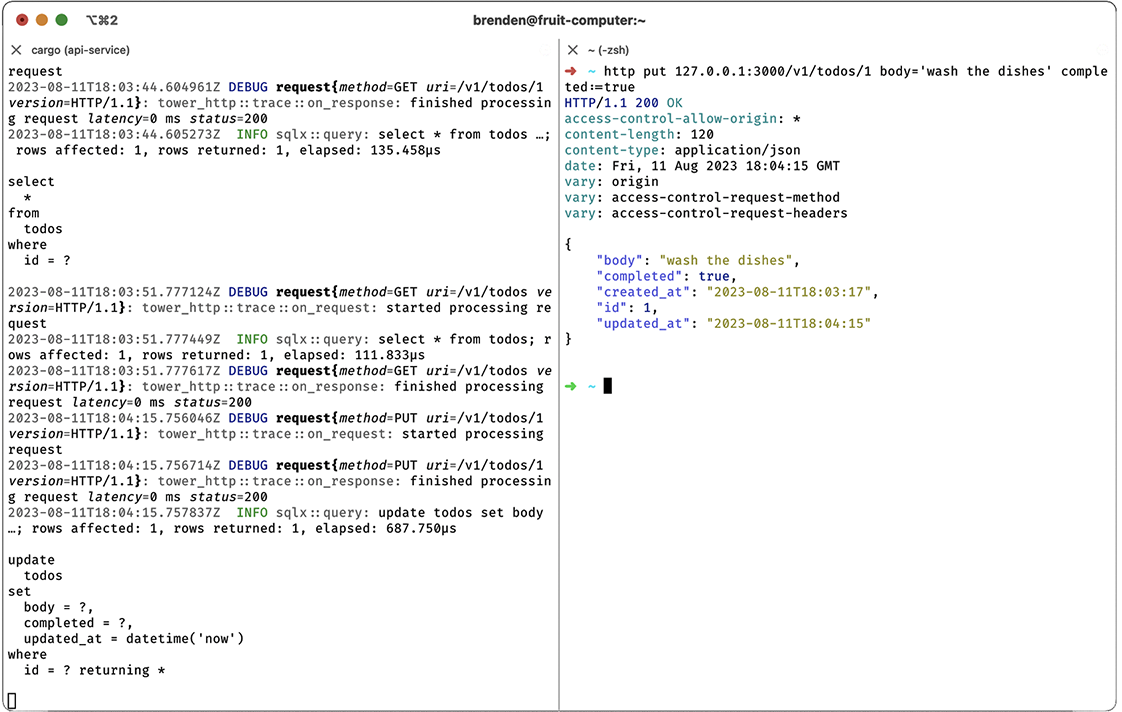
Figure 9.6 Updating todos with PUT
Notice how we need to specify both the body and completed fields, which is a bit annoying. It would be nice if we gracefully handled only the required fields when updating a record, but I’ll leave that as an exercise for the reader. Finally, let’s check that we can delete our todo with http delete 127.0.0.1:3000/v1/todos/1, as shown in figure 9.7.
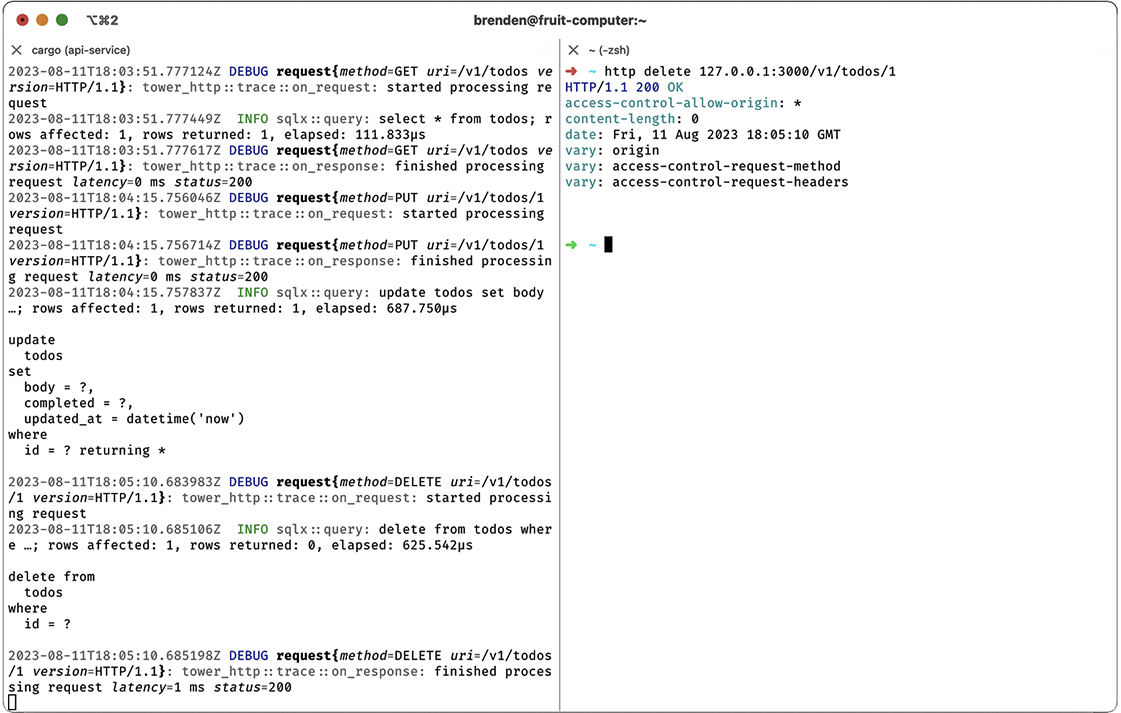
Figure 9.7 Deleting todos with DELETE
Success! It looks like everything works. As an exercise for the reader, I suggest running a few more tests and experimenting with some of the following options:
Changing the response for POST to include the resource URL or a 3xx redirect, a pattern sometimes used in RESTful APIs
axum is a web framework that provides everything needed to build web service APIs in Rust using the Tokio async runtime. Although there are other Rust web frameworks, axum provides a type-safe API without the need for macros.
axum can be used together with a number of other crates to provide everything you need in a web framework, but the axum crate itself is fairly small and only provides a few key abstractions: the router, extractors, responses, error handling, and integration with the tower and tower-http crates.
axum supports HTTP/1 and HTTP/2 via the hyper crate, can handle TLS termination with rustls, and is built on Tokio’s insanely fast async runtime with stable Rust support for the async/await syntax.
Most of the work in building an API service involves designing a data model, deciding on state management, adding tracing and logging, deciding how to render the client-side data (HTML, JSON, etc.), and choosing an architecture that suits your needs.
The standard web-tier architecture will fit the needs of a considerable portion of applications, and it’s relatively robust, highly scalable, well understood, and backed by well-known standards, like HTTP.