
Unit testing is one way to improve code quality, as it can catch regressions and ensure code meets requirements before shipping. Rust includes a built-in unit testing framework to make your life easier. In this chapter, we’ll review some of the features Rust provides and discuss some of the shortfalls of Rust’s unit testing framework—and how to overcome them.
Before we jump into the details of Rust’s unit testing features, we should talk about the differences between Rust and other languages and how they relate to unit testing. For those coming from languages like Haskell or Scala, you may find Rust has similar properties when it comes to testing. Compared to most languages, however, Rust varies greatly, in that the kinds of unit tests you might see in other languages aren’t necessary in Rust.
To elaborate, there are many cases in Rust in which, so long as the code compiles, the code must be correct. In other words, the Rust compiler can be thought of as an automatic test suite that’s always applied to code. This only remains true for certain types of tests, and there are a variety of ways to break this contract in Rust.
The two most commons ways to undo some of Rust’s safety guarantees are
The latter can happen in a variety of ways, but the most common is by using Option or Result without properly dealing with both result cases. In particular, this error can be made by calling unwrap() on these types without handling the failure case. In some cases, this is the desired behavior, but it’s also a mistake people often make simply because they don’t want to spend time handling errors. To avoid these problems, the simple solution is to handle all cases and avoid calling functions that panic at run time (such as unwrap()). Rust does not provide a way to verify that code is panic free.
In the case of Rust’s standard library, functions and methods that panic on failures are generally noted as such in the documentation. As a general rule, for any kind of programming, any functions that perform I/O or nondeterministic operations may fail (or panic) at any time, and those failure cases should be handled appropriately (unless, of course, the correct way to handle the failure is to panic).
Note In Rust, the term panic means to raise an error and abort the program. If you want to force a panic yourself, the panic!() macro can be used. Additionally, you can use the compile_error!() macro to induce a compile-time error.
Often, the Rust compiler can catch errors before code ships, without the help of unit tests. What the Rust compiler cannot do, however, is catch logic errors. For example, the Rust compiler can detect certain cases of divide-by-zero errors, but it can’t tell you when you mistakenly used division instead of multiplication.
As a rule, the best way to write software that’s both easy to test and unlikely to be wrong is accomplished by breaking down code into small units of computation (functions) that generally satisfy the following properties:
Functions should be idempotent in cases where they must be stateful.
Functions should be deterministic whenever possible; the result of a function should always be the same for any given set of inputs.
Functions that may return no value (i.e., null) should return an Option.
Following points 4 and 5 allows you to make heavy use of the ? operator in Rust (? is shorthand for returning early with an error result if the result is not Ok), which can save you from typing a lot of code. In chapter 4, we discussed using Result with the From trait, which greatly simplifies error handling in your code. For any given function you write that returns a Result, you only need to write the necessary From trait implementation for any possible errors within the function, and then you can handle those errors appropriately with the ? operator. Keep in mind this only works in generic situations and may not be appropriate in cases where the error handling is specific to the function in question.
Tip If you want to panic on an unexpected result, use the expect() function. expect() takes a message as an argument explaining why the program panicked. expect() is a safer alternative to unwrap() and can be thought of as behaving similarly to assert().
By convention, Rust unit tests are stored in the same source file as the code being tested. That is to say, for any given struct, function, or method, its corresponding unit test would generally be within the same source file. Tests are typically located near the bottom of the file. This has the nice side effect of helping you keep code relatively small and as separate concerns. If you try to pack too much logic into one file, it can grow quite large, especially if you have complicated tests. Once you pass the 1,000-line mark, you may need to think about refactoring.
Finally, most of this advice is not necessarily Rust specific—it applies to all programming languages. For Rust specifically, your code should always handle return values and avoid the use of unwrap(), except when necessary.
Rust provides several basic testing features (table 6.1), although you may find the built-in features lacking compared to more mature testing frameworks. One notable difference between Rust and other languages is that the core Rust tooling and language includes testing features without the use of additional libraries or frameworks. In many languages, testing is an afterthought and requires additional tooling and libraries bolted on to properly test code. Features not provided by Rust can usually be found in crates; however, you may also find that Rust makes testing much easier overall, thanks to the strict language guarantees.
Table 6.1 Summary of Rust’s testing features
Let’s examine the anatomy of a simple library with a unit test to demonstrate Rust’s testing features. Consider the following example, which provides a generic adder.
Listing 6.1 Code for a basic unit test in Rust
pub fn add<T: std::ops::Add<Output = T>>(a: T, b: T) -> T {   ❶
    a + b                                                     ❶
}                                                             ❶

#[cfg(test)]                                                  ❷
mod tests {                                                   ❷
    use super::*;                                             ❸

    #[test]                                                   ❹
    fn test_add() {
        assert_eq!(add(2, 2), 4);
    }
}
❶ This is an addition function that takes two parameters of the same type and returns the result of the same type. The type T needs to have the std::ops::Add trait implemented for the same output type.
❷ Our mod tests contains our tests, and the #[cfg(test)] attribute tells the compiler this is our unit test mod.
❸ This is a convenient shorthand to include everything from the outer scope of this mod. You’ll often see this used in tests.
❹ The #[test] attribute tells the compiler this function is a unit test.
This test passes, which is great. If you run cargo test, the output looks like the code in the following listing.
Listing 6.2 Successful test run
$ cargo test
   Compiling unit-tests v0.1.0
   (/Users/brenden/dev/code-like-a-pro-in-rust/code/c6/6.2/unit-tests)
    Finished test [unoptimized + debuginfo] target(s) in 0.95s
     Running unittests (target/debug/deps/unit_tests-c06c761997d04f8f)

running 1 test
test tests::test_add ... ok

test result: ok. 1 passed; 0 failed; 0 ignored; 0 measured; 0 filtered out;
finished in 0.00s

   Doc-tests unit-tests

running 0 tests

test result: ok. 0 passed; 0 failed; 0 ignored; 0 measured; 0 filtered out;
finished in 0.00s
Rust’s unit testing doesn’t include the helpers, fixtures, harnesses, or parameterized testing features, like you may find in other unit testing frameworks. For those, you’ll either need to code your own or try some libraries.
For basic parameterized testing, the parameterized (https://crates.io/crates/parameterized) crate provides a nice interface to create tests. The test-case (https://crates.io/crates/test-case) crate provides another implementation of parameterized testing that’s simple, concise, and easy to use. For fixtures, you can try the rstest (https://crates.io/crates/rstest) crate. The assert2 (https://crates.io/crates/assert2) crate provides assertions inspired by the popular C++ Catch2 library.
One library worth mentioning in detail is the proptest (https://lib.rs/crates/proptest) crate, which provides a Rust implementation of QuickCheck (https://github.com/nick8325/quickcheck), a Haskell library originally released in 1999, and one which you may have already encountered. Proptest isn’t a 1:1 port of QuickCheck to Rust, but rather, it provides equivalent functionality with some Rust-specific differences, which are documented at http://mng.bz/YRno.
Property testing can save you a lot of time by generating random test data, verifying results, and reporting back with the minimum test case required to create an error. This is a huge time saver, although it’s not necessarily a replacement for testing well-known values (e.g., when verifying spec compliance).
Note There’s no free lunch with property testing; it comes with the tradeoff of possibly having to spend more CPU cycles testing random values, as opposed to hand-picked or well-known values. You can tune the number of random values to test, but for data with a large set of possible values, it’s often not practical to test every outcome.
Let’s revisit our adder example from the previous section, but this time, we’ll try it with proptest, which will provide the test data for our test function.
Listing 6.3 Code listing of adder with proptest
pub fn add<T: std::ops::Add<Output = T>>(a: T, b: T) -> T {
    a + b
}

#[cfg(test)]
mod tests {
    use super::*;
    use proptest::prelude::*;                 ❶
    proptest! {
        #[test]
        fn test_add(a: i64, b: i64) {         ❷
            assert_eq!(add(a, b), a + b);     ❸
        }
    }
}
❶ Here, we include the proptest library, which includes the proptest! macro.
❷ Our test function’s parameters, a and b, will be provided by the proptest! macro.
❸ We assert that our adder does, indeed, return the result of a + b.
Now, let’s run this test again with proptest:
cargo test
   Compiling proptest v0.1.0
   (/Users/brenden/dev/code-like-a-pro-in-rust/code/c6/6.2/proptest)
    Finished test [unoptimized + debuginfo] target(s) in 0.59s
     Running unittests (target/debug/deps/proptest-db846addc2c2f40d)

running 1 test
test tests::test_add ... FAILED

failures:

----- tests::test_add stdout -----
# ... snip ...
thread ‘tests::test_add’ panicked at ‘Test failed: attempt to add with
overflow; minimal failing input: a = -2452998745726535882,
b = -6770373291128239927
    successes: 1
    local rejects: 0
    global rejects: 0
‘, src/lib.rs:9:5

failures:
    tests::test_add

test result: FAILED. 0 passed; 1 failed; 0 ignored; 0 measured; 0 filtered
out; finished in 0.00s

error: test failed, to rerun pass ‘--lib’
Uh oh! It looks like our adder wasn’t so great after all. It turns out it can “blow up” under certain circumstances (in this case, the addition operation overflowed because we’re adding two signed integers of finite length). We weren’t expecting this kind of failure and probably wouldn’t have caught it unless we were manually generating random data for a and b.
We have a few options for fixing the previous test, but the easiest one is to just explicitly wrap overflows (i.e., follow the C behavior of integer overflow). Let’s update our code to look like this:
extern crate num_traits;                                    ❶
use num_traits::ops::wrapping::WrappingAdd;

pub fn add<T: WrappingAdd<Output = T>>(a: T, b: T) -> T {   ❷
    a.wrapping_add(&b)
}

#[cfg(test)]
mod tests {
    use super::*;
    use proptest::prelude::*;
    proptest! {
        #[test]
        fn test_add(a: i64, b: i64) {
            assert_eq!(add(a, b), a.wrapping_add(b));       ❸
        }
    }
}
❶ We’re relying on the num_traits crate, which provides the WrappingAdd trait.
❷ The trait bound is switched from Add to WrappingAdd.
❸ The test needs to be updated so that it is also using wrapping_add().
We’ve added the num_traits crate, a small library that provides the WrappingAdd trait, to the preceding code. The Rust standard library doesn’t have an equivalent trait, and it’s difficult to create a generic function this way without one (we’ll explore traits in greater depth in chapters 8 and 9).
If we run our code now, it passes as expected:
cargo test
   Compiling wrapping-adder v0.1.0
   (/Users/brenden/dev/code-like-a-pro-in-rust/code/c6/6.2/wrapping-adder)
    Finished test [unoptimized + debuginfo] target(s) in 0.65s
     Running unittests (target/debug/deps/wrapping_adder-5330c09f59045f6a)

running 1 test
test tests::test_add ... ok

test result: ok. 1 passed; 0 failed; 0 ignored; 0 measured; 0 filtered out;
finished in 0.01s

     Running unittests (target/debug/deps/wrapping_adder-a198d5a6a64245d9)

running 0 tests

test result: ok. 0 passed; 0 failed; 0 ignored; 0 measured; 0 filtered out;
finished in 0.00s

   Doc-tests wrapping-adder

running 0 tests

test result: ok. 0 passed; 0 failed; 0 ignored; 0 measured; 0 filtered out;
finished in 0.00s
Rust is a statically typed language, which brings with it some major advantages, especially when it comes to testing. One way to think about statically typed languages, as opposed to dynamically typed languages, is that the compiler does the work of limiting the set of possible inputs and outputs to any given statement or block of code by analyzing the source code before it runs. The possible set of inputs and outputs are constrained by type specifications. That is to say, a string can’t be an integer, and vice versa. The compiler verifies that the types match what’s expected and references are valid. You don’t need to worry about mixing up strings and integers at run time because the compiler doesn’t let it happen; this frees you (the developer) from having to worry about a host of problems, provided you use types correctly.
In dynamically typed languages, type errors are one of the most common types of problems. In interpreted languages, the combination of invalid syntax and type errors creates a potent opportunity for run-time errors that can be difficult to catch before code is shipped. Many dynamic languages have been retrofitted with static analyzer tools, but they’re not always adequately strict or thorough to catch common errors.
When it comes to testing, we never need to test anything the compiler or borrow checker tests for us. For example, we don’t need to check whether an integer is an integer or a string is a string. We don’t need to check that references are valid or whether data is being mutated by two different threads (a race condition).
Let’s be clear that this doesn’t mean you don’t need to test—it just means most of what you test in Rust is logic, rather than type validation or memory use. It’s true that you still need to perform type conversions, which might fail, but handling these is a matter of logic. Rust’s ergonomics make it hard to handle things that might fail improperly.
Testing properly in Rust begins with effectively using Rust’s type system. Overuse of Option, unwrap(), or unsafe code can lead to harder-to-find bugs, especially if you use these features as a way to avoid handling edge cases. Stateful operations and I/O need to be checked and handled appropriately (as a good habit, functions or methods performing I/O should probably return a Result).
When Cargo runs unit tests, it does so in parallel. Rust uses threads to execute multiple tests simultaneously, to speed up testing. Most of the time, this works transparently, and you don’t need to worry about it. However, we sometimes find ourselves needing to create global state or fixtures for tests, and doing so may require shared state.
Rust provides a couple of facilities for handling this problem: one is to create your own main() function for testing (by, effectively, overriding Rust’s libtest, which is the built-in testing library in Rust and not something you typically interact with directly). That option, however, is probably more trouble than it’s worth, so instead, I’ll direct you to an alternative: the handy lazy_static (https://crates.io/crates/lazy_static) crate.
Tip If you do want to provide your own main() for testing, you can do so by disabling Rust’s built in harness libtest with harness = false in the target settings.
Some details on how to do this can be found in the rustc (https://doc.rust-lang.org/rustc/tests/index.html) and libtest (https://doc.rust-lang.org/test/index.html) documentation.
If, by some chance, you haven’t already encountered lazy_static at this point, then you’ll be pleased to learn about it now. The lazy_static crate makes the creation of static variables in Rust much easier. Creating global shared state in Rust is somewhat tricky because you sometimes need to initialize static structures at run time. To accomplish this, you can create a static reference and update that reference when it’s first accessed, which is what lazy_static does.
To illustrate the problem with global state, consider the following code listing.
Listing 6.4 Unit test with global count
#[cfg(test)]
mod tests {
    static mut COUNT: i32 = 0;    ❶

    #[test]
    fn test_count() {
        COUNT += 1;               ❷
    }
}
❶ Defines a static mutable counter variable
❷ Increments the counter within our test
This code fails to compile, with the following error:
error[E0133]: use of mutable static is unsafe and requires unsafe function
or block
 --> src/lib.rs:7:9
  |
7 |         COUNT += 1;
  |         ^^^^^^^^^^^^ use of mutable static
  |
  = note: mutable statics can be mutated by multiple threads: aliasing
  violations or data races will cause undefined behavior
The compiler is correctly catching the error here. If you wrote equivalent code in C, it would compile and run without complaint (and it will probably work most of the time ... until it doesn’t).
We’ve got a couple of options to fix the code. In this case, we’ve just got a simple count, so we can simply use an atomic integer instead (which is thread safe). Seems easy enough, right? Let’s try the following:
#[cfg(test)]
mod tests {
    use std::sync::atomic::{AtomicI32, Ordering};
    static mut COUNT: AtomicI32 = AtomicI32::new(0);    ❶

    #[test]
    fn test_count() {
        COUNT.fetch_add(1, Ordering::SeqCst);           ❷
    }
}
❶ Uses an Atomic integer provided by Rust’s standard library
❷ Performs a fetch and add operation, which increments the atomic integer; Ordering::SeqCst tells the compiler how to synchronize operations, documented at http://mng.bz/0lRp.
If we try compiling our updated test, it prints the exact same error (use of mutable static). So what gives? rustc is being very strict: it’s complaining about the ownership of the COUNT variable, which, itself, doesn’t implement the Send trait. We’ll have to introduce Arc to implement Send as well.
Let’s update our code again, now that we’ve realized we need to use Arc:
#[cfg(test)]
mod tests {
    use std::sync::atomic::{AtomicI32, Ordering};
    use std::sync::Arc;

    static COUNT: Arc<AtomicI32> = Arc::new(AtomicI32::new(0));

    #[test]
    fn test_count() {
        let count = Arc::clone(&COUNT);          ❶
        count.fetch_add(1, Ordering::SeqCst);
    }
}
❶ We need to clone the Arc before we can use it to obtain a reference in this thread context.
If we try to compile this, we’re going to be disappointed again with a new error:
error[E0015]: calls in statics are limited to constant functions, tuple
structs and tuple variants
 --> src/lib.rs:6:38
  |
6 |     static COUNT: Arc<AtomicI32> = Arc::new(AtomicI32::new(0));
  |                                    ^^^^^^^^^^^^^^^^^^^^^^^^^^^
If you reached this point on your own, you may feel like giving up here. However, the solution is pretty simple: lazy_static. The compiler doesn’t let us create globals that aren’t constants, so we need to either write custom code to do the initialization at run time, or we can just use lazy_static. Let’s update the test one more time:
#[cfg(test)]
mod tests {
    use lazy_static::lazy_static;
    use std::sync::atomic::{AtomicI32, Ordering};
    use std::sync::Arc;
    lazy_static! {                                                        ❶
        static ref COUNT: Arc<AtomicI32> = Arc::new(AtomicI32::new(0));   ❷
    }

    #[test]
    fn test_count() {
        let count = Arc::clone(&COUNT);
        count.fetch_add(1, Ordering::SeqCst);
    }
}
❶ The lazy_static! macro is used to wrap our static variable definitions.
❷ When initializing with lazy_static!, you supply a code block returning the initialized object. In this case, it all fits on one line, so the braces ({ ... }) are omitted.
Presto! Now, our code compiles and runs safely. The lazy_static! macro takes care of the details of initializing the data at run time. When the variable is first accessed, it’s initialized automatically, and we can use it globally. To understand what lazy_static does, let’s view the code generated by the macro with cargo expand (introduced in chapter 3):
#[allow(missing_copy_implementations)]
#[allow(non_camel_case_types)]
#[allow(dead_code)]
struct COUNT {
    __private_field: (),
}
#[doc(hidden)]
static COUNT: COUNT = COUNT {
    __private_field: (),
};
impl ::lazy_static::__Deref for COUNT {                   ❶
    type Target = Arc<AtomicI32>;
    fn deref(&self) -> &Arc<AtomicI32> {
        #[inline(always)]
        fn __static_ref_initialize() -> Arc<AtomicI32> {
            Arc::new(AtomicI32::new(0))                   ❷
        }
        #[inline(always)]
        fn __stability() -> &’static Arc<AtomicI32> {
            static LAZY: ::lazy_static::lazy::Lazy<Arc<AtomicI32>> =
                ::lazy_static::lazy::Lazy::INIT;          ❸
            LAZY.get(__static_ref_initialize)             ❸
        }
        __stability()
    }
}
impl ::lazy_static::LazyStatic for COUNT {
    fn initialize(lazy: &Self) {
        let _ = &**lazy;
    }
}
❶ lazy_static implements the Deref trait (within its code, __Deref is aliased to the core library Deref).
❷ This block will be replaced with the initialization code supplied by us (in our case, a single line).
❸ lazy_static uses the std::sync::Once primitive internally, from the Rust core library, which is initialized at this point.
Examining lazy_static’s source code, we can see it is based on the std::sync::Once primitive (provided by the standard library). We can drop the superfluous Arc that we added in the previous step because lazy_static provides Send. The final result when using lazy_static looks like this:
#[cfg(test)]
mod tests {
    use lazy_static::lazy_static;
    use std::sync::atomic::{AtomicI32, Ordering};
    lazy_static! {
        static ref COUNT: AtomicI32 = AtomicI32::new(0);
    }

    #[test]
    fn test_count() {
        COUNT.fetch_add(1, Ordering::SeqCst);
    }
}
And while lazy_static helps us solve the problem of sharing global state, it doesn’t help us with synchronizing the tests themselves. For example, if you want to ensure your tests execute one at a time, you’ll have to either implement your own main() to run your tests; instruct libtest to run the tests with only one thread; or synchronize your tests using a mutex, as shown in the following code:
#[cfg(test)]
mod tests {
    use lazy_static::lazy_static;
    use std::sync::Mutex;
    lazy_static! {
        static ref MUTEX: Mutex<i32> = Mutex::new(0);
    }
    #[test]
    fn first_test() {
        let _guard = MUTEX.lock().expect("couldn’t acquire lock");
        println!("first test is running");
    }
    #[test]
    fn second_test() {
        let _guard = MUTEX.lock().expect("couldn’t acquire lock");
        println!("second test is running");
    }
}
If you run this code repeatedly with cargo test --nocapture, you may notice that the output doesn’t always print in the same order. That’s because we can’t guarantee the order of execution (libtest is still trying to run these tests in parallel). If you need tests to run in a particular order, you need to either use a barrier or condition variable or implement your own main() function to run your tests.
As a final note, let it be said that unit tests shouldn’t require synchronization or shared state. If you find yourself doing this, you may need to consider whether your design needs to be refactored.
One value proposition of unit testing is catching regressions—code changes that break existing features or behaviors—before software ships. Indeed, if your unit tests cover the software’s specification in its entirety, any change to that software that does not conform to the specification will result in test failures.
Code refactoring—which I’ll define here as code changes that don’t affectthe behavior of public interfaces to the software—is common practice and carries with it advantages as well as risks. The main risk of refactoring is the introduction of regressions. The benefits of refactoring can be some combination of improved code quality, faster compilation, and better performance.
We can employ various strategies when writing tests to improve the quality of our software. One strategy is to test public interfaces in addition to private or internal interfaces. This works especially well if you can achieve near 100% coverage (and we’ll discuss code coverage later in this chapter).
In practical software development, unit tests break frequently and can often consume a great deal of development time to debug, fix, and maintain. For that reason, only testing what needs to be tested can, perhaps counterintuitively, save you time and provide equivalent or better software quality. Determining what needs to be tested can be accomplished by analyzing test coverage, determining what’s required by the specifications, and removing anything that doesn’t need to be there (provided it’s not a breaking change).
With good testing, we can refactor mercilessly with confidence. Too much testing makes our software inflexible, and we spin our wheels managing tests. Combining automated testing tools, such as property-based testing, fuzz testing (discussed in the next chapter), and code coverage analysis, gives us a great deal of quality and flexibility without requiring superpowers.
So now you have some wonderful tests and a clean API, and you want to start improving the internals of your software by cleaning things up. Some refactorings are harder than others, but there are a few tools we can use to make things smoother.
Before we discuss which tools to use, we need to break down the process of refactoring into types of refactorings. Some examples of common refactoring tasks include the following:
Reformatting—Adjusting whitespace and rearranging symbols for readability
Renaming—Changing the names of variables, symbols, constants
Relocating—Moving code from one location to another within the source tree, possibly into different crates
Rewriting—Completely rewriting sections of code or algorithms
For code formatting, the preferred tool is rustfmt (introduced in chapter 3). You will rarely need to manually reformat Rust code; rustfmt can be configured according to your preferences. Review the rustfmt section in chapter 3 for details on how to adjust the rustfmt settings to your preferences. Using rustfmt is as simple as running cargo fmt as needed, or it can be integrated directly into your editor or IDE using rust-analyzer.
Let’s discuss renaming, which can be a tricky task in certain complex situations. Most code editors include some type of find-and-replace tool to apply code changes (or you can do this from the command line using sed or some other command), but that’s not always the best way to do big refactorings. Regular expressions are very powerful, but sometimes, we need something more contextually aware.
The rust-analyzer tool can intelligently rename symbols, and it also provides a structural search-and-replace tool (documented at http://mng.bz/K97P). You can use both of these directly from your IDE or code editor. In VS Code, rename a symbol by selecting it with the cursor and pressing F2 or use the context menu to select Rename Symbol.
Using the structural search-and-replace feature of rust-analyzer can be accomplished either through the command palette or by adding a comment with the replacement string. The replacement is applied to the entire workspace by default, which makes refactoring a snap. rust-analyzer will parse the syntax tree to find matches and perform replacements on expressions, types, paths, or items, in a way that doesn’t introduce syntax errors. A substitution is only applied if the result is valid. For example, using the Mutex guard example from earlier in this chapter, we can use the $m.lock() => Mutex::lock(&$m) substitution, as shown in figure 6.1.
Figure 6.1 Structural substitution with rust-analyzer, before applying
After applying the substitution, we get the result shown in figure 6.2. In this example, calling MUTEX.lock() and Mutex::lock(&MUTEX) are equivalent, but some might prefer the latter form. The structural search and replace is contextual, as you can see in the preceding example, where I only specify Mutex::lock() instead of std::sync::Mutex::lock(). rust-analyzer knows I’m asking for std::sync::Mutex::lock() because of the use std::sync::Mutex statement on line 4.
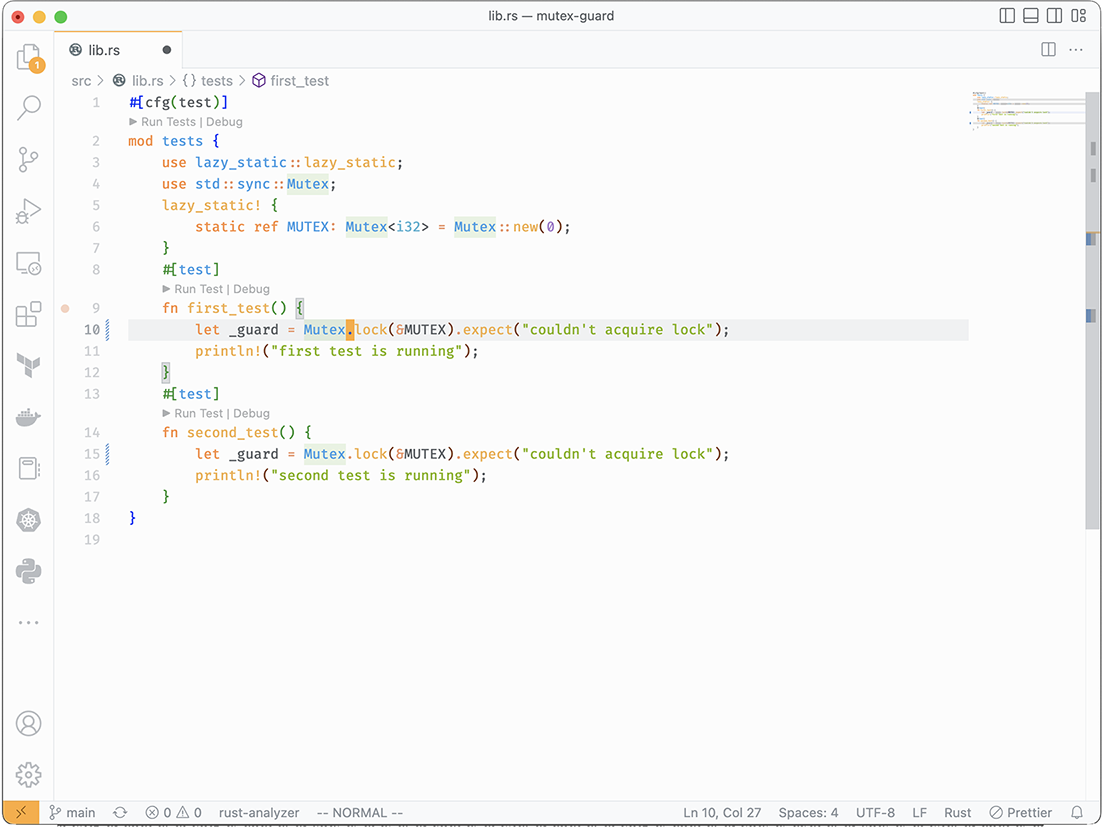
Figure 6.2 Structural substitution with rust-analyzer, after applying
At the time of writing, rust-analyzer doesn’t have any features for relocating or moving code. For example, if you want to move a struct and its methods to a different file or module, you’ll need to do this process manually.
I wouldn’t normally recommend noncommunity projects, but I feel it’s worth mentioning that the IntelliJ IDE Rust plugin does provide a move feature for relocating code (as well as many other features comparable to rust-analyzer), documented at http://mng.bz/9QJx. This plugin is specific to IntelliJ and (to the best of my knowledge) can’t be used with other editors, though it is open source.
If you find yourself needing to rewrite large swaths of code or individual algorithms, a great way to test whether the new code works just like the old code is to use the proptest crate, which we discussed earlier in this chapter. Consider the following implementation of the FizzBuzz algorithm and corresponding test.
Listing 6.5 FizzBuzz with unit test
fn fizzbuzz(n: i32) -> Vec<String> {
    let mut result = Vec::new();

    for i in 1..(n + 1) {
        if i % 3 == 0 && i % 5 == 0 {
            result.push("FizzBuzz".into());
        } else if i % 3 == 0 {
            result.push("Fizz".into());
        } else if i % 5 == 0 {
            result.push("Buzz".into());
        } else {
            result.push(i.to_string());
        }
    }

    result
}

#[cfg(test)]
mod tests {
    use super::*;
    #[test]
    fn test_fizzbuzz() {
        assert_eq!(fizzbuzz(3), vec!["1", "2", "Fizz"]);
        assert_eq!(fizzbuzz(5), vec!["1", "2", "Fizz", "4", "Buzz"]);
        assert_eq!(
            fizzbuzz(15),
            vec![
                "1", "2", "Fizz", "4", "Buzz", "Fizz", "7", "8", "Fizz",
                "Buzz", "11", "Fizz",
                "13", "14", "FizzBuzz"
            ]
        )
    }
}
We’re pretty confident this algorithm works, but we want to write a different version of the code. So we write our new implementation like so, using a HashMap (with the same unit test):
fn better_fizzbuzz(n: i32) -> Vec<String> {
    use std::collections::HashMap;
    let mappings = HashMap::from([(3, "Fizz"), (5, "Buzz")]);
    let mut result = vec![String::new(); n as usize];
    let mut keys: Vec<&i32> = mappings.keys().collect();
    keys.sort();
    for i in 0..n {
        for key in keys.iter() {
            if (i + 1) % *key == 0 {
                result[i as usize].push_str(mappings.get(key)
                  .expect("couldn’t fetch mapping"));
            }
        }
        if result[i as usize].is_empty() {
            result[i as usize] = (i + 1).to_string();
        }
    }

    result
}
Our new implementation is a little more complicated, and while it passes all the test cases, we aren’t as confident that it works. Here’s where proptest comes in: we can just generate test cases using proptest and compare them to the original implementation:
use proptest::prelude::*;
proptest! {
    #[test]
    fn test_better_fizzbuzz_proptest(n in 1i32..10000) {   ❶
        assert_eq!(fizzbuzz(n), better_fizzbuzz(n))        ❷

    }
}
❶ We limit the range of values from 1 to 10,000 for this test, so it doesn’t run too long.
❷ Here, we just compare the result of our old and new algorithms, which we expect to always be the same.
Code coverage analysis is an important tool in assessing the quality and effectiveness of your tests and code. We can automatically generate code coverage reports using a crate called Tarpaulin (https://crates.io/crates/cargo-tarpaulin), which is provided as a Cargo command. Once installed with cargo install cargo-tarpaulin, you can start generating coverage reports.
Using the code from the previous section, we can generate a local HTML coverage report using cargo tarpaulin --out Html, the result of which is shown in figures 6.3 and 6.4. Our report shows 100% coverage for lib.rs, which means every line of code has been tested by our unit tests.

Figure 6.3 Summary of coverage report
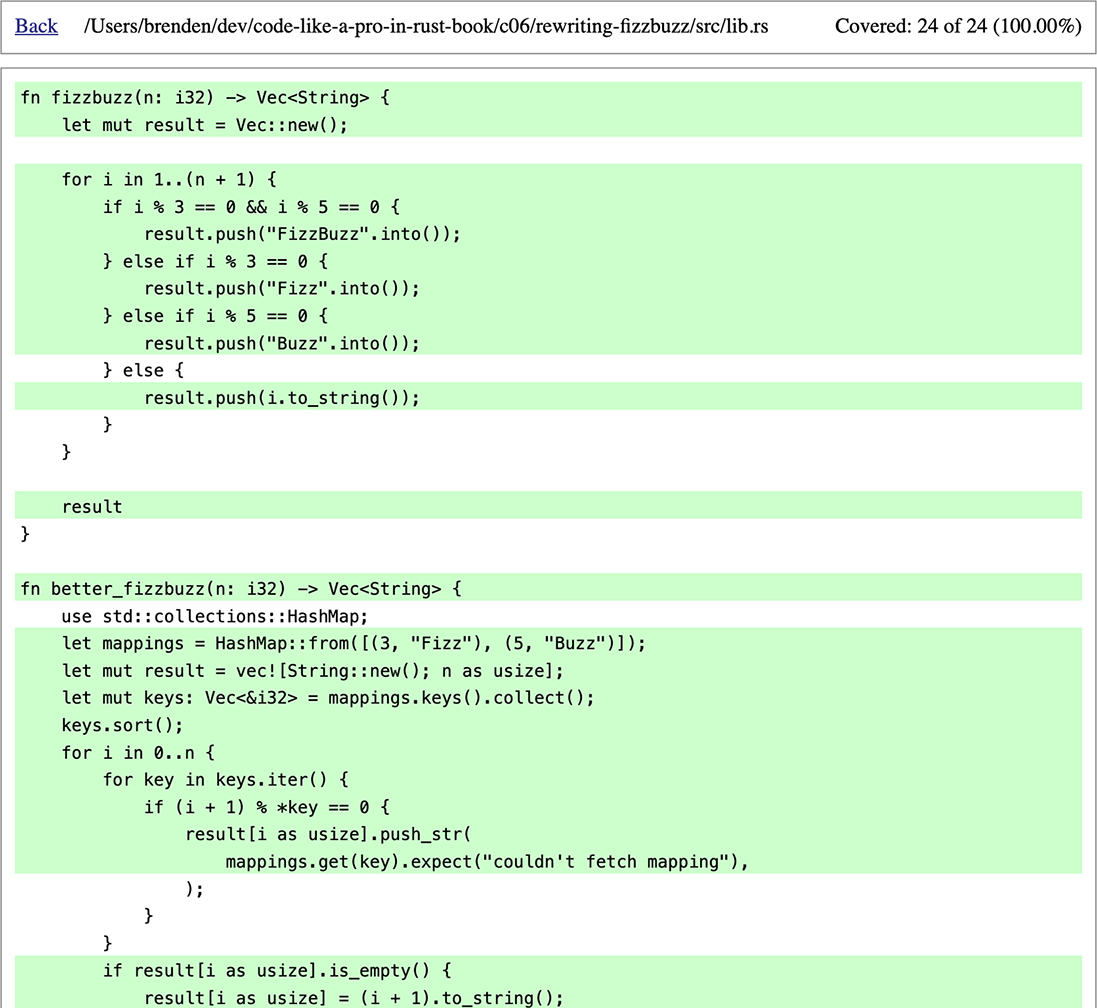
Figure 6.4 Coverage report for lib.rs detail
These reports can either be examined locally or integrated with a CI/CD system to track code coverage over time. Services like Codecov (https://about.codecov.io/) and Coveralls (https://coveralls.io/) offer a free tier for open source projects. The dryoc crate, for example, uses Codecov, which can be viewed at https://app.codecov.io/gh/brndnmtthws/dryoc/. These services track coverage changes over time, integrate with GitHub pull requests, and make it easy to measure progress.
A final note on code coverage: achieving 100% coverage shouldn’t be your end goal. In fact, sometimes, it can be nearly impossible to test every line of code. Coverage data can be used to see if you’re improving over time, or at least not getting worse, but the number itself is an arbitrary metric that doesn’t have qualitative substance. As Voltaire said, “Perfect is the enemy of good.”
Rust is continuously improving and being updated, both in terms of the language itself and its core libraries, as well as all the crates available in the Rust ecosystem. While it’s great to be on the cutting edge, this brings with it some challenges. In particular, maintaining backward and forward compatibility can be tricky.
Unit testing plays an important role in continuous maintenance, especially when dealing with moving targets. You may be tempted to simply pin dependency versions and avoid updates, but this will do more harm than good in the long run, especially as dependencies can intertwine. Even a few tests go a long way in helping detect regressions, especially from third-party library updates or even language changes you weren’t expecting.
Rust’s strong, static typing, strict compiler, and borrow checker lessen the burden of unit testing, as runtime type errors don’t need to be tested, like they do in other languages.
The built-in testing features are minimal, but several crates exist to augment and automate unit testing.
Rust’s libtest runs unit tests in parallel, which provides a nice speedup for normal situations, but code that’s sensitive to timing or requires synchronization needs to be handled accordingly.
Property testing can greatly limit the amount of time and effort spent maintaining unit tests and provide a higher level of assurance.
Measuring and analyzing code coverage over time allows you to quantify the effectiveness of unit tests.
Unit tests help ensure third-party libraries and crates function as expected after upgrades.