In chapter 4, we discussed Rust’s data structures, but to complete our understanding, we also need to discuss memory management and how it works with Rust’s data structures. The core data structures provide nice abstractions for managing memory allocation and deallocation, but some applications may require more advanced features that require custom allocators, reference counting, smart pointers, or system-level features that are outside the scope of the Rust language.
It’s possible to effectively use Rust without having a deep understanding of memory management, but there are many cases in which it’s quite beneficial to know what’s going on under the hood, so to speak. In this chapter, we’ll get into the details of Rust’s memory management.
Rust has very powerful and fine-grained memory management semantics. You may find when you’re new to Rust that it seems somewhat opaque at first. For example, when you use a string or a vector, you likely aren’t thinking too much about how the memory is allocated. In some ways, this is similar to scripting languages, such as Python or Ruby, where memory management is largely abstracted away and rarely something you need to think about.
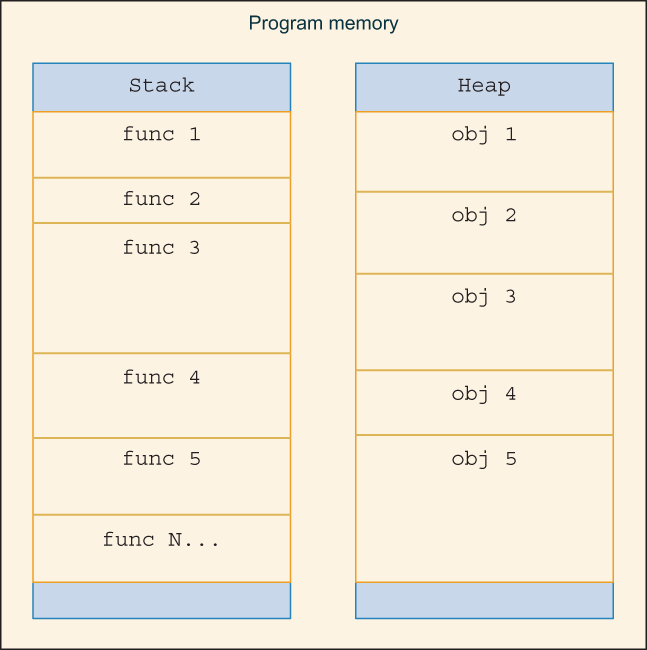
Under the hood, Rust’s memory management is not too different from languages like C or C++. In Rust, however, the language tries to keep memory management out of your way until you need to worry about memory management. And when you do, the language provides the tools you’ll need to dial the complexity up or down, depending on what you’re trying to accomplish. Let’s quickly review the differences between the heap and the stack (figure 5.1).
Figure 5.1 Example layout of stack and heap
The heap is a section of memory for dynamic allocation. This is typically a location in memory reserved for resizable data structures or anything where the size is only known at run time. That is not to say you cannot store static data in the heap; however, for static data, it’s usually better to use the stack (the compiler will typically place static data into the program’s static memory segment as an optimization, so it’s not actually pushed onto the stack). The heap is typically managed by the underlying OS or core language libraries; however, programmers may—if they choose—implement their own heap. For systems that are memory constrained, such as embedded systems, it’s common to write code without a heap.
The heap is usually managed by an allocator, and in most cases, the operating system, language runtime, or C library provides an allocator (e.g., malloc()). Data in the heap can be thought of as allocated randomly throughout the heap and can grow and shrink throughout the life of the process.
In Rust, allocating on the heap is accomplished by using any heap-allocated data structure, such as Vec or Box (Box is discussed in greater detail later in this chapter), as shown in the following listing.
Listing 5.1 Code showing heap-allocated values
let heap_integer = Box::new(1);
let heap_integer_vec = vec![0; 100];
let heap_string = String::from("heap string");    ❶
❶ As noted in chapter 4, String is based on Vec, which makes this a heap-allocated string.
The stack is a thread-local memory space bound to the scope of a function. The stack is allocated using last in, first out (LIFO) order. When a function is entered, the memory is allocated and pushed onto the stack. When a function is exited, the memory is released and popped off the stack. For stack-allocated data, the size needs to be known at compile time. Allocating memory on the stack is normally much quicker than using the heap. There is one stack per thread of execution on operating systems that support it.
The stack is managed by the program itself based on the code generated by the compiler. When a function is entered, a new frame is pushed onto the stack (appended to the end of the stack) and the frame is popped off the stack when leaving the function. As a programmer, you don’t have to worry about managing the stack—it’s handled for you. The stack has some nice properties in that it’s fast, and the function call stack can be used as a data structure by making recursive calls, as shown in the following listing; there’s no need to worry about memory management.
Listing 5.2 Code showing stack-allocated values
let stack_integer = 69420;
let stack_allocated_string = "stack string";
Many languages obfuscate or abstract away the concepts of stack and heap, so you don’t have to worry about them. In C and C++, you typically allocate memory on the heap using malloc() or the new keyword and simply declare a variable within a function to allocate it on the stack. Java also features the new keyword for allocating memory on the heap; however, in Java, memory is garbage collected, and you don’t need to manage cleanup of the heap.
In Rust, the stack is managed by the compiler and platform implementation details. Allocating data on the heap, on the other hand, can be customized to suit your needs (we’ll discuss custom allocators later in this chapter), which is similar to what you might find in C or C++.
The only types that can be allocated on the stack are primitive types, compound types (e.g., tuples and structs), str, and the container types themselves (but not necessarily their contents).
Rust introduces a new programming concept called ownership, which is part of what makes it different from other languages. Ownership in Rust is where its safety guarantees come from—it’s how the compiler knows when memory is in scope, being shared, has gone out of scope, or is being misused. The compiler’s borrow checker is responsible for enforcing a small set of ownership rules. Every value has an owner; there can only be one owner at a time; and when the owner goes out of scope, the value is dropped.
If you’re already comfortable with Rust’s ownership, this section will serve as a review for you, or you can skip it if you wish. On the other hand, if you’re still trying to get a handle on ownership in Rust, this section should help clarify those concepts in familiar terms.
Rust’s ownership semantics are similar in some ways to C, C++, and Java, except that Rust has no concept of copy constructors (which create a copy of an object upon assignment), and you rarely interact with raw pointers in Rust. When you assign the value of one variable to another (i.e., let a = b;), it’s called a move, which is a transfer of ownership (and a value can only have one owner). A move doesn’t create a copy unless you’re assigning a base type (i.e., assigning an integer to another value creates a copy).
Rather than using pointers, in Rust, we often pass data around using references. In Rust, a reference is created by borrowing. Data can be passed into functions by value (which is a move) or reference. While Rust does have C-like pointers, they aren’t something you’ll see very often in Rust, except, perhaps, when interacting with C code.
Borrowed data (i.e., a reference) can either be immutable or mutable. By default, when you borrow data, you do so immutably (i.e., you can’t modify the data pointed to by the reference). If you borrow with the mut keyword, you can obtain a mutable reference, which allows you to modify data. You can borrow data immutably simultaneously (i.e., have multiple references to the same data), but you cannot borrow data mutably more than once at a time.
Borrowing is typically done using the & operator (or &mut, to borrow mutably); however, you’ll sometimes see as_ref() or as_mut() methods being used instead, which are from the AsRef and AsMut traits, respectively. as_ref() and as_mut() are often used by container types to provide access to internal data, rather than obtaining a reference to the container itself (and we’ll explore this in more detail later in this chapter). To clarify these concepts, consider the following code listing.
Listing 5.3 Code listing to demonstrate ownership
fn main() {
    let mut top_grossing_films =                                           ❶
        vec!["Avatar", "Avengers: Endgame", "Titanic"];
    let top_grossing_films_mutable_reference =
        &mut top_grossing_films;                                           ❷
    top_grossing_films_mutable_reference                                   ❸
        .push("Star Wars: The Force Awakens");
    let top_grossing_films_reference = &top_grossing_films;                ❹
    println!(
        "Printed using immutable reference: {:#?}",
        top_grossing_films_reference                                       ❺
    );
    let top_grossing_films_moved = top_grossing_films;                     ❻
    println!("Printed after moving: {:#?}", top_grossing_films_moved);     ❼


    // println!("Print using original value: {:#?}", top_grossing_films);  ❽
    // println!(
    //     "Print using mutable reference: {:#?}",
    //     top_grossing_films_mutable_reference                            ❾
    // );
}
❶ Here, we create a mutable Vec and populate it with some values.
❷ This borrows a mutable reference to the preceding Vec.
❸ We can use this mutable reference to modify the data that was borrowed in the previous line.
❹ Now, we’ll take an immutable reference of the same data, and by doing so, the previous mutable reference becomes invalid.
❺ Here, we print the contents of the Vec.
❻ This assignment is a move, which transfers ownership of the Vec.
❼ Here, we print the contents of the Vec after moving it.
❽ The original variable is no longer valid, as it has been moved, so this code won’t compile.
❾ This code also won’t compile because this reference was invalidated when we created the immutable reference.
Running the code in the preceding listing produces the following output:
Printed using immutable reference: [
    "Avatar",
    "Avengers: Endgame",
    "Titanic",
    "Star Wars: The Force Awakens",
]
Printed after moving: [
    "Avatar",
    "Avengers: Endgame",
    "Titanic",
    "Star Wars: The Force Awakens",
]
You may have encountered the concept of deep copying from other languages, such as Python or Ruby. The need for deep copying arises when the language or data structures implement optimizations to prevent copying data, typically through the use of pointers, references, and copy-on-write semantics.
Copies of data structures can either be shallow (copying a pointer or creating a reference) or deep (copying or cloning all the values within a structure, recursively). Some languages perform shallow copies by default when you make an assignment (a = b) or call a function. Thus, if you come from languages like Python, Ruby, or JavaScript, you may have needed to occasionally perform an explicit deep copy. Rust doesn’t assume anything about your intentions; thus, you always need to explicitly instruct the compiler what to do. In other words, the concept of shallow copies does not exist in Rust, but rather, we have borrowing and references.
Languages that use implicit data references can create undesired side effects, and this may occasionally catch people off guard or create hard-to-find bugs. The problem occurs, generally speaking, when you intend to make a copy, but the language, instead, provides a reference. Lucky for you, Rust doesn’t do any type of implicit data referencing magic but only so long as you stick to core data structures.
In Rust, the term cloning (rather than copying) is used to describe the process of creating a new data structure and copying (or, more correctly, cloning) all the data from the old structure into the new one. The operation is typically handled through the clone() method, which comes from the Clone trait and can be automatically derived using the #[derive(Clone)] attribute (traits and deriving traits are discussed in greater detail in chapters 8 and 9). Many data structures in Rust come with the Clone trait implemented for you, so you can usually count on clone() being available.
Consider the following code listing.
Listing 5.4 Code to demonstrate clone()
fn main() {
    let mut most_populous_us_cities =
        vec!["New York City", "Los Angeles", "Chicago", "Houston"];
    let most_populous_us_cities_cloned = most_populous_us_cities.clone();  ❶
    most_populous_us_cities.push("Phoenix");                               ❷
    println!("most_populous_us_cities = {:#?}", most_populous_us_cities);
    println!(
        "most_populous_us_cities_cloned = {:#?}",
        most_populous_us_cities_cloned                                     ❸
    );
}
❶ Here, we clone the original Vec.
❷ We’ll add a new city to the list in the original Vec.
❸ When the cloned Vec is printed, it won’t output "Phoenix" because it’s an entirely distinct structure.
Running the code in the previous listing prints the following:
most_populous_us_cities = [
    "New York City",
    "Los Angeles",
    "Chicago",
    "Houston",
    "Phoenix",
]
most_populous_us_cities_cloned = [
    "New York City",
    "Los Angeles",
    "Chicago",
    "Houston",
]
The Clone trait, when derived, operates recursively. Thus, calling clone() on any top-level data structure, such as a Vec, is sufficient to create a deep copy of the contents of the Vec, provided they all implement Clone. Deeply nested structures can be easily cloned without needing to do anything beyond ensuring they implement the Clone trait.
There are certain cases where, perhaps unintentionally, data structures can end up being cloned or copied more often than needed. This can happen in string processing, for example, when many copies of a string are made repeatedly within algorithms that scan, mutate, or otherwise handle some arbitrary set of data.
One downside to Clone is that it can be too easy to copy data structures, and you may end up with many copies of the same data if applied too liberally. For most intents and purposes this isn’t a problem, and you’re unlikely to have problems until you start operating on very large sets of data.
Many core library functions in Rust return copies of objects, as opposed to modifying them in place. This is, in most cases, the preferred behavior; it helps maintain immutability of data, which makes it easier to reason about how algorithms behave, at the cost of duplicating memory—perhaps only temporarily. To illustrate, let’s examine a few string operations from Rust’s core library in table 5.1.
Table 5.1 Examining Rust core string functions for copies
You’ll notice a pattern in table 5.1, which is that you can often identify whether an algorithm creates a copy based on whether the function modifies the source data in place or returns a new copy. There’s one more case to illustrate, which is what I call the pass through. Consider the following:
fn lowercased(s: String) -> String {
    s.to_lowercase()                            ❶
}

fn lowercased_ascii(mut s: String) -> String {
    s.make_ascii_lowercase();                   ❷
    s
}
❶ A copy is created here, inside to_lowercase(), and the new string is returned.
❷ The string is passed through directly, with the memory modified in place. The ownership is passed back to the caller by returning the same owned object, as the make_ascii_lowercase() function operates in place.
In the preceding code, the first function, lowercased(), takes an owned string but returns a new copy of that string by calling to_lowercase(). The second function takes a mutable owned string and returns a lowercased version using the in-place version (which only works on ASCII strings).
The following is a summary of what we’ve learned about functions:
Functions that take immutable references and return a reference or slice are unlikely to make copies (e.g., fn func(&self) -> &str).
Functions that take a reference (i.e., &) and return an owned object may be creating a copy (e.g., fn func(&self) -> String).
Functions that take a mutable reference (i.e., &mut) may be modifying data in place (e.g., fn func(&mut self)).
Functions that take an owned object and return an owned object of the same type are likely making a copy (e.g., fn func(String) -> String).
Functions that take a mutable owned object and return an owned object of the same type may not be making a copy (e.g., fn func(mut String) -> String).
As a general rule, you should examine documentation and source code when you’re unsure as to whether functions make copies, operate in place, or merely pass ownership. Rust’s memory semantics do make it relatively easy to reason about how algorithms operate on data merely by examining the inputs and outputs, but this only works provided the functions being called follow these patterns. In cases when you have serious performance concerns, you should closely examine the underlying algorithms.
Rust’s Box is a type of smart pointer, which we briefly discussed in chapter 4. Box is a bit different from smart pointers in languages like C++, as its main purpose is providing a way to allocate data on the heap. In Rust, the two main ways to allocate data on the heap are by using Vec or Box. Box is quite limited in terms of its capabilities; it only handles allocation and deallocation of memory for the object it holds, without providing much else in terms of features, but that’s by design. Box is still very useful, and it should be the first thing you reach for in cases when you need to store data on the heap (aside from using a Vec).
Tip Since a Box cannot be empty (except in certain situations best left unexplored), we often hold a Box within an Option in any case when boxed data might not be present.
If the data or object is optional, you should put your Box in an Option. Optional types (or maybe types) aren’t unique to Rust; you may have encountered them from Ada, Haskell, Scala, or Swift, to name a few languages. Optionals are a kind of monad—a functional design pattern whereby you wrap values that shouldn’t have unrestricted access in a function. Rust provides some syntax sugar to make working with optionals more pleasant.
You will see Option used frequently in Rust; if you haven’t encountered optionals before, you can think of them as a way to safely handle null values (e.g., pointers). Rust doesn’t have null pointers (excluding unsafe code), but it does have None, which is functionally equivalent to a null pointer, without the safety problems.
The cool thing about Box and Option is that when both are used together, it’s nearly impossible to have run-time errors (e.g., null pointer exceptions) due to invalid, uninitialized, or doubly freed memory. However, there is one caveat: heap allocations may fail. Handling this situation is tricky, outside the scope of this book, and somewhat dependent on the operating system and its settings.
One common cause of allocation failures is the system running out of free memory, and handling this (if you choose to handle it at all) is largely dependent on the application. Most of the time, the expected result for failed memory allocations is for the program to “fail fast” and exit with an out of memory error (OOM), which is almost always the default behavior (i.e., what will happen if you as a developer don’t handle OOM errors). You have likely encountered such situations yourself. Some notable applications that provide their own memory management features are web browsers, which often have their own built-in task managers and memory management, much like the OS itself. If you’re writing mission-critical software, such as a database or online transaction-processing system, you may want to handle memory allocation failures gracefully.
In situations when you suspect allocation might fail, Box provides the try_new() method, which returns a Result. This—like an Option—may be in either a success or failure state. The default new() method of Box will create a panic in case allocation fails, which will cause your program to crash. In most cases, crashing is the best way to handle failed allocations. Alternatively, you can catch allocation failures within a custom allocator (which is discussed later in this chapter).
Tip To better understand Option and Result, try implementing them yourself using an enum. In Rust, creating and using your own optionals is trivial with enums and pattern matching.
To illustrate the use of Box, consider a basic singly linked list in Rust.
Listing 5.5 Code for a basic, singly linked list in Rust
struct ListItem<T> {
    data: Box<T>,                                             ❶
    next: Option<Box<ListItem<T>>>,                           ❷
}

struct SinglyLinkedList<T> {
    head: ListItem<T>,                                        ❸
}

impl<T> ListItem<T> {
    fn new(data: T) -> Self {
        ListItem {
            data: Box::new(data),                             ❹
            next: None,                                       ❺
        }
    }
    fn next(&self) -> Option<&Self> {                         ❻
        if let Some(next) = &self.next {                      ❼
            Some(next.as_ref())                               ❽
        } else {
            None
        }
    }
    fn mut_tail(&mut self) -> &mut Self {
        if self.next.is_some() {                              ❾
            self.next.as_mut().unwrap().mut_tail()            ❿
        } else {
            self                                              ⓫
        }
    }
    fn data(&self) -> &T {
        self.data.as_ref()                                    ⓬
    }
}

impl<T> SinglyLinkedList<T> {
    fn new(data: T) -> Self {
        SinglyLinkedList {
            head: ListItem::new(data),                        ⓭
        }
    }
    fn append(&mut self, data: T) {
        let mut tail = self.head.mut_tail();                  ⓮
        tail.next = Some(Box::new(ListItem::new(data)));      ⓯
    }
    fn head(&self) -> &ListItem<T> {
        &self.head                                            ⓰
    }
}
❶ Data is boxed within each list item. The data field can’t be empty or null.
❷ next is optional; a None value denotes the end of the list.
❸ The struct for the list itself only contains the head; we don’t bother boxing the head because it must always be present.
❹ New data is moved into the list within a Box, allocating memory on the heap.
❺ The next pointer is initialized as None because new elements don’t know where they are in the list yet. Additionally, this implementation doesn’t have an insert operation, only append.
❻ The next() method on each item returns an optional reference to the next item, if it exists. This function exists to help unwrap the nested references for the sake of simplifying the code.
❼ We’re using a code construct to check if the next pointer points to anything before trying to dereference it.
❽ We return the inner reference to the next item, equivalent to Some(&*next).
❾ Using if let ... won’t work here, because we can’t borrow self.next and return a mutable reference to the inner pointer simultaneously.
❿ We have Box within Option, so we need to unwrap the Option from a mutable reference and return a mutable reference from within.
⓫ If there’s no next element, this item is the tail; just return self.
⓬ This method provides a convenient reference to T.
⓭ We require a first element for a new list; to permit an empty list, the head element would need to be optional.
⓮ We can assume the tail’s next is None when appending a new item.
⓯ We add our new element to the tail item’s next pointer, and the new element becomes the new tail.
⓰ For convenience, we provide direct access to the head element via a method.
There’s a lot to unpack in the linked list example. For someone new to Rust, implementing a linked list is one of the best ways to learn about Rust’s unique features. The preceding example provides some nice features, and it’s safe. The list will never be empty or invalid or contain null pointers. This is a really powerful feature of Rust, and it’s only possible thanks to Rust’s rules about object ownership.
We can test the linked list we just created using the following code:
fn main() {
    let mut list = SinglyLinkedList::new("head");  ❶
    list.append("middle");                         ❶
    list.append("tail");                           ❶
    let mut item = list.head();                    ❷
    loop {                                         ❸
        println!("item: {}", item.data());         ❹
        if let Some(next_item) = item.next() {     ❺
            item = next_item;
        } else {
            break;                                 ❻
        }
    }
}
❶ Creates a new linked list of strings, with a head element, and then we add a middle and tail element.
❷ Gets a reference to the head of the list
❸ Loops until we’ve visited every item in the list
❹ Prints the value of each item
❺ Fetches the next item in the list using an if let statement, which unwraps the Option
❻ We terminate the loop with a break when we’ve reached the end of the list, which we know when the next item is None.
Running the preceding code produces the following output:
item: head
item: middle
item: tail
Before moving on to the next sections, I suggest you take some time to understand the singly linked list in Rust. Try implementing it yourself from scratch, and refer to the example provided as needed. In the next section, we’ll do a more advanced version of the linked list. If you care to read on anyway, it may be worth revisiting this exercise if you want to get a better handle on Rust’s memory management once you have a good understanding of the overall language.
Finally, in practice, you’ll likely never need to implement your own linked list in Rust. Rust’s core library provides std::collections::LinkedList in case you really want a linked list. For most cases, however, just use a Vec. Additionally, the example provided here is not optimized.
In the previous section, we talked about Box, which is a useful—but very limited—smart pointer and something you’ll encounter often. Notably, a Box cannot be shared. That is to say, you can’t have two separate boxes pointing to the same data in a Rust program; Box owns its data and doesn’t allow more than one borrow at a time. This is, for the most part, a feature (or antifeature) worth being excited about. However, there are cases in which you do want to share data: perhaps, across threads of execution or by storing the same data in multiple structures to address it differently (such as a Vec and a HashMap).
In cases where Box doesn’t cut it, what you’re probably looking for are reference-counted smart pointers. Reference counting is a common technique in memory management to avoid keeping track of how many copies of a pointer exist, and when there are no more copies, the memory is released. The implementation usually relies on keeping a static counter of the number of copies of a given pointer and incrementing the counter every time a new copy is made. When a copy is destroyed, the counter is decremented. If the counter ever reaches zero, the memory can be released because that means there are no more copies of the pointer, and thus, the memory is no longer in use or accessible.
Tip Implementing a reference-counted smart pointer is a fun exercise to do on your own; however, it’s a bit tricky in Rust and requires the use of raw (i.e., unsafe) pointers. If you find the linked list exercise too easy, try making your own reference-counted smart pointer.
Rust provides two different reference-counted pointers:
Rc—A single-threaded, reference-counted smart pointer, which enables shared ownership of an object
Arc—A multithreaded, reference-counted smart pointer, which enables shared ownership of objects across threads
To use reference-counted pointers effectively, we also need to introduce another concept in Rust called interior mutability. Interior mutability is something you may need when Rust’s borrow checker doesn’t provide enough flexibility with mutable references. If this sounds like an escape hatch, then pat yourself on the back for being an astute reader because it is an escape hatch. But worry not, it doesn’t break Rust’s safety contracts and still allows you to write safe code.
To enable interior mutability, we need to introduce two special types in Rust: Cell and RefCell. If you’re new to Rust, you probably haven’t encountered these yet, and it’s unlikely you would bump into them under normal circumstances. In most cases, you’ll want to use RefCell rather than Cell, as RefCell allows us to borrow references, whereas Cell moves values in and out of itself (which is probably not the behavior you want most of the time).
Another way to think about RefCell and Cell is that they allow you to provide the Rust compiler with more information about how you want to borrow data. The compiler is quite good, but it’s limited in terms of flexibility, and there are some cases in which perfectly safe code won’t compile because the compiler doesn’t understand what you’re trying to do (regardless of how correct it might be).
You shouldn’t need RefCell or Cell very often; if you find yourself trying to use these to get around the borrow checker, you might need to rethink what you’re doing. They are mainly needed for specific cases, such as containers and data structures that hold data that needs to be accessed mutably.
One limitation of Cell and RefCell is that they’re only for single-threaded applications. In the case where you require safety across threads of execution, you can use Mutex or RwLock, which provide the same feature to enable interior mutability but can be used across threads. These would typically be paired with Arc rather than Rc (we’ll explore concurrency in greater detail in chapter 10).
Let’s update the linked list example from the previous section to use Rc and RefCell instead of Box, which gives us more flexibility. Notably, we can now make our singly linked list a doubly linked list, as shown in the following listing. This isn’t possible using Box because it doesn’t allow shared ownership.
Listing 5.6 Code of a doubly linked list using Rc, RefCell, and Box
use std::cell::RefCell;
use std::rc::Rc;

struct ListItem<T> {
    prev: Option<ItemRef<T>>,                                        ❶
    data: Box<T>,                                                    ❷
    next: Option<ItemRef<T>>,
}

type ItemRef<T> = Rc<RefCell<ListItem<T>>>;                          ❸

struct DoublyLinkedList<T> {
    head: ItemRef<T>,
}

impl<T> ListItem<T> {
    fn new(data: T) -> Self {
        ListItem {
            prev: None,
            data: Box::new(data),                                    ❹
            next: None,
        }
    }
    fn data(&self) -> &T {
        self.data.as_ref()
    }
}

impl<T> DoublyLinkedList<T> {
    fn new(data: T) -> Self {
        DoublyLinkedList {
            head: Rc::new(RefCell::new(ListItem::new(data))),
        }
    }
    fn append(&mut self, data: T) {
        let tail = Self::find_tail(self.head.clone());               ❺
        let new_item = Rc::new(RefCell::new(ListItem::new(data)));   ❻
        new_item.borrow_mut().prev = Some(tail.clone());             ❼
        tail.borrow_mut().next = Some(new_item);                     ❽
    }
    fn head(&self) -> ItemRef<T> {
        self.head.clone()
    }
    fn tail(&self) -> ItemRef<T> {
        Self::find_tail(self.head())
    }
    fn find_tail(item: ItemRef<T>) -> ItemRef<T> {
        if let Some(next) = &item.borrow().next {                    ❾
            Self::find_tail(next.clone())                            ❿
        } else {
            item.clone()                                             ⓫
        }
    }
}
❶ We’ve added a pointer to the previous item in the list.
❷ The data is still kept in a Box; we don’t need to use an Rc here because we’re not sharing ownership of the data, only the pointers to nodes in the list.
❸ This type alias helps keep the code clean.
❹ Data is moved into a Box here.
❺ First, we need to find the pointer to the tail item in the list.
❻ Creates a pointer for the new item we’re about to append.
❼ We’ll update the prev pointer in the new item to point to the previous tail.
❽ Update the next pointer of the previous tail to point to the new tail, which is the newly inserted item.
❾ Checks if the next pointer is empty and continues searching recursively if not.
❿ We clone the next pointer and return it, continuing the search.
⓫ If the next pointer is empty, we’re at the end (or tail) of the list. It returns the current item pointer after cloning it.
This version of the linked list looks quite different from the previous version. Introducing Rc and RefCell adds some complexity but provides us with a lot more flexibility. We’ll revisit this example again later in the book as we explore more language features. To summarize, Rc and Arc provide reference-counted pointers, but to access inner data mutably, you’ll need to use an object such as RefCell or Cell (and for multi-threaded applications, Mutex or RwLock).
Earlier in this chapter, we discussed avoiding copies. However, there are cases in which you prefer making copies of data, rather than ever mutating data in place. This pattern has some very nice features, especially if you prefer functional programming patterns. You may not have heard of clone on write before, but you’re probably familiar with copy on write.
Copy on write is a design pattern in which data is never mutated in place, but rather, any time data needs to be changed, it’s copied to a new location and mutated, and then a reference to the new copy of data is returned. Some programming languages enforce this pattern as a matter of principle, such as in Scala, where data structures are classified as either mutable or immutable, and all the immutable structures implement copy on write. A very popular JavaScript library, Immutable.js, is based entirely on this pattern, with all data structure mutations resulting in a new copy of the data. Building data structures based on this pattern makes it much easier to reason about how data is handled within programs.
For example, with a copy-on-write list or array, the append operation would return a new list with all the old elements, plus the new element appended, while leaving the original list of items intact. The programmer assumes the compiler can handle optimizations and cleanup of old data.
In Rust, this pattern is referred to as clone on write, as it depends on the Clone trait. Clone has a cousin, the Copy trait, and they differ in that Copy denotes a bitwise copy (i.e., literally copying the bytes of an object to a new memory location), whereas Clone is an explicit copy. In the case of Clone, we call the clone() method on an object to clone it, but Copy occurs implicitly via assignment (i.e., let x = y;). The Clone trait is normally implemented automatically using #[derive(Clone)], but it can be implemented manually for special cases.
Rust provides three smart pointers to help implement clone on write:
Cow—An enum-based smart pointer that provides convenient semantics
Rc and Arc—Both reference-counted smart pointers provide clone-on-write semantics with the make_mut() method. Rc is the single-threaded version, and Arc is the multithreaded version.
Let’s look at the type signature for Cow in the following listing.
Listing 5.7 Snippet of Cow definition from the Rust standard library
pub enum Cow<'a, B> where
    B: 'a + ToOwned + ?Sized,  {
    Borrowed(&'a B),
    Owned(<B as ToOwned>::Owned),
Cow is an enum that can contain either a borrowed variant or an owned variant. For the owned variant, it behaves a lot like Box, except that with Cow, the data is not necessarily allocated on the heap. If you want heap-allocated data with Cow, you’ll need to use a Box within Cow, or use Rc or Arc instead. Rust’s clone-on-write feature is also not a language-level feature—you need to explicitly use the Cow trait.
To demonstrate the use of Cow, let’s update the singly linked list example so that the data structure becomes immutable. First, let’s examine the following listing, which, aside from adding #[derive(Clone)], isn’t too different from the previous version.
Listing 5.8 Code listing of ListItem for a singly linked list using Cow
#[derive(Clone)]        ❶
struct ListItem<T>
where
    T: Clone,
{
    data: Box<T>,
    next: Option<Box<ListItem<T>>>,
}

impl<T> ListItem<T>
where
    T: Clone,
{
    fn new(data: T) -> Self {
        ListItem {
            data: Box::new(data),
            next: None,
        }
    }
    fn next(&self) -> Option<&Self> {
        if let Some(next) = &self.next {
            Some(&*next)
        } else {
            None
        }
    }
    fn mut_tail(&mut self) -> &mut Self {
        if self.next.is_some() {
            self.next.as_mut().unwrap().mut_tail()
        } else {
            self
        }
    }
    fn data(&self) -> &T {
        self.data.as_ref()
    }
}
❶ We derive the Clone trait for both structs. Cow depends on the behavior of the Clone trait.
Next, let’s look at the following listing, which shows the usage of Cow in our list.
Listing 5.9 Code listing of SinglyLinkedList for singly linked list using Cow
#[derive(Clone)]
struct SinglyLinkedList<'a, T>
where
    T: Clone,
{
    head: Cow<'a, ListItem<T>>,                             ❶
}

impl<T> ListItem<T>
where
    T: Clone,
{
    fn new(data: T) -> Self {
        ListItem {
            data: Box::new(data),
            next: None,
        }
    }
    fn next(&self) -> Option<&Self> {
        if let Some(next) = &self.next {
            Some(&*next)
        } else {
            None
        }
    }
    fn mut_tail(&mut self) -> &mut Self {
        if self.next.is_some() {
            self.next.as_mut().unwrap().mut_tail()
        } else {
            self
        }
    }
    fn data(&self) -> &T {
        self.data.as_ref()
    }
}

impl<'a, T> SinglyLinkedList<'a, T>
where
    T: Clone,
{
    fn new(data: T) -> Self {
        SinglyLinkedList {
            head: Cow::Owned(ListItem::new(data)),          ❷
        }
    }
    fn append(&self, data: T) -> Self {                     ❸
        let mut new_list = self.clone();
        let mut tail = new_list.head.to_mut().mut_tail();   ❹
        tail.next = Some(Box::new(ListItem::new(data)));
        new_list
    }
    fn head(&self) -> &ListItem<T> {
        &self.head
    }
}
❶ The head pointer is stored within a Cow. We must include a lifetime specifier for the struct, so the compiler knows that the struct and the head parameter have the same lifetime.
❷ Here, we initialize the list with the head pointer.
❸ The append signature has changed such that it no longer requires a mutable self, and instead, it returns an entirely new linked list.
❹ The call to to_mut() triggers the clone on write, which happens recursively, by obtaining a mutable reference to the head.
In some cases, you may find yourself needing to customize memory allocation behavior. The following are some example cases:
Embedded systems, which are highly memory constrained or lack an operating system.
Performance-critical applications that required optimized memory allocation, including custom heap managers, such as jemalloc (http://jemalloc.net/) or TCMalloc (https://github.com/google/tcmalloc).
Applications with strict security or safety requirements, where you may want to protect memory pages using the mprotect() and mlock() system calls, for example
Some library or plugin interfaces may require special allocators when handing off data to avoid memory leaks; this is quite common when working across language boundaries (i.e., integrating between Rust and a garbage collected language).
Implementing custom heap management, such as memory usage tracking from within your application.
By default, Rust will use the standard system implementation for memory allocation, which on most systems is the malloc() and free() functions provided by the system’s C library. This behavior is implemented by Rust’s global allocator. The global allocator can be overridden for an entire Rust program using the GlobalAlloc API, and individual data structures can be overridden using custom allocators with the Allocator API.
Note The Allocator API in Rust is a nightly-only feature, as of the time of writing. For more details on the status of this feature, refer to https://github.com/rust-lang/rust/issues/32838. You can still use the GlobalAlloc API in stable Rust.
Even if you never need to write your own allocator (most people are unlikely to need a custom allocator), it’s worth getting a feel for the allocator interface to have a better understanding of Rust’s memory management. In practice, you’re unlikely to ever need to worry about allocators except in special circumstances such as those mentioned.
Let’s explore writing a custom Allocator, which we’ll use with a Vec. Our allocator will simply call the malloc() and free() functions. To start, let’s examine the Allocator trait as defined in the Rust standard library at http://mng.bz/g7ze. The trait is shown in the following listing.
Listing 5.10 Code listing for Allocator trait, from the Rust standard library
pub unsafe trait Allocator {
    fn allocate(&self, layout: Layout)
      -> Result<NonNull<[u8]>, AllocError>;                          ❶
    unsafe fn deallocate(&self, ptr: NonNull<u8>, layout: Layout);   ❶

    fn allocate_zeroed(                                              ❷
        &self,
        layout: Layout
    ) -> Result<NonNull<[u8]>, AllocError> { ... }
    unsafe fn grow(                                                  ❷
        &self,
        ptr: NonNull<u8>,
        old_layout: Layout,
        new_layout: Layout
    ) -> Result<NonNull<[u8]>, AllocError> { ... }
    unsafe fn grow_zeroed(                                           ❷
        &self,
        ptr: NonNull<u8>,
        old_layout: Layout,
        new_layout: Layout
    ) -> Result<NonNull<[u8]>, AllocError> { ... }
    unsafe fn shrink(                                                ❷
        &self,
        ptr: NonNull<u8>,
        old_layout: Layout,
        new_layout: Layout
    ) -> Result<NonNull<[u8]>, AllocError> { ... }
    fn by_ref(&self) -> &Self { ... }                                ❷
}
❷ Optional methods, with default implementations provided
To implement an allocator, we only need to provide two methods: allocate() and deallocate(). These are analogous to malloc() and free(). The other methods are provided for cases when you wish to optimize allocation further. The C-equivalent call for allocated_zeroed() would be calloc(), whereas for the grow and shrink functions, you’d use realloc().
Note You may notice the unsafe keyword on some of the Allocator trait’s methods. Allocating and deallocating memory nearly always involves unsafe operations in Rust, which is why these methods are marked as unsafe.
Rust provides default implementations for the optional methods in the Allocator trait. In the case of growing and shrinking, the default implementation will simply allocate new memory, copy all the data, and then deallocate old memory. For allocating zeroed data, the default implementation calls allocate() and writes zeroes to all the memory locations. Let’s begin by writing an allocator that passes through to the global allocator.
Listing 5.11 Code for a pass-through allocator
#![feature(allocator_api)]

use std::alloc::{AllocError, Allocator, Global, Layout};
use std::ptr::NonNull;

pub struct PassThruAllocator;

unsafe impl Allocator for PassThruAllocator {
  fn allocate(&self, layout: Layout) -> Result<NonNull<[u8]>, AllocError> {
      Global.allocate(layout)
  }
  unsafe fn deallocate(&self, ptr: NonNull<u8>, layout: Layout) {
      Global.deallocate(ptr, layout)
  }
}
Note The code samples for the allocator API are nightly only, and to compile or run them, you need to either use cargo +nightly ... or override the toolchain within the project directory with rustup override set nightly.
The preceding code creates a pass-through allocator, which simply calls the underlying global allocator implementation, with the minimum required code. Run the following to test our allocator:
fn main() {
    let mut custom_alloc_vec: Vec<i32, _> =
        Vec::with_capacity_in(10, BasicAllocator);      ❶
    for i in 0..10 {
        custom_alloc_vec.push(i as i32 + 1);
    }
    println!("custom_alloc_vec={:?}", custom_alloc_vec);
}
❶ Creates a Vec using our custom allocator, initializing the vector with a capacity of 10 items
Running this code provides the following output, as expected:
custom_alloc_vec=[1, 2, 3, 4, 5, 6, 7, 8, 9, 10]
Now, let’s change the allocator to call the malloc() and free() functions directly from the C library instead. The Layout struct provides us with the details needed to determine how much memory to allocate using the size() method.
Listing 5.12 Code for a basic custom allocator using malloc() and free()
#![feature(allocator_api)]

use std::alloc::{AllocError, Allocator, Layout};
use std::ptr::NonNull;

use libc::{free, malloc};

pub struct BasicAllocator;

unsafe impl Allocator for BasicAllocator {                             ❶
    fn allocate(
        &self,
        layout: Layout,
    ) -> Result<NonNull<[u8]>, AllocError> {
        unsafe {
            let ptr = malloc(layout.size() as libc::size_t);           ❷
            let slice = std::slice::from_raw_parts_mut(                ❸
                ptr as *mut u8,
                layout.size(),
            );
            Ok(NonNull::new_unchecked(slice))                          ❹
        }
    }
    unsafe fn deallocate(&self, ptr: NonNull<u8>, _layout: Layout) {
        free(ptr.as_ptr() as *mut libc::c_void);                       ❺
    }
}
❶ The allocate() method in the Allocator trait does not include the unsafe keyword, but we still need to make unsafe calls. Thus, this code block is wrapped in an unsafe {} block.
❷ We’re calling the C library’s malloc(), and we assume normal standard alignment from the Layout struct.
❸ The block of memory is returned as a slice, so first we convert the raw C pointer into a Rust slice.
❹ Finally, create and return the final pointer to the slice of bytes.
❺ deallocate() is essentially the reverse of allocate(), but this method is already marked as unsafe for us. The pointer must be converted from its raw Rust representation to a C pointer.
Note The Layout struct contains size and align properties, both of which should be handled for portability. The size property specifies the minimum number of bytes to allocate, and the align property is the minimum byte alignment for a block in powers of two. For details, refer to the Rust documentation on Layout at http://mng.bz/eEY9.
Pay attention to the use of the preceding unsafe keyword; the deallocate() method includes unsafe as part of the function signature itself, and allocate() requires the use of unsafe within the method. In both cases, unsafe is required and cannot be avoided because we’re handling raw pointers and memory. deallocate() is marked as unsafe because if the method is called with invalid data (e.g., a bad pointer or incorrect layout), the behavior is undefined and, therefore, considered unsafe. In the event you need to write a custom allocator, the preceding code provides a starting point for you, regardless of your allocation needs.
Let’s quickly explore a more advanced example of a custom memory allocator to shed light on a scenario in which you’d want to utilize Rust’s allocator API. For this example, the allocator can be applied piecewise to individual data structures, rather than to the program as a whole, which allows fine tuning for performance purposes.
In the dryoc crate, which I use for example purposes throughout this book, I make use of the Allocator trait to implement the protected memory feature of dryoc. Modern operating systems provide several memory-protection features for developers who are writing safety- or security-critical systems, and to utilize those features in a Rust program, you would need to write your own memory allocation code. Specifically, the dryoc crate uses the mprotect() and mlock() system calls on UNIX-like systems and the VirtualProtect() and VirtualLock() system calls on Windows. These system calls provide the ability to lock and control access to specific regions of memory within a process, both to code inside and outside the process. This is an important feature for code that manages sensitive data, such as secret keys.
As part of the implementation of memory-locking and -protection features, memory must be allocated by special platform-dependent memory functions (posix_memalign() on UNIX and VirtualAlloc() on Windows), such that it’s aligned to platform-specific memory pages. Additionally, in the following code, two extra memory blocks are allocated before and after the target memory region, and those blocks are locked, which provides additional protection against certain types of memory attacks. These regions can be thought of as bumpers, like those you would find on an automobile.
When our custom allocator is used, memory will be allocated on the heap, as shown in figure 5.2. The active region is a subset of the total memory allocated, and a subset that excludes the first and last pages is returned as a slice by the allocator.
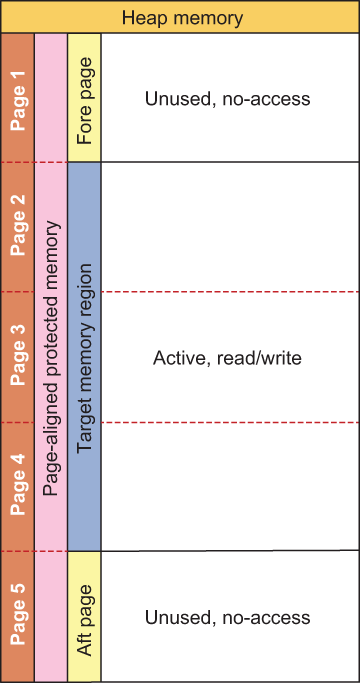
Figure 5.2 Diagram showing protected memory layout, with fore and aft regions.
Let’s examine a partial code sample of this allocator (the full code listing is included with the book’s code). First, we’ll examine the following listing.
Listing 5.13 Partial code listing for allocate() from page-aligned allocator
fn allocate(&self, layout: Layout,
) -> Result<ptr::NonNull<[u8]>, AllocError> {
    let pagesize = *PAGESIZE;
    let size = _page_round(layout.size(), pagesize) + 2 * pagesize;     ❶
    #[cfg(unix)]
    let out = {
        let mut out = ptr::null_mut();
        let ret = unsafe {
            libc::posix_memalign(&mut out, pagesize as usize, size)     ❷
        };
        if ret != 0 {
            return Err(AllocError);
        }
        out
    };
    #[cfg(windows)]
    let out = {
        use winapi::um::winnt::{MEM_COMMIT, MEM_RESERVE, PAGE_READWRITE};
        unsafe {
            winapi::um::memoryapi::VirtualAlloc(                        ❸
                ptr::null_mut(), size, MEM_COMMIT | MEM_RESERVE,
                PAGE_READWRITE,
            )
        }
    };
    let fore_protected_region = unsafe {
        std::slice::from_raw_parts_mut(out as *mut u8, pagesize)
    };
    mprotect_noaccess(fore_protected_region)                           ❹
        .map_err(|err| {
            eprintln!("mprotect error = {:?}, in allocator", err)
        })
        .ok();
    let aft_protected_region_offset =
        pagesize + _page_round(layout.size(), pagesize);
    let aft_protected_region = unsafe {
        std::slice::from_raw_parts_mut(
            out.add(aft_protected_region_offset) as *mut u8,
            pagesize,
        )
    };
    mprotect_noaccess(aft_protected_region)                            ❺
        .map_err(|err| {
            eprintln!("mprotect error = {:?}, in allocator", err)
        })
        .ok();
    let slice = unsafe {
        std::slice::from_raw_parts_mut(
            out.add(pagesize) as *mut u8,
            layout.size(),
        )
    };
    mprotect_readwrite(slice)                                          ❻
        .map_err(|err| {
            eprintln!("mprotect error = {:?}, in allocator", err)
        })
        .ok();
    unsafe { Ok(ptr::NonNull::new_unchecked(slice)) }                  ❼
}
❶ Rounds the size of the memory region to the nearest page length, adding two additional pages before and after the memory region
❷ Allocates page-aligned memory on POSIX-based systems
❸ Allocates page-aligned memory on Windows-based systems
❹ Marks the memory page in front of the new region as no-access to prevent scanning
❺ Marks the memory page after the new region as no access to prevent scanning
❻ Marks the new region of memory as read/write
❼ Returns the new pointer as a slice consisting of the memory location and size
Next, let’s look at the implementation for deallocate() in the following listing.
Listing 5.14 Partial code for deallocate() from page-aligned allocator
unsafe fn deallocate(&self, ptr: ptr::NonNull<u8>, layout: Layout) {
    let pagesize = *PAGESIZE;
    let ptr = ptr.as_ptr().offset(-(pagesize as isize));
    // unlock the fore protected region
    let fore_protected_region =
        std::slice::from_raw_parts_mut(ptr as *mut u8, pagesize);
    mprotect_readwrite(fore_protected_region)                      ❶
        .map_err(|err| eprintln!("mprotect error = {:?}", err))
        .ok();
    // unlock the aft protected region
    let aft_protected_region_offset =
        pagesize + _page_round(layout.size(), pagesize);
    let aft_protected_region = std::slice::from_raw_parts_mut(
        ptr.add(aft_protected_region_offset) as *mut u8,
        pagesize,
    );
    mprotect_readwrite(aft_protected_region)                       ❷
        .map_err(|err| eprintln!("mprotect error = {:?}", err))
        .ok();
    #[cfg(unix)]
    {
        libc::free(ptr as *mut libc::c_void);                      ❸
    }
    #[cfg(windows)]
    {
        use winapi::shared::minwindef::LPVOID;
        use winapi::um::memoryapi::VirtualFree;
        use winapi::um::winnt::MEM_RELEASE;
        VirtualFree(ptr as LPVOID, 0, MEM_RELEASE);                ❹
    }
}
❶ Returns the fore memory page to read/write, the default state
❷ Returns the aft memory page to read/write, the default state
❸ Releases the page-aligned memory on POSIX-based systems
❹ Releases the page-aligned memory on Windows-based systems
This code listing is based on code from the dryoc crate. You can find the full code listing on GitHub at http://mng.bz/p1R5, which may include future improvements. .
In table 5.2, I have summarized the core smart pointer and memory container types to guide you when you are deciding which to use. You can refer to it as you learn more about Rust and start experimenting with more advanced memory management.
Table 5.2 Summarizing Rust’s smart pointers and containers
Box and Vec provide methods to allocate memory on the heap. Vec should be preferred when you need a list of items; otherwise, use Box for a single item.
The Clone trait can be used to provide deep copying of data structures in Rust.
Rc and Arc provide reference-counted smart pointers for shared ownership.
Cell and RefCell provide an escape hatch for the interior mutability problem when you need to mutate data inside an immutable structure but only for single-threaded applications.
Mutex and RwLock provide synchronization primitives, which can be used with Arc to enable internal mutability.
The Allocator and GlobalAlloc APIs provide a way to customize memory allocation behavior in Rust.