Up to this point in the book, we haven’t spent much time talking about the Rust language itself. In the previous two chapters, we discussed tooling. With that out of the way, we can start diving into the Rust language and its features, which we’ll focus on for the rest of this book. In this chapter, we’ll cover the most important part of Rust after its basic syntax: data structures.
When working with Rust, you’ll spend a great deal of time interacting with its data structures, as you would any other language. Rust offers most of the features you’d expect from data structures, as you’d expect with any modern programming language, but it does so while offering exceptional safety and performance. Once you get a handle on Rust’s core data types, you’ll find the rest of the language comes into great clarity, as the patterns often repeat themselves.
In this chapter, we’ll discuss how Rust differs from other languages in its approach to data, review the core data types and structures, and discuss how to effectively use them. We’ll also discuss how Rust’s primitive types map to C types, which allows you to integrate with non-Rust software.
When working with Rust, you’ll likely spend most of your time working with three core data structures: strings, vectors, and maps. The implementations included with Rust’s standard library are fast and full featured and will cover the majority of your typical programming use cases. We’ll begin by discussing strings, which are commonly used to represent a plethora of data sources and sinks.
In my first encounters with Rust, I was a little confused by the string types. If you find yourself in a similar position, worry not, for I have good news: while they seem complicated, largely due to Rust’s concepts of borrowing, lifetimes, and memory management, I can assure you it’s all very straightforward once you get a handle on the underlying memory layout.
Sometimes, you may find yourself with a str when you want a String, or you may end up with String but have a function that wants a &str. Getting from one to the other isn’t hard, but it may seem confusing at first. We’ll discuss all that and more in this section.
It’s important to separate the underlying data (a contiguous sequence of characters) from the interface you’re using to interact with them. There is only one kind of string in Rust, but there are multiple ways to handle a string’s allocation and references to that string.
Let’s start by clarifying a few things: first, there are, indeed, two separate core string types in Rust (String and str). And while they are technically different types, they are—for the most part—the same thing. They both represent a UTF-8 sequence of characters of arbitrary length, stored in a contiguous region of memory. The only practical difference between String and str is how the memory is managed. Additionally, to understand all core Rust types, it’s helpful to think about them in terms of how memory is managed. Thus, the two Rust string types can be summarized as
str—A stack-allocated UTF-8 string, which can be borrowed but cannot be moved or mutated (note that &str can point to heap-allocated data; we’ll talk more about this later)
String—A heap-allocated UTF-8 string, which can be borrowed and mutated
In languages like C and C++, the difference between heap- and stack-allocated data can be blurry, as C pointers don’t tell you how memory was allocated. At best, they tell you that there’s a region of memory of a specific type, which might be valid and may be anywhere from 0 to N elements in length. In Rust, memory allocation is explicit; thus your types, themselves, usually define how memory is allocated, in addition to the number of elements.
In C, you can allocate strings on the stack and mutate them, but this is not allowed in Rust without using the unsafe keyword. Not surprisingly, this is a major source of programming errors in C.
Let’s illustrate some C strings:
char *stack_string = "stack-allocated string";
char *heap_string  = strndup("heap-allocated string");
In this code, we have two identical pointer types, pointing to different kinds of memory. The first, stack_string, is a pointer to stack-allocated memory. Memory allocated on the stack is usually handled by the compiler, and the allocation is essentially instantaneous. heap_string is a pointer of the same type, to a heap-allocated string. strndup() is a standard C library function that allocates a region of memory on the heap using malloc(), copies the input into that region, and returns the address of the newly allocated region.
Note If we’re being pedantic, we might say that heap-allocated string in the preceding example is initially stack allocated but converted into a heap- allocated string after the call to strndup(). You can prove this by examining the binary generated by the compiler, which would contain the literal heap-allocated string in the binary.
Now, as far as C is concerned, all strings are the same: they’re just contiguous regions of memory of arbitrary length, terminated by a null character (hex byte value 0x00). So if we switch back to thinking about Rust, we can think of str as equivalent to the first line, stack_string. String is equivalent to the second line, heap_string. While this is somewhat of an oversimplification, it’s a good model to help us understand strings in Rust.
Most of the time, when working in Rust, you’re going to be working with either a String or &str but never a str. The Rust standard library’s immutable string functions are implemented for the &str type, but the mutable functions are only implemented for the String type.
It’s not possible to create a str directly; you can only borrow a reference to one. The &str type serves as a convenient lowest common denominator, such as when used as a function argument because you can always borrow a String as &str.
Let’s quickly discuss static lifetimes: In Rust, 'static is a special lifetime specifier that defines a reference (or borrowed variable) that is valid for the entire life of a process. There are a few special cases in which you may need an explicit &'static str, but in practice, it’s something infrequently encountered.
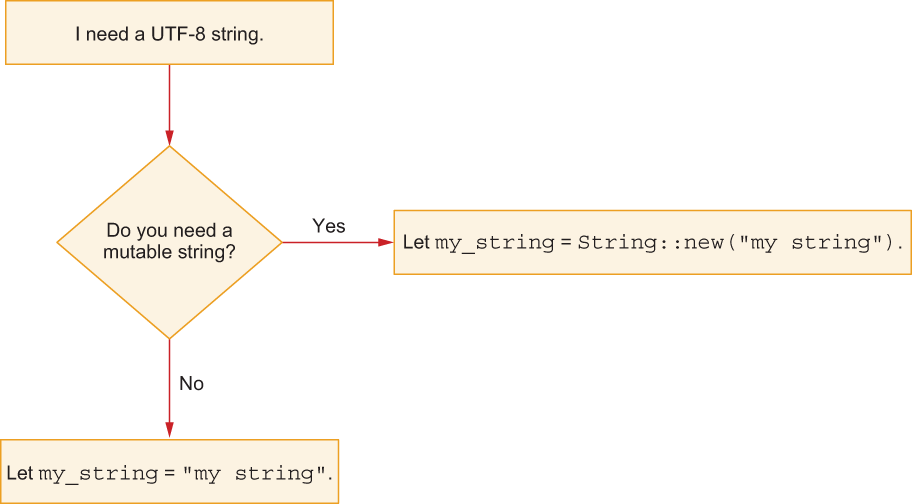
Deciding to use String or a static string comes down to mutability, as shown in figure 4.1. If you don’t require mutability, a static string is almost always the best choice.
Figure 4.1 Deciding when to use str or a String, in a very simple flowchart
The only real difference between &'static str and &str is that, while a String can be borrowed as &str, String can never be borrowed as &'static str because the life of a String is never as long as the process. When a String goes out of scope, it’s released with the Drop trait (we’ll explore traits in greater detail in chapter 8).
Under the hood, a String is actually just a Vec of UTF-8 characters. We’ll discuss Vec in greater detail later in the chapter. Additionally, a str is just a slice of UTF-8 characters, and we’ll discuss slices more in the next section. Table 4.1 summarizes the core string types you will encounter and how to differentiate them.
Table 4.1 String types summarized
Another difference between str and String is that String can be moved, whereas str cannot. In fact, it’s not possible to own a variable of type str—it’s only possible to hold reference to a str. To illustrate, consider the following listing.
Listing 4.1 Movable and nonmovable strings
fn print_String(s: String) {
    println!("print_String: {}", s);
}

fn print_str(s: &str) {
    println!("print_str: {}", s);
}

fn main() {
    // let s: str = "impossible str";       ❶
    print_String(String::from("String"));   ❷
    print_str(&String::from("String"));     ❸
    print_str("str");                       ❹
    // print_String("str");                 ❺
}
❶ Does not compile; rustc will report “error[E0277]: the size for values of type str cannot be known at compilation time.”
❷ OK: moves a String out of main into print_String
❸ OK: returns a &str from a String in main
❹ OK: creates a str on the stack within main and passes a reference to that str as &str to print_str
❺ Does not compile; rustc will report “error[E0308]: mismatched types, expected struct String, found &str.”
The preceding code, when run, prints the following output:
print_String: String
print_str: String
print_str: str
Slices and arrays are special types in Rust. They represent a sequence of arbitrary values of the same type. You can also have multidimensional slices or arrays (i.e., slices of slices, arrays of arrays, arrays of slices, or slices of arrays).
Slices are a somewhat new programming concept, as you generally won’t find the term slice used when discussing sequences in the language syntax for Java, C, C++, Python, or Ruby. Typically, sequences are referred to as either arrays (as in Java, C, C++, and Ruby), lists (as in Python), or simply sequences (as in Scala). Other languages may provide equivalent behavior, but slices are not necessarily a first-class language concept or type in the way they are in Rust or Go (although the slice abstraction has been catching on in other languages). C++ does have std::span and std::string_view, which provide equivalent behavior, but the term slice is not used in C++ when describing these.
Note The term slices appears to have originated with the Go language, as described in this blog post from 2013 by Rob Pike: https://go.dev/blog/slices.
In Rust, specifically, slices and arrays differ subtly. An array is a fixed-length sequence of values, and a slice is a sequence of values with an arbitrary length. That is, a slice can be of a variable length, determined at run time, whereas an array has a fixed length known at compile time. Slices have another interesting property, which is that you can destructure slices into as many nonoverlapping subslices as desired; this can be convenient for implementing algorithms that use divide-and-conquer or recursive strategies.
Working with arrays can, at times, be tricky in Rust because knowing the length of a sequence at compile time requires the information to be passed to the compiler at compile time and present in the type signature. As of Rust 1.51, it’s possible to use a feature called const generics (discussed in greater detail in chapter 10) to define generic arrays of arbitrary length but only at compile time.
Let’s illustrate the difference between slices and arrays with the following code.
Listing 4.2 Creating an array and a slice
let array = [0u8; 64];        ❶
 let slice: &[u8] = &array;   ❷
❶ The type signature here is [u8; 64], an array, initialized with zeroes.
❷ This borrows a slice of the array.
In this code, we’ve initialized a byte array containing 64 elements, all of which are zero. 0u8 is shorthand for an unsigned integral type, 8 bits in length, with a value of 0. 0 is the value, and u8 is the type.
On the second line, we’re borrowing the array as a slice. Up until now, this hasn’t been particularly interesting. You can do some slightly more interesting things with slices, such as borrowing twice:
let (first_half, second_half) = slice.split_at(32);     ❶
println!(
    "first_half.len()={} second_half.len()={}",
    first_half.len(),
    second_half.len()
);
❶ Splits and borrows a slice twice, destructuring it into two separate, nonoverlapping subslices
The preceding code is calling the split_at() function, which is part of Rust’s core library and implemented for all slices, arrays, and vectors. split_at()destructures the slice (which is already borrowed from array) and gives us two nonoverlapping slices that correspond to the first and second half of the original array.
This concept of destructuring is important in Rust because you may find yourself in situations where you need to borrow a portion of an array or slice. In fact, you can borrow the same slice or array multiple times using this pattern, as slices don’t overlap. One common use case for this is parsing or decoding text or binary data. For example:
let wordlist = "one,two,three,four";
for word in wordlist.split(‘,’) {
    println!("word={}", word);
}
Looking at the preceding code, it may be immediately obvious that we’ve taken a string, split it on ,, and then printed each word within that string. The output from this code prints the following:
word=one
word=two
word=three
word=four
What’s worth noting about the preceding code is that there’s no heap allocation happening. All of the memory is allocated on the stack, of a fixed length known at compile time, with no calls to malloc() under the hood. This is the equivalent of working with raw C pointers, but there’s no reference counting or garbage collection involved; therefore, there is none of the overhead. And unlike C pointers, the code is succinct, safe, and not overly verbose.
Slices, additionally, have a number of optimizations for working with contiguous regions of memory. One such optimization is the copy_from_slice() method, which works on slices. A call to copy_from_slice() from the standard library uses the memcpy() function to copy memory, as shown in the following listing.
Listing 4.3 Snippet of slice/mod.rs, from http://mng.bz/5oRO
pub fn copy_from_slice(&mut self, src: &[T])
where
    T: Copy,
{
           ❶

    // SAFETY: `self` is valid for `self.len()` elements by definition,
    // and `src` was checked to have the same length. The slices cannot
    // overlap because mutable references are exclusive.
    unsafe {
        ptr::copy_nonoverlapping(
          src.as_ptr(),
          self.as_mut_ptr(),
          self.len()
        );
    }
}
In the preceding listing, which comes from Rust’s core library, ptr::copy_nonoverlapping() is just a wrapper around the C library’s memcpy(). On some platforms, memcpy() has additional optimizations beyond what you might be able to accomplish with normal code. Other optimized functions are fill() and fill_with(), which both use memset() to fill memory.
Let’s review the core attributes of arrays and slices:
An array is a fixed-length sequence of values, with the value known at compile time.
Slices are pointers to contiguous regions of memory, including a length, representing an arbitrary-length sequence of values.
Both slices and arrays can be recursively destructured into nonoverlapping subslices.
Vectors are, arguably, Rust’s most important data type (the next most important being String, which is based on Vec). When working with data in Rust, you’ll find yourself frequently creating vectors when you need a resizable sequence of values. If you’re coming from C++, you’ve likely heard the term vectors before, and in many ways Rust’s vector type is very similar to what you’d find in C++. Vectors serve as a general-purpose container for just about any kind of sequence.
Vectors are one of the ways to allocate memory on the heap in Rust (another being smart pointers, like Box; smart pointers are covered in greater detail in chapter 5). Vectors have a few internal optimizations to limit excessive allocations, such as allocating memory in blocks. Additionally, in nightly Rust, you can supply a custom allocator (discussed in greater detail in chapter 5) to implement your own memory allocation behavior.
Vec inherits the methods of slices because we can obtain a slice reference from a vector. Rust does not have inheritance in the sense of object-oriented programming, but rather Vec is a special type that is both a Vec and a slice at the same time. For example, let’s take a look at the standard library implementation for as_slice().
Listing 4.4 Snippet of vec/mod.rs, from http://mng.bz/6nRe
pub fn as_slice(&self) -> &[T] {
    self
}
The preceding code listing is performing a special conversion that (under normal circumstances) wouldn’t work. It’s taking self, which is Vec<T> in the preceding code, and simply returning it as &[T]. If you try to compile the same code yourself, it will fail.
How does this work? Rust provides a trait called Deref (and its mutable companion DerefMut), which may be used by the compiler to coerce one type into another, implicitly. Once implemented for a given type, that type will also automatically implement all the methods of the dereferenced type. In the case of Vec, Deref and DerefMut are implemented in the Rust standard library, as shown in the following listing.
Listing 4.5 Snippet of the Deref implementation for Vec, from http://mng.bz/6nRe
impl<T, A: Allocator> ops::Deref for Vec<T, A> {
    type Target = [T];

    fn deref(&self) -> &[T] {
        unsafe { slice::from_raw_parts(self.as_ptr(), self.len) }
    }
}

impl<T, A: Allocator> ops::DerefMut for Vec<T, A> {
    fn deref_mut(&mut self) -> &mut [T] {
        unsafe { slice::from_raw_parts_mut(self.as_mut_ptr(), self.len) }
    }
}
In the preceding code listing, dereferencing the vector will coerce it into a slice from its raw pointer and length. It should be noted that such an operation is temporary—that is to say, a slice cannot be resized, and the length is provided to the slice at the time of dereferencing.
If, for some reason, you took a slice of a vector and resized the vector, the slice’s size would not change. This would only be possible in unsafe code, however, because the borrow checker will not let you borrow a slice from a vector and change the vector at the same time. Take the following to illustrate:
let mut vec = vec![1, 2, 3];
let slice = vec.as_slice();       ❶
vec.resize(10, 0);                ❷
println!("{}", slice[0]);         ❸
❶ Returns &[i32] because vec is borrowed here
❷ This is a mutable operation.
The preceding code will fail to compile, as the borrow checker returns this error:
error[E0502]: cannot borrow `vec` as mutable because it is also borrowed as
immutable
 --> src/main.rs:4:5
  |
3 |     let slice = vec.as_slice();
  |                 --- immutable borrow occurs here
4 |     vec.resize(10, 0);
  |     ^^^^^^^^^^^^^^^^^ mutable borrow occurs here
5 |     println!("{}", slice[0]);
  |                    -------- immutable borrow later used here
Some types in Rust merely wrap a Vec, such as String. The String type is a Vec<u8> and dereferences (using the previously mentioned Deref trait) into a str.
Listing 4.6 Snippet of string.rs, from http://mng.bz/orAZ
pub struct String {
    vec: Vec<u8>,
}
Wrapping vectors is a common pattern, as Vec is the preferred way to implement a resizable sequence of any type.
In 90% of cases, you’ll want to use a Vec. In the other 10% of cases, you’ll probably want to use a HashMap (discussed in the next section). Container types other than Vec or HashMap may make sense in certain situations, or cases when you need special optimization, but most likely, a Vec will be sufficient, and using another type will not provide noticeable performance improvements. A quote comes to mind:
Programmers waste enormous amounts of time thinking about, or worrying about, the speed of noncritical parts of their programs, and these attempts at efficiency actually have a strong negative impact when debugging and maintenance are considered. We should forget about small efficiencies, say about 97% of the time: premature optimization is the root of all evil. Yet we should not pass up our opportunities in that critical 3%.
In cases where you are concerned about allocating excessively large regions of contiguous memory or about where the memory is located, you can easily get around this problem by simply stuffing a Box into a Vec (i.e, using Vec<Box<T>>). With that said, there are several other collection types in Rust’s standard library, some of which wrap a Vec internally, and you may occasionally need to use them:
VecDeque—A double-ended queue that can be resized, based on Vec
HashMap—A hash map, discussed in more detail in the next section
BinaryHeap—A priority queue, implemented with a binary heap, using a Vec internally
Additional recommendations, including up-to-date performance details of Rust’s core data structures, can be found in the Rust standard library collections reference at https://doc.rust-lang.org/std/collections/index.html.
Tip It’s also reasonable to build your own data structures on top of Vec, should you need to. For an example of how to do this, the BinaryHeap from Rust’s standard library provides a complete example, which is documented at http://mng.bz/n1A5.
HashMap is the other container type in Rust that you’ll find yourself using. If Vec is the preferred resizable type of the language, HashMap is the preferred type for cases where you need a collection of items that can be retrieved in constant time, using a key. Rust’s HashMap is not much different from hash maps you may have encountered in other languages, but Rust’s implementation is likely faster and safer than what you might find in other libraries, thanks to some optimizations Rust provides.
HashMap uses the Siphash-1-3 function for hashing, which is also used in Python (starting from 3.4), Ruby, Swift, and Haskell. This function provides good tradeoffs for common cases, but it may be inappropriate for very small or very large keys, such as integral types or very large strings.
It’s also possible to supply your own hash function for use with HashMap. You may want to do this in cases where you want to hash very small or very large keys, but for most cases, the default implementation is adequate.
To use a HashMap with a custom hashing function, you need to first find an existing implementation or write a hash function that implements the necessary traits. HashMap requires that std::hash::BuildHasher, std::hash::Hasher, and std::default::Default are implemented for the hash function you wish to use. Traits are discussed in greater detail in chapter 8.
Let’s examine the implementation of HashMap from the standard library in the following listing.
Listing 4.7 Snippet of HashMap, from http://mng.bz/vPAp
impl<K, V, S> HashMap<K, V, S>
where
    K: Eq + Hash,
    S: BuildHasher,
{
   ❶
}
In this listing, you can see BuildHasher specified as a trait requirement on the S type parameter. Digging a little deeper, in the following listing, you can see BuildHasher is just a wrapper around the Hasher trait.
Listing 4.8 Snippet of BuildHasher, from http://mng.bz/46RR
pub trait BuildHasher {
    /// Type of the hasher that will be created.
    type Hasher: Hasher;      ❶

                              ❷
}
❶ Here, there’s a requirement on the Hasher trait.
The BuildHasher and Hasher APIs leave most of the implementation details up to the author of the hash function. For BuildHasher, only a build_hasher() method is required, which returns the new Hasher instance. The Hasher trait only requires two methods: write() and finish(). write() takes a byte slice (&[u8]), and finish() returns an unsigned 64-bit integer representing the computed hash. The Hasher trait also provides a number of blanket implementations, which you inherit for free if you implement the Hasher trait. It’s worth examining the documentation for the traits themselves at http://mng.bz/QR76 and http://mng.bz/Xqo9 to get a clearer picture of how they work.
Many crates are available on https://crates.io that already implement a wide variety of hash functions. As an example, in the following listing, let’s construct a HashMap with MetroHash, an alternative to SipHash, designed by J. Andrew Rogers, described at https://www.jandrewrogers.com/2015/05/27/metrohash/. The MetroHash crate already includes the necessary implementation of the std::hash::BuildHasher and std::hash::Hasher traits, which makes this very easy.
Listing 4.9 Code listing for using HashMap with MetroHash
use metrohash::MetroBuildHasher;
use std::collections::HashMap;

let mut map = HashMap::<String, String,
➥ MetroBuildHasher>::default();                ❶
map.insert("hello?".into(), "Hello!".into());   ❷

println!("{:?}", map.get("hello?"));            ❸
❶ Creates a new HashMap instance, using MetroHash
❷ Inserts a key and value pair into the map, using the Into trait for conversion from &str to String
❸ Retrieves the value from the map, which returns an Option; the {:?} argument to the println! macro tells it to format this value using the fmt::Debug trait.
HashMap can be used with arbitrary keys and values, but the keys must implement the std::cmp::Eq and std::hash::Hash traits. Many traits, such as Eq and Hash, can be automatically derived using the #[derive] attribute. Consider the following example.
Listing 4.10 Code listing for a compound key type
#[derive(Hash, Eq, PartialEq, Debug)]
struct CompoundKey {
    name: String,
    value: i32,
}
The preceding code represents a compound key composed of a name and value. We’re using the #[derive] attribute to derive four traits: Hash, Eq, PartialEq, and Debug. While HashMap only requires Hash and Eq, we need to also derive PartialEq because Eq depends on PartialEq. I’ve also derived Debug, which provides automatic debug print methods. This is extremely convenient for debugging and testing code.
We haven’t discussed #[derive] much in this book yet, but it’s something you’ll use frequently in Rust. We’ll go into more detail on traits and #[derive] in chapters 8 and 9. For now, you should just think of it as an automatic way to generate trait implementations. These trait implementations have the added benefit in that they’re composable: so long as they exist for any subset of types, they can also be derived for a superset of types.
Being a strongly typed language, Rust provides several ways to model data. At the bottom are primitive types, which handle our most basic units of data, like numeric values, bytes, and characters. Moving up from there, we have structs and enums, which are used to encapsulate other types. Finally, aliases let us rename and combine other types into new types.
To summarize, in Rust, there are four categories of types:
Primitives—These include strings, arrays, tuples, and integral types.
Structs—A compound type composed of any arbitrary combination of other types, similar to C structs, for example.
Enums—A special type in Rust, which is somewhat similar to enum from C, C++, Java, and other languages.
Aliases—Syntax sugar for creating new type definitions based on existing types.
Primitive types are provided by the Rust language and core library. These are equivalent to the primitives you’d find in any other strongly typed language, with a few exceptions, which we’ll review in this section. The core primitive types are summarized in table 4.2, which includes integers, floats, tuples, and arrays.
Table 4.2 Summary of primitive types in Rust
Integer types can be recognized by their signage designation (either i or u for signed and unsigned, respectively), followed by the number of bits. Sizes begin with i or u, followed by the word size. Floating-point types begin with f, followed by the number of bits. Table 4.3 summarizes the primitive integer types.
Table 4.3 Summary of integer-type identifiers
|
|
|||
|
Extended integers are nonstandard C but provided as |
The type for an integer literal can be specified by appending the type identifier. For example, 0u8 denotes an unsigned 8-bit integer with a value of 0. Integer values can be prefixed with 0b, 0o, 0x, or b for binary, octal, hexadecimal, and byte literals. Consider the following listing, which prints each value as a decimal (base 10) integer.
Listing 4.11 Code listing with integer literals
let value = 0u8;
println!("value={}, length={}", value, std::mem::size_of_val(&value));
let value = 0b1u16;
println!("value={}, length={}", value, std::mem::size_of_val(&value));
let value = 0o2u32;
println!("value={}, length={}", value, std::mem::size_of_val(&value));
let value = 0x3u64;
println!("value={}, length={}", value, std::mem::size_of_val(&value));
let value = 4u128;
println!("value={}, length={}", value, std::mem::size_of_val(&value));

println!("Binary (base 2)         0b1111_1111={}", 0b1111_1111);
println!("Octal (base 8)          0o1111_1111={}", 0o1111_1111);
println!("Decimal (base 10)         1111_1111={}", 1111_1111);
println!("Hexadecimal (base 16)   0x1111_1111={}", 0x1111_1111);
println!("Byte literal            b’A’={}", b’A’);
When we run this code, we get the following output.
Listing 4.12 Output from listing 4.11
value=0, length=1
value=1, length=2
value=2, length=4
value=3, length=8
value=4, length=16
Binary (base 2)         0b1111_1111=255
Octal (base 8)          0o1111_1111=2396745
Decimal (base 10)         1111_1111=11111111
Hexadecimal (base 16)   0x1111_1111=286331153
Byte literal            b’A’=65
For size types, the identifiers are usize and isize. These are platform-dependent sizes, which are typically 32 or 64 bits in length for 32- and 64-bit systems, respectively. usize is equivalent to C’s size_t, and isize is provided to permit signed arithmetic with sizes. In the Rust standard library, functions returning or expecting a length parameter expect a usize.
Many languages permit unchecked arithmetic on primitive types. In C and C++, in particular, many arithmetic operations have undefined results and produce no errors. One such example is division by zero. Consider the following C program.
Listing 4.13 Code of divide_by_zero.c
#include <stdio.h>

int main() {
    printf("%d\n", 1 / 0);
}
If you compile and run this code with clang divide_by_zero.c && ./a.out, it will print a value that appears random. Both Clang and GCC happily compile this code, and they both print a warning, but there is no run-time check for an undefined operation.
In Rust, all arithmetic is checked by default. Consider the following Rust program:
// println!("{}", 1 / 0);         ❶

let one = 1;
let zero = 0;
// println!("{}", one / zero);    ❶

let one = 1;
let zero = one - 1;
// println!("{}", one / zero);    ❷

let one = { || 1 }();
let zero = { || 0 }();
println!("{}", one / zero);       ❸
In the preceding code, Rust’s compiler is pretty good at catching errors at compile time. We need to trick the compiler to allow the code to compile and run. In the preceding code, we do this by initializing a variable from the return value of a closure. Another way to do it would be to just create a regular function that returns the desired value. In any case, running the problem produces the following output:
Running `target/debug/unchecked-arithmetic`
thread ‘main’ panicked at ‘attempt to divide by zero’, src/main.rs:14:20
note: run with `RUST_BACKTRACE=1` environment variable to display a
backtrace
If you need more control over arithmetic in Rust, the primitive types provide several methods for handling such operations. For example, to safely handle division by zero, you can use the checked_div() method, which returns an Option:
assert_eq!((100i32).checked_div(1i32), Some(100i32));    ❶
assert_eq!((100i32).checked_div(0i32), None);            ❷
❷ 100 / 0—the result is undefined.
For scalar types (integers, sizes, and floats), Rust provides a collection of methods that provide basic arithmetic operations (e.g., division, multiplication, addition, and subtraction) in checked, unchecked, overflowing, and wrapping forms.
When you want to achieve compatibility with the behavior from languages like C, C++, Java, C#, and others, the method you probably want to use is the wrapping form, which performs modular arithmetic and is compatible with the C-equivalent operations. Keep in mind that overflow on signed integers in C is undefined. Here’s an example of modular arithmetic in Rust:
assert_eq!(0xffu8.wrapping_add(1), 0);
assert_eq!(0xffffffffu32.wrapping_add(1), 0);
assert_eq!(0u32.wrapping_sub(1), 0xffffffff);
assert_eq!(0x80000000u32.wrapping_mul(2), 0);
The full listing of arithmetic functions for each primitive is available in the Rust documentation. For i32, it can be found at https://doc.rust-lang.org/std/primitive.i32.html.
Rust’s tuples are similar to what you’ll find in other languages. A tuple is a fixed-length sequence of values, and the values can each have different types. Tuples in Rust are not reflective; unlike arrays, you can’t iterate over a tuple, take a slice of a tuple, or determine the type of its components at run time. Tuples are essentially a form of syntax sugar in Rust, and while useful, they are quite limited.
Consider the following example of a tuple:
let tuple = (1, 2, 3);
This code looks somewhat similar to what you might expect for an array, except for the limitations mentioned above (you can’t slice, iterate, or reflect tuples). To access individual elements within the tuple, you can refer to them by their position, starting at 0:
println!("tuple = ({}, {}, {})", tuple.0, tuple.1, tuple.2); ❶
❶ This prints "tuple = (1, 2, 3)".
Alternatively, you can use match, which provides temporary destructuring, provided there’s a pattern match (pattern matching is discussed in greater detail in chapter 8):
match tuple {
    (one, two, three) => println!("{}, {}, {}", one, two, three),    ❶
}
We can also destructure a tuple into its parts with the following syntax, which moves the values out of the tuple:
let (one, two, three) = tuple;
println!("{}, {}, {}", one, two, three);    ❶
In my experience, the most common use of tuples is returning multiple values from a function. For example, consider this succinct swap() function:
fn swap<A, B>(a: A, b: B) -> (B, A) {
    (b, a)
}

fn main() {
    let a = 1;
    let b = 2;

    println!("{:?}", swap(a, b));    ❶
}
Tip It’s recommended that you don’t make tuples with more than 12 arguments, although there is no strict upper limit to the length of a tuple. The standard library only provides trait implementations for tuples with up to 12 elements.
Structs are the main building block in Rust. They are composite data types, which can contain any set types and values. They are similar in nature to C structs or classes in object-oriented languages. They can be composed generically in a fashion similar to templates in C++ or generics in Java, C#, or TypeScript (generics are covered in greater detail in chapter 8).
You should use a struct any time you need to
Provide stateful functions (i.e., functions or methods that operate on internal-only state)
Control access to internal state (i.e., private variables); or
You are not required to use structs. You can write APIs with functions only, if you desire, in a fashion similar to C APIs. Additionally, structs are only needed to define implementations—they are not for specifying interfaces. This differs from object- oriented languages, like C++, Java, and C#.
The simplest form of a struct is an empty struct:
struct EmptyStruct {}

struct AnotherEmptyStruct;     ❶
❶ Unit struct, which ends with semicolon with no braces
Empty structs (or unit structs) are something you may encounter occasionally. Another form of struct is the tuple struct, which looks like this:
struct TupleStruct(String);

let tuple_struct = TupleStruct("string value".into());    ❶
println!("{}", tuple_struct.0);                           ❷
❶ Initializes the struct similarly to a tuple
❷ The first tuple element can be accessed with .0, the second with .1, the third with .2, and so on.
A tuple struct is a special form of struct, which behaves like a tuple. The main difference between a tuple struct and a regular struct is that, in a tuple struct, the values have no names, only types. Notice how a tuple struct has a semicolon (;) at the end of the declaration, which is not required for regular structs (except for an empty declaration). Tuple structs can be convenient in certain cases by allowing you to omit the field names (thereby shaving a few characters off your source code), but they also create ambiguity.
A typical struct has a list of elements with names and types, like this:
struct TypicalStruct {
  name: String,
  value: String,
  number: i32,
}
Each element within a struct has module visibility by default. That means values within the struct are accessible anywhere within the scope of the current module. Visibility can be set on a per-element basis:
pub struct MixedVisibilityStruct {    ❶
  pub name: String,                   ❷
  pub(crate) value: String,           ❸
  pub(super) number: i32,             ❹
}
❶ A public struct, visible outside the crate
❷ This element is public, accessible outside of the crate.
❸ This element is public anywhere within the crate.
❹ This element is accessible anywhere within the parent scope.
Most of the time, you shouldn’t need to make struct elements public. An element within a struct can be accessed and modified by any code within the public scope for that struct element. The default visibility (which is equivalent to pub(self)) allows any code within the same module to access and modify the elements within a struct.
Visibility semantics also apply to the structs themselves, just like their member elements. For a struct to be visible outside of a crate (i.e., to be consumed from a library), it must be declared with pub struct MyStruct { ... }. A struct that’s not explicitly declared as public won’t be accessible outside of the crate (this also applies generally to functions, traits, and any other declarations).
When you declare a struct, you’ll probably want to derive a few standard trait implementations:
#[derive(Debug, Clone, Default)]
struct DebuggableStruct {
    string: String,
    number: i32,
}
In this code, we’re deriving the Debug, Clone, and Default traits. These traits are summarized as follows:
Debug—Provides a fmt() method, which formats (for printing) the content of the type
Clone—Provides a clone() method, which creates a copy (or clone) of the type
Default—Provides an implementation of default(), which returns a default (usually empty) instance of the type
You can derive these traits yourself if you wish (such as in cases where you want to customize their behavior), but so long as all elements within a struct implement each trait, you can derive them automatically and save a lot of typing.
With these three traits derived for the preceding example, we can now do the following:
let debuggable_struct = DebuggableStruct::default();
println!("{:?}", debuggable_struct);                  ❶
println!("{:?}", debuggable_struct.clone());          ❷
❶ Prints DebuggableStruct { string: "", number: 0 }
❷ Also prints DebuggableStruct { string: "", number: 0 }
To define methods for a struct, you will implement them using the impl keyword:
impl DebuggableStruct {
  fn increment_number(&mut self) {    ❶
    self.number += 1;
  }
}
❶ A function that takes a mutable reference to self
This code takes a mutable reference of our struct and increments it by 1. Another way to do this would be to consume the struct and return it from the function:
impl DebuggableStruct {
  fn incremented_number(mut self) -> Self {     ❶
    self.number += 1;
    self
  }
}
❶ A function that takes an owned mutable instance of self
There’s a subtle difference between these two implementations, but they are functionally equivalent. There may be cases when you want to consume the input to a method to swallow it, but in most cases, the first version (using &mut self) is preferred.
Enums can be thought of as a specialized type of struct that contains enumerated mutually exclusive variants. An enum can be one of its variants at a given time. With a struct, all elements of the struct are present. With an enum, only one of the variants is present. An enum can contain any kind of type, not just integral types. The types may be named or anonymous.
This is quite different from enums in languages like C, C++, Java, or C#. In those languages, enums are effectively used as a way to define constant values. Rust’s enums can emulate enums, as you might expect from other languages, but they are conceptually different. While C++ has enums, Rust’s enums are more similar to std::variant than C++’s enum.
#[derive(Debug)]
enum JapaneseDogBreeds {
    AkitaKen,
    HokkaidoInu,
    KaiKen,
    KishuInu,
    ShibaInu,
    ShikokuKen,
}
For the preceding enum, JapaneseDogBreeds is the name of the enum type, and each of the elements within the enum is a unit-like type. Since the types in the enum don’t exist outside the enum, they are created within the enum. We can run the following code now:
println!("{:?}", JapaneseDogBreeds::ShibaInu);          ❶
println!("{:?}", JapaneseDogBreeds::ShibaInu as u32);   ❷
❷ This prints "4", the 32-bit unsigned integer representation of the enum value.
Casting the enum type to a u32 works because enum types are enumerated. Now, what if we want to go from the number 4 to the enum value? For that, there is no automatic conversion, but we can implement it ourselves using the From trait:
impl From<u32> for JapaneseDogBreeds {
    fn from(other: u32) -> Self {
        match other {
            other if JapaneseDogBreeds::AkitaKen as u32 == other => {
                JapaneseDogBreeds::AkitaKen
            }
            other if JapaneseDogBreeds::HokkaidoInu as u32 == other => {
                JapaneseDogBreeds::HokkaidoInu
            }
            other if JapaneseDogBreeds::KaiKen as u32 == other => {
                JapaneseDogBreeds::KaiKen
            }
            other if JapaneseDogBreeds::KishuInu as u32 == other => {
                JapaneseDogBreeds::KishuInu
            }
            other if JapaneseDogBreeds::ShibaInu as u32 == other => {
                JapaneseDogBreeds::ShibaInu
            }
            other if JapaneseDogBreeds::ShikokuKen as u32 == other => {
                JapaneseDogBreeds::ShikokuKen
            }
            _ => panic!("Unknown breed!"),
        }
    }
}
In the preceding code, we must cast the enum type to a u32 to perform the comparison, and then we return the enum type if there’s a match. In the case where no value matches, we call panic!(), which causes the program to crash. The preceding syntax uses the match guard feature, which lets us match using an if statement.
It’s possible to specify the enumeration variant types in an enum as well. This can be used to achieve behavior similar to C enums:
enum Numbers {
    One = 1,
    Two = 2,
    Three = 3,
}

fn main() {
  println!("one={}", Numbers::One as u32);    ❶
}
❶ This prints "one=1". Note that without the as cast, this does not compile because One doesn’t implement std::fmt.
Enums may contain tuples, structs, and anonymous (i.e., unnamed) types as variants:
enum EnumTypes {
    NamedType,                     ❶
    String,                        ❷
    NamedString(String),           ❸
    StructLike { name: String },   ❹
    TupleLike(String, i32),        ❺
}
❸ A named String type, specified as a tuple with one item
❹ A struct-like type, with a single element called name
❺ A tuple-like type with two elements
To clarify, an unnamed enum variant is a variant that’s specified as a type, rather than with a name. A named enum variant is equivalent to creating a new type within the enum, which also happens to correspond to an enumerated integer value. In other words, if you want to emulate the behavior of enums from languages like C, C++, or Java, you’ll be using named variants, which conveniently emulate the enumeration behavior by casting the value to an integer type, even though enum variants are also types (i.e., not just values).
As a general rule, it’s good practice to avoid mixing named and unnamed variants within an enum, as it can be confusing.
Aliases are a special type in Rust that allows you to provide an alternative and equivalent name for any other type. They are equivalent to C and C++’s typedef or the C++ using keyword. Defining an alias does not create a new type.
Providing aliased type definitions for public types, as a matter of ergonomics and convenience for the user of a library
Providing shorthand types that correspond to more complicated type compositions
For example, I may want to create a type alias for a hash map I frequently use within my crate:
pub(crate) type MyMap = std::collections::HashMap<String, MyStruct>;
Now, rather than having to type the full std::collections::HashMap<String, MyStruct>, I can use MyMap instead.
For libraries, it’s common practice to export public type aliases with sensible defaults for type construction when generics are used. It can be difficult at times to determine which types are required for a given interface, and aliases provide one way for library authors to signal that information.
In the dryoc crate, I provide a number of type aliases, for convenience. The API makes heavy use of generics. One such example is shown in the following listing.
Listing 4.14 Snippet for kdf.rs, from http://mng.bz/yZAp
/// Stack-allocated key type alias for key derivation with [`Kdf`].
pub type Key = StackByteArray<CRYPTO_KDF_KEYBYTES>;
/// Stack-allocated context type alias for key derivation with [`Kdf`].
pub type Context = StackByteArray<CRYPTO_KDF_CONTEXTBYTES>;
In the preceding code, the Key and Context type aliases are provided within this module, so the user of this library does not need to worry about implementation details.
Rust provides a few features to make error handling easier. These features are based on an enum called Result, defined in the following listing.
Listing 4.15 Snippet of std::result::Result, from http://mng.bz/M97Q
pub enum Result<T, E> {
    Ok(T),
    Err(E),
}
A Result represents an operation that can either succeed (returning a result) or fail (returning an error). You will quickly become accustomed to seeing Result as the return type for many functions in Rust.
You will likely want to create your own error type in your crate. That type could be either an enum containing all the different kinds of errors you expect or simply a struct with something actionable, such as an error message. I, being a simple person, prefer to just provide a helpful message and move on with my life. Here’s a very simple error struct:
#[derive(Debug)]
struct Error {
    message: String,
}
Within your crate, you’ll need to decide what type of errors you want your functions to return. My suggestion is to have your crate return its own error type. This is convenient for anyone else using your crate because it will be clear to them where the error originates from.
To make this pattern work, you’ll need to implement the From trait to convert your error type into the target error type returned from the function where the ? operator is used in cases where the types differ. Doing this is relatively easy because the compiler will tell you when it’s necessary.
Now, within your crate, suppose you have a function that reads the contents of a file, like this:
fn read_file(name: &str) -> Result<String, Error> {
    use std::fs::File;
    use std::io::prelude::*;

    let mut file = File::open(name)?;      ❶
    let mut contents = String::new();
    file.read_to_string(&mut contents)?;   ❷
    Ok(contents)
}
❶ Using the ? operator here for implicit error handling
❷ Using the ? operator here too
In the preceding code, we have a function that opens a file, name; reads the contents into a string; and returns the contents as a result. We use the ? operator twice, which works by returning the result of the function upon success or returning the error immediately. Both File::open and read_to_string() use the std::io::Error type, so we’ve provided the following From implementation, which permits this conversion automatically:
impl From<std::io::Error> for Error {
    fn from(other: std::io::Error) -> Self {
        Self {
            message: other.to_string(),
        }
    }
}
Rust provides two very useful traits as part of its core library: the From and Into traits. If you browse the Rust standard library, you may notice that From and Into are implemented for a great number of different types because of the usefulness of these traits. You will frequently encounter these traits when working with Rust.
These traits provide a standard way to convert between types. They are occasionally used by the compiler to automatically convert types on your behalf.
As a general rule, you only need to implement the From trait and almost never Into. The Into trait is the reciprocal of From and will be derived automatically by the compiler. There is one exception to this rule: versions of Rust prior to 1.41 had slightly stricter rules, which didn’t allow implementing From when the conversion destination was an external type.
From is preferred because it doesn’t require specifying the destination type, resulting in slightly simpler syntax. The signature for the From trait (from the standard library) is as follows:
pub trait From<T>: Sized {
    /// Performs the conversion.
    fn from(_: T) -> Self;
}
Let’s create a very simple String wrapper and implement this trait for our type:
struct StringWrapper(String);

impl From<&str> for StringWrapper {
    fn from(other: &str) -> Self {
        Self(other.into())            ❶
    }
}

fn main() {
    println!("{}", StringWrapper::from("Hello, world!").0);
}
❶ Returns a copy of the string, wrapped in a new StringWapper
In the preceding code, we’re allowing conversion from a &str, a borrowed string, into a string. To convert the other string into our string, we just call into(), which comes from the Into trait implemented for String. In this example, we use both From and Into.
In practice, you will find yourself needing to convert between types for a variety of reasons. One such case is for handling errors when using Result. If you call a function that returns a result and use the ? operator within that function, you’ll need to provide a From implementation if the error type returned by the inner function differs from the error type used by the Result.
use std::{fs::File, io::Read};

struct Error(String);

fn read_file(name: &str) -> Result<String, Error> {
    let mut f = File::open(name)?;
    let mut output = String::new();

    f.read_to_string(&mut output)?;

    Ok(output)
}
The preceding code attempts to read a file into a string and returns the result. We have a custom error type, which just contains a string. The code, as is, does not compile:
error[E0277]: `?` couldn’t convert the error to `Error`
 --> src/main.rs:6:33
  |
5 | fn read_file(name: &str) -> Result<String, Error> {
  |                             --------------------- expected `Error`
  because of this
6 |     let mut f = File::open(name)?;
  |                                 ^ the trait `From<std::io::Error>` is
  not implemented for `Error`
  |
  = note: the question mark operation (`?`) implicitly performs a conversion
  on the error value using the `From` trait
  = note: required by `from`

error[E0277]: `?` couldn’t convert the error to `Error`
 --> src/main.rs:9:34
  |
5 | fn read_file(name: &str) -> Result<String, Error> {
  |                             --------------------- expected `Error`
  because of this
...
9 |     f.read_to_string(&mut output)?;
  |                                  ^ the trait `From<std::io::Error>` is
  not implemented for `Error`
  |
  = note: the question mark operation (`?`) implicitly performs a conversion
  on the error value using the `From` trait
  = note: required by `from`
To make it compile, we need to implement the From trait for Error such that the compiler knows how to convert std::io::Error into our own custom error. The implementation looks like this:
impl From<std::io::Error> for Error {
    fn from(other: std::io::Error) -> Self {
        Self(other.to_string())
    }
}
Now, if we compile and run the code, it works as expected.
In addition to the From and Into traits, there are TryFrom and TryInto. These traits are nearly identical, except they are for cases in which the type conversion may fail. The conversion methods in these traits return Result, whereas with From and Into, there is no way to return an error aside from panicking, which causes the entire program to crash.
We can summarize the best practices for type conversion with the From and Into traits as follows:
Implement the From trait for types that require conversion to and from other types.
Avoid writing custom conversion routines, and, instead, rely on the well-known traits where possible.
You may, occasionally, need to call functions from non-Rust libraries (or vice versa), and in many cases, that requires modeling C structs in Rust. To do this, you must use Rust’s foreign function interface features (FFI). Rust’s structs are not compatible with C structs. To make them compatible, you should do the following:
Structs should be declared with the #[repr(C)] attribute, which tells the compiler to pack the struct in a C-compatible representation.
You should use C types from the libc crate, which provides mappings between Rust and C types. Rust types are not C types, and you can’t always assume they’ll be compatible, even when you think they’re equivalent.
To make this whole process much easier, the Rust team provides a tool called rust-bindgen. With rust-bindgen, you can generate bindings to C libraries automatically from C headers. Most of the time, you should use rust-bindgen to generate bindings, and you can follow the instructions at http://mng.bz/amgj to do so.
In some cases, I have found I need to call C functions for test purposes or some other reason, and dealing with rust-bindgen is not worth the trouble for simple cases. In those cases, the process for mapping C structs to Rust is as follows:
Following up on the zlib example from chapter 2, let’s quickly implement zlib’s file struct, which looks like this in C:
struct gzFile_s {
    unsigned have;
    unsigned char *next;
    z_off64_t pos;
};
The corresponding Rust struct, after conversion, would look like this:
#[repr(C)]             ❶
struct GzFileState {   ❷
    have: c_uint,
    next: *mut c_uchar,
    pos: i64,
}
❶ Instructs rustc to align the memory in this struct as a C compiler would, for compatibility with C
❷ A C struct representing a zlib file state, as defined in zlib.h
Putting it all together, you can call C functions from zlib with the struct that zlib expects:
type GzFile = *mut GzFileState;

#[link(name = "z")]                                                   ❶
extern "C" {                                                          ❷
    fn gzopen(path: *const c_char, mode: *const c_char) -> GzFile;    ❷
    fn gzread(file: GzFile, buf: *mut c_uchar, len: c_uint) -> c_int; ❷
    fn gzclose(file: GzFile) -> c_int;                                ❷
    fn gzeof(file: GzFile) -> c_int;                                  ❷
}

fn read_gz_file(name: &str) -> String {
    let mut buffer = [0u8; 0x1000];
    let mut contents = String::new();
    unsafe {
        let c_name = CString::new(name).expect("CString failed");     ❸
        let c_mode = CString::new("r").expect("CString failed");
        let file = gzopen(c_name.as_ptr(), c_mode.as_ptr());
        if file.is_null() {
            panic!(
                "Couldn’t read file: {}",
                std::io::Error::last_os_error()
            );
        }
        while gzeof(file) == 0 {
            let bytes_read = gzread(
                file,
                buffer.as_mut_ptr(),
                (buffer.len() - 1) as c_uint,
            );
            let s = std::str::from_utf8(&buffer[..(bytes_read as usize)])
                .unwrap();
            contents.push_str(s);
        }
        gzclose(file);
    }

    contents
}
❶ Instructs rustc that these functions belong to the external z library
❷ External zlib functions as defined in zlib.h
❸ Converts a Rust UTF-8 string into an ASCII C string, raising an error if there’s a failure
The read_gz_file() will open a gzipped file, read its contents, and return them as a string.
str is Rust’s stack-allocated UTF-8 string type. A String is a heap-allocated UTF-8 string, based on Vec.
A &str is a string slice, which can be borrowed from both a String and &'static str.
Vec is a heap-allocated, resizable sequence of values, allocated in a contiguous region of memory. In most cases, you should use a Vec when modeling a sequence of values.
HashMap is Rust’s standard hash map container type, which is suitable for most uses requiring constant-time lookups from a key.
Rust also has VecDeque, LinkedList, BTreeMap, HashSet, BTreeSet, and BinaryHeap within its collections library.
Structs are composable containers and Rust’s primary building block. They are used to store state and implement methods that operate on that state.
Enums are a special variant type in Rust, and they can emulate the behavior of enum from languages like C, C++, C#, and Java.
Implementations of many standard traits can be derived using the #[derive] attribute. If needed, you can manually implement these traits, but most of the time, the automatically derived implementations are sufficient.