Mastery of any language depends on mastering its tooling. In this chapter, we’ll explore some of the critical tools you need to be effective with Rust.
Rust offers several tools to improve productivity and reduce the amount of busy work required to produce high-quality software. Rust’s compiler, rustc, is built upon LLVM, so Rust inherits the rich tools included with LLVM, such as LLVM’s debugger, LLDB. In addition to the tools you would expect to find from other languages, Rust includes a number of its own Rust-specific tools, which are discussed in this chapter.
The main tools discussed in this chapter are rust-analyzer, rustfmt, Clippy, and sccache. These are tools you’ll likely use every time you work with Rust. Additionally, I have included instructions for a few other tools, which you may find yourself using occasionally: cargo-update, cargo-expand, cargo-fuzz, cargo-watch, and cargo-tree.
In chapter 2, we focused on working with Cargo, which is Rust’s project management tool. Additionally, there are several tools you may want to use when working with Rust. Unlike Cargo, these tools are optional and can be used at your own discretion. However, I find them to be extremely valuable, and I use them on nearly all of my Rust projects. Projects may require some of these tools, so it’s worthwhile to familiarize yourself with them.
The tools discussed in this chapter are normally used via a text editor, or as command-line tools. In table 3.1, I’ve listed a summary of the core Rust language tools, and in table 3.2, I’ve summarized a few popular editors and their support for Rust.
Table 3.1 Summary of Rust’s core language tools
Table 3.2 Summary of Rust editors
The rust-analyzer tool is the most mature and full-featured editor for the Rust language. It can be integrated with any editor that implements the Language Server Protocol (LSP, https://microsoft.github.io/language-server-protocol). The following are some of the features provided by rust-analyzer:
With VS (Visual Studio) Code, rust-analyzer can be installed using the CLI (see figure 3.1):
$ code --install-extension rust-lang.rust-analyzer
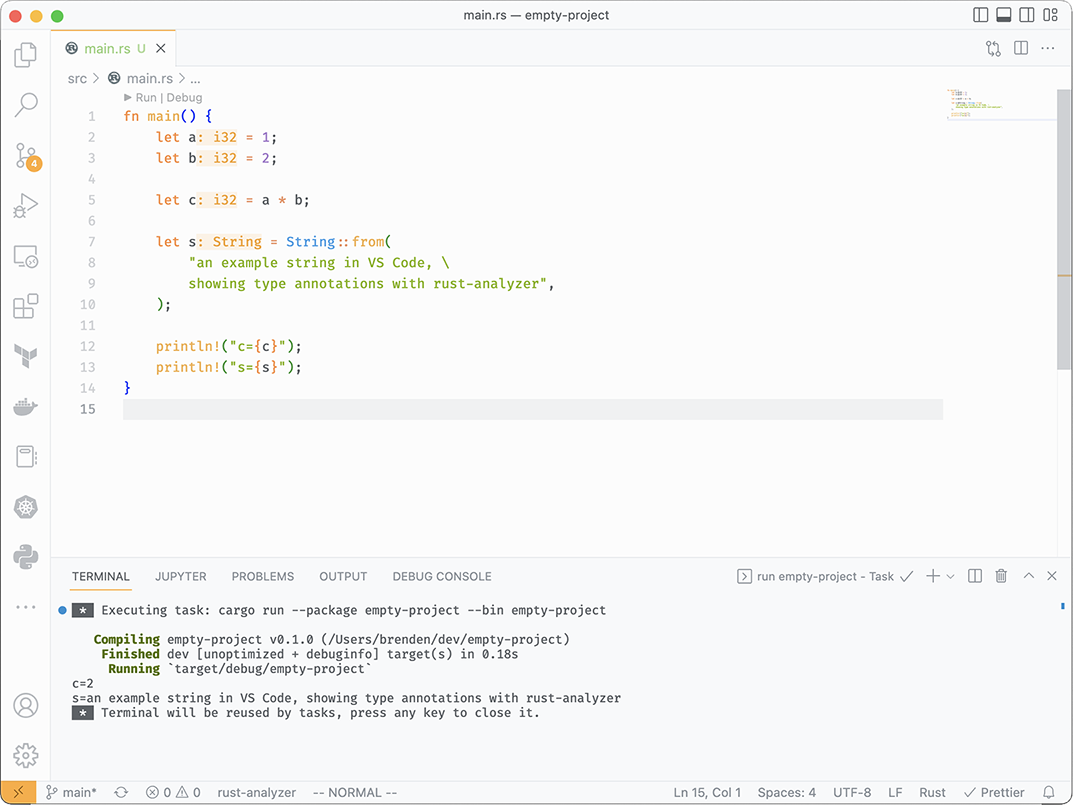
Figure 3.1 VS Code with rust-analyzer showing inferred type annotations
Once installed, VS Code will look as shown in figure 3.1 when working with Rust code. Note the Run | Debug buttons at the top of fn main(), which allow you to run or debug code with one click.
If you use IntelliJ Rust, there is no need to install a separate extension for Rust support. However, it’s worth noting that IntelliJ Rust shares some code with rust-analyzer, specifically for its macro support (http://mng.bz/wjAP).
Rust-analyzer has a postfix text completion feature that provides quick completions for common tasks, such as debug printing or string formatting. Becoming familiar with magic completions can save you a lot of repetitive typing. Additionally, you only need to remember the completion expressions rather than memorizing syntax. I recommend practicing magic completions, as you’ll find yourself using them frequently once you get the hang of the syntax.
Magic completions are similar to snippets (a feature of VS Code and other editors) but with a few Rust-specific features that make them a bit like “snippets++.” Magic completions also work in any editor that supports the language server protocol, not just VS Code.
Using magic completions is as simple as typing an expression and using the editor’s completion dropdown menu. For example, to create a test module in the current source file, you can type tmod and select the first completion result, which will create a test module template like so:
tmod ->
#[cfg(test)]
mod tests {
    use super::*;

    #[test]
    fn test_name() {

    }
}
The tmod completion creates a test module with a single test function, which can be filled out accordingly. In addition to tmod, there’s a tfn completion, which creates a test function.
Another useful magic completion is for string printing. Rust versions prior to 1.58.0 did not support string interpolation. To help with the lack of string interpolation, rust-analyzer provides several completions for printing, logging, and formatting strings.
Note While string interpolation was added in Rust 1.58.0, this section has been left in the book because it provides a good demonstration of the features of rust-analyzer.
Type the following into your editor:
let bananas = 5.0;
let apes = 2.0;

"bananas={bananas} apes={apes} bananas_per_ape={bananas / apes}"
At this point, placing the cursor at the end of the string quote and typing .print will convert the string to the println completion option, as shown in figure 3.2.
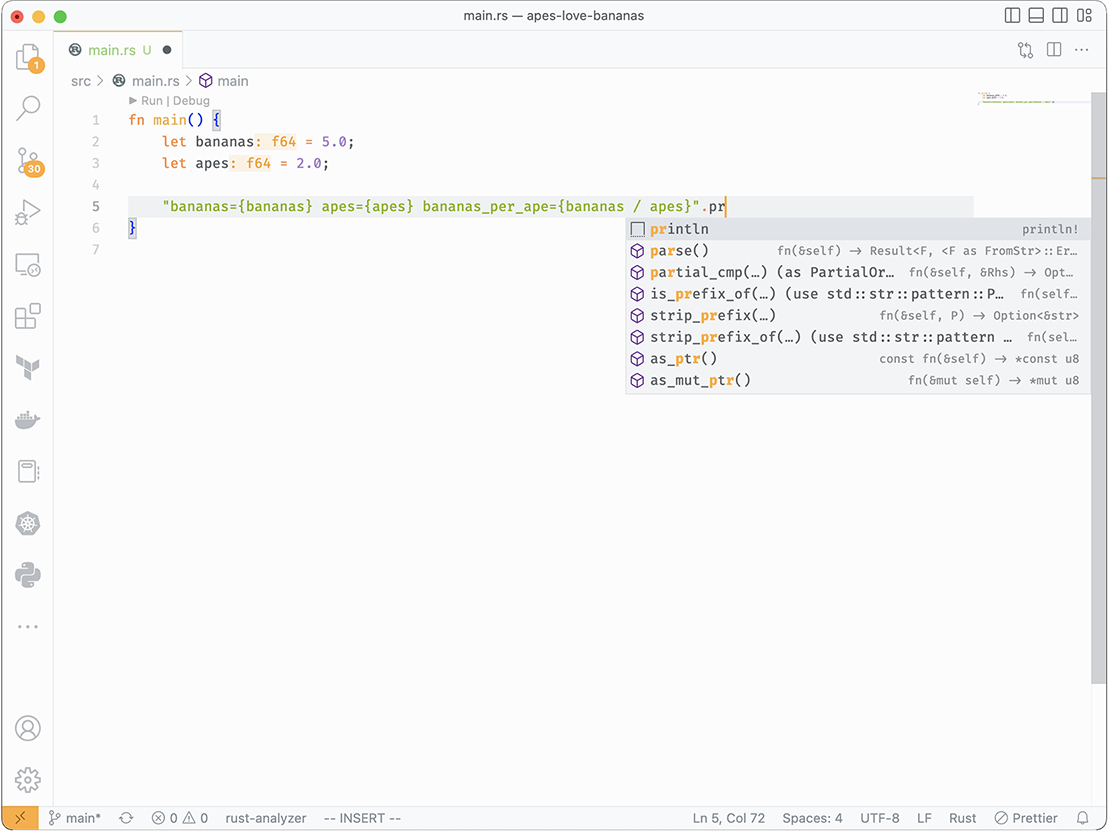
Figure 3.2 VS Code with rust-analyzer showing println magic completion
If you select the println option by pressing the Enter key once, the option is selected from the drop-down menu that appears, and then rust-analyzer converts the code into the following:
let bananas = 5.0;
let apes = 2.0;

println!(
    "bananas={} apes={} bananas_per_ape={}",
    bananas,
    apes,
    bananas / apes
)
Table 3.3 contains several important magic completions to take note of. The list is not exhaustive, and the full list of magic completions and other features of rust-analyzer is available in the manual at https://rust-analyzer.github.io/manual.html.
Table 3.3 Magic completions to remember
|
|
||
|
Converts an expression to an if statement, which is especially useful with |
Source code formatting can be a source of frustration, especially in a Rust project with multiple developers. For single-contributor projects, it’s not such a big deal, but once you have more than one contributor, there can be a divergence in coding style. Rustfmt is Rust’s answer to coding style, providing an idiomatic, automatic, and opinionated styling tool. It’s similar in nature to gofmt if you’re coming from Golang or an equivalent formatting tool of other languages. The idea of opinionated formatting is relatively new, and—in my humble opinion—it is a wonderful addition to modern programming languages.
Example output from running cargo fmt----check -v is shown in figure 3.3, which enables verbose mode and check mode. Passing --check will cause the command to return nonzero if the formatting is not as expected, which is useful for checking the code format on continuous integration systems.
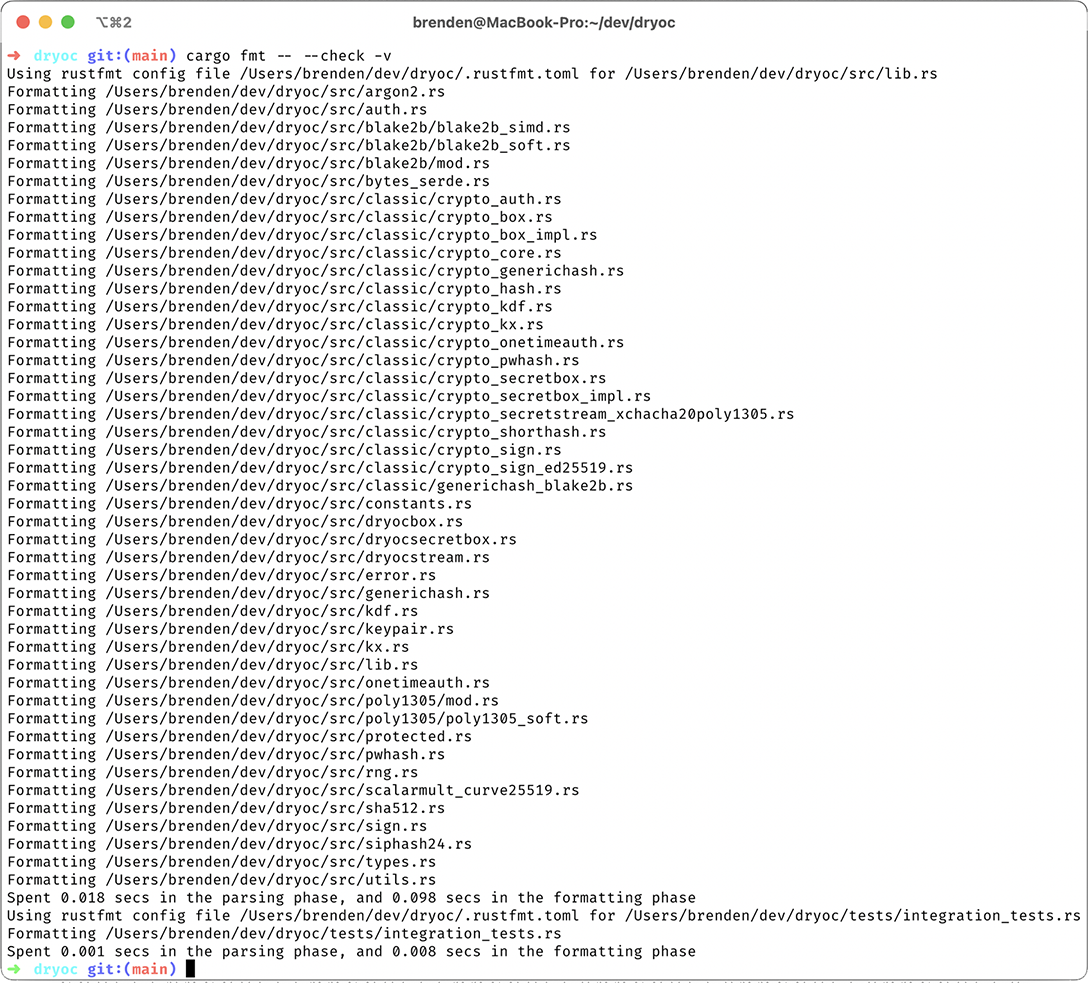
Figure 3.3 Rustfmt in action on the dryoc crate
I can’t count the number of hours of my life I’ve lost debating code formatting on pull requests. This problem can be solved instantly by using rustfmt and simply mandating code contributions follow the defined style. Rather than publishing and maintaining lengthy style guideline documents, you can use rustfmt and save everyone a lot of time.
Rustfmt is installed as a rustup component:
$ rustup component add rustfmt
...
Once installed, it can be used by running Cargo:
$ cargo fmt
# Rustfmt will now have formatted your code in-place
While the default rustfmt configuration is adequate for most people, you may want to tweak settings slightly to suit your preferences. This can be done by adding a .rustfmt .toml configuration file to your project’s source tree.
Listing 3.1 Example .rustfmt.toml configuration
format_code_in_doc_comments = true
group_imports = "StdExternalCrate"
imports_granularity = "Module"
unstable_features = true
version = "Two"
wrap_comments = true
I’ve listed a few rustfmt options in table 3.4, which illustrates some of the configurations permitted.
Table 3.4 Partial listing of rustfmt options
|
Enables nightly-only features (unavailable on the stable channel) |
|||
|
Selects the rustfmt version to use. Some rustfmt features are only available in version 2. |
At the time of writing, some notable rustfmt options are nightly-only features. An up-to-date listing of the available style options can be found on the rustfmt website at https://rust-lang.github.io/rustfmt/.
Tip If you’re coming from the C or C++ world and want to apply the same opinionated formatting pattern there, be sure to check out the clang-format tool as part of LLVM.
Clippy is Rust’s code quality tool, which provides more than 450 checks at the time of writing. If you’ve ever been frustrated by a colleague who likes to chime in on your code reviews and point out minor syntax, formatting, and other stylistic improvements, then Clippy is for you. Clippy can do the same job as your colleague but without any snark, and it will even give you the code change, in many cases.
Clippy can often find real problems in your code. However, the real benefit of Clippy is that it obviates the need for arguing over code style problems because it enforces idiomatic style and patterns for Rust. Clippy is related to, but a little more advanced than, rustfmt, which is discussed in the previous section.
Clippy is distributed as a rustup component; thus, it’s installed as follows:
$ rustup component add clippy
...
Once installed, you can run Clippy on any Rust project using Cargo:
$ cargo clippy
...
When run, Clippy will produce output that looks similar to the rustc compiler output, as shown in figure 3.4.
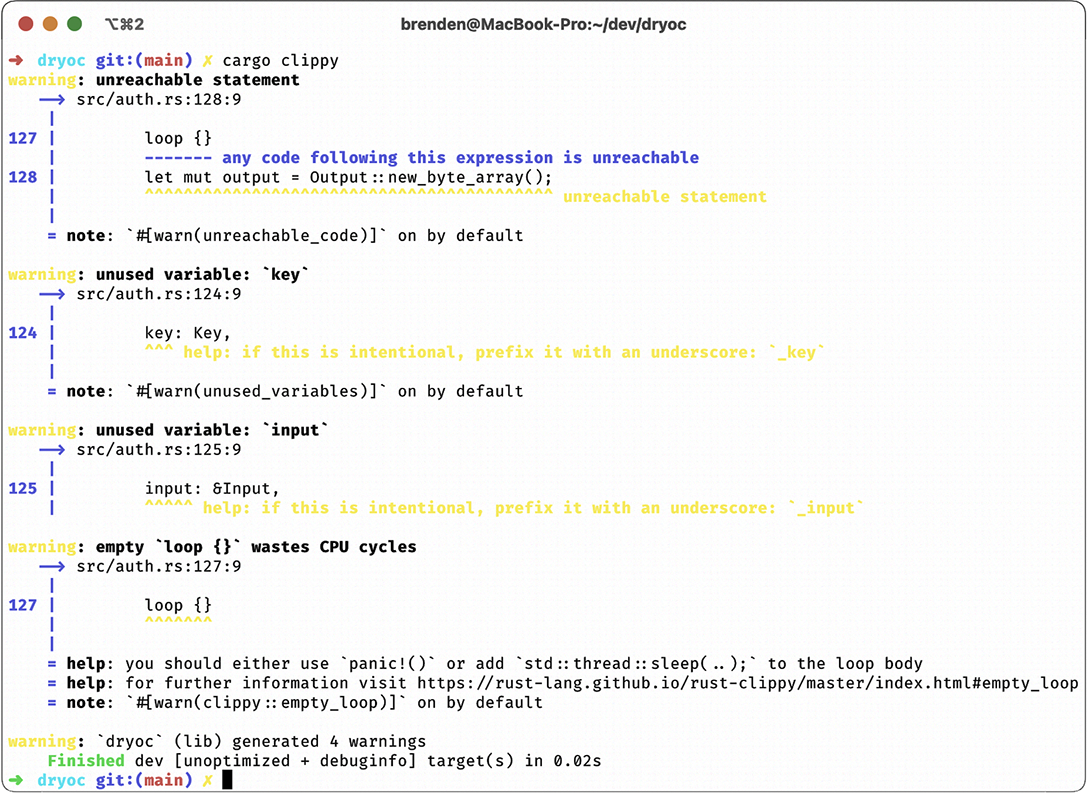
Figure 3.4 Clippy in action on the dryoc crate, with an intentional error added
With more than 450 code quality checks (known as lints), one could write an entire book about Clippy. Lints are categorized by their severity level (allow, warn, deny, and deprecated) and grouped according to their type, which can be one of the following: correctness, restriction, style, deprecated, pedantic, complexity, perf, cargo, and nursery.
One such lint is the blacklisted_name lint, which disallows the use of variable names such as foo, bar, or quux. The lint can be configured to include a custom list of variable names you wish to disallow.
Another example of a lint is the bool_comparison lint, which checks for unnecessary comparisons between expressions and Booleans. For example, the following code is considered invalid:
if function_returning_boolean() == true {} ❶
On the other hand, the following code is valid:
if function_returning_boolean() {} ❶
❶ The == true is not necessary.
Most of Clippy’s lints are style related, but it can also help find performance bugs. For example, the redundant_clone lint can find situations where a variable is unnecessarily cloned. Typically, this case looks something like this:
let my_string = String::new("my string");
println!("my_string=‘{}’", my_string.clone());
In the preceding code, the call to clone() is entirely unnecessary. If you run Clippy with this code, you’ll get the following warning:
$ cargo clippy
warning: redundant clone
 --> src/main.rs:3:37
  |
3 | println!("my_string=‘{}’", my_string.clone());
  |                                     ^^^^^^^^ help: remove this
  |
  = note: `#[warn(clippy::redundant_clone)]` on by default
note: this value is dropped without further use
 --> src/main.rs:3:28
  |
3 | println!("my_string=‘{}’", my_string.clone());
  |                            ^^^^^^^^^
  = help: for further information visit
  https://rust-lang.github.io/rust-clippy/master/index.html#redundant_clone

warning: 1 warning emitted
Clippy is frequently updated, and an up-to-date list of the lints for stable Rust can be found in the Clippy documentation at http://mng.bz/qjAr.
Clippy can be configured either by adding a .clippy.toml file to the project source tree or placing attributes within your Rust source files. In most cases, you’ll want to use attributes to disable Clippy lints on an as-needed basis. There are many cases in which Clippy may generate a warning but the code is as intended.
Notably, some complexity warnings from Clippy may need to be tweaked or disabled when there’s no better alternative. For example, the too_many_arguments warning will trigger when you have a function with more than the default limit of seven arguments. You could increase the default value or simply disable it for the specific function:
#[allow(clippy::too_many_arguments)]
fn function(
  a: i32, b: i32, c: i32, d: i32, e: i32, f: i32, g: i32, h: i32
) {
  // ...   ❶
}
The allow() attribute in the preceding code is specific to Clippy and instructs it to allow an exception for the too_many_arguments lint on the next line of code.
Alternatively, to change the argument threshold for the entire project, you could add the following into your .clippy.toml:
too-many-arguments-threshold = 10 ❶
❶ Sets the argument threshold to 10, up from the default of 7
The .clippy.toml file is a normal TOML file, which should contain a list of name = value pairs, according to your preferences. Each lint and its corresponding configuration parameters are described in detail in the Clippy documentation at https://rust-lang .github.io/rust-clippy/stable/index.html.
Clippy can, in some cases, automatically fix code. In particular, when Clippy is able to provide a precise suggestion for you to fix the code, it can generally apply the fix automatically as well. To fix the code automatically, run Clippy with the --fix flag:
$ cargo clippy --fix -Z unstable-options
...
Note that we pass the -Z unstable-options option as well because at the time of writing, the --fix feature is nightly only.
I recommend enabling Clippy as part of your CI/CD system, provided you have one. You would typically run Clippy as a step after build, test, and format. Additionally, you may want to instruct Clippy to fail on warnings, run for all features, as well as check tests:
$ cargo clippy                                                ❶
...
$ cargo clippy -- -D warnings                                 ❷
...
$ cargo clippy --all-targets --all-features -- -D warnings    ❸
...
❶ This command runs Clippy with the default settings.
❷ This command runs Clippy, but instructs it to fail on warnings (rather than allowing warnings).
❸ This command runs Clippy, fails on warnings, enables all crate features, and also checks tests (by default, Clippy ignores tests).
If you maintain an open source project, enabling Clippy as part of the CI/CD checks will make it easier for others to contribute high-quality code to your project, and it also makes it easier to confidently maintain the code and accept code changes.
Listing 3.2 Brief example using Clippy with GitHub Actions
on: [push]

name: CI

jobs:
  clippy:
    name: Rust project
    runs-on: ubuntu-latest
    steps:
      - uses: actions/checkout@v2
      - name: Install Rust toolchain with Clippy
        uses: actions-rs/toolchain@v1
        with:
          toolchain: stable
          components: clippy
      - name: Run Clippy
        uses: actions-rs/cargo@v1
        with:
          command: clippy
          args: --all-targets --all-features -- -D warnings
Chapter 2 contains a full example of using Clippy and rustfmt together with GitHub’s Actions CI/CD system.
The sccache tool is a general-purpose compiler cache that can be used with Rust projects. Rust compile times can grow significantly for large projects, and sccache helps reduce compile times by caching unchanged objects produced by the compiler. The sccache project was created by the nonprofit organization Mozilla specifically to help with Rust compilation, but it’s generic enough to be used with most compilers. It was inspired by the ccache tool, which you may have encountered from the C or C++ world.
Even if your project is not large, installing sccache and using it locally can save you a lot of time recompiling code. To illustrate, compiling the dryoc crate from a clean project takes 8.891 seconds on my computer, normally. On the other hand, compiling from a clean project with sccache enabled takes 5.839 seconds. That’s 52% more time to compile a relatively small project without sccache versus with it! That time accumulates and can become significant for larger projects.
Note that sccache only helps in cases in which code has been previously compiled. It will not speed up fresh builds.
Sccache is written in Rust and can be installed using Cargo:
$ cargo install sccache
Once installed, sccache is enabled by using it as a rustc wrapper with Cargo. Cargo accepts the RUSTC_WRAPPER argument as an environment variable. You can compile and build any Rust project using sccache by exporting the wrapper environment variable as follows:
$ export RUSTC_WRAPPER=`which sccache`   ❶
$ cargo build
...
❶ The which sccache command returns the path of sccache, assuming it’s available in $PATH.
If you’ve previously used ccache, then sccache will be familiar to you. Sccache has some noteworthy features that ccache lacks: it can be used directly with a number of networked storage backends, which makes it ideally suited for use with CI/CD systems. It supports the vendor-neutral S3 protocol, a couple of vendor storage services, as well as the open source Redis and Memcached protocols.
To configure sccache, you can specify environment variables, but it can also be configured through platform-dependent configuration files. By default, sccache uses up to 10 GiB of local storage. To configure sccache to use the Redis backend, you can set the address for Redis as an environment variable:
$ export SCCACHE_REDIS=redis://10.10.10.10/sccache ❶
❶ Assuming a Redis instance running on the default port at 10.10.10.10, with a database named sccache.
For details on sccache configuration and usage, consult the official project documentation at https://github.com/mozilla/sccache.
This is a topic I won’t cover in detail, but it’s worth mentioning some features for working with Rust in text editors. These days, I prefer to use VS Code, but it is possible to use tools like rust-analyzer, Clippy, rustfmt, and more with any editor.
For rust-analyzer, there are installation instructions provided in the rust-analyzer manual to integrate with Vim, Sublime, Eclipse, Emacs, and others. Rust-analyzer should work with any editor that supports the Language Server API, which includes many popular editors in addition to those mentioned here.
In the case of VS Code, using rust-analyzer is as simple as installing the extension. From the command line, you need to first make sure you have the rust-src component installed, which you can do with rustup:
$ rustup component add rust-src
Next, install the VS Code extension from the command line:
$ code --install-extension matklad.rust-analyzer
Using the extension in VS Code is as simple as opening any Rust project in VS Code. It will automatically recognize the Cargo.toml file in your project directory and load the project.
Tip You can open VS Code directly from any project directory using the command line by running code ., where . is shorthand for the current working directory.
You may start out using Rust on the stable toolchain and slowly find yourself discovering features you want to use but cannot because they aren’t available in the stable channel. Those features, however, are available in the nightly channel. This is a common problem in Rust and something many have balked at. In fact, a number of popular crates are nightly-only crates. That is, they can only be used with the nightly channel.
There are, in a sense, two Rusts: stable Rust and nightly Rust. This may sound confusing or cumbersome, but in practice, it’s not so bad. In most cases, you should be fine using stable, but in some cases, you’ll want to use nightly. If you’re publishing public crates, you may find that you have certain features behind a nightly feature flag, which is a common pattern.
You may eventually find yourself asking this: Why not just use nightly exclusively to get all the benefits of Rust? Practically speaking, this isn’t such a bad idea. The only caveat is the case where you want to publish crates for others to use, and your potential customers are only able to use stable Rust. In that case, it makes sense to try and maintain stable support, with nightly features behind a feature flag.
You may need to use nightly-only features, and to do so, you must tell rustc which features you want to use. For example, to enable the allocator_api, a feature available only in nightly Rust at the time of writing, you need to enable the allocator_api.
Listing 3.3 Code for lib.rs from dryoc
#![cfg_attr(
    any(feature = "nightly", all(feature = "nightly", doc)),    ❶
    feature(allocator_api, doc_cfg)                             ❷
)]
❶ any() returns true if any of the predicates are true, and all() returns true if all predicates are true. The doc attribute is set automatically whenever the code is being analyzed with rustdoc.
❷ If the predicate evaluates to true, the allocator_api and doc_cfg features are enabled.
In the preceding code listing, I’ve enabled two nightly-only features: allocator_api and doc_cfg. One feature provides custom memory allocation in Rust, and the other enables the doc compiler attribute, which allows one to configure rustdoc from within the code.
Tip Rust’s built-in attributes are documented at https://doc.rust-lang.org/reference/attributes.html. The any() and all() predicates are specific to cfg and cfg_attr, which are the conditional compilation attributes. These are documented at http://mng.bz/7vRv.
Also note that in listing 3.3, we’re using a feature flag, which means we need to build this crate with the nightly feature enabled. At the moment, there isn’t a way to detect which channel your code is being compiled with, so we have to specify feature flags instead.
In the dryoc crate, I use this pattern to provide a protected memory feature. Protected memory, in the case of the dryoc crate, is a feature whereby data structures that use a custom allocator (which is a nightly-only API in Rust, at the time of writing) to implement memory locking and protection. The feature gating within the crate is shown in the following listing.
Listing 3.4 Code from src/lib.rs
#[cfg(any(feature = "nightly", all(doc, not(doctest))))]
#[cfg_attr(all(feature = "nightly", doc), doc(cfg(feature = "nightly")))]
#[macro_use]
pub mod protected;
There are a few things going on in this code, which I’ll explain. First, you’ll notice the doc and doctest keywords. Those are included because I want to make sure the protected module is included when building the documentation but not when running the doctests if feature = "nightly" isn’t enabled (i.e., testing the code samples within the crate documentation). The first line translates to the following: enable the next block of code (which is pub mod protected) only if feature = "nightly" is enabled or doc is enabled and we’re not running the doctests. doc and doctests are special attributes that are enabled only while running either cargo doc or cargo test.
The second line enables a rustdoc-specific attribute that tells rustdoc to mark all the content within the module as feature = "nightly". In other words, if you look at the docs for the dryoc crate at http://mng.bz/mjAa, you will see a note that says the following:
Available on crate feature nightly only.
For details about the allocator API feature in Rust, refer to the GitHub tracking issue at https://github.com/rust-lang/rust/issues/32838. For details about the doc attribute feature, refer to the GitHub tracking issue at https://github.com/rust-lang/rust/issues/43781.
There are a few more Cargo tools worth mentioning, which I will summarize in the following subsections. Each of them is supplemental to the tools already discussed, and they may be mentioned elsewhere in the book.
Packages installed with Cargo may need to be updated occasionally, and cargo-update provides a way to keep them up to date. This is different from project dependencies, which are updated with the cargo update command. The cargo-update crate is for managing Cargo’s own dependencies, separately from a project.
Run the following to install cargo-update:
$ cargo install cargo-update
Do the following using cargo-update:
$ cargo help install-update     ❶
...
$ cargo install-update -a       ❷
...
❷ Updates all installed packages.
At some point, you may encounter macros you need to debug in other crates, or you may need to implement your own macro. rustc provides a way to generate the resulting source code with the macro applied, and cargo-expand is a wrapper around that feature.
Run the following to install cargo-expand:
$ cargo install cargo-expand
Using cargo-expand, from a project you’re working on, do the following:
$ cargo help expand                  ❶
...
$ cargo expand outermod::innermod    ❷
...
❷ Shows the expanded form of "outermod::innermod"
For a simple "Hello, world!" Rust project, the output of cargo expand would look like this:
#![feature(prelude_import)]
#[prelude_import]
use std::prelude::rust_2018::*;
#[macro_use]
extern crate std;
fn main() {
    {
        ::std::io::_print(::core::fmt::Arguments::new_v1(
            &["Hello, world!\n"],
            &match () {
                () => [],
            },
        ));
    };
}
You can run cargo-expand for an entire project or filter by item name, as shown in the preceding example. It’s worth experimenting with cargo-expand to see how other code looks once its macros are expanded. For any moderately large project, the expanded code can become very large, so I recommend filtering by specific functions or modules. I have found cargo-expand especially useful when using libraries with macros, as it helps me understand what’s happening in other people’s code.
Fuzz testing is one strategy for finding unexpected bugs, and cargo-fuzz provides fuzzing support based on LLVM’s libFuzzer (https://llvm.org/docs/LibFuzzer.html). Do the following to install cargo-fuzz:
$ cargo install cargo-fuzz
Using cargo-fuzz from a project you’re working on, run the following:
$ cargo help fuzz    ❶
 ...
Using cargo-fuzz requires creating tests using the libFuzzer API. This can be accomplished with the cargo-fuzz tool by running the cargo fuzz add command, followed by the name of the test. For example, run the following to create a boilerplate test (with cargo-fuzz):
$ cargo fuzz new myfuzztest   ❶
 $ cargo fuzz run myfuzztest  ❷
❶ Creates a new fuzz test called myfuzztest
❷ Runs the newly created test, which may take a long time
The resulting test (created by cargo-fuzz in fuzz/fuzz_targets/myfuzztest.rs) looks like so:
#![no_main]
use libfuzzer_sys::fuzz_target;

fuzz_target!(|data: &[u8]| {
    // ...                    ❶
});
Fuzz testing is covered in greater detail in chapter 7. If you’re already familiar with libFuzzer or fuzz testing in general, you should have no trouble getting up to speed on your own with cargo-fuzz.
Cargo-watch is a tool that continuously watches your project’s source tree for changes and executes a command when the there’s a change. Common use cases for cargo-watch are automatically running tests, generating documentation with rustdoc, or simply recompiling your project.
To install cargo-watch, run the following:
$ cargo install cargo-watch
Using cargo-watch from a project you’re working on, run the following:
$ cargo help watch        ❶
...
$ cargo watch             ❷
$ cargo watch -x doc      ❸
❷ Runs cargo check continuously.
❸ Continuously rebuilds documentation on changes.
As projects grow in complexity, you may find yourself perplexed by dependencies, either because there are too many, there are conflicts, or there is some other combination thereof. One tool that’s useful for figuring out where dependencies come from is cargo-tree.
To install cargo-tree, run the following:
$ cargo install cargo-tree
Using cargo-tree from a project you’re working on, do the following:
$ cargo help tree   ❶
 ...
As an example, if I run cargo-tree on the dryoc crate, I will see the dependency tree, as shown in the following listing.
Listing 3.5 Partial output of cargo-tree for dryoc crate
$ cargo tree
dryoc v0.3.9 (/Users/brenden/dev/dryoc)
├── bitflags v1.2.1
├── chacha20 v0.6.0
│   ├── cipher v0.2.5
│   │   └── generic-array v0.14.4
│   │       └── typenum v1.12.0
│   │       [build-dependencies]
│   │       └── version_check v0.9.2
│   └── rand_core v0.5.1
│       └── getrandom v0.1.16
│           ├── cfg-if v1.0.0
│           └── libc v0.2.88
├── curve25519-dalek v3.0.2
│   ├── byteorder v1.3.4
│   ├── digest v0.9.0
│   │   └── generic-array v0.14.4 (*)
│   ├── rand_core v0.5.1 (*)
│   ├── subtle v2.4.0
│   └── zeroize v1.2.0
│       └── zeroize_derive v1.0.1 (proc-macro)
│           ├── proc-macro2 v1.0.26
│           │   └── unicode-xid v0.2.1
│           ├── quote v1.0.9
│           │   └── proc-macro2 v1.0.26 (*)
│           ├── syn v1.0.68
│           │   ├── proc-macro2 v1.0.26 (*)
│           │   ├── quote v1.0.9 (*)
│           │   └── unicode-xid v0.2.1
│           └── synstructure v0.12.4
│               ├── proc-macro2 v1.0.26 (*)
│               ├── quote v1.0.9 (*)
│               ├── syn v1.0.68 (*)
│               └── unicode-xid v0.2.1
... snip ...
We can see the preceding hierarchy of regular and dev-only dependencies for the crate. Packages marked with (*) are shown with duplicates removed.
Many popular editors include Rust support, either via the Language Server Protocol (LSP) or native extensions.
Rust-analyzer is the canonical Rust language IDE tool, and it can be used with any editor that provides support for LSP.
Using rustfmt and Clippy can boost productivity and improve code quality.
There are cases when you may want to use nightly-only features in published crates. When doing so, you should place these features behind a feature flag to support stable users.
cargo-expand lets you expand macros to see the resulting code.
cargo-fuzz let’s you easily integrate with libFuzzer for fuzz testing.
cargo-watch automates rerunning Cargo commands on code changes.
cargo-tree allows you to visualize project dependency trees.