Microservice architecture encourages you to write minimal services that can be easily tested as a unit. For example, while testing the Order service, the only context you need to focus on is Order. To test the Order service, you have two high-level alternatives: manual testing and automated testing.
With manual testing, you must run actual and dependent services to test the entire flow. This can be a time-consuming operation compared to testing backed by a machine. This inefficient testing methodology will also slow down your software delivery. However, with automated testing, you can get fast feedback from your implementation because you don’t need to wait until you finish and test the entire system.
We will look at different testing strategies in this chapter, but first let’s look at the relations between them and their possible advantages and disadvantages.
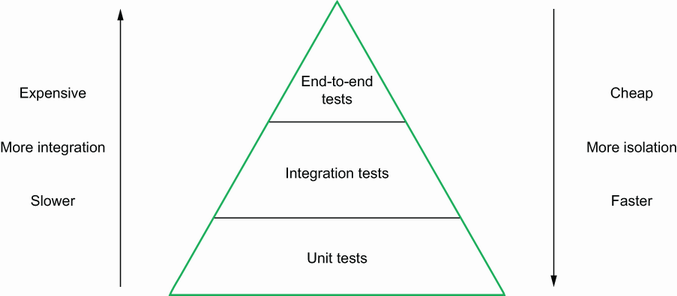
The testing pyramid organizes software tests into three categories based on their context and provides insight into the percentage of tests for each category:
Unit tests—Type of software test in which specific units of software are tested
Integration tests—Type of software test in which the integration of multiple modules is tested
End-to-end tests—Type of software test in which the entire behavior of the application is tested
The unit test category is at the bottom of the pyramid, the integration test is in the middle, and the end-to-end test is at the top (figure 7.1).
As you can see, in a typical application, the percentage of unit tests is greater than that for integration tests, which is greater than the percentage for end-to-end tests. There are possible reasons/outputs for that percentage; let’s analyze them individually.
Unit tests are designed to test one component at a time, with maximum isolation. While testing a component (SUT), you should mock the other dependencies. Isolation levels get lower once you move up on the pyramid because you start to involve more components in the test suite that might break the isolation.
In a unit test, you probably have a test runner, enough to test the core features and mock the dependencies. Once you move to the integration test, you need third-party tools to maintain dependencies, such as having test containers for a DB connection. Once you start to use third parties, test execution will slow down to wait for all the dependent components.
Going from a unit test to an end-to-end test has cost increases because more components mean more resource consumption, and thus more money. The unit test has the greatest percentage of the pyramid because it is fast and cheap. In the same way, the end-to-end test has the lowest percentage of the pyramid because it is expensive and slow to run. This does not mean you need to write a unit test but not an end-to-end test. It does mean you should arrange the percentage of test types as stated in the test pyramid. Now that we can see the relations between testing strategies, let’s look at how those strategies are used to verify the microservice application behavior.
Automated testing gives faster feedback, and thus saves on time and cost. Unit tests are good for verifying one basic operation unit at a time, but is that enough to verify your implementation? We will see different testing strategies, such as integration and end-to-end tests, but let’s look at a SUT first.
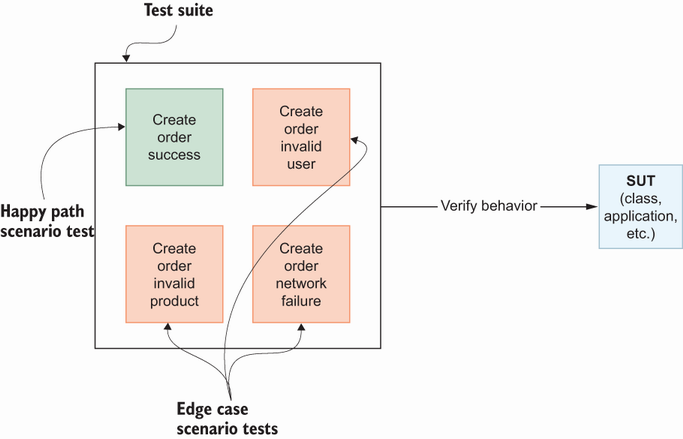
The SUT test contains inputs, execution conditions, and expected results to verify its behavior within a codebase. A SUT means a software element is being tested. Based on your testing strategy, a SUT can be a class or an entire application. This test is important if you are testing a specific layer in hexagonal architecture because you need to know what to test in that layer. It becomes a test suite if you group related tests to verify the behavior of a SUT. In figure 7.2, one happy path and three edge case tests form a test suite to verify different kinds of SUT behavior.
Before diving into the internals of testing frameworks and writing actual Go code, let’s start with the phases of an automated test:
Setup—In this phase, we prepare the dependencies of a SUT and initialize a SUT with them. This can also involve initializing third-party dependencies, such as a MySQL database.
Invoke the SUT—If we are testing a class, in this phase, we might call a function from that class.
Verify—Verify the actual result with the expected result by using assertions.
Teardown—Clean up resources that are no longer needed. For example, we could destroy the MySQL database once we are done with it.
You may not need setup and teardown phases for some tests, which contain very simple logic. For example, to test the following Fibonacci behavior from the math class, you can call the SUT, Fibonacci(), and compare the actual result with the expected result:
// math.go
package math

func Fibonacci(n int) int {   ❶
    if n <= 1 {
        return n
    }
    return Fibonacci(n-1) + Fibonacci(n-2)
}
❶ Returns a value at the nth position
To implement test cases for the Fibonacci function, you can create another file with the _test.go suffix and execute it via the go test command:
// math_test.go
package math

import (
    "testing"

    "github.com/stretchr/testify/assert"   ❶
)

func TestFibonacci(t *testing.T) {
    actual := Fibonacci(3)
    expected := 2
    assert.Equal(t, actual, expected)
}
Go has built-in libraries for testing, but you may want to use other third-party libraries for better test suite management. In this example, we use a third-party library, testify (https://github.com/stretchr/testify), a unit testing assertion library, to verify the behavior of SUTs. Since the Fibonacci function does not depend on other systems, we ignore the setup and teardown phases, even though this is not typical in microservices architecture. For example, the Order service depends on a MySQL database, and to test Order features, you need to prepare dependent systems with one of the following:
Spin up the database via test containers and provide credentials of a created database instance to the Order service to be able to run it and execute tests against it.
Since preparing real dependencies would be inefficient because it will slow down the testing process, in this case it’s better to use mocking to get fast feedback.
Mocking in a test aims to isolate dependent systems’ internals and focus only on a SUT to not only have minimal setup for your test, but to also control the behavior of the dependent system based on your needs. Let’s say that the Order service depends on the Payment service and Order database, and you want to test one of the scenarios for the PlaceOrder functionality in the Order service. If you want to control the behavior of the Order database and Payment service operations, you can mock the Order database and Payment service and then simulate the method calls (figure 7.3).
Whatever you are trying to mock should be an interface. Since we are using hexagonal architecture, and ports in that architecture are interfaces, we can quickly provide a mock without changing the real implementation. Because we already have PaymentPort and DBPort, let’s look at how we can mock them using a mock library (https://pkg.go.dev/github.com/stretchr/testify/mock).
Here is the PlaceOrder implementation from the Order service:
type Application struct {
    db      ports.DBPort
    payment ports.PaymentPort
}
...
func (a *Application) PlaceOrder(order domain.Order) (domain.Order, error) {
    err := a.db.Save(&order)
    if err != nil {
        return domain.Order{}, err
    }
    paymentErr := a.payment.Charge(&order)
    if paymentErr != nil {
        st, _ := status.FromError(paymentErr)
        fieldErr := &errdetails.BadRequest_FieldViolation{
            Field:       "payment",
            Description: st.Message(),
        }
        badReq := &errdetails.BadRequest{}
        badReq.FieldViolations = append(badReq.FieldViolations, fieldErr)
        orderStatus := status.New(codes.InvalidArgument, "order creation
        ➥ failed")
        statusWithDetails, _ := orderStatus.WithDetails(badReq)
        return domain.Order{}, statusWithDetails.Err()
    }
    return order, nil
}
In the Application struct, we can see there are two dependencies we can mock, and in the PlaceOrder function, there is a db call and a payment service call. We also have error cases for both db and payment service calls. If we properly mock payment- and db-related calls, we can easily control the behavior to test branches in the PlaceOrder function.
We can use the following steps to create a mock for any interface:
Create a receiver function for the Save and Get functions that have the same signature as stated in a real interface.
type mockedPayment struct {
    mock.Mock                         ❶
}

func (p *mockedPayment) Charge(order *domain.Order) error {
    args := p.Called(order)           ❷
    return args.Error(0)              ❸
}

type mockedDb struct {
    mock.Mock
}

func (d *mockedDb) Save(order *domain.Order) error {
    args := d.Called(order)
    return args.Error(0)
}

func (d *mockedDb) Get(id string) (domain.Order, error) {
    args := d.Called(id)
    return args.Get(0).(domain.Order), args.Error(1)
}
❶ Embeds to track the activity of the payment
❷ Tracks the function call with arguments
❸ Tracks the function return values
Called() is a method on the mock object we can call directly because it is an anonymous property. (You can see the internals of this usage here: http://mng.bz/5wOq.) Now that we have mock behaviors of the Payment service, let’s add a simple test to verify PlaceOrder behavior on the Order service.
To simplify the test, let’s say that DB- and payment-related calls don’t return an error. In this case, we can verify that application.PlaceOrder does not return an error using an assert library:
func Test_Should_Place_Order(t *testing.T) {
    payment := new(mockedPayment)
    db := new(mockedDb)
    payment.On("Charge", mock.Anything).Return(nil)    ❶
    db.On("Save", mock.Anything).Return(nil)           ❷

    application := NewApplication(db, payment)
    _, err := application.PlaceOrder(domain.Order{
        CustomerID: 123,
        OrderItems: []domain.OrderItem{
            {
                ProductCode: "camera",
                UnitPrice:   12.3,
                Quantity:    3,
            },
        },
        CreatedAt: 0,
    })
    assert.Nil(t, err)                                 ❸

}
❶ There is no error on payment.Charge.
❷ There is no error on db.Save.
We just wrote a unit test for the happy path scenario, but what happens if there is a problem on the db.Save() method? Let’s try to mock an error case to see the behavior change on PlaceOrder:
Since this happens inside the PlaceOrder() function, we need to verify that the return value contains the error message from db.Save().
To test behavior, implement the following test:
func Test_Should_Return_Error_When_Db_Persistence_Fail(t *testing.T) {
    payment := new(mockedPayment)
    db := new(mockedDb)
    payment.On("Charge", mock.Anything).Return(nil)
    db.On("Save", mock.Anything).Return(errors.New("connection error"))   ❶

    application := NewApplication(db, payment)
    _, err := application.PlaceOrder(domain.Order{
        CustomerID: 123,
        OrderItems: []domain.OrderItem{
            {
                ProductCode: "phone",
                UnitPrice:   14.7,
                Quantity:    1,
            },
        },
        CreatedAt: 0,
    })
    assert.EqualError(t, err, "connection error")                         ❷
}
❶ db.Save() returns a connection error.
❷ application.PlaceOrder() should contain a connection error.
There could be an error on the payment.Charge() call, and solving this would be a bit complex because it contains a validation error message. Since the message comes from the Payment service, we get only the fields we need and return them to the end user. Let’s write a unit test for that flow:
func Test_Should_Return_Error_When_Payment_Fail(t *testing.T) {
    payment := new(mockedPayment)
    db := new(mockedDb)
    payment.On("Charge", mock.Anything).Return(errors.New("insufficient
    ➥ balance"))                                                  ❶
    db.On("Save", mock.Anything).Return(nil)

    application := NewApplication(db, payment)
    _, err := application.PlaceOrder(domain.Order{
        CustomerID: 123,
        OrderItems: []domain.OrderItem{
            {
                ProductCode: "bag",
                UnitPrice:   2.5,
                Quantity:    6,
            },
        },
        CreatedAt: 0,
    })
    st, _ := status.FromError(err)                                 ❷
    assert.Equal(t, st.Message(), "order creation failed")         ❸
    assert.Equal(t,
    ➥ st.Details()[0].(*errdetails.BadRequest).FieldViolations[0]
    ➥ .Description, "insufficient balance")                       ❹
    assert.Equal(t, st.Code(), codes.InvalidArgument)              ❺
}
❷ Converts to status for the better assertion
❸ This comes from the Order service.
❹ Asserts field violations from the Payment service
In this unit test, we expect to see an error after calling PlaceOrder and assert the error message and each validation error. To run tests, you can simply execute the following command:
go test ./..
If you want to see the coverage report in your test results, simply use the following test command:
go test ./... -cover -coverprofile=coverage.out
With -cover parameter, Go generates the coverage, and a report is written to the file coverage.out with a -coverprofile param. You can see the report in the execution output, as shown in figure 7.4.
It seems straightforward to create mocks and control the behavior to test a SUT, but what if you have many interfaces in your project? In the next section, we will see how to generate these mocks automatically with simple automation.
Hexagonal architecture encourages defining your ports as an interface, then implementing the adapters afterward. It is easy to mock interfaces because mocking libraries need exposed functions of an API. If there are lots of interfaces in your project to mock, you can use mockery (https://github.com/vektra/mockery). There are several options with mockery, and in this book, we will use a mockery executable that can be installed via homebrew if you are using macOS. Once you have mockery available in your system, navigate to your service (e.g., the order folder), then execute the following command/:
mockery –-all –-keeptree
You will see autogenerated files, such as *_mock.go, for each interface that contains the mocks. Instead of trying to mock method arguments and return values, mockery does that for us, and we can use those mocks in our unit tests. When they are needed, we can re-create mocks whenever we update an interface or introduce a new one. The flow is the same after generating mocks so that you can control their behavior and test a SUT. Now that we understand how to test individual system modules with unit testing methodology, let’s look at how to test the interaction between two modules to verify behavior.
In integration testing, we aim to test different modules together to verify they work as expected. For example, we have a DB adapter, and we can test if this adapter works well with a running MySQL database. You may ask, “Why do we want to access a real database?” Because we want to verify our codebase still works in case of a change in code or a version change on the DB side. This section will use Testcontainers (https://www.testcontainers.org/) to spin up a MySQL instance and pass the Testcontainers’ URL to a DB adapter. Let’s look at how to structure our test suite and initialize a MySQL instance using Testcontainers.
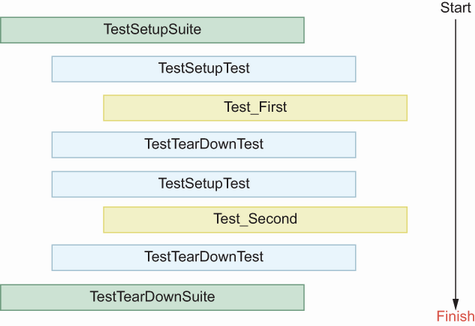
Test suite libraries help you prepare before and after tests and allow you to run your tests with those test preparations. In this book, we use suite (https://github.com/stretchr/testify/tree/master/suite), which comes from testify. You may want to act on the following cases in a test suite:
Before each test—You may want to create a mock before each test instead of manually defining that mock on each test function. We can run an action before each test by adding a method named TestSetupTest to our test suite.
After each test—Let’s say you interact with files and folders on each test and want to delete them to have a new state on the next test. We can activate such an action by implementing TestTearDownSuite.
Before all the tests—We prepare resources for all tests to use because they use a shared resource. For example, we can initialize a database via Testcontainers before running the tests. This action can be activated by implementing TestSetupSuite.
After all the tests—Let’s say you initialized your DB instance and want to destroy it right after you finish all the tests. We can trigger this action by adding a method named TestTearDownSuite.
The flow diagram of test execution is shown in figure 7.5.
To create a test suite, we simply create a struct and embed suite.Suite inside it. Let’s look at how we can create our test suite to prepare the MySQL test container and use it to test the DB adapter.
To use Testcontainers with Go, first, we add the testcontainers-go dependency to the Order service project; then use it in our tests to pull and run the MySQL container:
go get github.com/testcontainers/testcontainers-go
This will add the latest testcontainers-go dependency to the Order service project. In a typical Testcontainer setup, you can see the following events:
A container request with an image, exposed ports, and a liveness probe statement that the Testcontainers library can use to check whether the running container is ready to accept connections
Once the container is up and running, a connection URL to use in our tests
Now you can navigate to the order/internal/adapters folder and create a file named db_integration_test.go. The following struct should be added to the test file to define our test suite context:
type OrderDatabaseTestSuite struct {
    suite.Suite            ❶
    DataSourceUrl string   ❷
}
❷ Datasource URL for each test
Now we are ready to add Testcontainers to initialize a MySQL instance in the Docker container in the TestSetupSuite function, with the receiver type OrderDatabaseTestSuite. This will create a MySQL container, verify it is up and running, then get the available endpoint URL and pass it to the test suite context:
func (o *OrderDatabaseTestSuite) SetupSuite() {                      ❶
    ctx := context.Background()
    port := "3306/tcp"
    dbURL := func(port nat.Port) string {
        return fmt.Sprintf("root:s3cr3t@tcp(localhost:%s)/
        ➥ orders?charset=utf8mb4&parseTime=True&loc=Local",
        ➥ port.Port())                                              ❷
    }
    req := testcontainers.ContainerRequest{
        Image:        "docker.io/mysql:8.0.30",
        ExposedPorts: []string{port},
        Env: map[string]string{
            "MYSQL_ROOT_PASSWORD": "s3cr3t",
            "MYSQL_DATABASE":      "orders",
        },
        WaitingFor: wait.ForSQL(nat.Port(port), "mysql",
        ➥ dbURL).Timeout(time.Second * 30),                         ❸
    }
    mysqlContainer, err := testcontainers.GenericContainer(ctx,
    ➥ testcontainers.GenericContainerRequest{
        ContainerRequest: req,
        Started:          true,
    })
    if err != nil {
        log.Fatal("Failed to start Mysql.", err)
    }
    endpoint, _ := mysqlContainer.Endpoint(ctx, "")
    o.DataSourceUrl =
    ➥ fmt.Sprintf("root:s3cr3t@tcp(%s)/
    ➥ orders?charset=utf8mb4&parseTime=True&loc=Local", endpoint)   ❹
}
❶ Suite setup with receiver function
❷ Used for a health check in the WaitFor field
❸ Verifies DB with the SELECT 1 query
❹ Sets DataSourceUrl to be used on each test
A security note here: we have used a root user in our tests, but it is good practice to use a nonroot user for accessing databases. Let’s implement a test for verifying DB adapter save functionality and see if MySQL is correctly initialized, then assert there is no error in the test after saving. These tests contain a receiver with the type OrderDatabaseTestSuite so that we have direct access to asserting functions. Now we can append db.Save() testing to the db_integrateion_test.go file:
func (o *OrderDatabaseTestSuite) Test_Should_Save_Order() {
    adapter, err := NewAdapter(o.DataSourceUrl)
    o.Nil(err)                                   ❶
    saveErr := adapter.Save(&domain.Order{})     ❷
    o.Nil(saveErr)                               ❸
}
❶ Assertions are available through receiver o.
❸ Asserts there is no error after saving
According to this test, there shouldn’t be an error after order information is saved to the database. Let’s add one more test for the db.Get() function verification; then we will see how to execute all tests in one suite. Create a sample order and save it to the database, then get it to verify if the returned order contains the same customerID we provided the initial order:
func (o *OrderDatabaseTestSuite) Test_Should_Get_Order() {
    adapter, _ := NewAdapter(o.DataSourceUrl)
    order := domain.NewOrder(2, []domain.OrderItem{   ❶
        {
            ProductCode: "CAM",
            Quantity:    5,
            UnitPrice:   1.32,
        },
    })
    adapter.Save(&order)
    ord, _ := adapter.Get(order.ID)                   ❷
    o.Equal(int64(2), ord.CustomerID)                 ❸
}
❷ Retrieves the order by its ID
❸ Equal is accessible via the receiver.
Now that we have added all the tests, let’s add another function responsible for running them, suite.Run(..), with the argument OrderDatabaseTestSuite, which causes all the tests that contain a receiver with this type to run. We can append the following function to our test file as a final step:
func TestOrderDatabaseTestSuite(t *testing.T) {
    suite.Run(t, new(OrderDatabaseTestSuite))   ❶
}
❶ Runs all tests with the OrderDatabaseTestSuite receiver
Now you can navigate to internal/adapters/db and execute the following to run all the tests inside the suite:
go test ./...
This execution will spin up a test container for MySQL, and the tests will run against that database. This verifies that the DB adapter works well with a real MySQL database. We call it an integration test because we verify that the two modules work together. What if we want to test all the components together? Let’s look at how we can verify our application works well with all its dependencies.
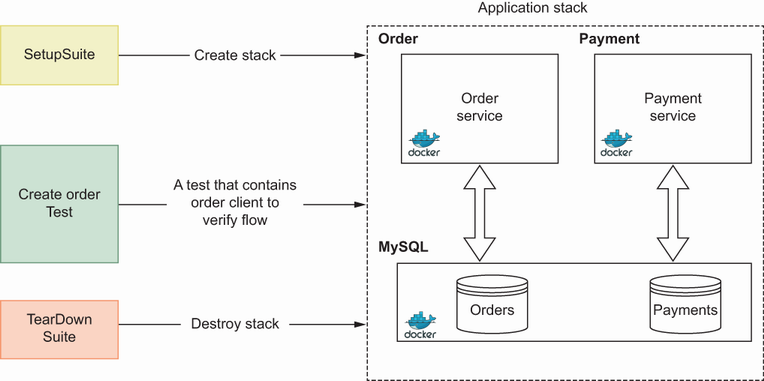
We addressed testing one component with unit tests and integration tests to check consistency between two components, but to say our product is working, we need more than that. Here, we will do an end-to-end test by running the stack that contains the minimum set of required services and verifying a certain flow against this stack. To accomplish this goal, we will run MySQL database, Payment service, and Order service and use the testing techniques we used for previous sections with an order client to test a create order flow. We will create an order and get order details to assert each response field in that suite. Let’s look at high-level information about that setup and dive deep into each section.
Here are the end-to-end test specifications we will use for our tests:
Good news if you already have some experience with Docker (https://www.docker.com/): we will use Docker Compose (https://docs.docker.com/compose/) to build our stack, which helps you to define and run your application stack with multiple containers. We will simply create a YAML file and define our ser-vices there.
We will use the suite package again to run our stack via test containers in the SetupSuite phase and destroy that in the TearDownSuite phase.
We will implement one test case about the create order flow.
To run our services as a Docker container, we need Dockerfile definitions for each service. We will see new terms for building new Docker images while running test containers in this context.
We will use mysql:8 for the database layer in our stack, and we will mount an SQL file to this container to create a payments and an orders database in advance.
Based on these specifications, our test diagram will look like figure 7.6.
Now that we see the big picture, let’s look at what a Docker Compose YAML files looks like.
Docker Compose lets you define service definitions in a YAML file, which contains two major sections: version and services. The version section helps the Docker Compose CLI understand the YAML file’s data structure. The services section defines service dependencies, requirements, and corresponding properties, as follows:
build—This field states the path of the Dockerfile to use during the stack build.
environment—With this field, we can define our environment variables, such as application port. This field accepts a list with key-value pairs.
depends_on—Sometimes, you may need a prerequisite service for your service. To accomplish that, you can use the depends_on field. A service that has depends_on will not be built until the services defined under this field are ready.
ports—This field contains a port list for a specific service to be accessed from outside.
healthcheck—By default, a service is marked ready once the container is started in a stack. However, the application inside this service may not accept the connection. For this reason, you may need to define a health check condition using this field.
volumes—This field mounts a local resource to the container so that your local resource will be available inside the container. We will use this to mount an SQL file to the mysql container so that it will process it at startup.
We will use these fields in this book, but if you are interested in other fields, you can refer to https://docs.docker.com/compose/. Now that we have insight into Docker Compose service fields, let’s look at how to structure our end-to-end test.
To add a separate module to run our end-to-end tests, go to the root folder of our project and create a folder with the name e2e. You can navigate to that folder and initialize a module via the following command:
go mod init github.com/huseyinbabal/microservices/e2e
Do not forget to replace the username and repository in the go.mod file based on your needs. To store our docker-compose.yml and DB migration files, create a resources folder under the e2e folder. Once you add the docker-compose.yml file to the resources folder, we can proceed with the initial service definitions that contain the database layer. Notice that we just created a separate module dedicated to end-to-end tests that contains a Docker Compose file to define the required service layers for our tests. Let’s start with the database layer used by our microservices.
In this layer, we provide a Docker image, mysql:8.0.30, and a password for the root user. We also have an SQL file mounted to this service. As a health check mechanism, we simply ping the MySQL server, which will be retried 20 times maximum, with a 5-second difference on each retry. If the command result provided in the test field returns true, this service will be marked as ready. You can append the following YAML definition to the docker-compose.yml file:
version: "3.9"
services:
  mysql:                                                    ❶
    image: "mysql:8.0.30"
    environment:
      MYSQL_ROOT_PASSWORD: "s3cr3t"
    volumes:
      - "./init.sql:/docker-entrypoint-initdb.d/init.sql"   ❷
    healthcheck:
      test: ["CMD", "mysqladmin" ,"ping", "-h", "localhost", "-uroot", "-
      ➥ ps3cr3t"]
      interval: 5s
      timeout: 5s
      retries: 20
❷ The SQL file contains DB creations.
You can create an init.sql file and append the following SQL script to prepare our databases when the MySQL container starts:
CREATE DATABASE IF NOT EXISTS payments;
CREATE DATABASE IF NOT EXISTS orders;
The following command will provision a MySQL container with the payments and orders database:
cd resources && docker-compose up
This command will provision a database container, and before accepting a new connection, it will create two databases and the test section will start to work. Now that we know how to create the database container, let’s look at the Payment service to integrate it with a database that is already up and running with a stack.
The Payment service depends on the database layer because it stores payment information for specific orders. To run the Payment service, we will need a Docker image built during the test container startup process, but we don’t have a Dockerfile yet. In a Dockerfile, we express which parent Docker image will be used, and, in our case, we have two parent images: one for compilation and one for runtime. This type of build is called a multistage build, which we will cover in detail in chapter 8. For now, it is enough to know we use a Golang base image to build the payment project and a scratch image and payment executable to run the application.
You can navigate the payment folder and create a Dockerfile with the following content:
FROM golang:1.18 AS builder                               ❶
WORKDIR /usr/src/app                                      ❷
COPY . .                                                  ❸
RUN CGO_ENABLED=0 GOOS=linux go build -a -installsuffix cgo -o payment
➥ ./cmd/main.go                                          ❹

FROM scratch
COPY --from=builder /usr/src/app/payment ./payment        ❺
CMD ["./payment"]                                         ❻
❷ Changes the working directory
❸ Copies the source code of the payment
❹ Builds the binary executable
❺ Copies the binary from the builder stage
❻ The payment executable is an entry point.
We also need some configurations in the environment variables: application port, database URL, and so forth. You can append the following service definition for the Payment service to the docker-compose.yml file as follows:
version: "3.9"
services:
  mysql:
  ...
  payment:
    depends_on:                     ❶
      mysql:
        condition: service_healthy
    build: ../../payment/           ❷
    environment:                    ❸
      APPLICATION_PORT: 8081
      ENV: "development"
      DATA_SOURCE_URL: "root:s3cr3t@tcp(mysql:3306)/
      ➥ payments?charset=utf8mb4&parseTime=True&loc=Local"
❶ Depends on running the mysql service
❷ Dockerfile location for the payment
We can now continue with the Order service.
The Order service definition is almost the same as the Payment service, except it has an additional configuration in the environment: a port exposed for our test suite to access. The only difference between the payment and order Dockerfile is the binary executable name:
FROM golang:1.18 AS builder
WORKDIR /usr/src/app
COPY . .
RUN CGO_ENABLED=0 GOOS=linux go build -a -installsuffix cgo -o order
➥ ./cmd/main.go

FROM scratch
COPY --from=builder /usr/src/app/order ./order
CMD ["./order"]
From the order folder, add this content to the Dockerfile. The service definition of the Order service is as follows:
version: "3.9"
services:
  mysql:
  ...
  payment:
  ...
  order:
    depends_on:
      mysql:
        condition: service_healthy
    build: ../../order/
    ports:
          “8080:8080”                          ❶
    environment:
      APPLICATION_PORT: 8080
      ENV: "development"
      DATA_SOURCE_URL: "root:s3cr3t@tcp(mysql:3306)/
      ➥ orders?charset=utf8mb4&parseTime=True&loc=Local"
      PAYMENT_SERVICE_URL: "localhost:8081"    ❷
❶ The test suite will use this port.
❷ User payment gRPC connection
Now that we added the Order service definition, we can see how to use the docker-compose.yml file within our test suite.
We will use the same test suite strategy here that we did with integration tests, and the application stack will be provisioned in the SetupSuite section. Here, we will have Docker Compose a reference (testcontainers.LocalDockerCompose), which will be available to the suite via the test suite struct (CreateOrderTestSuite). We will have only one test to test order creation flow during which we will create an order gRPC client to call Create and Get endpoints. Once we finish the test, the application stack will be destroyed in the TearDownSuite section. We can start by creating a file with the name create_order_e2e_test.go under the e2e folder and add the following struct:
type CreateOrderTestSuite struct {
    suite.Suite                                  ❶
    compose *testcontainers.LocalDockerCompose   ❷
}
❶ Suite dependency to use via the receiver function
In the SetupSuite section, we will use the e2e/resources/docker-compose.yml file we prepared previously for the Docker Compose up operation through test containers, as follows:
func (c *CreateOrderTestSuite) SetupSuite() {
    composeFilePaths := []string{"resources/docker-compose.yml"}      ❶
    identifier := strings.ToLower(uuid.New().String())                ❷

    compose := testcontainers.NewLocalDockerCompose(composeFilePaths,
    ➥ identifier)
    c.compose = compose                                               ❸
    execError := compose.
        WithCommand([]string{"up", "-d"}).
        Invoke()                                                      ❹
    err := execError.Error
    if err != nil {
        log.Fatalf("Could not run compose stack: %v", err)
    }
}
❶ docker-compose.yml we just prepared
❷ Randomized docker-compose file name
❸ Sets shared Docker compose reference
docker-compose up operation, which causes application stack creation, will be executed first. Our stack is ready and will create a gRPC connection to the Order service, which lives in the Docker container. We will do two things here:
Add the following test after the SetupSuite section:
func (c *CreateOrderTestSuite) Test_Should_Create_Order() {
    var opts []grpc.DialOption
    opts = append(opts, grpc.WithTransportCredentials(insecure.NewCredentials()))
    conn, err := grpc.Dial("localhost:8080", opts...)            ❶
    if err != nil {
        log.Fatalf("Failed to connect order service. Err: %v", err)
    }

    defer conn.Close()

    orderClient := order.NewOrderClient(conn)                    ❷
    createOrderResponse, errCreate :=
    ➥ orderClient.Create(context.Background(), &order.CreateOrderRequest{
        UserId: 23,
        OrderItems: []*order.OrderItem{
            {
                ProductCode: "CAM123",
                Quantity:    3,
                UnitPrice:   1.23,
            },
        },
    })                                                           ❸
    c.Nil(errCreate)                                             ❹

    getOrderResponse, errGet := orderClient.Get(context.Background(),
    ➥ &order.GetOrderRequest{OrderId: createOrderResponse.OrderId})
    c.Nil(errGet)
    c.Equal(int64(23), getOrderResponse.UserId)
    orderItem := getOrderResponse.OrderItems[0]
    c.Equal(float32(1.23), orderItem.UnitPrice)
    c.Equal(int32(3), orderItem.Quantity)
    c.Equal("CAM123", orderItem.ProductCode)
}
❶ localhost:8080 goes to the Order service in the stack.
❷ Initializes Order gRPC client
After success or failure, we need to shut the application stack down so as not to consume extra resources. We can do that in the TearDownSuite phase by using the Docker Compose reference and invoking the following shutdown operation:
func (c *CreateOrderTestSuite) TearDownSuite() {
    execError := c.compose.
        WithCommand([]string{"down"}).
        Invoke()                       ❶
    err := execError.Error
    if err != nil {
        log.Fatalf("Could not shutdown compose stack: %v", err)
    }
}
As a final step, we can add a runner section to run the entire test:
func TestCreateOrderTestSuite(t *testing.T) {
    suite.Run(t, new(CreateOrderTestSuite))
}
Our end-to-end test is almost ready; we just need to add the Order service client as a dependency to the e2e project via the following command:
go get github.com/huseyinbabal/microservices-proto/golang/order
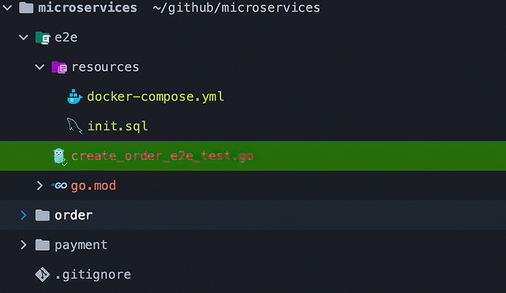
Now you can use NewOrderClient and other order-related resources for your test. After all, you should have a folder structure, as shown in figure 7.7.
You can now navigate to the e2e folder and execute the following test command to see how it works:
go test -run "^TestCreateOrderTestSuite$"
Notice we provide a regex to test the run command and start executing from TestCreateOrderTestSuite, the test suite runner.
To wrap up the end-to-end test, we simply run our application stack and run our tests against it, thanks to Testcontainers providing a good abstraction for Docker Compose that lets us run our stack via service definitions. This kind of test may take longer because it provisions a real system to verify features. Now that we have seen all the major test strategies for microservice architecture, let’s look at how we can measure the coverage of our tests for the entire application.
The test coverage operation’s primary motivation is to understand the missing test cases for production code. Code coverage is a strategy to detect how much of the application’s entire codebase is covered by tests. Golang has very good built-in features for testing, and coverage can be automatically handled during test execution with the -cover parameter:
go test -cover ./...
Once you execute this command, you can see the coverage information for each package among test execution status:
ok
➥ github.com/huseyinbabal/microservices/order/internal/application/core/a
➥ pi       0.274s  coverage: 93.3% of statements
At the end of the line, you can see the coverage information of that package, which mostly describes your confidence level in the codebase (more coverage means you know your codebase better), and you can refactor your codebase with fewer problems. It is simple to see the coverage information for your tests, but let’s look at how we can see the distribution of this coverage under a package.
With the -cover parameter, you can see the percentage of each package in the output. Completing the following steps shows a detailed report to drill down files, functions, and so on:
You can use the following command to redirect detailed coverage information to a file:
go test -coverprofile=coverage.out
This will save coverage information into the coverage.out file, and then we are ready to pass this file to the following command to generate an HTML report.
go tool cover -html=coverage.out
coverage.out is provided via the -html option, which should generate an HTML report. In a modern automated environment, we are not interested in coverage reports in HTML format, but the coverage.out file can be passed to modern tools in our CI pipeline to maintain code quality for our repository. Now let’s look at a brief introduction for using tests and coverages in a CI flow in our environment.
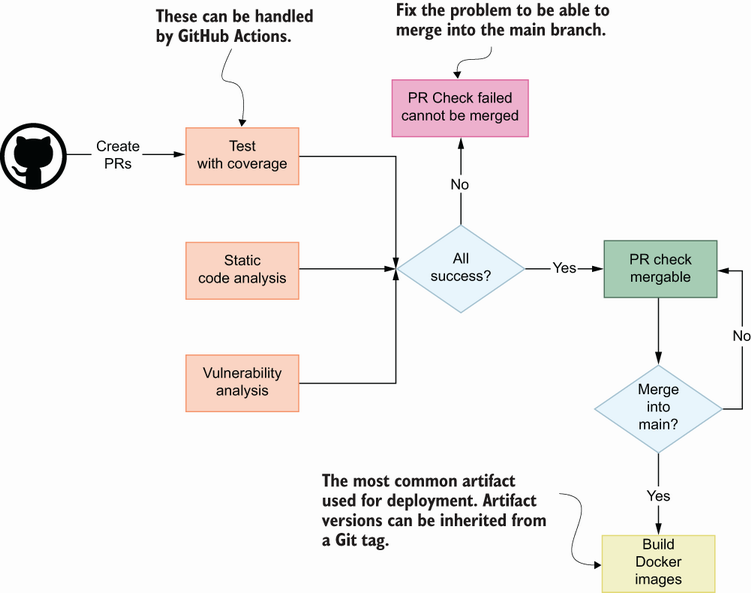
Continuous integration (CI) is a special automation that aims to integrate code changes. Those code changes can trigger testing and artifact generation, such as a Docker image or JAR file, to verify changes or build an artifact after changes are already approved. As a more concrete example, if you create a pull request (PR) in GitHub, CI can trigger a set of actions to calculate coverage and do some static code analysis to verify the code changes for maintaining quality. Once you merge this PR into the main branch, the CI can trigger a Docker image build operation with a special tag to use in application deployment. You can also configure rules, such as if the coverage is dropped under a certain threshold, the the PR check should fail. This will force the maintainer to revisit changes and add more tests to increase coverage. The more coverage you have, the more confidence you have during any change in the codebase. Figure 7.8 shows an overview of PR flow.
CI is powerful in maintaining code quality and reducing distraction while developing software. You can focus more on business logic development while CI handles checks and artifact generation for you.
Testing is important to save time and money, and to maintain code quality, which results in almost bug-free applications in production.
Unit testing is not designed for verifying the functions in a file; it is mostly helpful when you want to test scenarios in a file. A function can have one or more scenarios based on the conditional statements inside it. A SUT gives the exact place in the code base you are running your test against.
We can use integration tests to test two modules to verify they are well integrated. The most popular example is testing a data layer with a real database. Test containers are beneficial here.
Suites work well for defining requirements before tests and destroying required components after tests. Setup and TearDown are very powerful in integration tests because we create the DB adaptor before the test and destroy it once we finish.
End-to-end tests can contain all the available services in your environment because you test a flow from beginning to end.
The test pyramid is used to explain the distribution of test percentages for each test type. Unit testing has a bigger percentage of the pyramid since it is preferred, mostly to get faster feedback and reduce the cost of the testing infrastructure.
Test outputs and test coverage can be used in the CI pipeline to verify PRs.