In a typical monolithic application, any critical error can bring the entire system down because all the application components live in one shared runtime. Once you switch to microservice architecture, those components are decoupled by extracting to separate services, but this distributed system environment has its own disadvantages. For this reason, microservices should be designed for resiliency and always be fault tolerant. Let’s look at the problematic use cases in a microservices environment first, then explain the possible solutions to make microservices resilient and fault tolerant.
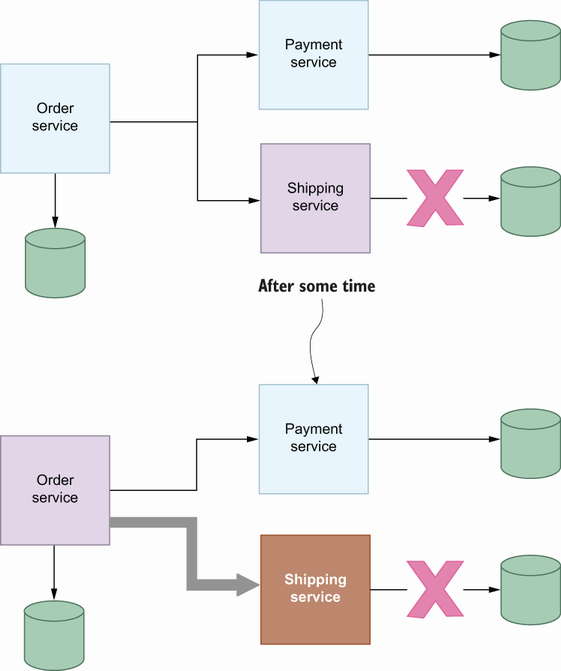
It is possible to have network failures in a distributed system environment, and this can cause a malfunction in a specific service. For example, if the Shipping service cannot access its database due to network failure, it will be out of order after some time. Since the Order service uses the Shipping service to ship orders after successful payment, this database failure will ultimately affect the Order service. Suppose there is no proper resiliency pattern for interservice communication. In that case, it can cause a cascading failure in that the Order service also becomes unreachable, even though it should be able to handle other types of requests that do not depend on the Shipping service. With a proper resiliency pattern, we would time out the shipping operation or apply some logic to fail fast now and retry it in the future once the Shipping service is back.
In figure 6.1, there is a complete network failure in that the Shipping service cannot access the database; it might also be a partial failure in that the network is okay, but there is a latency between the service and database that breaches the service-level objective. Assume that you have a 50 MS average latency limit for your interservice communication, which sometimes exceeds this limit. You can apply resiliency patterns to this use case: once the average request latency exceeds the limit, you halt sending the request for a while and then resume after a specific time. This prevents memory leaks by dropping long-lived connections to other services, which can cause a possible cascading failure. Now that you understand a common example of a failure in a microservice environment, let’s look at how we can recover from this state by using patterns such as timeout, retry, and circuit breaker to make communication more resilient.
In a microservice pattern, you have multiple services, and they handle a task together: each service applies its business logic to this task to complete the whole task successfully. For example, the Order service depends on the Payment service to charge customers for their orders, and the Order service depends on the Shipping service to ship the customer order after a successful payment to mark the order creation as successful. Service dependencies like these may lead to bottlenecks or, even worse, single points of failure in a microservices architecture. A latency on the Shipping or Payment services can affect the Order service and become very slow. If you have a commitment on the latency numbers, you may need to revisit the network communication logic for those services and apply some timeout pattern to fail fast instead of breaching the latency commitment. Let’s look at concrete examples of canceling requests if they take more time than committed latency numbers allow.
As you may remember, once we generate the source code from .proto files, service functions take context.Context as the first parameter. This lets users pass their context to a specific service call to control the execution. But what is context.Context? The context in Go enables you to specify deadlines, cancellation signals, or key-value pairs available between processes. If you define a context with a deadline specification and pass it to a function, that function should be finished before the deadline; if not, it will be automatically canceled. For example, if we call the Shipping service to ship order items to a customer, you can limit the client side to one second to see the shipping response from the server side.
Listing 6.1 Timeout pattern on the client side
  shippingClient := shipping.NewShippingServiceClient(conn)   ❶
    ctx, _ := context.WithDeadline(context.Background(),
    ➥ time.Now().Add(1*time.Second))                         ❷
    log.Println("Creating shipping...")
    _, errCreate := shippingClient.Create(ctx,
    ➥ &shipping.CreateShippingRequest{UserId: 23})
    if errCreate != nil {
        log.Printf("Failed to create shipping. Err: %v", errCreate)
    } else {
        log.Println("Shipping is created successfully.")
    }
❷ Create should be finished in one second.
context.WithDeadline requires a target date as a parameter, but there is an easier step: context.WithTimeout, a wrapper for WithDeadline that allows you to specify a timeout value instead of calculating the target date from the current time:
ctx, _ := context.WithTimeout(context.Background(), 1*time.Second)
Both functions take a parent context, context.Background(), which in our case is an empty context without a deadline.
context.WithTimeout and context.WithDeadline both return two values: context and cancellation functions. You can call the cancellation function to halt any further execution within that context, as needed. More concretely, you can call three competing endpoints with the same context, then cancel the context for the remaining two when the first endpoint finishes and returns a value. This way, you do not have to wait for other endpoint responses that are no longer needed.
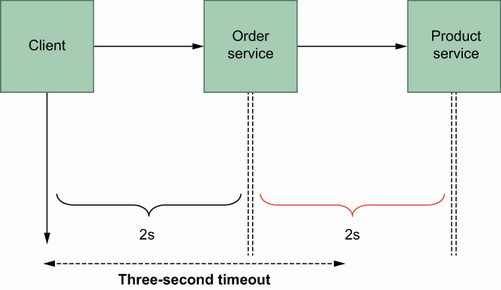
Another advantage of using context is propagating context information between services. In gRPC, context is available on both the client and server sides. That means that if there are three services to fulfill an operation, the initial context can be propagated to the final one without extra context definition on the second and third services. For example, I know that the order operation should take at most three seconds to complete, and in our scenario, the Order service calls the Payment service, then the Shipping service. We can create a context with a three-second timeout and use it in three services (figure 6.2).
The client initializes a context with a timeout value and uses it in further gRPC calls.
Listing 6.2 Context timeout propagation
...
func (s *server) Get(ctx context.Context, in *product.GetProductRequest)
➥ (*product.GetProductResponse, error) {                                 ❶
    time.Sleep(2 * time.Second)                                           ❷
    return &product.GetProductResponse{Title: "Demo title"}, nil
}
...

...
func (s *server) Create(ctx context.Context, in *order.CreateOrderRequest)
➥ (*order.CreateOrderResponse, error) {                                  ❸
    time.Sleep(2 * time.Second)                                           ❹
    productInfo, err := s.productClient.Get(ctx,
    ➥ &product.GetProductRequest{ProductId: in.ProductId})
    if err != nil {
        return nil, err
    }
    return &order.CreateOrderResponse{OrderId: 123, ProductTitle:
    ➥ productInfo.Title}, nil
}
...

...
orderServiceClient := order.NewOrderServiceClient(conn)
    ctx, _ := context.WithTimeout(context.TODO(), time.Second*3)          ❺
    log.Println("Creating order...")
    _, errCreate := orderServiceClient.Create(ctx,
    ➥ &order.CreateOrderRequest{
        UserId:    23,
        ProductId: 123,
        Price:     12.3,
    })
    if errCreate != nil {
        log.Printf("Failed to create order. Err: %v", errCreate)
    } else {
        log.Println("Order is created successfully.")
    }
...
❶ The Product Service’s Get endpoint
❷ Two seconds delay simulation.
❸ The Order service’s Create endpoint
❹ Two seconds delay simulation.
❺ The total timeout is three seconds.
We will get an error here because OrderServiceClient has three seconds as a timeout value, and the Order and Product services have at least a four-second delay, which causes a timeout in OrderServiceClient. Now that we understand how context is used for the timeout pattern to trigger a failure in the service chain instead of waiting for an unknown period of time, let’s look at the retry pattern.
Transient faults occur when a momentary loss of service functionality self-corrects. The retry pattern in gRPC enables us to retry a failed call automatically and thus is perfect for transient faults such as these:
gRPC has an interception mechanism that allows you to implement your interceptor and configure the gRPC client to apply the interceptor to all gRPC calls. Using the same strategy, we can execute interceptors on the gRPC server side before the request is passed to actual business logic. gRPC middleware is a good place to define the retry pattern and apply it to all gRPC calls on the client side instead of duplicating retry logic for each type of client call. Thanks to the gRPC ecosystem, a GitHub organization contains notable, community-maintained projects related to gRPC for resiliency. We will use the gRPC retry module (http://mng.bz/XNV9) of go-grpc-middleware (https://github.com/grpc-ecosystem/go-grpc-middleware) to apply retry logic to our gRPC calls.
Assume that the Order service calls the Shipping service, but the Shipping service is unavailable at that time due to very short maintenance. Without a retry mechanism, the Order service will get a failure from the shipping call and mark that order as failed. With a proper retry mechanism, the Order service can retry this call a couple more times and succeed once the Shipping service is back online. We can use the following example if we want to execute five one-second retries once we get either an Unavailable or ResourceExhausted response code from the Shipping service.
Listing 6.3 Retry pattern for resiliency
...
imports (
grpc_retry "github.com/grpc-ecosystem/go-grpc-middleware/retry"
"google.golang.org/grpc/codes"
)
...
var opts []grpc.DialOption
    opts = append(opts,
     ➥ grpc.WithUnaryInterceptor(grpc_retry.UnaryClientInterceptor(       ❶
        grpc_retry.WithCodes(codes.Unavailable, codes.ResourceExhausted),  ❷
        grpc_retry.WithMax(5),                                             ❸
        grpc_retry.WithBackoff(grpc_retry.BackoffLinear(time.Second)),     ❹
    )))
    opts = append(opts, grpc.WithInsecure())
    conn, err := grpc.Dial("localhost:8080", opts...)
    if err != nil {
        log.Fatalf("Failed to connect shipping service. Err: %v", err)
    }

    defer conn.Close()

    shippingServiceClient := shipping.NewShippingServiceClient(conn)
    log.Println("Creating shipping...")
    _, errCreate := shippingServiceClient.Create(context.Background(),
    ➥ &shipping.CreateShippingRequest{
        UserId:  23,
        OrderId: 2344,
    })
    if errCreate != nil {
        log.Printf("Failed to create shipping. Err: %v", errCreate)        ❺
    } else {
        log.Println("Shipping is created successfully.")
    }
❶ Enables interceptor for Unary connections
❷ Retries only once those codes are returned
❹ Uses a one-second timeout for each retry
❺ May return ContextDeadlineExceeded
In gRPC, there are two types of interceptor usage, WithUnaryInterceptor and WithStreamingInterceptor for unary and streaming (http://mng.bz/yQop) connections, respectively. As in listing 6.3, you can use UnaryClientInterceptor with or without values; if you don’t pass a value, it will use default values for retry, or you can override them by using additional configurations such as WithCodes, WithMax, or WithBackoff. Keep in mind that the gRPC retry configuration is handled via the grpc_retry package.
WithCodes is used for deciding when to retry, and its default value is the total of the Unavailable and ResourceExhausted lists. Unavailable code is the default since retrying until the service becomes available is beneficial for the client to recover the gRPC call once the dependent service becomes available. In the same way, ResourceExhausted is a default because the client might have performed multiple calls that caused the server to apply throttling. For this kind of case, the server will remove throttling, and the client will succeed on the next calls performed by the retry. With these defaults, the retry pattern is applied only if you get Unavailable or ResourceExhausted from the service call.
The WithMax parameter helps to set a maximum limit for retries during interservice communication. If the dependent service becomes available earlier, the client will not retry until the maximum count; it will stop once the client starts to get a response code other than Unavailable or ResourceExhausted.
WithBackoff requires a function to specify back-off functionality between retries. In our example, BackoffLinear is used, which means there is a one-second wait time between retries. There are other options, such as BackoffExponential, in which the timeout interval on the next retry is multiplied by two, compared to the current timeout interval. Other options are BackoffLinearWithJitter and BackoffExponentialWithJitter, in which the next timeout interval is decided randomly. This randomness reduces the collision of gRPC calls clients make. See http://mng.bz/MB1Q for the details of backoff strategies.
The retry pattern works well for covering transient failures, but if we don’t know how long the problem will last, we may end up putting a high load on dependent services with infinite retries. Let’s look at a smarter version of the retry pattern that breaks the connection altogether: the circuit breaker pattern.
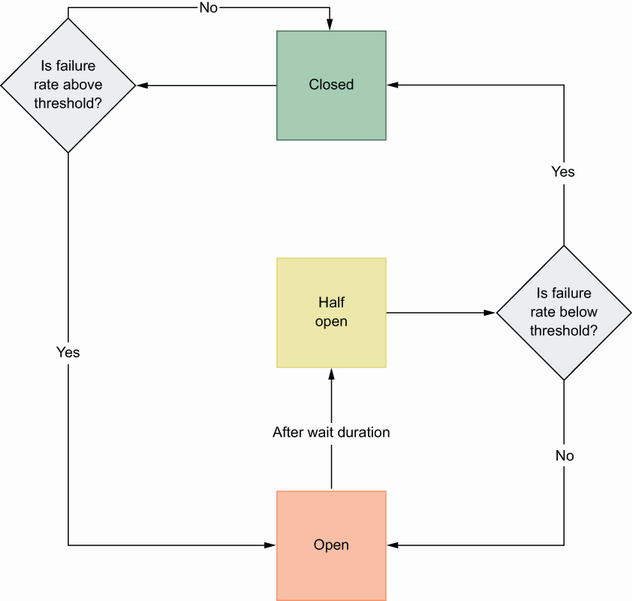
In the circuit breaker pattern, connections between services are also called circuits, and if the error rate of an interservice communication reaches a threshold value, it opens that circuit, which means the connection between two services is closed intentionally. After this point, any request to the dependent service will immediately fail due to the open circuit. Of course, this is not a permanent situation; it will be reset after a certain time based on your configuration, and if there is no failure in new requests, the circuit will be closed again. Once the reset timeout is triggered, the state will go into a half-open state, and become closed if there is no other failure. If it continues to get failures, it will go back into an open state (figure 6.3).
Now that we understand what the circuit breaker pattern, let’s look at a Go example to understand production use cases.
Circuit breaker implementations allow your business logic to know the result of your execution and decide the next step in the circuit breaker state machine. You can define several circuit breakers with different configurations and apply them to different parts of your application. In this book, we use a Go circuit breaker. (You can see the source code here: https://github.com/sony/gobreaker.) Before diving deep into the implementation, let’s explore the relevant terms in a circuit breaker implementation:
MaxRequests limits the number of requests allowed to pass through a half-open circuit. The difference between an open and half-open circuit is that a half-open one allows certain requests to pass through the circuit based on your configuration, whereas you can’t pass through an open request.
Interval mainly defines when the count is cleared while the state is closed. For some use cases, you may not want to clear the interval, even if it has been a long time since you last saw a failure. However, this interval is cleared for most use cases to allow users to make failures within a reasonable time interval.
Timeout decides when to change a circuit breaker state from an open to a half-open state. The advantage of this change is that in an open state, the requests will fail fast, whereas in a half-open state, the circuit breaker allows passing through a half-open circuit by limiting the number of requests.
ReadyToTrip checks the state of the failure threshold after the last failure and decides on whether to open the circuit completely.
OnStateChange is mainly used for tracking state changes while handling business models within a function wrapper.
With this very basic explanation of the configurations of a circuit breaker out of the way, let’s design client-server communication using a circuit breaker pattern with the following characteristics:
The maximum allowed failure (failed_request_count / total_request_count) ratio is 0.6.
The timeout value needed for state transition from open to half-open is 4 seconds.
To implement these requirements, we can simply initialize *gobreaker.CircuitBreaker with configurations and wrap a random function to simulate circuit breaker behavior. This random function generates a random number between 10 and 30, and if the generated number is 25, it also returns an error. This error increases the failure count in the circuit breaker, which causes the state to change from closed to open.
Listing 6.4 Circuit breaker for simple function
package main

import (
    "errors"
    "github.com/sony/gobreaker"
    "log"
    "math/rand"
)

var cb *gobreaker.CircuitBreaker

func main() {
    cb = gobreaker.NewCircuitBreaker(gobreaker.Settings{
        Name:        "demo",                                        ❶
        MaxRequests: 3,                                             ❷
        Timeout:     4,                                             ❸
        ReadyToTrip: func(counts gobreaker.Counts) bool {           ❹
            failureRatio := float64(counts.TotalFailures) /
            ➥ float64(counts.Requests)
            return failureRatio >= 0.6
        },
        OnStateChange: func(name string, from gobreaker.State, to
        ➥ gobreaker.State) {                                       ❺
            log.Printf("Circuit Breaker: %s, changed from %v, to %v", name,
            ➥ from, to)
        },
    })
    cbRes, cbErr := cb.Execute(func() (interface{}, error) {        ❻
        res, isErr := isError()
        if isErr {
            return nil, errors.New("error")
        }
        return res, nil
    })
    if cbErr != nil {                                               ❼
        log.Fatalf("Circuit breaker error %v", cbErr)
    } else {
        log.Printf("Circuit breaker result %v", cbRes)
    }
}

func isError() (int, bool) {                                        ❽
    min := 10
    max := 30
    result := rand.Intn(max-min) + min
    return result, result != 20
}
❶ Unique name for the circuit breaker
❷ Allowed number of requests for a half-open circuit
❸ Timeout for an open to half-open transition
❹ Decides on if the circuit will be open
❺ Executed on each state change
❻ Wrapped function to apply a circuit breaker
❼ Returns an error once the circuit is open
❽ Random number between 10–30 with error logic
We wrapped a simple function with circuit breaker logic. Let’s apply this logic to a client-server example in which the client tries to create an order periodically, and an exception for some requests is thrown due to an outage in the Order service. For this kind of error case, applying the circuit breaker pattern to client-server interaction is beneficial instead of blindly sending requests.
Listing 6.5 Client-side circuit breaker
...
    orderClient := order.NewOrderServiceClient(conn)
    for {                                                                   ❶
        log.Println("Creating order...")
        orderResponse, errCreate := cb.Execute(func() (interface{}, error) {❷
            return orderClient.Create(context.Background(),
            ➥ &order.CreateOrderRequest{
                UserId:    23,
                ProductId: 1234,
                Price:     3.2,
            })
        })

        if errCreate != nil {                                               ❸
            log.Printf("Failed to create order. Err: %v", errCreate)
        } else {                                                            ❹
            log.Printf("Order %d is created successfully.", orderResponse.(*order.CreateOrderResponse).OrderId)
        }
        time.Sleep(1 * time.Second)                                         ❺
    }                                                                       ❻
...
❶ Periodic call to simulate end-user requests
❷ Begins wrapping the Order service call with the circuit breaker
❸ If the circuit is closed, it returns data.
❺ Waits for one second to not heat the CPU
Suppose you have multiple places like this where you call a dependent service from a consumer service. Would you apply a circuit breaker pattern to all calls by wrapping them? Or would you want some central place to manage the circuit breaker pattern? Let’s look at how we can control circuit breaker logic in one place using gRPC interceptors.
Remember, we already used UnaryClientInterceptor while handling a retry operation for client-server communication. Now we will implement an interceptor that allows us to pass circuit breaker logic as a parameter to ensure we return UnaryClientInterceptor.
Listing 6.6 Circuit breaker interceptor
package middleware

import (
    "context"
    "github.com/sony/gobreaker"
    "google.golang.org/grpc"
)

func CircuitBreakerClientInterceptor(cb *gobreaker.CircuitBreaker)
➥ grpc.UnaryClientInterceptor {                                    ❶
    return func(
    ctx context.Context,
    method string,
    req, reply interface{},
    cc *grpc.ClientConn,
    invoker grpc.UnaryInvoker,
    opts ...grpc.CallOption
    ) error {
        _, cbErr := cb.Execute(func() (interface{}, error) {        ❷
            err := invoker(ctx, method, req, reply, cc, opts...)    ❸
            if err != nil {
                return nil, err
            }

            return nil, nil

        })
        return cbErr
    }
}
...
// Interceptor usage on the client side
...
var opts []grpc.DialOption
    opts = append(opts, grpc.WithInsecure())
    opts = append(opts, grpc.WithUnaryInterceptor(middleware
    ➥ .CircuitBreakerClientInterceptor(cb)))                       ❹
    conn, err := grpc.Dial("localhost:8080", opts...)
    if err != nil {
        log.Fatalf("Failed to connect order service. Err: %v", err)
    }
...
❶ A function with a UnaryClientInterceptor type
❸ The gRPC call is resumed within a circuit breaker wrapper.
❹ Adds to the interceptor list for gRPC calls
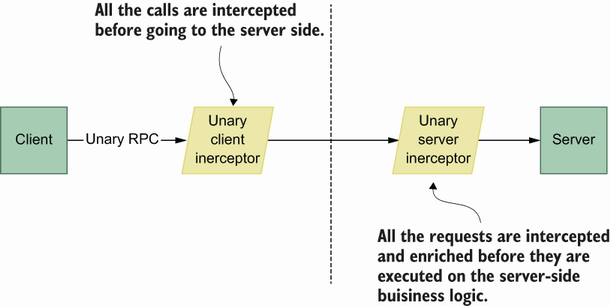
Client interceptors are responsible for modifying/enriching requests before reaching the server side, whereas server interceptors are responsible for applying some logic before using it in server-side business logic (figure 6.4).
Now that we know resilient communication patterns in a microservice architecture, let’s look at how we can improve resiliency by providing a proper error-handling mechanism to interservice communication.
Error handling affects the resiliency of interservice communication in a microservices architecture. For a typical client-server communication scenario, the handling response is very trivial, but it becomes complicated once you need to handle errors. Your application must decide what happens next based on the error code in the gRPC response. For example, your application decides whether to retry the request or apply a circuit breaker pattern if you get an error from the server, such as {code: ResourceExhausted, message: Order Limit Exceeded}. Notice that instead of simply throwing an exception, we can retry later since Order Limit will be available soon. Unstructured error messages can also complicate decision making with ambiguity. If any service returns error messages without code, it might be challenging to understand what happened on the server side. Therefore, gRPC provides a status package to handle errors in a more structured way.
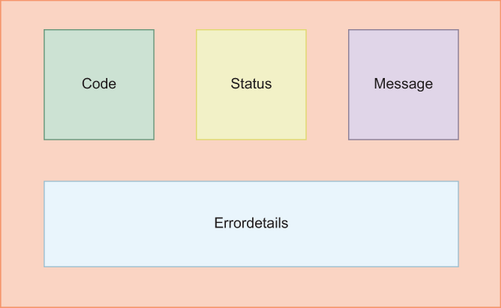
gRPC conveniently disambiguates error handling with a reliable error response structure (figure 6.5). In a typical error response, you can see three primary fields: Code, Status, and Message. The Code field contains the response code (see all the available codes here: http://mng.bz/a1Vj). Status is the human-friendly version of the Code field and primarily describes the meaning of Code in a couple of words, such as Bad Request for 400. The Message field contains a message that explains the error situation in an understandable format. For example, Email address is invalid explains to the end user why a registration failed during the Register gRPC call. You can also see the ErrorDetails section for the error types that contain a list of errors. For example, if a customer submits a register form, you can return multiple error messages under the ErrorDetails field explaining which fields are problematic.
Now that we are familiar with the gRPC error model, let’s look at how we can implement an Order service endpoint that returns an error response with a detail that the client side correctly handles.
Let’s check the requirements for client-server interaction to better understand error-handling logic:
The client sends a Create order request with product_id, user_id, and price parameters.
The server validates those parameters, generates an error model, and returns it to the client.
The client converts that response to an error model and determines the validation errors.
Listing 6.7 Server-client validation
...
import “google.golang.org/grpc/status"

func (s *server) Create(ctx context.Context, in *order.CreateOrderRequest)
➥ (*order.CreateOrderResponse, error) {
    var validationErrors []*errdetails.BadRequest_FieldViolation
    if in.UserId < 1 {                                       ❶
        validationErrors = append(validationErrors,
        ➥ &errdetails.BadRequest_FieldViolation{
            Field:       "user_id",
            Description: "user id cannot be less than 1",
        })                                                   ❷
    }
    if in.ProductId < 0 {                                    ❸
        validationErrors = append(validationErrors,
        ➥ &errdetails.BadRequest_FieldViolation{
            Field:       "product_id",
            Description: "product id cannot be negative",
        })                                                   ❹
    }
    if len(validationErrors) > 0 {
        stat := status.New(400, "invalid order request")
        badRequest := &errdetails.BadRequest{}               ❺
        badRequest.FieldViolations = validationErrors        ❻
        s, _ := stat.WithDetails(badRequest)                 ❼
        return nil, s.Err()
    }
    return &order.CreateOrderResponse{OrderId: 1243}, nil
}
...
❶ Validates the user ID and prepares a violation error
❷ Field violation is added to the error list as a bad request.
❹ Product field validation is added as a bad request item.
❺ A bad request object is initialized under the status object.
❻ Error list is added to FieldValidations.
❼ The status object is augmented with validation errors.
Now let’s look at how we can handle errors on the client side if the server returns a validation error:
...
import “google.golang.org/grpc/status"

orderResponse, errCreate := orderClient.Create(context.Background(),
➥ &order.CreateOrderRequest{
        UserId:    -1,
        ProductId: 0,
        Price:     2,
    })

    if errCreate != nil {
        stat := status.Convert(errCreate)         ❶
        for _, detail := range stat.Details() {
            switch errType := detail.(type) {     ❷
            case *errdetails.BadRequest:
                for _, violation := range errType.GetFieldViolations() {
                    log.Printf("The field %s has invalid value. desc: %v",
                    ➥ violation.GetField(), violation.GetDescription())
                }
            }
        }
    } else {
        log.Printf("Order %d is created successfully.",
        ➥ orderResponse.OrderId)
    }
...
❶ The client converts an error into an error model.
❷ Based on error type, prints error descriptions
The client side can decide what to do next since it parses the error response and checks fields to understand what is happening with the message. Extended error messages are always beneficial because they may also affect retry and circuit breaker patterns during communication. For example, you can open/close a circuit based on the status code you return from the server side, or retry once you see a specific status code. Now that we better understand gRPC error handling, let’s look at securing gRPC communication.
In this section, we visit the security aspect of the microservices environment. We will skip some topics, such as encrypting TLS certificate passwords, for simplification. In a production environment with many microservices, it is a best practice to delegate certificate generation to a third party, which we will see in detail in chapter 8.
In a microservices environment, services exchange data for different purposes: resource creation, resource aggregation, and so on. The security of this communication is critical and is mostly addressed by encrypting the communication so that nobody can change it when it travels in the network. TLS (Transport Layer Security) helps us provide an encryption protocol for interservice communication. Notice that TLS is the successor of a Secure Sockets Layer (SSL; you probably have heard SSL more often than TLS).
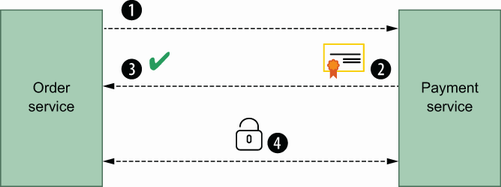
In TLS communication, there is a procedure for securing the communication via public key encryption using a public and private key called a TLS handshake. Public key information is stored in a TLS certificate and contains basic information: issuer, expiration date, and so on. In figure 6.6, you can see the minimum required steps for a TLS handshake between the Order and Payment Services:
The Payment service shows its certificate to the Order service.
The Order service sends data to the Payment service in an encrypted communication channel.
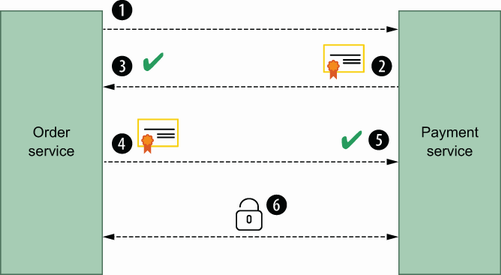
As you can see, only the server provides its certificate to let the client verify it. However, there is another version of this handshake in which the client shows its certificate and the server verifies it. This type of handshake is called mTLS (mutual TLS), which contains server verification. Figure 6.7 illustrates these steps :
The Payment service shows its certificate to the Order service.
The Order service shows its certificate to the Payment service.
The Payment service verifies that certificate and allows the Order service to send requests.
The Order service sends data to the Payment service in an encrypted communication channel.
With mTLS, you simply secure the connection between the Order service and the Payment service in both directions. Whenever there is a connection to those services, the identity will be extracted, and both sides will know the owner of a specific call. This approach is beneficial for organizations that use a zero-trust approach for their network security. Next, let’s prepare a certificate for the Go microservices example.
We will use the OpenSSL (https://www.openssl.org/source/) tool to generate self-signed certificates. A certificate authority (CA) is responsible for storing, signing, and issuing digital certificates. This means we will first generate a private key and a self-signed certificate for the certificate authority:
openssl req -x509 \                                                     ❶
    -sha256 \                                                           ❷
    -newkey rsa:4096 \                                                  ❸
    -days 365 \                                                         ❹
    -keyout ca-key.pem \                                                ❺
    -out ca-cert.pem \                                                  ❻
    -subj "/C=TR/ST=EURASIA/L=ISTANBUL/O=Software/OU=Microservices/
     ➥ CN=*.microservices.dev/emailAddress=huseyin@microservices.dev"  ❼
    -nodes                                                              ❽
❶ Public key certificate format
❷ Uses a sha-256 message digest algorithm
❸ Generates a private key and its certificate request
❼ Adds identity information to certificate
❽ “no DES” means the private key will not be encrypted.
We will not encrypt the private key of the certificate, but in upcoming chapters, we will automate certificate generation for production use cases with the private key encrypted.
The -subj parameter contains identity information about the certificate:
/OU is for the organization unit to explain which department.
/CN is used for the domain name, the short version of common name.
/emailAddress is used for an email address to contact the certificate owner.
You can verify the generated self-certificate for the CA with the following command:
openssl x509 -in ca-cert.pem -noout -text
Once you verify it, we can proceed with the private key and certificate signing request:
openssl req \                   ❶
    -newkey rsa:4096 \
    -keyout server-key.pem \    ❷
    -out server-req.pem \       ❸
    -subj "/C=TR/ST=EURASIA/L=ISTANBUL/O=Microservices/OU=PaymentService/
     ➥ CN=*.microservices.dev/emailAddress=huseyin@microservices.dev" \
    -nodes \
    -sha256
❷ The location of the private key
❸ The location of the certificate request
Then we will use CA’s private key to sign the request:
openssl x509 \
    -req -in server-req.pem \   ❶
    -days 60 \
    -CA ca-cert.pem \           ❷
    -CAkey ca-key.pem \         ❸
    -CAcreateserial \           ❹
    -out server-cert.pem \
    -extfile server-ext.cnf \   ❺
    -sha256
❹ Generates the next serial number for the certificate
❺ Additional configs for the certificate
An example configuration for ext file option is as follows:
subjectAltName=DNS:*.microservices.dev,DNS:*.microservices.dev,IP:0.0.0.0
Now you can verify the server’s self-signed certificate:
openssl x509 -in server-cert.pem -noout -text
For mTLS communication, we need to generate a certificate signing request for the client side, so let’s generate a private key and this self-signed certificate:
openssl req \
    -newkey rsa:4096 \
    -keyout client-key.pem \
    -out client-req.pem \
    -subj "/C=TR/ST=EURASIA/L=Istanbul/O=Microservices/OU=OrderService/
     ➥ CN=*.microservices.dev/emailAddress=huseyin@microservices.dev" \
    -nodes \
    -sha256
Now, let’s sign it using the CA’s private key:
openssl x509 \
    -req -in client-req.pem \
    -sha256 \
    -days 60 \
    -CA ca.crt \
    -CAkey ca.key \
    -CAcreateserial \
    -out client.crt \
    -extfile client-ext.cnf
Finally, you can verify the client certificate with the following command:
openssl x509 -in client-cert.pem -noout -text
Now the server certificate can be used on the server side, which is the Payment service, in our case. Let’s look at how we can integrate those certificates into Payment and Order services.
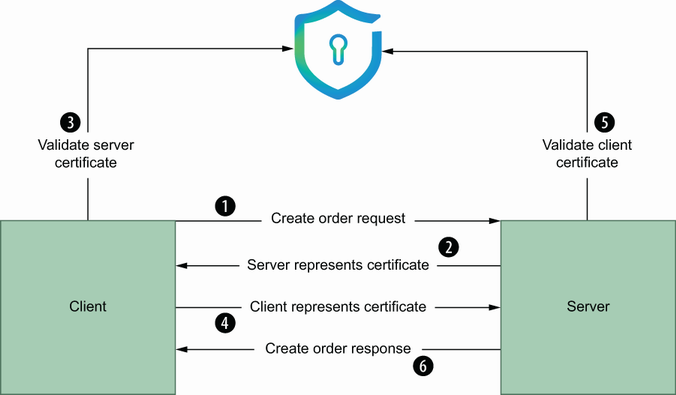
Adding certificate information to a server implementation is twofold: implement logic to load credentials and create a TransportCredentials(http://mng.bz/gBAe) instance; then use this function within the interceptor to handle credentials verification out of the box for each request. This means the following steps are applied (figure 6.8):
The server presents its shared certificate with its public key.
The client validates this certificate on a CA. For now, the CA cert contains client and server shared certificates.
After client validation, the client presents its shared certificate with its public key to the server.
After successful verification, the client receives a response from the gRPC call.
If we wanted to implement this flow on the client and server side, we could use already generated shared certificates for both the server and client side. Since the CA signs the certificate, those shared certificates (client.crt, server.crt) are already in ca.crt. For development purposes, we will generate a cert pool in the server and client and append client and server certificates there. Finally, we will put TLS configuration inside gRPC server options.
Listing 6.8 gRPC TLS configuration
...
func getTlsCredentials() (credentials.TransportCredentials, error) {
    serverCert, serverCertErr := tls.LoadX509KeyPair("cert/server.crt",
    ➥ "cert/server.key")                                         ❶
    // handle serverCertErr
    certPool := x509.NewCertPool()                                ❷
    caCert, caCertErr := ioutil.ReadFile("cert/ca.crt")
    // handle caCertErr

    if ok := certPool.AppendCertsFromPEM(caCert); !ok {           ❸
        return nil, errors.New("failed to append the CA certs")
    }

    return credentials.NewTLS(
        &tls.Config{
            ClientAuth:   tls.RequireAnyClientCert,               ❹
            Certificates: []tls.Certificate{serverCert},          ❺
            ClientCAs:    certPool,                               ❻
        }), nil
}
...
func main() {

    listener, err := net.Listen("tcp", fmt.Sprintf(":%d", 8080))
    // handle err
    tlsCredentials, tlsCredentialsErr := getTlsCredentials()
    // handle tlsCredentialsErr
    var opts []grpc.ServerOption
    opts = append(opts, grpc.Creds(tlsCredentials))               ❼

    grpcServer := grpc.NewServer(opts...)
    ...
}
❷ Certificate pool for CA check
❻ Roots the CA for the server to verify client certificates
❼ Adds TLS configuration to server options
In listing 6.8, transport credentials are created from the certificate files, and the newly created credentials object is passed to the gRPC server initialization. This also means that when a client wants to connect this gRPC server, it must provide a client certificate to its gRPC client connections.
Now that the server side has TLS configuration enabled, let’s look at how we can configure the client side to let the client and server exchange their certificates and then establish secure communication:
func getTlsCredentials() (credentials.TransportCredentials, error) {
    clientCert, clientCertErr := tls.LoadX509KeyPair("cert/client.crt",
    ➥ "cert/client.key")                                                 ❶
    // handle clientCertErr

    certPool := x509.NewCertPool()                                        ❷
    caCert, caCertErr := ioutil.ReadFile("cert/ca.crt")
    // handle caCertErr

    if ok := certPool.AppendCertsFromPEM(caCert); !ok {                   ❸
        return nil, errors.New("failed to append CA cert.")
    }

    return credentials.NewTLS(&tls.Config{
        ServerName:   "*.microservices.dev",                              ❹
        Certificates: []tls.Certificate{clientCert},                      ❺
        RootCAs:      certPool,                                           ❻
    }), nil
}
...
func main() {
    tlsCredentials, tlsCredentialsErr := getTlsCredentials()
    // handle tlsCredentialsErr
    var opts []grpc.DialOption

    opts = append(opts, grpc.WithTransportCredentials(tlsCredentials))    ❼
    conn, err := grpc.Dial("localhost:8080", opts...)
    // handle err
}
...
❷ Certificate pool for CA check
❸ Adds the CA to the certificate pool
❹ Server name used during certificate generation
❺ Provides the client certificate
❻ Roots the CA for the client to verify the server certificate
❼ Adds TLS configuration to gRPC dial options
This implementation is useful for local development, but in a production environment, it is best practice to delegate certificate management to a third party, which we will see in detail in chapter 8 when we deploy microservices to a Kubernetes environment.
In a typical microservices architecture, it is normal for one service to depend on one or more other services. If one of the dependent services is down, it will affect the availability of the entire microservice application. We use resiliency patterns such as retry, timeout, and circuit breaker to prevent these situations.
Once the dependent service is down, we can use the retry strategy on the consumer side to make gRPC communication eventually succeed.
Retry logic can be triggered for certain status codes, such as Unavailable or ResourceExhausted, instead of blindly retrying on each failure. For example, it is not wise to retry a request if you received a validation exception because it shows that you sent an invalid payload; you should fix it to make it succeed.
Using retry logic blocks the actual gRPC call since you have to wait for dependent service. It is hard to detect recovery time for a dependent service, which can create long wait times for retries. To prevent this situation, we use context timeout and deadline to put a time limit on blocking the actual execution.
In the retry mechanism, you can redo an operation for specific time intervals, but this can also put an extra load on the dependent service since it has to retry all the time, even if the dependent service is not ready. To solve this problem, we use a circuit breaker to open a circuit once we reach the failure limit, retry the request after some time, and finally close the circuit once the dependent service is back online.
Error handling is important in interservice communication because the next step is decided from error codes or messages in the gRPC response. We use a status package to return customized errors from a service, and we can convert them on the client side once needed.
Resiliency is important not only in communication patterns, but also in zero-trust environments, in which we use TLS-enabled communications, as the server and client verify their certificates during gRPC communications. This is also called mutual TLS.