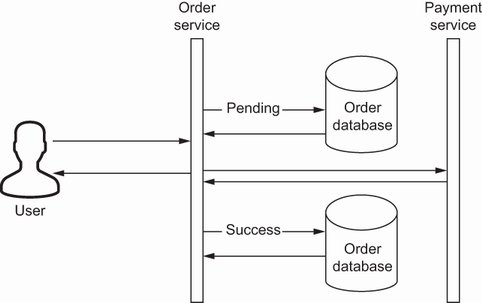
Figure 5.1 The Order service uses a Payment service gRPC stub.
In the previous chapter, we implemented a gRPC service for the Order service. In this chapter, we will implement a gRPC client for that service to show how underlying communication works in microservice architecture. You can see the high-level picture of interservice communication in figure 5.1.
In previous chapters, we saw how to generate Go source codes from proto files; now, we will learn how to use repositories that contain gRPC stubs as Go module dependencies on the client side. gRPC also provides flexible configurations for client connections to make interservice communication more reliable. These configurations allow us to retry operations based on the response status or error type we get from the gRPC response. Let’s look at an example to better understand how communication works and how we can handle error cases to have a better failover strategy.
In a distributed microservice architecture, a service may have multiple identical backends to handle a certain consumer load. Those backends have a discrete capacity, and loads from clients are distributed using load balancers. For example, saying “Call Payment service from Order service” does not mean we connect an endpoint that contains just one instance. This type of connection is called server-side load balancing: the client connects to a single endpoint, and that endpoint proxies requests to backend instances. Alternatively, the client may want to be able to connect multiple backends explicitly for the Payment service. This type of connection is called client-side load balancing.
We will use Kubernetes in upcoming chapters to handle our microservices in a containerization environment. Kubernetes provides an out-of-the-box solution for service communication, and we will use server-side load balancing. Now that we understand the initial concepts of client- and server-side load balancing, let’s take a detailed look at the characteristics of these strategies.
In server-side load balancing, the client makes an RPC call to a load balancer (or proxy). The load balancer distributes the RPC call to one of the available application instances (e.g., the Payment service), as shown in figure 5.2. The load balancer also tracks the load status of each instance to distribute the load fairly. The client application is not aware of actual backend instances for server-side load balancing.
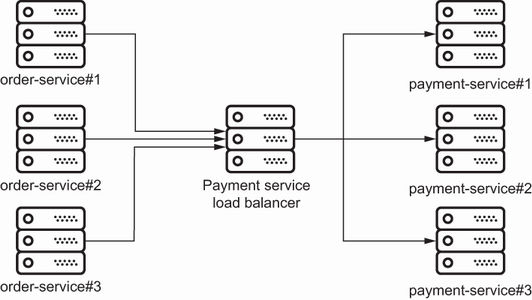
Figure 5.2 Server-side load balancing: the Order service calls the Payment service load balancer, and that load balancer proxies requests to backend instances.
There are different kinds of load balancing algorithms (http://mng.bz/rWVB), and with minimum configuration, the client can ignore the load report and use a round-robin algorithm in which traffic is distributed to backend instances in rotation. In client-side load balancing, the client knows the addresses of multiple backend instances of an application and chooses one of the available instances to make an RPC call. The client collects insights from backend instances to decide which backend service to call for fair distribution. In an ideal scenario, the client makes an RPC call to the backend instance, and the instance returns its load report so that the client can decide on instance selection (see figure 5.3).
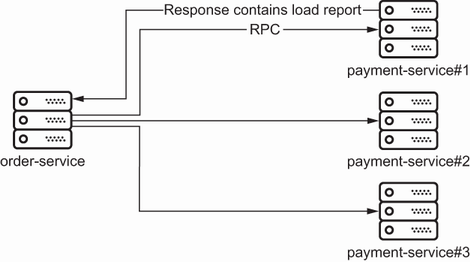
Figure 5.3 Client-side load balancing: the client is aware of backend instances, and it knows on which instance the next RPC call should be performed from the load report.
Table 5.1 summarizes the pros and cons of load-balancing strategies.
Table 5.1 Server-side LB versus client-side LB
Now that we understand the load balancer options for service communication, let’s look at how to use payment service stubs in the Order service.
In Go, package names are mostly structured around a version control system URL, such as GitHub. You must use your account and replace the username in import statements for dependency packages. For example, feel free to replace import "github.com/huseyinbabal/ microservices/order/internal/application/core/domain" with import "github.com/<your_ user_name>/microservices/order/internal/application/core/domain".
We described how to generate Go service source code out of .proto files and automated it within GitHub Actions in chapter 3. Those generated source files contain stubs for gRPC clients to call methods defined by the service. For example, the Order service, which we implemented in chapter 4, depends on the Payment service to charge the customer for specified order items. The Order service should include Payment service stubs to call the Create method on the Payment service. You can simply run the following command to add a payment module to the Order service project:
go get -u github.com/huseyinbabal/microservices-proto/golang/payment
This command will always download the latest version of the module, but you can also depend on a specific version to prevent unexpected behaviors like this:
go get -u github.com/huseyinbabal/microservices-
➥ proto/golang/payment@v1.0.38
This will fix the version of the payment module dependency so that you always get the same version whenever you refresh your dependencies. After you add the Payment service dependency to the Order service, you can use the following code to call the Payment service:
paymentClient := payment.NewPaymentClient(conn, opts)
paymentClient.Create(ctx, &CreatePaymentRequest{})
The primary motivation for creating a payment client is fulfilling the Order service’s goal: charge customers when they try to place an order. Now that we have seen a quick summary of how the Order service will use a payment client, let’s look at the implementation details of integrating the Payment service into the Order service.
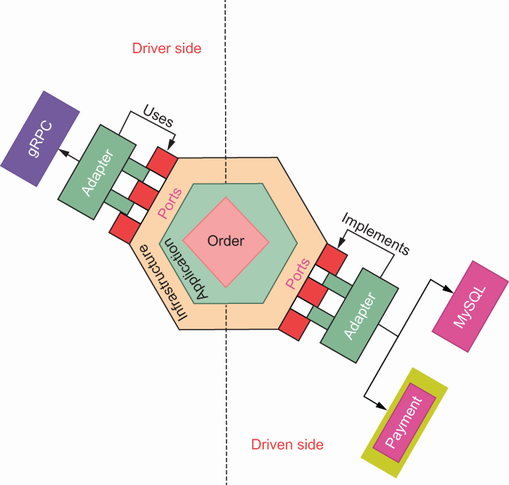
As discussed in chapter 4, a port is an interface that contains contracts about a business model in hexagonal architecture. When we say “port,” we mean the contract of a payment operation or a Go interface that contains payment-related function signatures, not the concrete implementation of a specific payment strategy. The main expectation from the payment port is adding the capability of inserting a payment step within the Order creation flow. This way, the Order service will never depend on a concrete implementation but on an interface. Because the Order service uses this payment port, this is located on the driven side of hexagonal architecture, as shown in figure 5.4.
There can be multiple implementations of payment ports, called adapters. If your adapter implementation is suitable for a payment port contract and contains identical function signatures with the port interface, you can easily plug that adapter into the payment port. This is done by dependency injection: you have the actual implementation of the payment port, and you simply initialize and add it to the Order domain model during application initialization to call it during the payment step.
We should have a payment port and adapter in the Order service to interact with the Payment service, as shown in figure 5.5. If we clearly state those components in the hexagon, the picture and design of the Order service based on those components are more visible.
Now that we understand how the Order service evolves with the payment module, let’s zoom into the payment port and adapter and review step-by-step explanations on how to implement a payment strategy for the Order service.
The payment port allows the Order service to call the Payment service (http://mng.bz/V1xP). To define a basic contract in a payment port, you can simply go to the Order service project we implemented in chapter 4 and create a payment port file: mkdir -p internal/ports && touch internal/ports/payment.go.
The payment port has only one functionality: charge. Simply pass the actual order object, and it charges the customer based on order details:
package ports

import "github.com/huseyinbabal/microservices/order/internal/application/
➥ core/domain"

type PaymentPort interface {
    Charge(*domain.Order) error
}
Now that we have PaymentPort, let’s see what the payment adapter looks like.
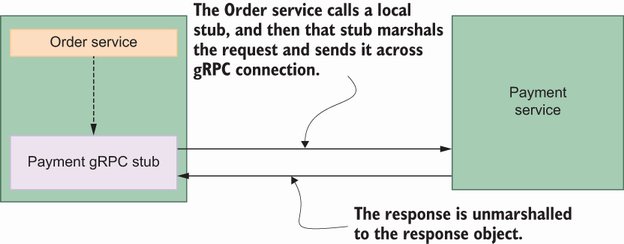
The primary motivation behind the payment adapter is to help the Order service access the Payment service to charge the customer. The payment adapter will depend on a payment stub from autogenerated source code managed in a separate repo (http://mng.bz/x42W; you can see the details in chapter 3). Simply call a function locally with a payment stub that runs on the remote server, the Payment service. This stub implementation is about marshalling requests on the client side (Order service), sending them through gRPC, then unmarshalling requests on the server side (Payment service) to call the actual function (figure 5.6).
Let’s create an adapter file to add concrete payment stub implementations: mkdir -p internal/adapters/payment && touch internal/adapters/payment/payment.go. Since the payment adapter depends on the payment stub from the autogenerated Go source code, its structure will look like the following in payment.go:
package payment

import (
    "context"
    "github.com/huseyinbabal/microservices-proto/golang/payment"
    "github.com/huseyinbabal/microservices/order/internal/application/core/
     ➥ domain"
    "google.golang.org/grpc"
    "google.golang.org/grpc/credentials/insecure"
)

type Adapter struct {
    payment payment.PaymentClient    ❶
}
❶ This comes from generated Go source.
Notice that the payment adapter is responsible for handling payment-related operations, and the Order service does not need to know these internals. The next step is to provide an initialization method to create a new adapter, like the one that follows, and you can append it to the payment.go file:
func NewAdapter(paymentServiceUrl string) (*Adapter, error) {
    var opts []grpc.DialOption                                      ❶
    opts = append(opts,
    ➥ grpc.WithTransportCredentials(insecure.NewCredentials()))    ❷
    conn, err := grpc.Dial(paymentServiceUrl, opts...)              ❸
    if err != nil {
        return nil, err
    }
    defer conn.Close()                                              ❹
    client := payment.NewPaymentClient(conn)                        ❺
    return &Adapter{payment: client}, nil
}
❶ Data model for connection configurations
❹ Always close the connection before quitting the function.
❺ Initializes the new payment stub instance
grpc.WithTransportCredentials(insecure.NewCredentials()) means disabling the TLS handshake during client-server connection. This is for simplifying the explanation of concepts, but we will dive deep into TLS-enabled connections in future chapters. Finally, we can implement the Charge method to satisfy the contract of the payment port using a payment stub: we can simply call the Create method through paymentClient, which is already injected in the payment adapter. Refer to the following implementation for simple payment creation using the order object in payment.go:
func (a *Adapter) Charge(order *domain.Order) error {
    _, err := a.payment.Create(context.Background(), &payment.CreatePaymentRequest{ ❶
        UserId:     order.CustomerID,
        OrderId:    order.ID,
        TotalPrice: order.TotalPrice(),
    })
    return err
}
❶ This request comes from an autogenerated Go code.
TotalPrice is calculated from order details, as follows:
func (o *Order) TotalPrice() float32 {
    var totalPrice float32
    for _, orderItem := range o.OrderItems {
        totalPrice += orderItem.UnitPrice * float32(orderItem.Quantity)
    }
    return totalPrice
}
For now, ignore the error handling part in this example, but we will get back to error handling soon. Let’s look at how we can provide configuration to the payment client so that it can request that endpoint.
In previous chapters, we set up a configuration system to access the specific configurations needed by the Order service. We need a payment service endpoint (or URL) for a payment stub to use, and the following function is a good candidate for resolving that:
func GetPaymentServiceUrl() string {
    return getEnvironmentValue("PAYMENT_SERVICE_URL")   ❶
}

func getEnvironmentValue(key string) string {           ❷
    if os.Getenv(key) == "" {
        log.Fatalf("%s environment variable is missing.", key)
    }

    return os.Getenv(key)
}
❶ This will be in the Order service env params.
❷ Validates env param exists and gets it
We assume that the value of PAYMENT_SERVICE_URL is somehow known for now, but we will see the internals of how to auto-discover the payment endpoint in chapter 8. Since we know how to get the payment endpoint, we can use the following code to initialize the payment adapter for the Order service:
paymentAdapter, err := payment.NewAdapter(config.GetPaymentServiceUrl())  ❶
if err != nil {
        log.Fatalf("Failed to initialize payment stub. Error: %v", err)   ❷
}
❶ The payment endpoint is available on the config object.
❷ The Order service will not run without the payment config.
The Order service needs this payment adapter to create an order successfully. To inject a payment adapter to the Order service, we can use following code within main.go:
func main() {
    dbAdapter, err := db.NewAdapter(config.GetDataSourceURL())
    if err != nil {
        log.Fatalf("Failed to connect to database. Error: %v", err)
    }

    paymentAdapter, err :=
    ➥ payment.NewAdapter(config.GetPaymentServiceUrl())
    if err != nil {
        log.Fatalf("Failed to initialize payment stub. Error: %v", err)
    }

    application := api.NewApplication(dbAdapter, paymentAdapter)    ❶
    grpcAdapter := grpc.NewAdapter(application,
    ➥ config.GetApplicationPort())
    grpcAdapter.Run()
}
❶ The payment adapter is now a must-have parameter.
As always, main.go is the place where we handle dependency injections. We create a payment and DB adapter and pass them to the Order service. Now that we understand how to implement and use a payment adapter to inject it into the Order service, let’s look at how we can make it available in the gRPC endpoint within order creation.
gRPC is one of the adapters in the Order service, as you can see in the internal/ adapters/grpc package. The gRPC adapter depends on APIPort, which is the core of the Order service:
type Adapter struct {
    api  ports.APIPort    ❶
    port int
    order.UnimplementedOrderServer
}

func NewAdapter(api ports.APIPort, port int) *Adapter {
    return &Adapter{api: api, port: port}
}
❶ This contains the payment adapter.
When you check the APIPort interface, you see it contains the payment adapter we implemented in this chapter. In the current implementation of order creation, the Create endpoint calls the PlaceOrder method of the APIPort:
func (a Adapter) Create(ctx context.Context, request
➥ *order.CreateOrderRequest) (*order.CreateOrderResponse, error) {
    var orderItems []domain.OrderItem
    for _, orderItem := range request.OrderItems {
        orderItems = append(orderItems, domain.OrderItem{
            ProductCode: orderItem.ProductCode,
            UnitPrice:   orderItem.UnitPrice,
            Quantity:    orderItem.Quantity,
        })
    }
    newOrder := domain.NewOrder(request.UserId, orderItems)
    result, err := a.api.PlaceOrder(newOrder)                ❶
    if err != nil {
        return nil, err
    }
    return &order.CreateOrderResponse{OrderId: result.ID}, nil
}
❶ The API knows how to use a payment adapter.
Once you go to the PlaceOrder method in internal/application/core/api/api.go, it saves order requests into the database with the PENDING state:
func (a Application) PlaceOrder(order domain.Order) (domain.Order, error) {
    err := a.db.Save(&order)
    if err != nil {
        return domain.Order{}, err
    }
    return order, nil
}
Now we add another step: calling the Payment service to charge the customer for that specific order:
func (a Application) PlaceOrder(order domain.Order) (domain.Order, error) {
    err := a.db.Save(&order)
    if err != nil {
        return domain.Order{}, err
    }
    paymentErr := a.payment.Charge(&order)    ❶
    if paymentErr != nil {
        return domain.Order{}, paymentErr
    }
    return order, nil
}
❶ Charges for the current order
Now that we understand how to call the Payment service within the gRPC endpoint, let’s look at how we can handle errors to decide on the next step of retrying or marking the operation as failed. As you can see, we call the Payment service, and for a specific reason: it may return an error. In the example, we return that error to the client side directly, but it is better to differentiate errors to take different actions on the client side.
Thus far, we have assumed that everything went well during service-to-service communication, which means the server returned an OK status message to the client. However, in real-life applications, there can be problems during service communication, and you need to understand what happened in these cases. If an error occurs, gRPC returns two basic pieces of information: a status code and an optional error message that explains the problem in detail. Let’s look at some of the status codes and their use cases.
gRPC uses predefined status codes within the RPC protocol that are understood among different languages. For example, for successful operations, gRPC returns an OK status code. All the remaining codes are about unsuccessful use cases:
CANCELLED—In this use case, the client calls the server, and for a specific reason, it cancels the request. For example, you call multiple services, and for whichever returns first, you use that data and cancel the other requests.
INVALID_ARGUMENT—This status code is caused by the caller in that it provides invalid input, and the server complains about that. For example, the server will return this status code if you provide an empty order ID during payment creation.
DEADLINE_EXCEEDED—This status code shows that the deadline expired before the actual operation could complete. For example, say you configure your client to have a deadline of 5 seconds. If you call an endpoint with this client and it takes 6 seconds to complete, you will see it will get DEADLINE_EXCEEDED after 5 seconds before the actual operation finishes.
NOT_FOUND—This status code states that a resource is not found. For example, you want to get order details by ID, but you get NOT_FOUND since there is no order with that ID.
ALREADY_EXISTS—This status code is for preventing resource duplication. For example, if you try creating a user with an existing email address, the server will return this status code.
PERMISSION_DENIED—If the operation is not allowed for the current caller, the server will return this status code. You might be already logged into the system, but the resource you are trying to access may need higher permissions.
RESOURCE_EXHAUSTED—This code is used once the caller reaches its limit for usage. For example, you may have a quota for a Software as a Service (SaaS) product; then, once you reach the limit for the product in that environment, the server will return this status code.
INTERNAL—This status code is used for internal server errors.
(See the gRPC status codes here: http://mng.bz/Aodz.) Now that we understand the meanings of gRPC status codes, let’s look at how we can use them in gRPC responses.
Consider the following code from the Payment service to better understand the error structure:
func (a Adapter) Create(ctx context.Context, request
➥ *payment.CreatePaymentRequest) (*payment.CreatePaymentResponse, error) {
    newPayment := domain.NewPayment(request.UserId, request.OrderId,
    ➥ request.TotalPrice)
    result, err := a.api.Charge(newPayment)                             ❶
    // Assume it returns something like => err = errors.New("failed to
       ➥ charge customer")
    if err != nil {
        return nil, err
    }
    return &payment.CreatePaymentResponse{PaymentId: result.ID}, nil
}
❶ Assume this returns an error.
If you call the Create endpoint of the Payment service with the following command, the result will create a clear picture:
grpcurl -d '{"user_id": 123, "order_id":12, "total_price": 32}' -plaintext
➥ localhost:3001 Payment/Create
ERROR:
  Code: Unknown
  Message: failed to charge the customer
As you can see, the Message field is there, but what about the code field? That is missing because we simply returned an error object instead of gRPC status. Let’s refine the code a bit so that it also returns code:
func (a Adapter) Create(ctx context.Context, request
➥ *payment.CreatePaymentRequest) (*payment.CreatePaymentResponse, error) {
    newPayment := domain.NewPayment(request.UserId, request.OrderId,
    ➥ request.TotalPrice)
    result, err := a.api.Charge(newPayment)         ❶
    // Assume it returns => err = status.Errorf(
        codes.InvalidArgument,
        fmt.Sprintf("failed to charge user: %d", request.UserId))
    if err != nil {
        return nil, err
    }
    return &payment.CreatePaymentResponse{PaymentId: result.ID}, nil
}
❶ Assume this returns an error.
Once we make another payment Create endpoint call, you will see the following response:
grpcurl -d '{"user_id": 123, "order_id":12, "total_price": 32}' -plaintext
➥ localhost:3001 Payment/Create
ERROR:
  Code: InvalidArgument
  Message: failed to charge user: 123
Error codes help you understand the error category and decide on the next step. Now that we know how to return errors with their statuses and codes, let’s try to add more details to those errors for a better understanding of the root cause of the problem.
In the previous example, we assumed that the customer’s credit card failed to charge, and, in this case, we should propagate this error to the Order service to let it return a proper message to the consumer. Since the Order service depends on multiple services, such as the Payment and Shipping services, any error can be caused by several reasons: insufficient balance, invalid shipping address, and so on. The gRPC status package has another constructor to allow passing more details to the status object. The following code is a good example for explaining why the order creation failed:
func (a Application) PlaceOrder(order domain.Order) (domain.Order, error) {
    err := a.db.Save(&order)
    if err != nil {
        return domain.Order{}, err
    }
    paymentErr := a.payment.Charge(&order)
    if paymentErr != nil {
        st, _ := status.FromError(paymentErr)                             ❶
        fieldErr := &errdetails.BadRequest_FieldViolation{
            Field:       "payment",
            Description: st.Message(),
        }                                                                 ❷
        badReq := &errdetails.BadRequest{}                                ❸
        badReq.FieldViolations = append(badReq.FieldViolations, fieldErr) ❹
        orderStatus := status.New(codes.InvalidArgument, "order creation
        ➥ failed")                                                       ❺
        statusWithDetails, _ := orderStatus.WithDetails(badReq)           ❻
        return domain.Order{}, statusWithDetails.Err()
    }
    return order, nil
}
❶ Resolves status from a payment error
❷ Payment error as a separate field
❸ Initiates a bad request error
❹ Populates with an actual payment detail
❻ Augments the status with a payment error
Here, we reuse the error from the Payment service and return the new error from the Order service. If you make another call to create an endpoint from the Payment service, you will get following:
grpcurl -d '{"user_id": 123, "order_items":[{"product_code":"sku1",
➥ "unit_price": 0.12, "quantity":1}]}' -plaintext localhost:3000
➥ Order/Create
ERROR:
  Code: InvalidArgument
  Message: order creation failed
  Details:
  1)    {"@type":"type.googleapis.com/google.rpc.BadRequest","fieldViolations":
     ➥ [{"field":"payment","description":"failed to charge. invalid billing
     ➥ address "}]}
As you can see, the error structure iteratively stays refactored so that those messages can be propagated to the user. Now that we know how to return more detailed status objects from a gRPC endpoint, let’s look at how we can handle those messages on the client side.
In our examples, the Order service is a Payment service client because it charges users for specific orders. If a problem occurs during a charge operation, the Payment service returns an error, and the Order Service should understand what happened to the operation. In a typical status response, there can be an error and a message to explain what happened. To handle this status on the client side, the gRPC status package provides a function to resolve the status from the error. The PlaceOrder endpoint of the Order service would get an error from the Payment service Create endpoint. In this case, we can resolve the status object from the error object. Since any gRPC service may call multiple services to aggregate data, it is also valuable to group errors to understand the source of the error in the response:
func (a Application) PlaceOrder(order domain.Order) (domain.Order, error) {
    err := a.db.Save(&order)
    if err != nil {
        return domain.Order{}, err
    }
    paymentErr := a.payment.Charge(&order)
    if paymentErr != nil {
        st, _ := status.FromError(paymentErr)                            ❶
        fieldErr := &errdetails.BadRequest_FieldViolation{
            Field:       "payment",
            Description: st.Message(),
        }                                                                ❷
        badReq := &errdetails.BadRequest{}
        badReq.FieldViolations = append(badReq.FieldViolations, fieldErr)
        orderStatus := status.New(codes.InvalidArgument, "order creation
        ➥ failed")                                                      ❸
        statusWithDetails, _ := orderStatus.WithDetails(badReq)          ❹
        return domain.Order{}, statusWithDetails.Err()
    }
    return order, nil
}
❶ Status object from a payment error
❹ Populates with a payment error
This example assumes the Payment service returns a simple status object with code and a message, but if it returns the message with details, we may need to extract those field violations separately. In that case, we can use the built-in status.Convert() instead of status.FromError():
func (a Application) PlaceOrder(order domain.Order) (domain.Order, error) {
    err := a.db.Save(&order)
    if err != nil {
        return domain.Order{}, err
    }
    paymentErr := a.payment.Charge(&order)
    if paymentErr != nil {
        st := status.Convert(paymentErr)                               ❶
        var allErrors []string                                         ❷
        for _, detail := range st.Details() {
            switch t := detail.(type) {
            case *errdetails.BadRequest:                               ❸
                for _, violation := range t.GetFieldViolations() {
                    allErrors = append(allErrors, violation.Description)
                }
            }
        }
        fieldErr := &errdetails.BadRequest_FieldViolation{
            Field:       "payment",
            Description: strings.Join(allErrors, "\n"),
        }                                                              ❹
        badReq := &errdetails.BadRequest{}
        badReq.FieldViolations = append(badReq.FieldViolations, fieldErr)
        orderStatus := status.New(codes.InvalidArgument, "order creation
        ➥ failed")                                                    ❺
        statusWithDetails, _ := orderStatus.WithDetails(badReq)        ❻
        return domain.Order{}, statusWithDetails.Err()
    }
    return order, nil
}
❶ Converts a complex error to a status
❺ A root error on the Order service
❻ Expands the root error with details
During interservice communication, we may not need to convert statuses frequently, but when it comes to software development kits (SDKs), such as a client implementation, your entire application may need to handle those error messages, as shown, to understand what happened in the system and provide a meaningful message to the end user. We’ve completed all the Payment and Order service steps; now let’s see how to run them.
As a reminder, you can access the payment module here: http://mng.bz/V1xP. If you have already cloned the repository, simply go to the payment folder and run the following:
DB_DRIVER=mysql \
DATA_SOURCE_URL=root:verysecretpass@tcp(127.0.0.1:3306)/payment \   ❶
APPLICATION_PORT=3001 \
ENV=development \
go run cmd/main.go
❶ Changes DB URL based on your setup
Now the Payment service is available on port 3001. Let’s go to the order module and run the Order service with a configuration that also includes the location of the Payment service:
DB_DRIVER=mysql \
DATA_SOURCE_URL=root:verysecretpass@tcp(127.0.0.1:3306)/order \   ❶
APPLICATION_PORT=3000 \
ENV=development \
PAYMENT_SERVICE_URL=localhost:3001 \                              ❷
go run cmd/main.go
❶ Points the DB URL to running a MySQL instance
❷ Endpoint for the Payment service
Now we have two local running services, and we only call the Order service. Once it is needed, the Order service will call the Payment service in the background. In other words, the Payment service is not open to the public since there is no suitable endpoint for the end user, whereas the Order service is open to the end user. The Order service can call the Payment service because they are in the same network.
Because the Order service depends on the Payment service, the Payment service can be defined as the outgoing port and adapter within the Order service hexagon.
If a typical service calls another service, it can use stubs of the other service to initialize and call any endpoint available on the second service.
A separate repository for .proto files helps us share generated code in services and client SDKs that can be used to generate source code for different services; a service depends on another service’s stub to call it.
In the client-side load-balancing technique, the caller knows the location of the service endpoints; in the server-side load-balancing approach, the caller trusts the server because the server knows the downstream services.
The status package provides a more structured way than returning pure errors to return the status code and descriptive error message and better understand what happened.