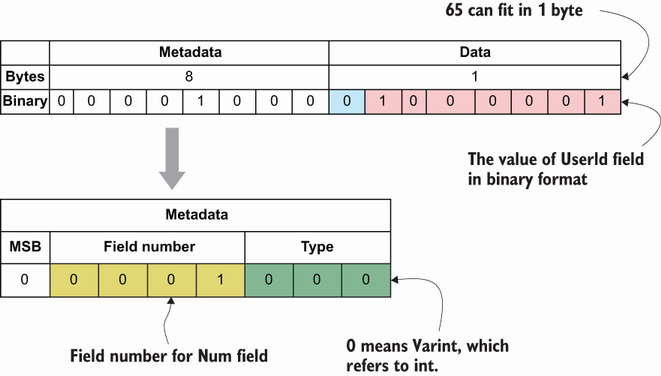
Figure 3.1 Protocol buffer encoding contains data and metadata sections.
The communication between two services is just like two people talking: people use a telephone to connect, and gRPC does the same thing for interservice communication. In the same way that people use language to understand each other, two services use protocol buffers to exchange messages. It is crucial to select the proper communication style to create an effective relationship. Now that we understand that vital communication strategy, let’s see how protocol buffers and gRPC are used together in microservice communication.
Protocol buffers allow you to serialize structured data to be transmitted over a wire. You can also define service functions and generate language-specific source code. The definitions of messages and service functions are written in a configuration file called a .proto file, which also contains version information for the protocol we will use (proto3) within this book. There are two other versions: proto1, which is deprecated, and proto2. The primary motivation behind the proto3 release is to simplify the syntax used in proto2. (For a detailed comparison of proto3 and proto2, see https://www.hackingnote.com/en/versus/proto2-vs-proto3.) You already saw a sample message in chapter 2, so let’s dive a bit deeper this time.
Let’s say you want to define a CreateOrderRequest message format in that each CreateOrderRequest has a user_id, items, and amount. In this case, the content of the .proto file would be like this:
syntax = “proto3”                ❶
message CreateOrderRequest {
  int64 user_id = 1;             ❷
  repeated Item items = 2;       ❸
  float amount = 3;              ❹
}
❸ List of items for this order
❹ Total amount of this order that should be paid
Let’s focus on the meaning of each part for each field in CreateOrderRequest.
Message fields can be one of the following:
Singular—A structured message can have at most one of these fields. This field is the default field rule.
Repeated—Any field with this rule may contain multiple values, including zero. The order of these items is preserved. In the previous example, multiple item values can be in the message (e.g., a customer ordered multiple products simultaneously).
Field types are the data type of each field and can be one of the scalar types, such as string and integer. (See a complete list of the scalar types at http://mng.bz/N2VN.) These can be enums or any other embedded message type. The embedded type is Item in the previous example since it should also be defined in the .proto file as a custom type.
The Protobuf compiler requires naming conventions for field naming since it generates source code for multiple languages by relying on those rules. The field name should be lowercase; if it contains more than one word, it should be separated by an underscore (e.g., user_id).
Each field has a unique identifier in the message to identify the field in the binary message format. Since field numbers are unique identifiers for the fields, those numbers shouldn’t be changed to provide a backward compatibility guarantee. If you want to remove a field, it is best to reserve it with the reserved keyword before removing it to prevent future definitions with the same field number or name. You can also reserve those fields by using their field numbers one by one or by a range with the help of the to keyword. For example, removing the customer_id field with field number 3 and adding a new field with the same field name or number with a different type will cause problems. If the client has the old message definition and the server has the new one, a data compatibility problem will result because they contain the same field but the data types are different:
message CreateOrderRequest {
  reserved 1, 2, 3 to 7;      ❶
  reserved "customer_id";     ❷
  int64 user_id = 7;
  repeated Item items = 8;
  float amount = 9;
}
❶ Reservation by single or ranged numbers such as 3 to 7
❷ customer_id is reserved since user_id is introduced.
Required fields in a message can be thought of as frequently used fields since you cannot skip them as you can for optional fields. It is a best practice to reserve some numbers between 1 and 15 for the fields that can be frequently used since the numbers take 1 byte to encode in that range. For example, if you introduce a field with the name correlation_id, and it is used in almost all types of requests, you can assign one of the pre-reserved numbers for this new field. In the same way, it takes 2 bytes to encode numbers from 16 to 2,047. Giving frequently used fields numbers between 1 and 15 will increase performance quality. Now that we understand how to create a simple message, let’s look at how protocol buffer messages are converted into a binary wire format.
The main goal of protocol buffer encoding is to convert .proto file content into a binary format to send over a wire. The protocol buffer compiler uses a set of rules to convert messages to a binary format for better performance during marshalling (serializing), sending (over a wire), and unmarshalling (deserializing) this data. Let’s analyze the example that follows and see how protocol buffer encoding works under the hood.
The CreateOrderRequest message has only one field, user_id, with type int, and field number 1. We compiled this message and used it in our production code:
// order.proto
message CreateOrderRequest {
    int64 user_id = 1;
}


// main.go
request := CreateOrderRequest{
    UserId: 65
}

// send a request via gRPC
The request object is marshalled by the protocol buffer (http://mng.bz/D49n) into []byte to be able to be sent over gRPC. Marshalling results in some bytes containing encoding information of the metadata and the data itself (see figure 3.1):
The metadata section is expressed with 1 byte and has the first three bits for denoting the wire type: 000, which is type 0 (Varint) since our data type is int. (You can see the whole list here: http://mng.bz/QPV6.)
The first bit of the data section is called the most significant bit (MSB), and its value is 0 when there is no additional byte. Its value becomes 1 if more bytes come to encode the remaining data.
The remaining bits of the metadata section contain the field value.
The data section contains the MSB (i.e., a continuation bit) to state whether there are more bytes.
A field’s value can be anything based on your needs, and thus cannot affect performance. However, we can affect performance by following some rules for field numbers. For example, you can use numbers less than or equal to 15 for field numbers since that is the maximum number a metadata block can store. More metadata blocks are needed to express a specified field number. In the same way, if you want to store a data value greater than 127 (the maximum capacity of a data block), you need more bytes to fit that value in those data blocks.
Now that we understand how protocol buffer encoding works for a simple object with a field number less than or equal to 15 and for data values greater than 127 bytes, let’s see how to encode an object with a value greater than 127. Let’s say that the CreatePaymentRequest message has only one field, user_id, with type int, and field number 2. We compiled this message and used it in our production code:
// order.proto
message CreatePaymentRequest {
    int64 user_id = 2;
}


// main.go
request := CreatePaymentRequest {
    UserId: 21567
}

// send a request via gRPC
The Protobuf compiler will marshal the request object into a []byte, and the metadata section will be encoded, just like the previous example and as visualized in figure 3.2. The data section will be handled this way:
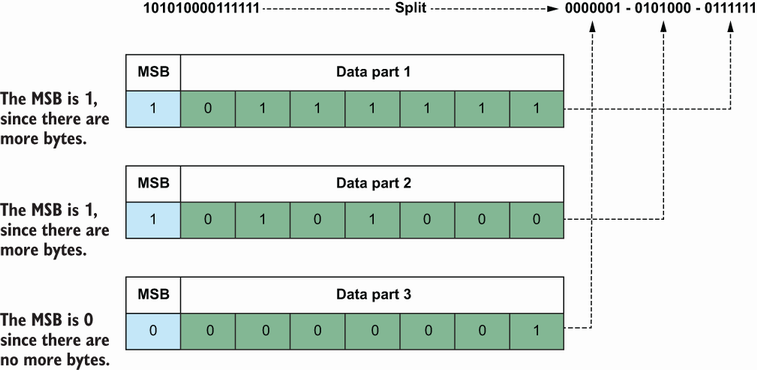
Convert the decimal value 21567 to a binary value: 101010000111111.
Split the binary value into seven-bit blocks: 0000001-0101000-0111111.
The seven-bit block is for data, and the last bit will be used to store MSB.
Reverse the order of data parts (https://betterexplained.com/articles/understanding-big-and-little-endian-byte-order/), which will result in 0111111-0101000-0000001.
Since there are three data parts here, the first will have the MSB as 1, the second as 1, and the 3rd as 0 since no more bytes come after that.
These examples can be expanded, but they are enough to better understand how protocol buffer encoding contributes to gRPC’s performance for exchanging messages. In other words, instead of exchanging messages as they are, which will result in larger data size, they are converted into a binary format with proper encoding to reduce data size.
gRPC Stub is a module that acts as an interface for the gRPC client. You can do several things using those stubs, such as connect and exchange data via streaming or nonstreaming notation. The protocol buffer compiler generates the source code for a specified language, and that source code contains all the stubs. You can import generated source code into both the client and server sides to implement the business logic by following the contracts defined in the interfaces.
To generate source code from .proto files, first install protoc, the protocol buffer compiler (https://grpc.io/docs/protoc-installation/). Then install two more modules to help protoc generate source code specific to the Go language:
go install google.golang.org/protobuf/cmd/protoc-gen-go@latest

go install google.golang.org/grpc/cmd/protoc-gen-go-grpc@latest
Let’s say you are about to implement a client-server application in which the client sends a create order request, and the server handles it. To do this, you can use the following .proto file to generate stubs using protoc:
syntax = “proto3”;
option go_package=" GitHub/huseyinbabal/microservices/order";  ❶

message CreateOrderRequest {
    int64 user_id = 1;
    repeated Item items = 2;
    float total_price = 3;
}

message Item {
    string name = 1;
}

message CreateOrderResponse {
    int order_id = 1;
}

service Order {
    rpc Create(CreateOrderRequest)
    returns (CreateOrderResponse){}
}
❶ Package name for the generated file
protoc mainly accepts the following parameters to generate language-specific source code:
-I—To specify the import path where imported packages in .proto files are searched
--go_ou—To specify where to put generated Go code for messages
--go_opt—To configure options for Go source code generation, such as paths=source_relative, to keep the same folder structure after source code generation
--go-grpc_out—To define the destination folder of gRPC-specific Go source code, such as calling a service function
--go-grpc_opt—To configure options for gRPC-related operations, such as paths=source_relative, to have the same folder structure after source code generation
Let’s say that the .proto file is proto/order.proto. In this case, the commands that follow will generate two files, order.pb.go, for message-related operations, and order_ grpc.pb.go, which contains gRPC-related functionalities.
Listing 3.1 Generation Go source code
protoc -I ./proto \                         ❶
   --go_out ./golang \                      ❷
   --go_opt paths=source_relative \         ❸
   --go-grpc_out ./golang \                 ❹
   --go-grpc_opt paths=source_relative \    ❺
   ./proto/order.proto                      ❻
❶ Imported packages will be searched in this location.
❷ Location of generated source code for messages
❸ Output files are placed in the same relative directory as the input file.
❹ Location of generated source code for service functions
❺ Output files are placed in the same relative directory as the input file.
When you open the generated order_grpc.pb.go file, you see a function, NewOrderClient(...), that returns an interface, OrderClient. There is a convention for functions like New<ServiceName>Client and <ServiceName>Client for the interface when <ServiceName> is the name of the service specified in the .proto file, which is Order. You can use the generated source code if the files are in your main project. Typical usage involves creating OrderClient and calling the Create method:
// Inside another module in the same project
import "GitHub/huseyinbabal/microservices/order"
...
client := order.NewOrderClient(...)
client.Create(ctx, &CreateOrderRequest{
    UserId: 123
})
Don’t worry about the missing part for now. We will see complete examples in upcoming chapters. This example shows how quickly you can create a client instance and call methods specific to the order domain. You don’t need to deal with connection-related operations; serializing/deserializing is handled out of the box.
Using autogenerated source code in the same project structure is easy, but what if you need to use those files as a dependency in external projects? For example, you generated stubs for the Payment, Order, and Shipping service and now want to use them in another project that can be written in another language other than Go. In this case, it would be better to maintain .proto files in a separate repository. However, keeping .proto files and their generations in the same location is easier if you are using a mono repo. Let’s look at how we can maintain .proto files and generate them in a separate repository.
In this section we’ll see how to prepare a separate repository to maintain .proto files, generate source code for multiple languages, and keep the files in dedicated folders. The primary reason to maintain .proto files in a separate repository is to be able to generate stubs for any language for use by any consumer. If we keep those operations within a microservice project that contains Go production codes, then any external non-Go consumer can depend on this Go project. Generated Java source codes in a Go microservices project may not be a good idea since they will never be used for interservice communication. They will, however, still be shipped and tagged with your production Go source code.
Assume you created a repository, github.com/huseyinbabal/microservices-proto, with dedicated folders for each service to store .proto files. This project will have the following characteristics:
.proto files are grouped by service folders such as order/order.proto in the root folder.
There is a folder inside the root project for each language to store language-specific implementations.
Generated source code for each service will be formatted as a typical Go module project since it will be added as a dependency on the consumer side.
Generated source code will be tagged: golang/<service_name>/<version> (e.g., golang/order/v1.2.3). This is the convention for the Go module to resolve the dependency that lives in subfolders in the remote repository:
├── golang                     ❶
│   ├── order
│   │   ├── go.mod             ❷
│   │   ├── go.sum             ❸
│   │   ├── order.pb.go        ❹
│   │   └── order_grpc.pb.go   ❺
│   ├── payment
│   │   ├── go.mod
│   │   ├── go.sum
│   │   ├── payment.pb.go
│   │   └── payment_grpc.pb.go
│   └── shipping
│       ├── go.mod
│       ├── go.sum
│       ├── shipping.pb.go
│       └── shipping_grpc.pb.go
├── order
│   └── order.proto
├── payment
│   └── payment.proto
└── shipping
    └── shipping.proto
❶ Generated code location for the Go language
❷ File that contains dependencies for order service
❸ Checksum definitions for go.mod file
❹ Generated Go code for messages
❺ Generated Go code for service functions
We already saw how to generate Go source code, so let’s tag the project to make each generated service code downloadable as dependencies on the consumer side.
Golang’s dependency version refers to a Git object as a tag, branch, or commit hash. In the dependent project, titles take a snapshot of the codebase to specify a specific release so that you can check any release for its release notes and use that tag. If there is no tag, the feature development is not read, and you can point your dependency to a branch or commit hash. Let’s say you finalized your implementations for order, payment, and shipping services and want to use them for interservice communication or with external consumers. Tagging will make the repository discoverable for that version, a specific pointer to subfolders. For example, if you tag the repository github.com/huseyinbabal/microservices-proto as golang/order/v1.2.3, the source codes under golang/order will be available to the client. Tags can be different for each project:
git tag -a golang/order/v1.2.3 -m "golang/order/v1.2.3"
git tag -a golang/payment/v1.2.8 -m "golang/payment/v1.2.8"
git tag -a golang/shipping/v1.2.6 -m "golang/shipping/v1.2.6"
git push --tags
Once the tags are successfully pushed to remote, you can download the latest version or a specific version of the packages to use on the client side. You can use the latest version if you want to stay up to date on a dependency. You may also want to use a static version to be safe, since the latest tag can have incompatible changes that break the client:
go get -u github.com/huseyinbabal/microservices-proto/golang/order@latest
go get -u github.com/huseyinbabal/microservices-proto/golang/order@v1.2.3
This is just a brief introduction to module versioning. We will revisit this topic in chapter 5 in detail.
Manually handling these generations and tagging processes can be a bit painful as the service count increases. Next, let’s look at how we can automate this process using GitHub Actions as an example of CI/CD.
GitHub Actions is a CI/CD platform that allows you to automate a building, testing, and deployment pipeline. All the pipeline steps can be defined in the workflow file that GitHub can detect under your repository’s .github/workflows folder. You don’t need to be an expert on GitHub Actions to fully understand the examples, but, since we are using GitHub Actions examples to explain CI/CD parts of this book, you may want to look at the very short GitHub Actions Quickstart tutorial on Github: https://docs.github.com/en/actions/quickstart.
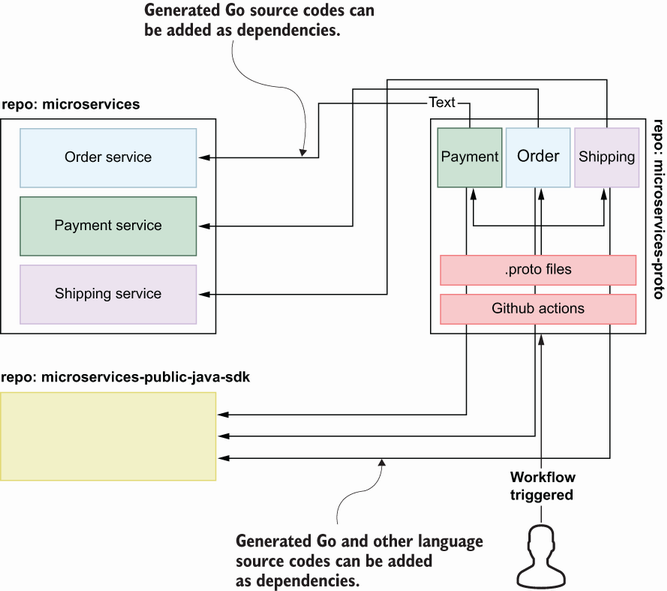
As you can see in figure 3.3, Go source codes for Payment, Order, and Shipping services are generated using GitHub Actions whenever the user sends a change to the repository that contains .proto files for each service. The basic steps for the automation of .proto file compilation and Git tagging are as follows:
The workflow file is created under the .github/workflows folder, and the run.sh source code generator is in the root folder.
Local changes are pushed to remote and tagged by a specific version, such as v1.2.3.
Job execution installs required tools such as protoc and executes required commands for Go source code generation.
Step 4 is performed for each service with a matrix strategy (http://mng.bz/Pz58).
The Go mod init github.com/huseyinbabal/microservices-proto/golang/ <service_name> command is executed for each service.
New tags are created and pushed to remote by using current content, and new tags look like the code that follows.
Listing 3.2 Go source code autogeneration
#!/bin/bash
SERVICE_NAME=$1
RELEASE_VERSION=$2

sudo apt-get install -y protobuf-compiler golang-goprotobuf-dev    ❶
go install google.golang.org/protobuf/cmd/protoc-gen-go@latest
go install google.golang.org/grpc/cmd/protoc-gen-go-grpc@latest
protoc --go_out=./golang --go_opt=paths=source_relative \          ❷
  --go-grpc_out=./golang --go-grpc_opt=paths=source_relative \
 ./${SERVICE_NAME}/*.proto
cd golang/${SERVICE_NAME}
go mod init \                                                      ❸
  github.com/huseyinbabal/microservices-proto/golang/${SERVICE_NAME} ||true
go mod tidy                                                        ❹
cd ../../
git config --global user.email "huseyinbabal88@gmail.com"
git config --global user.name "Huseyin BABAL"
git add . && git commit -am "proto update" || true
git tag -fa golang/${SERVICE_NAME}/${RELEASE_VERSION} \
  -m "golang/${SERVICE_NAME}/${RELEASE_VERSION}"
git push origin refs/tags/golang/${SERVICE_NAME}/${RELEASE_VERSION}
❶ Installation of required compilation tools
You can see that the code in listing 3.2 is a standalone Bash script to generate the Go source code for just one service. This standalone script should be called for each service to generate the Go source code. In this script, we simply download the dependencies required to generate the source code from the .proto files. After the source code is generated, it is initialized as a Go mod project and pushed to a remote repository to be consumed by client-side applications. Let’s see how this source code generation Bash script is used within the GitHub Actions workflow.
It is straightforward to run similar jobs in GitHub Actions using the matrix strategy, which allows you to use variables in job definitions to create multiple jobs with combinations of the variables. For example, you may want to execute a job for various services, or you can build numerous binaries by using different versions for one service. In the following example, source code generation is performed for order, payment, and shipping services whenever a tag is pushed to remote:
name: "Protocol Buffer Go Stubs Generation"
on:
  push:
    tags:
      - v**                                                                ❶
jobs:
  protoc:
    name: "Generate"
    runs-on: ubuntu-latest
    strategy:
      matrix:
        service: ["order", "payment", "shipping"]                          ❷
    steps:
      - name: Install Go
        uses: actions/setup-go@v2
        with:
          go-version: 1.17
      - uses: actions/checkout@v2
      - name: Etract Release Version
        run: echo "RELEASE_VERSION=${GITHUB_REF#refs/*/}" >> $GITHUB_ENV   ❸
      - name: "Generate for Golang"
        shell: bash
        run: |
          chmod +x "${GITHUB_WORKSPACE}/run.sh"                            ❹
          ./run.sh ${{ matrix.service }} ${{ env.RELEASE_VERSION }}        ❺
❶ Workflow is triggered once a tag (e.g., v1.2.3) is pushed.
❷ List of services to be generated
❹ Makes Bash script executable
❺ Go source code generation for each service
This example references protoc usage inside a GitHub Actions workflow (http://mng.bz/d16N), but you can still see the complete example in listing 3.2. (Refer to chapter 2, section 2.5.2.)
If this is the first time you’ve see GitHub Actions, workflow definitions may seem complicated, but don’t worry; there are examples in other chapters for automating operations such as deployment. This automation can significantly increase productivity because all you need to do is add is the experimental messages and service functions, tag them, and let GitHub Actions complete the remaining tasks. (Refer to figure 3.3 for more precise insight into the automation described.) Now that we know how to compile .proto files and automate this process at a high level, let’s look at what we can do to provide better compatibility between client and server.
The software development process is not a one-time operation; it constantly evolves. This evolution always introduces changes to the system. If those changes do not affect existing users, it is called backward compatible change, which provides a graceful upgrade mechanism for your end users’ integrations to your product. If a system is not backward compatible, it automatically forces users to upgrade their client library, which may not always be possible.
Forward compatibility involves processing input for the system with the latest version. A typical example is a web browser that can handle a newer version of HTML and simply ignore the part it cannot understand. Since writing software that is both backward and forward compatible is important, especially for client-facing APIs, let’s examine some use cases you can use to validate whether the change is backward or forward compatible.
As mentioned, gRPC lets us exchange messages between services, and those services should be carefully maintained, especially while changing something in message fields. Most of the time, you can add new fields to messages freely, but it is important to validate in advance if the new field you add is already reserved by field number or field name.
Let’s say that CreatePaymentRequest has only the price field, and it returns CreatePaymentResponse with total_price, which contains the final price, the sum of price, and VAT. In this scenario, the message is upgraded to v2 on the server side but is still v1 on the client side. The client side can live with v1, but the server side should change its implementation to support old client message types:
message CreatePaymentRequest {
    float64 price = 1;
}

message CreatePaymentResponse {
    float64 total_price = 1;
}

service Payment {
    rpc Create(CreatePaymentRequest) returns (CreatePaymentResponse){}
}


func (p *Payment) Create(ctx, req *pb.CreatePaymentRequest)
➥ (*pb.CreatePaymentResponse, error) {
    return &CreatePaymentResponse{
        TotalPrice: VAT + req.Price
    }, nil
}
Now let’s add a vat field to CreatePaymentRequest and update the server-side implementation:
message CreatePaymentRequest {
    float64 price = 1;
    float64 vat = 2;
}

 func (p *Payment) Create(ctx, req *pb.CreatePaymentRequest)
 ➥ (*pb.CreatePaymentResponse, error) {
    return &CreatePaymentResponse{
        TotalPrice: req.Vat + req.Price
    }, nil
}
Old clients will continue to send requests without the vat field, which will cause an inconsistency in the TotalPrice field. We can update the server-side implementation to use a default VAT if there is no vat in the request payload:
Func (p *Payment) Create(ctx, req *pb.CreatePaymentRequest) (*pb.CreatePaymentResponse, error) {
    vat := VAT
    if req.Vat > 0 {
        vat = req.Vat
    }
    return &CreatePaymentResponse{
        TotalPrice: vat + req.Price
    }, nil
}
If we upgrade the client but not the server, the client message type is upgraded to v2:
message CreatePaymentRequest {
    float64 price = 1;
    float64 vat = 2;
}
The server still uses the old message type, which does not expect a vat field, and a default value, VAT, for calculation. However, since the client sends this in the request, the server side will use the default value VAT and ignore the vat value within the request payload, but at least it will not throw an error.
Let’s say you have multiple fields in a message that require one or the other but not both. For example, CreatePaymentRequest has both credit_card and promo_code fields, but you can send only one at a time. The oneof feature is used for enforcing this behavior instead of trying to put extra logic in actual implementation:
message CreatePaymentRequest {
    oneof payment_method  {
        CreditCard credit_card = 1;
        PromoCode promo_code = 2;
    }
}
After a while, remove the promo_code option from the list, tag the message type as v2, and upgrade the server side. If the client uses v1 and sends promo_code in the request, the information about promo_code will be lost on the server side since it is an unknown field. Removing a field from oneof is a backward-incompatible change, and adding a new field to oneof is a forward-incompatible change. If there is an incompatible change in your message field, you need to introduce an update to your semantic version (https://semver.org/) so that consumers will know there is a breaking change. Consumers will need to check the release notes page of the new release to make the necessary changes on the client side and avoid compatibility problems.
This time a regular field is moved into or out of oneof group, which causes a data loss. Let’s say that you have the following request to send CreatePaymentRequest:
message CreatePaymentRequest {
    oneof payment_method {
        CreditCard credit_card = 1;
    }
    PromoCode promo_code = 2;
}
After a while, we decide to move the promo_code field into one of the groups. The message is as follows:
message CreatePaymentRequest {
    oneof payment_method {
        CreditCard credit_card = 1;
        PromoCode promo_code = 2;
    }
}
If the client used the first message, set credit_card and promo_code fields, and sent them to the server with the second version of the message, then either promo_code or credit_card will be lost since you cannot send multiple fields for a oneof group.
Use cases about compatibility problems can be extended. Still, it is enough to understand that we should be cautious while changing fields, especially when reusing an already used field number or name. Changes should always be backward and forward compatible to prevent disruption on both the client and server side.
The protocol buffer compiler uses a special encoding operation to marshal data into a [] byte for excellent performance on the gRPC protocol.
The protocol buffer compiler helps us generate language-specific source code that we can maintain in the same repo or an independent repository.
GitHub Actions allows us to automate source code generation and tagging by using a workflow definition.
Introducing changes that are always backward and forward compatible is crucial to prevent service disruption or data loss.