So far this book has almost completely avoided two fundamental terms of systems programming: threads and processes. Instead, the book has used the single term: program. This chapter expands our vocabulary.
Processes, threads, and containers are abstractions created to enable multiple tasks to be carried out at the same time. This enables concurrency. Its peer term, parallelism, means to make use of multiple physical CPU cores at the same time.
Counterintuitively, it is possible to have a concurrent system on a single CPU core. Because accessing data from memory and I/O take a long time, threads requesting data can be set to a blocked state. Blocked threads are rescheduled when their data is available.
Concurrency, or doing multiple things at the same time, is difficult to introduce into a computer program. Employing concurrency effectively involves both new concepts and new syntax.
The aim of this chapter is to give you the confidence to explore more advanced material. You will have a solid understanding of the different tools that are available to you as an applications programmer. This chapter exposes you to the standard library and the well engineered crates crossbeam and rayon. It will enable you to use them, though it won’t give you sufficient background to be able to implement your own concurrency crates. The chapter follows the following structure:
It introduces you to Rust’s closure syntax in section 10.1. Closures are also known as anonymous functions and lambda functions. The syntax is important because the standard library and many (perhaps all) external crates rely on that syntax to provide support for Rust’s concurrency model.
It provides a quick lesson on spawning threads in section 10.2. You’ll learn what a thread is and how to create (spawn) those. You’ll also encounter a discussion of why programmers are warned against spawning tens of thousands of threads.
It distinguishes between functions and closures in section 10.3. Conflating these two concepts can be a source of confusion for programmers new to Rust as these are often indistinguishable in other languages.
It follows with a large project in section 10.4. You’ll implement a multithreaded parser and a code generator using multiple strategies. As a nice aside, you get to create procedural art along the way.
The chapter concludes with an overview of other forms of concurrency. This includes processes and containers.
This chapter is fairly dense, so let’s get some points on the board quickly with some basic syntax and practical examples. We’ll circle back to fill in a lot of the conceptual and theoretical material.
Threads and other forms of code that can run concurrently use a form of function definition that we’ve avoided for the bulk of the book. Taking a look at it now, defining a function looks like this:
fn add(a: i32, b: i32) -> i32 {
  a + b
}
The (loosely) equivalent lambda function is
let add = |a,b| { a + b };
Lambda functions are denoted by the pair of vertical bars (|...|) followed by curly brackets ({...}). The pair of vertical bars lets you define arguments. Lambda functions in Rust can read variables from within their scope. These are closures.
Unlike regular functions, lambda functions cannot be defined in global scope. The following listing gets around this by defining one within its main(). It defines two functions, a regular function and a lambda function, and then checks that these produce the same result.
Listing 10.1 Defining two functions and checking the result
fn add(a: i32, b: i32) -> i32 {
  a + b
}

fn main() {
  let lambda_add = |a,b| { a + b };

 assert_eq!(add(4,5), lambda_add(4,5));
}
When you run listing 10.1, it executes happily (and silently). Let’s now see how to put this functionality to work.
Threads are the primary mechanism that operating systems provide for enabling concurrent execution. Modern operating systems ensure that each thread has fair access to the CPU. Understanding how to create threads (often referred to as spawning treads) and understanding their impact are fundamental skills for programmers wanting to make use of multi-core CPUs.
To spawn a thread in Rust, we pass an anonymous function to std::thread::spawn(). As described in section 10.1, anonymous functions are defined with two vertical bars to provide arguments and then curly brackets for the function’s body. Because spawn() doesn’t take any arguments, you will typically encounter this syntax:
thread::spawn(|| {
    // ...
});
When the spawned thread wants to access variables that are defined in the parent’s scope, called a capture, Rust often complains that captures must be moved into the closure. To indicate that you want to move ownership, anonymous functions take a move keyword:
thread::spawn(move || {      ①
    // ...
});
① The move keyword allows the anonymous function to access variables from their wider scope.
Why is move required? Closures spawned in subthreads can potentially outlive their calling scope. As Rust will always ensure that accessing the data is valid, it requires ownership to move to the closure itself. Here are some guidelines for using captures while you gain an understanding of how these work:
Values originating in outer scopes may need to have a static lifetime.
Spawned subthreads can outlive their parents. That implies that ownership should pass to the subthread with move.
A simple task waits, sleeping the CPU for 300 ms (milliseconds). If you have a 3 GHz CPU, you’re getting it to rest for nearly 1 billion cycles. Those electrons will be very relieved. When executed, listing 10.2 prints the total duration (in “wall clock” time) of both executing threads. Here’s the output:
300.218594ms
Listing 10.2 Sleeping a subthread for 300 ms
 1 use std::{thread, time};
 2
 3 fn main() {
 4   let start = time::Instant::now();
 5
 6   let handler = thread::spawn(|| {
 7     let pause = time::Duration::from_millis(300);
 8     thread::sleep(pause.clone());
 9   });
10
11   handler.join().unwrap();
12
13   let finish = time::Instant::now();
14
15   println!("{:02?}", finish.duration_since(start));
16 }
If you had encountered multi-threaded programming before, you would have been introduced to join on line 11. Using join is fairly common, but what does it mean?
join is an extension of the thread metaphor. When threads are spawned, these are said to have forked from their parent thread. To join threads means to weave these back together again.
In practice, join means wait for the other thread to finish. The join() function instructs the OS to defer scheduling the calling thread until the other thread finishes.
In ideal settings, adding a second thread doubles the work we can do in the same amount of time. Each thread can gets its work done independently. Reality is not ideal, unfortunately. This has created a myth that threads are slow to create and bulky to maintain. This section aims to dispel that myth. When used as intended, threads perform very well.
Listing 10.3 shows a program that measures the overall time taken for two threads to perform the job that was carried out by a single thread in listing 10.2. If adding threads take a long time, we would expect the duration of listing 10.3’s code to be longer.
As you’ll notice, there is a negligible impact from creating one or two threads. As with listing 10.2, listing 10.3 prints almost the same output:
300.242328ms ①
① Versus 300.218594 ms from listing 10.2
The difference in these two runs on my computer was 0.24 ms. While by no means a robust benchmark suite, it does indicate that spawning a thread isn’t a tremendous performance hit.
Listing 10.3 Creating two subthreads to perform work on our behalf
 1 use std::{thread, time};
 2
 3 fn main() {
 4   let start = time::Instant::now();
 5
 6   let handler_1 = thread::spawn(move || {
 7     let pause = time::Duration::from_millis(300);
 8       thread::sleep(pause.clone());
 9   });
10
11   let handler_2 = thread::spawn(move || {
12     let pause = time::Duration::from_millis(300);
13       thread::sleep(pause.clone());
14   });
15
16   handler_1.join().unwrap();
17   handler_2.join().unwrap();
18
19   let finish = time::Instant::now();
20
21   println!("{:?}", finish.duration_since(start));
22 }
If you’ve had any exposure to the field before, you may have heard that threads “don’t scale.” What does that mean?
Every thread requires its own memory, and by implication, we’ll eventually exhaust our system’s memory. Before that terminal point, though, thread creation begins to trigger slowdowns in other areas. As the number of threads to schedule increases, the OS scheduler’s work increases. When there are many threads to schedule, deciding which thread to schedule next takes more time.
Spawning threads is not free. It demands memory and CPU time. Switching between threads also invalidates caches.
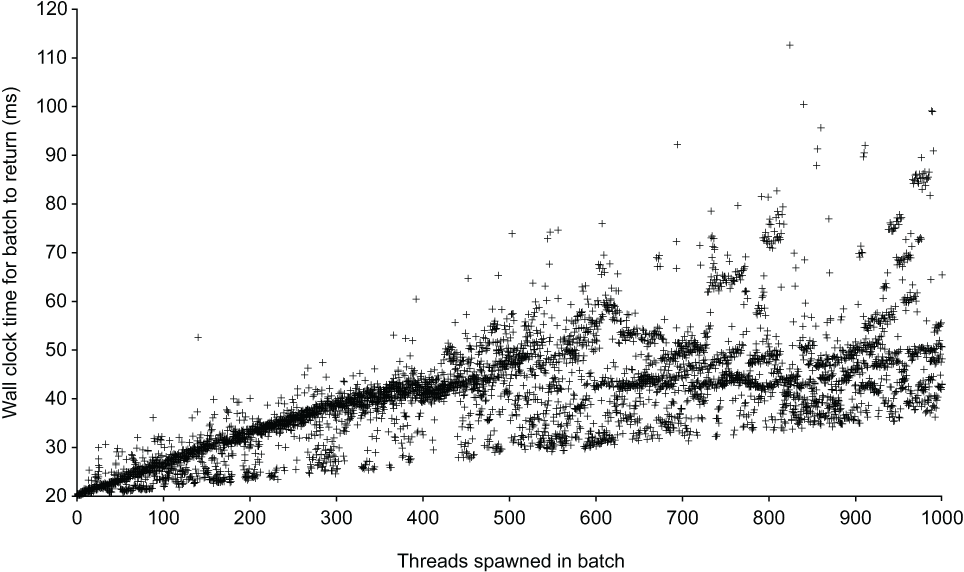
Figure 10.1 shows the data generated by successive runs of listing 10.4. The variance stays quite tight until about 400 threads per batch. After that, there’s almost no knowing how long a 20 ms sleep will take.
Figure 10.1 Duration needed to wait for threads to sleep 20 ms
And, if you’re thinking that sleeping is not a representative workload, figure 10.2 shows the next plot, which is even more telling. It asks each thread to enter a spin loop.
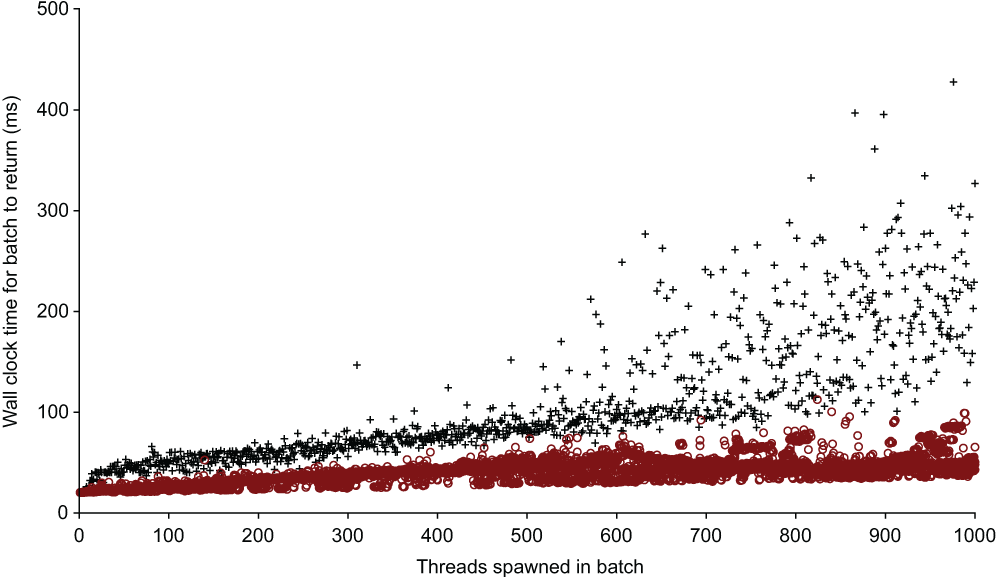
Figure 10.2 Comparing the time taken to wait for 20m using the sleep strategy (circles) versus the spin lock strategy (plus symbols). This chart shows the differences that occur as hundreds of threads compete.
Figure 10.2 provides features that are worth focusing in on briefly. First, for the first seven or so batches, the spin loop version returned closer to 20 ms. The operating system’s sleep functionality isn’t perfectly accurate, however. If you want to sleep pause a thread for short amounts of time, or if your application is sensitive to timing, use a spin loop.1
Second, CPU-intensive multithreading doesn’t scale well past the number of physical cores. The benchmarking was performed on a 6-core CPU (the Intel i7-8750H) with hyper-threading disabled. Figure 10.3 shows that as soon as the thread count exceeds the core count, performance degrades quickly.
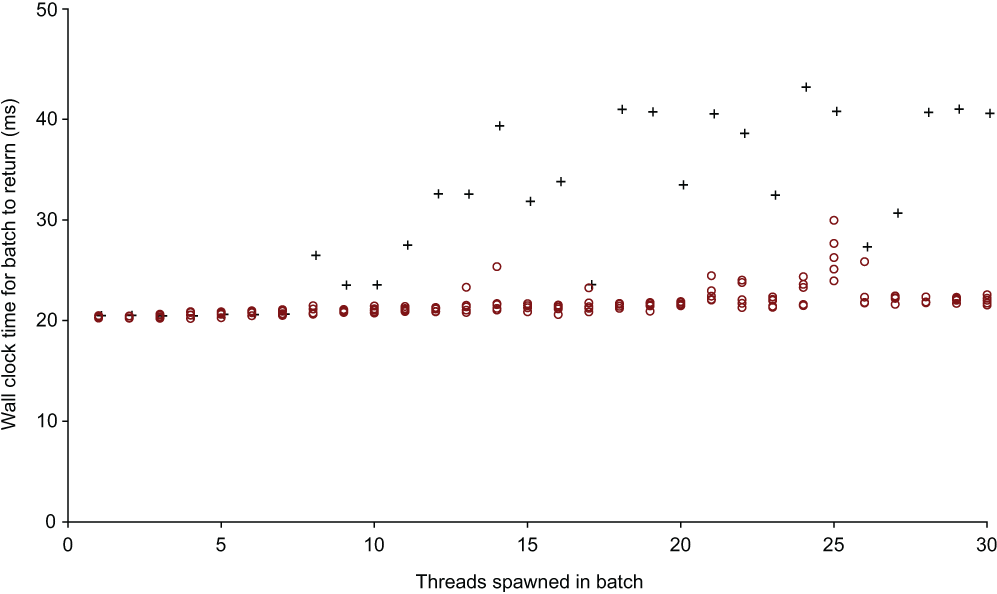
Figure 10.3 Comparing the time taken to wait for 20m using the sleep strategy (circles) versus the spin lock strategy (plus symbols). This chart shows the differences that occur as the number of threads exceeds the number of CPU cores (6).
Now that we’ve seen the effects of threading, let’s look at the code that generated the input data to the plots in figures 10.1–10.2. You are welcome to reproduce the results. To do so, write the output of listings 10.4 and 10.5 to two files, and then analyze the resulting data.
Listing 10.4, whose source code is available at c10/ch10-multijoin/src/main.rs, suspends threads for 20 ms with a sleep. A sleep is a request to the OS that the thread should be suspended until the time has passed. Listing 10.5, whose source code is available at c10/ch10-busythreads/src/main.rs, uses the busy wait strategy (also known as busy loop and spin loop) to pause for 20 ms.
Listing 10.4 Using thread::sleep to suspend threads for 20 ms
 1 use std::{thread, time};
 2
 3 fn main() {
 4   for n in 1..1001 {
 5     let mut handlers: Vec<thread::JoinHandle<()>> = Vec::with_capacity(n);
 6
 7     let start = time::Instant::now();
 8     for _m in 0..n {
 9       let handle = thread::spawn(|| {
10         let pause = time::Duration::from_millis(20);
11         thread::sleep(pause);
12       });
13       handlers.push(handle);
14     }
15
16       while let Some(handle) = handlers.pop() {
17           handle.join();
18       }
19
20     let finish = time::Instant::now();
21     println!("{}\t{:02?}", n, finish.duration_since(start));
22   }
23 }
Listing 10.5 Using a spin loop waiting strategy
 1 use std::{thread, time};
 2
 3 fn main() {
 4   for n in 1..1001 {
 5     let mut handlers: Vec<thread::JoinHandle<()>> = Vec::with_capacity(n);
 6
 7     let start = time::Instant::now();
 8     for _m in 0..n {
 9       let handle = thread::spawn(|| {
10         let start = time::Instant::now();
11         let pause = time::Duration::from_millis(20);
12         while start.elapsed() < pause {
13           thread::yield_now();
14         }
15       });
16       handlers.push(handle);
17     }
18
19     while let Some(handle) = handlers.pop() {
20       handle.join();
21     }
22
23     let finish = time::Instant::now();
24     println!("{}\t{:02?}", n, finish.duration_since(start));
25   }
26 }
The control flow we’ve chosen for lines 19–21 is slightly odd. Rather than iterating through the handlers vector, we call pop() and then drain it. The following two snippets compare the more familiar for loop (listing 10.6) with the control flow mechanism that is actually employed (listing 10.7).
Listing 10.6 What we would expect to see in listing 10.5
19 for handle in &handlers {
20   handle.join();
21 }
Listing 10.7 Code that’s actually used in listing 10.5
19 while let Some(handle) = handlers.pop() {
20   handle.join();
21 }
Why use the more complex control flow mechanism? It might help to remember that once we join a thread back to the main thread, it ceases to exist. Rust won’t allow us to retain a reference to something that doesn’t exist. Therefore, to call join() on a thread handler within handlers, the thread handler must be removed from handlers. That poses a problem. A for loop does not permit modifications to the data being iterated over. Instead, the while loop allows us to repeatedly gain mutable access when calling handlers.pop().
Listing 10.8 provides a broken implementation of the spin loop strategy. It is broken because it uses the more familiar for loop control flow that was avoided in listing 10.5. You’ll find the source for this listing in c10/ch10-busythreads-broken/src/main.rs. Its output follows the listing.
Listing 10.8 Using a spin loop waiting strategy
 1 use std::{thread, time};
 2
 3 fn main() {
 4   for n in 1..1001 {
 5     let mut handlers: Vec<thread::JoinHandle<()>> = Vec::with_capacity(n);
 6
 7     let start = time::Instant::now();
 8     for _m in 0..n {
 9       let handle = thread::spawn(|| {
10         let start = time::Instant::now();
11         let pause = time::Duration::from_millis(20);
12         while start.elapsed() < pause {
13           thread::yield_now();
14         }
15       });
16       handlers.push(handle);
17     }
18
19     for handle in &handlers {
20       handle.join();
21     }
22
23     let finish = time::Instant::now();
24     println!("{}\t{:02?}", n, finish.duration_since(start));
25   }
26 }
Here is the output generated when attempting to compile listing 10.8:
$ cargo run -q
error[E0507]: cannot move out of `*handle` which is behind a
shared reference
  --> src/main.rs:20:13
   |
20 |             handle.join();
   |             ^^^^^^ move occurs because `*handle` has type
   `std::thread::JoinHandle<()>`, which does not implement the
   `Copy` trait

error: aborting due to previous error

For more information about this error, try `rustc --explain E0507`.
error: Could not compile `ch10-busythreads-broken`.

To learn more, run the command again with --verbose.
This error is saying that taking a reference isn’t valid here. That’s because multiple threads might also be taking their own references to the underlying threads. And those references need to be valid.
Astute readers know that there is actually a simpler way to get around this problem than what was used in listing 10.5. As the following listing shows, simply remove the ampersand.
Listing 10.9 What we could have used in listing 10.5
19 for handle in handlers {
20   handle.join();
21 }
What we’ve encountered is one of those rare cases where taking a reference to an object causes more issues than using the object directly. Iterating over handlers directly retains ownership. That pushes any concerns about shared access to the side, and we can proceed as intended.
Yielding control with thread::yield_now()
As a reminder, the busy loop within listing 10.5 includes some unfamiliar code, repeated in the following listing. This section explains its significance.
Listing 10.10 Showing the current thread-yielding execution
14 while start.elapsed() < pause {
15   thread::yield_now();
16 }
std::thread::yield_now() is a signal to the OS that the current thread should be unscheduled. This allows other threads to proceed while the current thread is still waiting for the 20 ms to arrive. A downside to yielding is that we don’t know if we’ll be able to resume at exactly 20 ms.
An alternative to yielding is to use the function std::sync::atomic::spin_loop _hint(). spin_loop_hint() avoids the OS; instead, it directly signals the CPU. A CPU might use that hint to turn off functionality, thus saving power usage.
Note The spin_loop_hint() instruction is not present for every CPU. On platforms that don’t support it, spin_loop_hint() does nothing.
In our threading benchmarks, we created pause variables in each thread. If you’re not sure what I’m referring to, the following listing provides an excerpt from listing 10.5.
Listing 10.11 Emphasizing the needless creation of time::Duration instances
 9 let handle = thread::spawn(|| {
10    let start = time::Instant::now();
11    let pause = time::Duration::from_millis(20);     ①
12    while start.elapsed() < pause {
13      thread::yield_now();
14    }
15 });
① This variable doesn’t need to be created in each thread.
We want to be able to write something like the following listing. The source for this listing is ch10/ch10-sharedpause-broken/src/main.rs.
Listing 10.12 Attempting to share a variable in multiple subthreads
 1 use std::{thread,time};
 2
 3 fn main() {
 4   let pause = time::Duration::from_millis(20);
 5   let handle1 = thread::spawn(|| {
 6     thread::sleep(pause);
 7   });
 8   let handle2 = thread::spawn(|| {
 9     thread::sleep(pause);
10   });
11
12   handle1.join();
13   handle2.join();
14 }
If we run listing 10.12, we’ll receive a verbose—and surprisingly helpful—error message:
$ cargo run -q
error[E0373]: closure may outlive the current function, but it borrows
`pause`, which is owned by the current function
 --> src/main.rs:5:33
  |
5 |     let handle1 = thread::spawn(|| {
  |                                 ^^ may outlive borrowed value `pause`
6 |         thread::sleep(pause);
  |                       ----- `pause` is borrowed here
  |
note: function requires argument type to outlive `'static`
 --> src/main.rs:5:19
  |
5 |       let handle1 = thread::spawn(|| {
  |  ___________________^
6 | |         thread::sleep(pause);
7 | |     });
  | |______^
help: to force the closure to take ownership of `pause` (and any other
references variables), use the `move` keyword
  |
5 |     let handle1 = thread::spawn(move || {
  |                                 ^^^^^^^

error[E0373]: closure may outlive the current function, but it borrows
`pause`, which is owned by the current function
 --> src/main.rs:8:33
  |
8 |     let handle2 = thread::spawn(|| {
  |                                 ^^ may outlive borrowed value `pause`
9 |         thread::sleep(pause);
  |                       ----- `pause` is borrowed here
  |
note: function requires argument type to outlive `'static`
 --> src/main.rs:8:19
  |
8 |       let handle2 = thread::spawn(|| {
  |  ___________________^
9 | |         thread::sleep(pause);
10| |     });
  | |______^
help: to force the closure to take ownership of `pause` (and any other
referenced variables), use the `move` keyword
  |
8 |     let handle2 = thread::spawn(move || {
  |                                 ^^^^^^^

error: aborting due to 2 previous errors

For more information about this error, try `rustc --explain E0373`.
error: Could not compile `ch10-sharedpause-broken`.

To learn more, run the command again with --verbose.
The fix is to add the move keyword to where the closures are created, as hinted at in section 10.2.1. The following listing adds the move keyword, which switches the closures to use move semantics. That, in turn, relies on Copy.
Listing 10.13 Using a variable defined in a parent scope in multiple closures
 1 use std::{thread,time};
 2
 3 fn main() {
 4   let pause = time::Duration::from_millis(20);
 5   let handle1 = thread::spawn(move || {
 6     thread::sleep(pause);
 7    });
 8   let handle2 = thread::spawn(move || {
 9     thread::sleep(pause);
10   });
11
12   handle1.join();
13   handle2.join();
14 }
The details of why this works are interesting. Be sure to read the following section to learn those.
There are some differences between closures (|| {}) and functions (fn). The differences prevent closures and functions from being used interchangeably, which can cause problems for learners.
Closures and functions have different internal representations. Closures are anonymous structs that implement the std::ops::FnOnce trait and potentially std::ops::Fn and std::ops::FnMut. Those structs are invisible in source code but contain any variables from the closure’s environment that are used inside it.
Functions are implemented as function pointers. A function pointer is a pointer that points to code, not data. Code, when used in this sense, is computer memory that has been marked as executable. To complicate matters, closures that do not enclose any variables from their environment are also function pointers.
This section applies the syntax that we learned in section 10.2 to an application. Let’s say that we want the users of our app to have unique pictorial avatars by default. One approach for doing this is to take their usernames and the digest of a hash function, and then use those digits as parameter inputs to some procedural generation logic. Using this approach, everyone will have visually similar yet completely distinctive default avatars.
Our application creates parallax lines. It does this by using the characters within the Base 16 alphabet as opcodes for a LOGO-like language.
In this section, we’ll produce three variations. These will all be invoked in the same way. The following listing demonstrates this. It also shows the output from invoking our render-hex project (listing 10.18):
$ git clone https:/ /github.com/rust-in-action/code rust-in-action
...

$ cd rust-in-action/ch10/ch10-render-hex

$ cargo run -- $(
>   echo 'Rust in Action' |                               ①
>   sha1sum |                                             ①
>   cut -f1 -d' '                                         ①
> )
$ ls                                                      ②
5deaed72594aaa10edda990c5a5eed868ba8915e.svg  Cargo.toml  target
Cargo.lock                                    src

$ cat 5deaed72594aaa10edda990c5a5eed868ba8915e.svg        ③
<svg height="400" style='style="outline: 5px solid #800000;"'
viewBox="0 0 400 400" width="400" xmlns="http:/ /www.w3.org/2000/svg">
<rect fill="#ffffff" height="400" width="400" x="0" y="0"/>
<path d="M200,200 L200,400 L200,400 L200,400 L200,400 L200,400 L200,
400 L480,400 L120,400 L-80,400 L560,400 L40,400 L40,400 L40,400 L40,
400 L40,360 L200,200 L200,200 L200,200 L200,200 L200,200 L200,560 L200,
-160 L200,200 L200,200 L400,200 L400,200 L400,0 L400,0 L400,0 L400,0 L80,
0 L-160,0 L520,0 L200,0 L200,0 L520,0 L-160,0 L240,0 L440,0 L200,0"
fill="none" stroke="#2f2f2f" stroke-opacity="0.9" stroke-width="5"/>
<rect fill="#ffffff" fill-opacity="0.0" height="400" stroke="#cccccc"
stroke-width="15" width="400" x="0" y="0"/>
</svg>
① Generates some input from the Base 16 alphabet (e.g., 0-9 and A-F)
② The project creates a filename that matches the input data.
Any stream of valid Base 16 bytes generates a unique image. The file generated from echo 'Rust in Action' | sha256sum renders as shown in figure 10.4. To render SVG files, open the file in a web browser or a vector image program such as Inkscape (https://inkscape.org/).

Figure 10.4 The SHA256 digest of Rust in Action displayed as a diagram
The render-hex project converts its input to an SVG file. The SVG file format succinctly describes drawings using mathematical operations. You can view the SVG file in any web browser and many graphics packages. Very little of the program relates to multithreading at this stage, so I’ll skip much of the details. The program has a simple pipeline comprised of four steps:
Why can’t we directly create path data from input? Splitting this process into two steps allows for more transformations. This pipeline is managed directly within main().
The following listing shows the main() function for render-hex (listing 10.18). It parses the command-line arguments and manages the SVG generation pipeline. You’ll find the source for this listing in ch10/ch10-render-hex/src/main.rs.
Listing 10.14 The main() function of render-hex
166 fn main() {
167     let args = env::args().collect::<Vec<String>>();   ①
168     let input = args.get(1).unwrap();                  ①
169     let default = format!("{}.svg", input);            ①
170     let save_to = args.get(2).unwrap_or(&default);     ①
171
172     let operations = parse(input);                     ②
173     let path_data = convert(&operations);              ②
174     let document = generate_svg(path_data);            ②
175     svg::save(save_to, &document).unwrap();            ②
176 }
① Command-line argument parsing
Our job in this section is to convert hexadecimal digits to instructions for a virtual pen that travels across a canvas. The Operation enum, shown in the following code snippet, represents these instructions.
Note The term operation is used rather than instruction to avoid colliding with the terminology used within the SVG specification for path drawing.
21 #[derive(Debug, Clone, Copy)]
22 enum Operation {
23     Forward(isize),
24     TurnLeft,
25     TurnRight,
26     Home,
27     Noop(usize),
28 }
To parse this code, we need to treat every byte as an independent instruction. Numerals are converted to distances, and letters change the orientation of the drawing:
123 fn parse(input: &str) -> Vec<Operation> {
124   let mut steps = Vec::<Operation>::new();
125   for byte in input.bytes() {
126     let step = match byte {
127       b'0' => Home,
128       b'1'..=b'9' => {
129         let distance = (byte - 0x30) as isize;     ①
130         Forward(distance * (HEIGHT/10))
131       },
132       b'a' | b'b' | b'c' => TurnLeft,              ②
133       b'd' | b'e' | b'f' => TurnRight,             ②
134       _ => Noop(byte),                             ③
135     }
136   };
137     steps.push(step);
138   }
139   steps
140 }
① In ASCII, numerals start at 0x30 (48 in Base 10), so this converts the u8 value of b'2' to 2. Performing this operation on the whole range of u8 could cause a panic, but we’re safe here, thanks to the guarantee provided by our pattern matching.
② There’s plenty of opportunity to add more instructions to produce more elaborate diagrams without increasing the parsing complexity.
③ Although we don’t expect any illegal characters, there may be some in the input stream. Using a Noop operation allows us to decouple parsing from producing output.
The Artist struct maintains the state of the diagram. Conceptually, the Artist is holding a pen at the coordinates x and y and is moving it in the direction of heading:
49 #[derive(Debug)]
50 struct Artist {
51   x: isize,
52   y: isize,
53   heading: Orientation,
54 }
To move, Artist implements several methods of the render-hex project, two of which are highlighted in the following listing. Rust’s match expressions are used to succinctly refer to and modify internal state. You’ll find the source for this listing in ch10-render-hex/src/main.rs.
70   fn forward(&mut self, distance: isize) {
71     match self.heading {
72       North => self.y += distance,
73       South => self.y -= distance,
74        West  => self.x += distance,
75       East  => self.x -= distance,
76     }
77   }
78
79   fn turn_right(&mut self) {
80     self.heading = match self.heading {
81       North => East,
82       South => West,
83       West  => North,
84       East  => South,
85     }
86   }
The convert() function in listing 10.16, an extract from the render-hex project (listing 10.18), makes use of the Artist struct. Its role is to convert the Vec<Operation> from parse() to a Vec<Command>. That output is used later to generate an SVG. As a nod to the LOGO language, Artist is given the local variable name turtle. The source for this listing is in ch10-render-hex/src/main.rs.
Listing 10.16 Focusing on the convert() function
131 fn convert(operations: &Vec<Operation>) -> Vec<Command> {
132   let mut turtle = Artist::new();
133   let mut path_data: Vec<Command> = vec![];
134   let start_at_home = Command::Move(
135       Position::Absolute, (HOME_X, HOME_Y).into()      ①
136   );
137   path_data.push(start_at_home);
138
139   for op in operations {
140     match *op {
141       Forward(distance) => turtle.forward(distance),   ②
142       TurnLeft => turtle.turn_left(),                  ②
143       TurnRight => turtle.turn_right(),                ②
144       Home => turtle.home(),                           ②
145       Noop(byte) => {
146         eprintln!("warning: illegal byte encountered: {:?}", byte)
147       },
148     };
149     let line = Command::Line(                          ③
150       Position::Absolute,                              ③
151       (turtle.x, turtle.y).into()                      ③
152     );                                                 ③
153     path_data.push(line);
154
155     turtle.wrap();                                     ④
156   }
157   path_data
158 }
① To start, positions the turtle in the center of the drawing area
② We don’t generate a Command immediately. Instead, we modify the internal state of turtle.
③ Creates a Command::Line (a straight line toward the turtle’s current position)
④ If the turtle is out of bounds, returns it to the center
The process of generating the SVG file is rather mechanical. generate_svg() (lines 161–192 of listing 10.18) does the work.
SVG documents look a lot like HTML documents, although the tags and attributes are different. The <path> tag is the most important one for our purposes. It has a d attribute (d is short for data) that describes how the path should be drawn. convert() produces a Vec<Command> that maps directly to the path data.
Source code for the single-threaded version of render-hex
The render-hex project has an orthodox structure. The whole project sits within a (fairly large) main.rs file managed by cargo. To download the project’s source code from its public code repository, use the following commands:
$ git clone https:/ /github.com/rust-in-action/code rust-in-action
Cloning into 'rust-in-action'...

$ cd rust-in-action/ch10/ch10-render-hex
Otherwise, to create the project by hand, follow the commands in the following snippet, and then copy the code from listing 10.18 into src/main.rs:
$ cargo new ch10-render-hex
     Created binary (application) `ch10-render-hex` package

$ cd ch10-render-hex

$ cargo install cargo-edit
    Updating crates.io index
  Downloaded cargo-edit v0.7.0
  Downloaded 1 crate (57.6 KB) in 1.35s
  Installing cargo-edit v0.7.0
...

$ cargo add svg@0.6
    Updating 'https:/ /github.com/rust-lang/crates.io-index' index
      Adding svg v0.6 to dependencies
The standard project structure, which you can compare against the following snippet, has been created for you:
ch10-render-hex/
├── Cargo.toml      ①
└── src
    └── main.rs     ②
The following listing shows the metadata for our project. You should check that your project’s Cargo.toml matches the relevant details. You’ll find the source for this listing in ch10/ch10-render-hex/Cargo.toml.
Listing 10.17 Project metadata for render-hex
[package]
name = "render-hex"
version = "0.1.0"
authors = ["Tim McNamara <author@rustinaction.com>"]
edition = "2018"

[dependencies]
svg = "0.6"
The single-threaded version of render-hex appears in the following listing. You’ll find the source for this listing in ch10-render-hex/src/main.rs.
Listing 10.18 Source code for render-hex
  1 use std::env;
  2
  3 use svg::node::element::path::{Command, Data, Position};
  4 use svg::node::element::{Path, Rectangle};
  5 use svg::Document;
  6
  7 use crate::Operation::{                             ①
  8     Forward,                                        ①
  9     Home,                                           ①
 10     Noop,                                           ①
 11     TurnLeft,                                       ①
 12     TurnRight                                       ①
 13 };                                                  ①
 14 use crate::Orientation::{                           ①
 15     East,                                           ①
 16     North,                                          ①
 17     South,                                          ①
 18     West                                            ①
 19 };                                                  ①
 30
 21 const WIDTH: isize = 400;                           ②
 22 const HEIGHT: isize = WIDTH;                        ②
 23
 24 const HOME_Y: isize = HEIGHT / 2;                   ③
 25 const HOME_X: isize = WIDTH / 2;                    ③
 26
 27 const STROKE_WIDTH: usize = 5;                      ④
 28
 29 #[derive(Debug, Clone, Copy)]
 30 enum Orientation {
 31   North,                                            ⑤
 32   East,                                             ⑤
 33   West,                                             ⑤
 34   South,                                            ⑤
 35 }
 36
 37 #[derive(Debug, Clone, Copy)]
 38 enum Operation {                                    ⑥
 39   Forward(isize),                                   ⑦
 40   TurnLeft,
 41   TurnRight,
 42   Home,
 43   Noop(u8),                                         ⑧
 44 }
 45
 46 #[derive(Debug)]
 47 struct Artist {                                     ⑨
 48   x: isize,
 49   y: isize,
 50   heading: Orientation,
 51 }
 52
 53 impl Artist {
 54   fn new() -> Artist {
 55     Artist {
 56       heading: North,
 57       x: HOME_X,
 58       y: HOME_Y,
 59     }
 60   }
 61
 62   fn home(&mut self) {
 63     self.x = HOME_X;
 64     self.y = HOME_Y;
 65   }
 66
 67   fn forward(&mut self, distance: isize) {          ⑩
 68     match self.heading {
 69       North => self.y += distance,
 70       South => self.y -= distance,
 71       West => self.x += distance,
 72       East => self.x -= distance,
 73     }
 74   }
 75
 76   fn turn_right(&mut self) {                        ⑩
 77     self.heading = match self.heading {
 78       North => East,
 79       South => West,
 80       West => North,
 81       East => South,
 82     }
 83   }
 84
 85   fn turn_left(&mut self) {                         ⑪
 86     self.heading = match self.heading {
 87       North => West,
 88       South => East,
 89       West => South,
 90       East => North,
 91     }
 92   }
 93
 94   fn wrap(&mut self) {                              ⑫
 95     if self.x < 0 {
 96       self.x = HOME_X;
 97       self.heading = West;
 98     } else if self.x > WIDTH {
 99       self.x = HOME_X;
100       self.heading = East;
101     }
102
103     if self.y < 0 {
104       self.y = HOME_Y;
105       self.heading = North;
106     } else if self.y > HEIGHT {
107       self.y = HOME_Y;
108       self.heading = South;
109     }
110   }
111 }
112
113 fn parse(input: &str) -> Vec<Operation> {
114   let mut steps = Vec::<Operation>::new();
115   for byte in input.bytes() {
116     let step = match byte {
117       b'0' => Home,
118       b'1'..=b'9' => {
119         let distance = (byte - 0x30) as isize;    ⑬
120         Forward(distance * (HEIGHT / 10))
121       }
122       b'a' | b'b' | b'c' => TurnLeft,
123       b'd' | b'e' | b'f' => TurnRight,
124       _ => Noop(byte),                            ⑭
125     };
126     steps.push(step);
127   }
128   steps
129 }
130
131 fn convert(operations: &Vec<Operation>) -> Vec<Command> {
132   let mut turtle = Artist::new();
133
134   let mut path_data = Vec::<Command>::with_capacity(operations.len());
135   let start_at_home = Command::Move(
136     Position::Absolute, (HOME_X, HOME_Y).into()
137   );
138   path_data.push(start_at_home);
139
140   for op in operations {
141     match *op {
142       Forward(distance) => turtle.forward(distance),
143       TurnLeft => turtle.turn_left(),
144       TurnRight => turtle.turn_right(),
145       Home => turtle.home(),
146       Noop(byte) => {
147         eprintln!("warning: illegal byte encountered: {:?}", byte);
148       },
149     };
150
151     let path_segment = Command::Line(
152       Position::Absolute, (turtle.x, turtle.y).into()
153     );
154     path_data.push(path_segment);
155
156     turtle.wrap();
157   }
158   path_data
159 }
160
161 fn generate_svg(path_data: Vec<Command>) -> Document {
162   let background = Rectangle::new()
163     .set("x", 0)
164     .set("y", 0)
165     .set("width", WIDTH)
166     .set("height", HEIGHT)
167     .set("fill", "#ffffff");
168
169   let border = background
170     .clone()
171     .set("fill-opacity", "0.0")
172     .set("stroke", "#cccccc")
173     .set("stroke-width", 3 * STROKE_WIDTH);
174
175   let sketch = Path::new()
176     .set("fill", "none")
177     .set("stroke", "#2f2f2f")
178     .set("stroke-width", STROKE_WIDTH)
179     .set("stroke-opacity", "0.9")
180     .set("d", Data::from(path_data));
181
182   let document = Document::new()
183     .set("viewBox", (0, 0, HEIGHT, WIDTH))
184     .set("height", HEIGHT)
185     .set("width", WIDTH)
186     .set("style", "style=\"outline: 5px solid #800000;\"")
187     .add(background)
188     .add(sketch)
189     .add(border);
190
191   document
192 }
193
194 fn main() {
195   let args = env::args().collect::<Vec<String>>();
196   let input = args.get(1).unwrap();
197   let default_filename = format!("{}.svg", input);
198   let save_to = args.get(2).unwrap_or(&default_filename);
199
200   let operations = parse(input);
201   let path_data = convert(&operations);
202   let document = generate_svg(path_data);
203   svg::save(save_to, &document).unwrap();
204 }
① Operation and Orientation enum types are defined later. Including these with the use keyword removes a lot of noise from the source code.
② HEIGHT and WIDTH provide the bounds of the drawing.
③ HOME_Y and HOME_X constants allow us to easily reset where we are drawing from. Here y is the vertical coordinate and x is the horizontal.
④ STROKE_WIDTH, a parameter for the SVG output, defines the look of each drawn line.
⑤ Using descriptions rather than numerical values avoids mathematics.
⑥ To produce richer output, extends the operations available to your programs
⑦ Using isize lets us extend this example to implement a Reverse operation without adding a new variant.
⑧ Uses Noop when we encounter illegal input. To write error messages, we retain the illegal byte.
⑨ The Artist struct maintains the current state.
⑩ forward() mutates self within the match expression. This contrasts with turn_left() and turn_right(), which mutate self outside of the match expression.
⑪ forward() mutates self within the match expression. This contrasts with turn_left() and turn_right(), which mutate self outside of the match expression.
⑫ wrap() ensures that the drawing stays within bounds.
⑬ In ASCII, numerals start at 0x30 (48). byte – 0x30 converts a u8 value of b'2' to 2. Performing this operation on the whole range of u8 could cause a panic, but we’re safe here, thanks to the guarantee provided by our pattern matching.
⑭ Although we don’t expect any illegal characters, there may be some in the input stream. A Noop operation allows us to decouple parsing from producing output.
Our render-hex project (listing 10.18) also presents several opportunities for parallelism. We’ll focus on one of these, the parse() function. To begin, adding parallelism is a two-step process:
Using a functional programming style
The first step in adding parallelism is to replace our for. Rather than for, the toolkit for creating a Vec<T> with functional programming constructs includes the map() and collect() methods and higher-order functions, typically created with closures.
To compare the two styles, consider the differences to the parse() function from listing 10.18 (in ch10-render-hex/src/main.rs), repeated in the following listing, and a more functional style in listing 10.20 (in ch10-render-hex-functional/src/main.rs).
Listing 10.19 Implementing parse() with imperative programming constructs
113 fn parse(input: &str) -> Vec<Operation> {
114   let mut steps = Vec::<Operation>::new();
115   for byte in input.bytes() {
116     let step = match byte {
117       b'0' => Home,
118       b'1'..=b'9' => {
119         let distance = (byte - 0x30) as isize;
120         Forward(distance * (HEIGHT / 10))
121       }
122       b'a' | b'b' | b'c' => TurnLeft,
123       b'd' | b'e' | b'f' => TurnRight,
124       _ => Noop(byte),
125     };
126     steps.push(step);
127   }
128   steps
129 }
Listing 10.20 Implementing parse() with functional programming constructs
 99 fn parse(input: &str) -> Vec<Operation> {
100   input.bytes().map(|byte|{
101     match byte {
102       b'0' => Home,
103       b'1'..=b'9' => {
104         let distance = (byte - 0x30) as isize;
105         Forward(distance * (HEIGHT/10))
106       },
107       b'a' | b'b' | b'c' => TurnLeft,
108       b'd' | b'e' | b'f' => TurnRight,
109       _ => Noop(byte),
110   }}).collect()
111 }
Listing 10.20 is shorter, more declarative, and closer to idiomatic Rust. At a surface level, the primary change is that there is no longer a need to create the temporary variable steps. The partnership of map() and collect() removes the need for that: map() applies a function to every element of an iterator, and collect() stores the output of an iterator into a Vec<T>.
There is also a more fundamental change than eliminating temporary variables in this refactor, though. It has provided more opportunities for the Rust compiler to optimize your code’s execution.
In Rust, iterators are an efficient abstraction. Working with their methods directly allows the Rust compiler to create optimal code that takes up minimal memory. As an example, the map() method takes a closure and applies it to every element of the iterator. Rust’s trick is that map() also returns an iterator. This allows many transformations to be chained together. Significantly, although map() may appear in multiple places in your source code, Rust often optimizes those function calls away in the compiled binary.
When every step that the program should take is specified, such as when your code uses for loops, you restrict the number of places where the compiler can make decisions. Iterators provide an opportunity for you to delegate more work to the compiler. This ability to delegate is what will shortly unlock parallelism.
We’re going to cheat here and make use of a crate from the Rust community: rayon. rayon is explicitly designed to add data parallelism to your code. Data parallelism applies the same function (or closure!) on different data (such as a Vec<T>).
Assuming that you’ve already worked with the base render-hex project, add rayon to your crate’s dependencies with cargo by executing cargo add rayon@1:
$ cargo add rayon@1                                                    ①
    Updating 'https://github.com/rust-lang/crates.io-index' index
      Adding rayon v1 to dependencies
① Run cargo install cargo-edit if the cargo add command is unavailable.
Ensure that the [dependencies] section of your project’s Cargo.toml matches the following listing. You’ll find the source for this listing in ch10-render-hex-parallel-iterator/Cargo.toml.
Listing 10.21 Adding rayon as a dependency to Cargo.toml
7 [dependencies]
8 svg = "0.6.0"
9 rayon = "1"
At the head of the main.rs file, add rayon and its prelude as listing 10.23 shows. prelude brings several traits into the crate’s scope. This has the effect of providing a par_bytes() method on string slices and a par_iter() method on byte slices. Those methods enable multiple threads to cooperatively process data. The source for this listing is in ch10-render-hex-parallel-iterator/Cargo.toml.
Listing 10.22 Adding rayon to our render-hex project
use rayon::prelude::*;

100 fn parse(input: &str) -> Vec<Operation> {
101   input
102     .as_bytes()                         ①
103     .par_iter()                         ②
104     .map(|byte| match byte {
105       b'0' => Home,
106       b'1'..=b'9' => {
107         let distance = (byte - 0x30) as isize;
108         Forward(distance * (HEIGHT / 10))
109       }
110       b'a' | b'b' | b'c' => TurnLeft,
111       b'd' | b'e' | b'f' => TurnRight,
112       _ => Noop(*byte),                 ③
113     })
114     .collect()
115 }
① Converts the input string slice into a byte slice
② Converts the byte slice into a parallel iterator
③ The byte variable has the type &u8, whereas the Operation::Noop(u8) variant requires a dereferenced value.
Using rayon’s par_iter() here is a “cheat mode” available to all Rust programmers, thanks to Rust’s powerful std::iter::Iterator trait. rayon’s par_iter() is guaranteed to never introduce race conditions. But what should you do if you do not have an iterator?
Sometimes, we don’t have a tidy iterator that we want to apply a function to. Another pattern to consider is the task queue. This allows tasks to originate anywhere and for the task processing code to be separated from task creation code. A fleet of worker threads can then pick tasks once these have finished their current one.
There are many approaches to modeling a task queue. We could create a Vec<Task> and Vec<Result> and share references to these across threads. To prevent each thread from overwriting each other, we would need a data protection strategy.
The most common tool to protect data shared between threads is Arc<Mutex<T>>. Fully expanded, that’s your value T (e.g., Vec<Task> or Vec<Result> here) protected by a std::sync::Mutex, which itself is wrapped within std::sync::Arc. A Mutex is a mutually-exclusive lock. Mutually exclusive in this context means that no one has special rights. A lock held by any thread prevents all others. Awkwardly, a Mutex must itself be protected between threads. So we call in extra support. The Arc provides safe multithreaded access to the Mutex.
Mutex and Arc are not unified into a single type to provide programmers with added flexibility. Consider a struct with several fields. You may only need a Mutex on a single field, but you could put the Arc around the whole struct. This approach provides faster read access to the fields that are not protected by the Mutex. A single Mutex retains maximum protection for the field that has read-write access. The lock approach, while workable, is cumbersome. Channels offer a simpler alternative.
Channels have two ends: sending and receiving. Programmers don’t get access to what is happening inside the channel. But placing data at the sending end means it’ll appear at the receiving end at some future stage. Channels can be used as a task queue because multiple items can be sent, even if a receiver is not ready to receive any messages.
Channels are fairly abstract. These hide their internal structure, preferring to delegate access to two helper objects. One can send(); the other can recv() (receive). Importantly, we don’t get access to how channels transmit any information sent through the channel.
Note By convention, from radio and telegraph operators, the Sender is called tx (shorthand for transmission ) and the Receiver is called rx.
This section uses the channels implementation from the crossbeam crate rather than from the std::sync::mpsc module within the Rust standard library. Both APIs provide the same API, but crossbeam provides greater functionality and flexibility. We’ll spend a little time explaining how to use channels. If you would prefer to see them used as a task queue, feel free to skip ahead.
The standard library provides a channels implementation, but we’ll make use of the third-party crate, crossbeam. It provides slightly more features. For example, it includes both bounded queues and unbounded queues. A bounded queue applies back pressure under contention, preventing the consumer from becoming overloaded. Bounded queues (of fixed-width types) have deterministic maximum memory usage. These do have one negative characteristic, though. They force queue producers to wait until a space is available. This can make unbounded queues unsuitable for asynchronous messages, which cannot tolerate waiting.
The channels-intro project (listings 10.23 and 10.24) provides a quick example. Here is a console session that demonstrates running the channels-intro project from its public source code repository and providing its expected output:
$ git clone https:/ /github.com/rust-in-action/code rust-in-action
Cloning into 'rust-in-action'...

$ cd ch10/ch10-channels-intro

$ cargo run
...
   Compiling ch10-channels-intro v0.1.0 (/ch10/ch10-channels-intro)
    Finished dev [unoptimized + debuginfo] target(s) in 0.34s
     Running `target/debug/ch10-channels-intro`
Ok(42)
To create the project by hand, follow these instructions:
Enter these commands from the command-line:
$ cargo new channels-intro
$ cargo install cargo-edit
$ cd channels-intro
$ cargo add crossbeam@0.7
Check that the project’s Cargo.toml file matches listing 10.23.
The following two listings make up the project. Listing 10.23 shows its Cargo.toml file. Listing 10.24 demonstrates creating a channel for i32 messages from a worker thread.
Listing 10.23 Cargo.toml metadata for channels-intro
[package]
name = "channels-intro"
version = "0.1.0"
authors = ["Tim McNamara <author@rustinaction.com>"]
edition = "2018"

[dependencies]
crossbeam = "0.7"
Listing 10.24 Creating a channel that receives i32 messages
 1 #[macro_use]                                        ①
 2 extern crate crossbeam;
 3
 4 use std::thread;
 5 use crossbeam::channel::unbounded;
 6
 7
 8 fn main() {
 9     let (tx, rx) = unbounded();
10
11     thread::spawn(move || {
12         tx.send(42)
13           .unwrap();
14     });
15
16     select!{                                       ①
17        recv(rx) -> msg => println!("{:?}", msg),   ②
18     }
19 }
① Provides the select! macro, which simplifies receiving messages
② recv(rx) is syntax defined by the macro.
Some notes about the channels-intro project:
Creating a channel with crossbeam involves calling a function that returns Sender<T> and Receiver<T>. Within listing 10.24, the compiler infers the type parameter. tx is given the type Sender<i32> and rx is given the type Receiver<i32>.
The select! macro takes its name from other messaging systems like the POSIX sockets API. It allows the main thread to block and wait for a message.
Macros can define their own syntax rules. That is why the select! macro uses syntax (recv(rx) ->) that is not legal Rust.
What can be sent through a channel?
Mentally, you might be thinking of a channel like you would envision a network protocol. Over the wire, however, you only have the type [u8] available to you. That byte stream needs to be parsed and validated before its contents can be interpreted.
Channels are richer than simply streaming bytes ([u8]). A byte stream is opaque and requires parsing to have structure extracted out of it. Channels offer you the full power of Rust’s type system. I recommend using an enum for messages as it offers exhaustiveness testing for robustness and has a compact internal representation.
Bi-directional (duplex) communication is awkward to model with a single channel. An approach that’s simpler to work with is to create two sets of senders and receivers, one for each direction.
The channels-complex project provides an example of this two channel strategy. channels-complex is implemented in listings 10.25 and 10.26. These are available in ch10/ch10-channels-complex/Cargo.toml and ch10/ch10-channels-complex/src/main.rs, respectively.
When executed, channels-complex produces three lines of output. Here is a session that demonstrates running the project from its public source code repository:
$ git clone https:/ /github.com/rust-in-action/code rust-in-action
Cloning into 'rust-in-action'...

$ cd ch10/ch10-channels-complex

$ cargo run
...
   Compiling ch10-channels-intro v0.1.0 (/ch10/ch10-channels-complex)
    Finished dev [unoptimized + debuginfo] target(s) in 0.34s
     Running `target/debug/ch10-channels-complex`
Ok(Pong)
Ok(Pong)
Ok(Pong)
Some learners prefer to type everything out by hand. Here are the instructions to follow if you are one of those people:
Enter these commands from the command-line:
$ cargo new channels-intro
$ cargo install cargo-edit
$ cd channels-intro
$ cargo add crossbeam@0.7
Listing 10.25 Project metadata for channels-complex
[package]
name = "channels-complex"
version = "0.1.0"
authors = ["Tim McNamara <author@rustinaction.com>"]
edition = "2018"

[dependencies]
crossbeam = "0.7"
Listing 10.26 Sending messages to and from a spawned thread
 1 #[macro_use]
 2 extern crate crossbeam;
 3
 4 use crossbeam::channel::unbounded;
 5 use std::thread;
 6
 7 use crate::ConnectivityCheck::*;
 8
 9 #[derive(Debug)]
10 enum ConnectivityCheck {                         ①
11   Ping,                                          ①
12   Pong,                                          ①
13   Pang,                                          ①
14 }                                                ①
15
16 fn main() {
17   let n_messages = 3;
18   let (requests_tx, requests_rx) = unbounded();
19   let (responses_tx, responses_rx) = unbounded();
20
21   thread::spawn(move || loop {                  ②
22     match requests_rx.recv().unwrap() {
23       Pong => eprintln!("unexpected pong response"),
24       Ping => responses_tx.send(Pong).unwrap(),
25       Pang => return,                           ③
26     }
27   });
28
29   for _ in 0..n_messages {
30     requests_tx.send(Ping).unwrap();
31   }
32   requests_tx.send(Pang).unwrap();
33
34   for _ in 0..n_messages {
35     select! {
36        recv(responses_rx) -> msg => println!("{:?}", msg),
37     }
38   }
39 }
① Defining a bespoke message type simplifies interpreting messages later.
② Because all control flow is an expression, Rust allows the loop keyword here.
③ The Pang message indicates the thread should shut down.
After spending some time discussing channels, it’s time to apply these to the problem first introduced in listing 10.18. You’ll notice that the code that follows shortly in listing 10.28 is quite a bit more complex than the parallel iterator approach seen in listing 10.24.
The following listing displays the metadata for the channel-based task queue implementation of render-hex. The source for this listing is in ch10/ch10-render-hex-threadpool/Cargo.toml.
Listing 10.27 The channel-based task queue metadata for render-hex
[package]
name = "render-hex"
version = "0.1.0"
authors = ["Tim McNamara <author@rustinaction.com>"]
edition = "2018"

[dependencies]
svg = "0.6"
crossbeam = "0.7" #      ①
① The crossbeam crate is a new dependency for the project.
The following listing focuses on the parse() function. The rest of the code is the same as listing 10.18. You’ll find the code for the following listing in ch10/ch10-render-hex-threadpool/src/main.rs.
Listing 10.28 Partial code for the channel-based task queue for render-hex
  1 use std::thread;
  2 use std::env;
  3
  4 use crossbeam::channel::{unbounded};

 99 enum Work {                                            ①
100     Task((usize, u8)),                                 ②
101     Finished,                                          ③
102 }
103
104 fn parse_byte(byte: u8) -> Operation {                 ④
105     match byte {
106         b'0' => Home,
107         b'1'..=b'9' => {
108             let distance = (byte - 0x30) as isize;
109             Forward(distance * (HEIGHT/10))
110         },
111         b'a' | b'b' | b'c' => TurnLeft,
112         b'd' | b'e' | b'f' => TurnRight,
113         _ => Noop(byte),
114     }
115 }
116
117 fn parse(input: &str) -> Vec<Operation> {
118     let n_threads = 2;
119     let (todo_tx, todo_rx) = unbounded();              ⑤
120     let (results_tx, results_rx) = unbounded();        ⑥
121     let mut n_bytes = 0;
122     for (i,byte) in input.bytes().enumerate() {
123         todo_tx.send(Work::Task((i,byte))).unwrap();   ⑦
124         n_bytes += 1;                                  ⑧
125     }
126
127     for _ in 0..n_threads {                            ⑨
128         todo_tx.send(Work::Finished).unwrap();         ⑨
129     }                                                  ⑨
130
131     for _ in 0..n_threads {
132         let todo = todo_rx.clone();                    ⑩
133         let results = results_tx.clone();              ⑩
134         thread::spawn(move || {
135             loop {
136                 let task = todo.recv();
137                 let result = match task {
138                     Err(_) => break,
139                     Ok(Work::Finished) => break,
140                     Ok(Work::Task((i, byte))) => (i, parse_byte(byte)),
141                 };
142                 results.send(result).unwrap();
143
144             }
145         });
146     }
147     let mut ops = vec![Noop(0); n_bytes];              ⑪
148     for _ in 0..n_bytes {
149         let (i, op) = results_rx.recv().unwrap();
150         ops[i] = op;
151     }
152     ops
153 }
① Creates a type for the messages we send through the channels
② The usize field of this tuple indicates the position of the processed byte. This is necessary because these can be returned out of order.
③ Gives worker threads a marker message to indicate that it’s time to shut down
④ Extracts the functionality that workers will need to carry out to simplify the logic
⑤ Creates one channel for tasks to be completed
⑥ Creates one channel for the decoded instructions to be returned to
⑦ Fills the task queue with work
⑧ Keeps track of how many tasks there are to do
⑨ Sends each thread a signal that it’s time to shut down
⑩ When cloned, channels can be shared between threads.
⑪ Because results can be returned in arbitrary order, initializes a complete Vec<Command> that will be overwritten by our incoming results. We use a vector rather than an array because that’s what’s used by the type signature, and we don’t want to refactor the whole program to suit this new implementation.
When independent threads are introduced, the order in which tasks are completed becomes non-deterministic. Listing 10.28 includes some additional complexity to handle this.
Previously, we created an empty Vec<Command> for the commands that we interpreted from our input. Once parsed, main() repeatedly added elements via the vector’s push() method. Now, at line 147, we fully initialize the vector. Its contents don’t matter. It will all be overwritten. Even so, I’ve chosen to use Command::Noop to ensure that a mistake won’t result in a corrupt SVG file.
This section explains the difference between models of concurrency. Figure 10.5 displays some of the trade-offs.
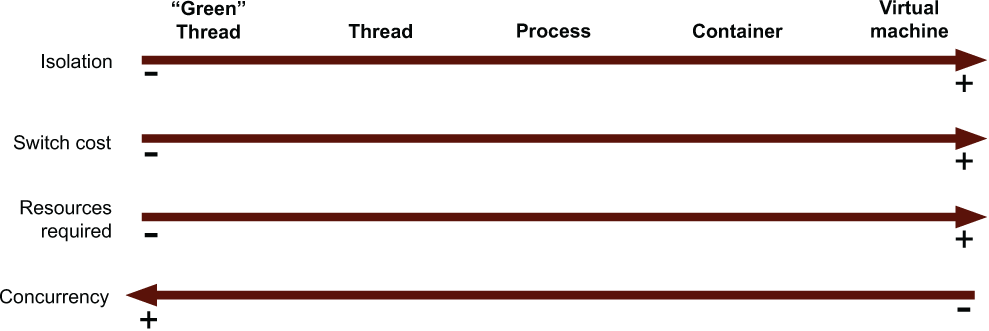
Figure 10.5 Trade-offs relating to different forms of task isolation in computing. In general terms, increasing the isolation level increases the overhead.
The primary benefit of more costly forms of task virtualization is isolation. What is meant by the term isolation?
Isolated tasks cannot interfere with each other. Interference comes in many forms. Examples include corrupting memory, saturating the network, and congestion when saving to disk. If a thread is blocked while waiting for the console to print output to the screen, none of the coroutines acting in that thread are able to progress.
Isolated tasks cannot access each other’s data without permission. Independent threads in the same process share a memory address space, and all threads have equal access to data within that space. Processes, however, are prohibited from inspecting each other’s memory.
Isolated tasks cannot cause another task to crash. A failure in one task should not cascade into other systems. If a process induces a kernel panic, all processes are shut down. By conducting work in virtual machines, tasks can proceed even when other tasks are unstable.
Isolation is a continuum. Complete isolation is impractical. It implies that input and output is impossible. Moreover, isolation is often implemented in software. Running extra software implies taking on extra runtime overhead.
A thread is the lowest level of isolation that an OS understands. The OS can schedule threads. Smaller forms of concurrency are invisible to the OS. You may have encountered terms such as coroutines, fibers, and green threads.
Switching between tasks here is managed by the process itself. The OS is ignorant of the fact that a program is processing multiple tasks. For threads and other forms of concurrency, context switching is required.
Switching between tasks at the same level of virtualization is known as a context switch. For threads to switch, CPU registers need to be cleared, CPU caches might need to be flushed, and variables within the OS need to be reset. As isolation increases, so does the cost of the context switch.
CPUs can only execute instructions in serial. To do more than one task, a computer, for example, needs to be able to press the Save Game button, switch to a new task, and resume at that task’s saved spot. The CPU is save scum.
Why is the CPU constantly switching tasks? Because it has so much time available. Programs often need to access data from memory, disk, or the network. Because waiting for data is incredibly slow, there’s often sufficient time to do something else in the meantime.
Threads exist within a process. The distinguishing characteristic of a process is that its memory is independent from other processes. The OS, in conjunction with the CPU, protects a process’s memory from all others.
To share data between processes, Rust channels and data protected by Arc<Mutex<_>> won’t suffice. You need some support from the OS. For this, reusing network sockets is common. Most operating systems provide specialized forms of interprocess communication (IPC), which are faster, while being less portable.
WebAssembly (Wasm) is interesting because it is an attempt at isolating tasks within the process boundary itself. It’s impossible for tasks running inside a Wasm module to access memory available to other tasks. Originating in web browsers, Wasm treats all code as potentially hostile. If you use third-party dependencies, it’s likely that you haven’t verified the behavior of all of the code that your process executes.
In a sense, Wasm modules are given access to address spaces within your process’s address space. Wasm address spaces are called linear memory. Runtime interprets any request for data within linear memory and makes its own request to the actual virtual memory. Code within the Wasm module is unaware of any memory addresses that the process has access to.
Containers are extensions to processes with further isolation provided by the OS. Processes share the same filesystem, whereas containers have a filesystem created for them. The same is true for other resources, such as the network. Rather than address space, the term used for protections covering these other resources is namespaces.
It’s possible to run an application as its own OS. Chapter 11 provides one implementation. The general term for an application that runs without an OS is to describe it as freestanding—freestanding in the sense that it does not require the support of an OS. Freestanding binaries are used by embedded software developers when there is no OS to rely on.
Using freestanding binaries can involve significant limitations, though. Without an OS, applications no longer have virtual memory or multithreading. All of those concerns become your application’s concerns. To reach a middle ground, it is possible to compile a unikernel. A unikernel is a minimal OS paired with a single application. The compilation process strips out everything from the OS that isn’t used by the application that’s being deployed.
Closures and functions both feel like they should be the same type, but they aren’t identical. If you want to create a function that accepts either a function or a closure as an argument, then make use of the std::ops::Fn family of traits.
A functional style that makes heavy use of higher-order programming and iterators is idiomatic Rust. This approach tends to work better with third-party libraries because std::iter::Iterator is such a common trait to support.
Threads have less impact than you have probably heard, but spawning threads without bounds can cause significant problems.
To create a byte (u8) from a literal, use single quotes (e.g., b'a'). Double quotes (e.g., b"a") creates a byte slice ([u8]) of length 1.
To increase the convenience of enums, it can be handy to bring their variants into local scope with use crate::.
Isolation is provided as a spectrum. In general, as isolation between software components increases, performance decreases.
1.It’s also possible to use both: sleep for the bulk of the time and a spin loop towards the end.