This chapter provides you with some of the tacit knowledge held by systems programmers about how a computer’s memory operates. It aims to be the most accessible guide to pointers and memory management available. You will learn how applications interact with an operating system (OS). Programmers who understand these dynamics can use that knowledge to maximize their programs’ performance, while minimizing their memory footprint.
Memory is a shared resource, and the OS is an arbiter. To make its life easier, the OS lies to your program about how much memory is available and where it’s located. Revealing the truth behind those lies requires us to work through some prior knowledge. This is the work of the first two sections of the chapter.
Each of the four sections in this chapter builds on the previous one. None of these sections assume that you’ve encountered the topic before. There is a fairly large body of theory to cover, but all of it is explained by examples.
In this chapter, you’ll create your first graphical application. The chapter introduces little new Rust syntax, as the material is quite dense. You’ll learn how to construct pointers, how to interact with an OS via its native API, and how to interact with other programs through Rust’s foreign function interface.
Pointers are how computers refer to data that isn’t immediately accessible. This topic tends to have an aura of mystique to it. That’s not necessary. If you’ve ever read a book’s table of contents, then you’ve used a pointer. Pointers are just numbers that refer to somewhere else.
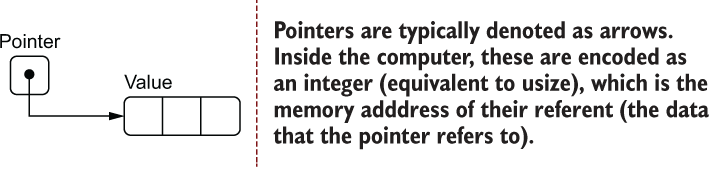
If you’ve never encountered systems programming before, there is a lot of terminology to grapple with that describes unfamiliar concepts. Thankfully, though, what’s sitting underneath the abstraction is not too difficult to understand. The first thing to grasp is the notation used in this chapter’s figures. Figure 6.1 introduces three concepts:
The arrow refers to some location in memory that is determined at runtime rather than at compile time.
Each box represents a block of memory, and each block refers to a usize width. Other figures use a byte or perhaps even a bit as the chunk of memory these refer to.
The rounded box underneath the Value label represents three contiguous blocks of memory.
Figure 6.1 Depicting notation used in this chapter’s figures for illustrating a pointer. In Rust, pointers are most frequently encountered as &T and &mut T, where T is the type of the value.
For newcomers, pointers are scary and, at the same time, awe-inspiring. Their proper use requires that you know exactly how your program is laid out in memory. Imagine reading a table of contents that says chapter 4 starts on page 97, but it actually starts on page 107. That would be frustrating, but at least you could cope with the mistake.
A computer doesn’t experience frustration. It also lacks any intuition that it has pointed to the wrong place. It just keeps working, correctly or incorrectly, as if it had been given the correct location. The fear of pointers is that you will introduce some impossible-to-debug error.
We can think of data stored within the program’s memory as being scattered around somewhere within physical RAM. To make use of that RAM, there needs to be some sort of retrieval system in place. An address space is that retrieval system.
Pointers are encoded as memory addresses, which are represented as integers of type usize. An address points to somewhere within the address space. For the moment, think of the address space as all of your RAM laid out end to end in a single line.
Why are memory addresses encoded as usize? Surely there’s no 64-bit computer with 264 bytes of RAM. The range of the address space is a façade provided by the OS and the CPU. Programs only know an orderly series of bytes, irrespective of the amount of RAM that is actually available in the system. We discuss how this works later in the virtual memory section of this chapter.
Note Another interesting example is the Option<T> type. Rust uses null pointer optimization to ensure that an Option<T> occupies 0 bytes in the compiled binary. The None variant is represented by a null pointer (a pointer to invalid memory), allowing the Some(T) variant to have no additional indirection.
This section teaches you how to work with several of Rust’s pointer types. Rust in Action tries to stick to the following guidelines when discussing these types:
References—Signal that the Rust compiler will provide its safety guarantees.
Pointers—Refer to something more primitive. This also includes the implication that we are responsible for maintaining safety. (There is an implied connotation of being unsafe.)
Raw pointers—Used for types where it’s important to make their unsafe nature explicit.
Throughout this section, we’ll expand on a common code fragment introduced by listing 6.1. Its source code is available in ch6/ch6-pointer-intro.rs. In the listing, two global variables, B and C, are pointed to by references. Those references hold the addresses of B and C, respectively. A view of what’s happening follows the code in figures 6.2 and 6.3.
Listing 6.1 Mimicking pointers with references
static B: [u8; 10] = [99, 97, 114, 114, 121, 116, 111, 119, 101, 108];
static C: [u8; 11] = [116, 104, 97, 110, 107, 115, 102, 105, 115, 104, 0];

fn main() {
    let a = 42;
    let b = &B;                                       ①
    let c = &C;                                       ①

    println!("a: {}, b: {:p}, c: {:p}", a, b, c);     ②
}
① For simplicity, uses the same reference type for this example. Later examples distinguish smart pointers from raw pointers and require different types.
② The {:p} syntax asks Rust to format the variable as a pointer and prints the memory address that the value points to.
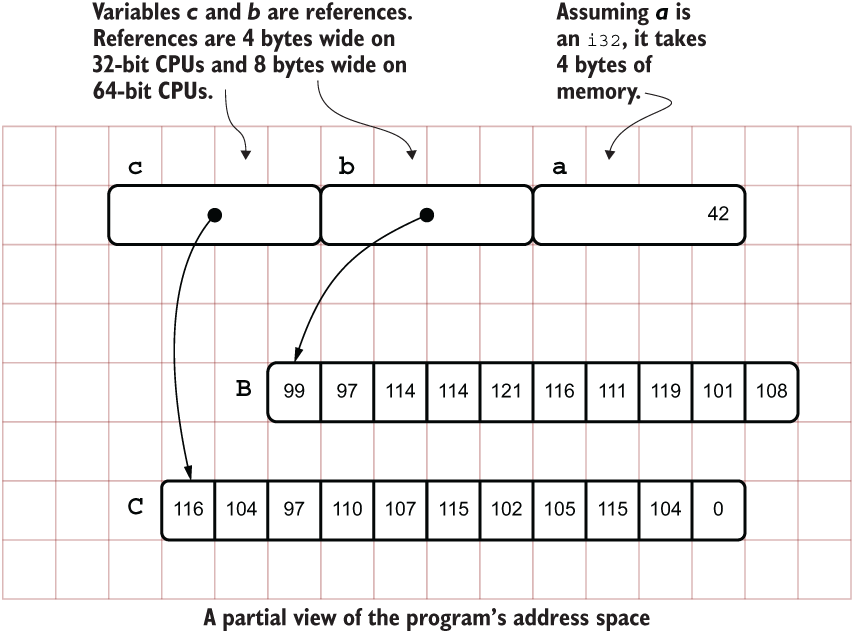
Figure 6.2 An abstract view of how two pointers operate alongside a standard integer. The important lesson here is that the programmer might not know the location of the referent data beforehand.
Listing 6.1 has three variables within its main() function. a is rather trivial; it’s just an integer. The other two are more interesting. b and c are references. These refer to two opaque arrays of data, B and C. For the moment, consider Rust references as equivalent to pointers. The output from one execution on a 64-bit machine is as follows:
a: 42, b: 0x556fd40eb480, c: 0x556fd40eb48a ①
① If you run the code, the exact memory addresses will be different on your machine.
Figure 6.3 provides a view of the same example in an imaginary address space of 49 bytes. It has a pointer width of two bytes (16 bits). You’ll notice that the variables b and c look different in memory, despite being the same type as in listing 6.1. That’s due to that because the listing is lying to you. The gritty details and a code example that more closely represents the diagram in figure 6.3 are coming shortly.
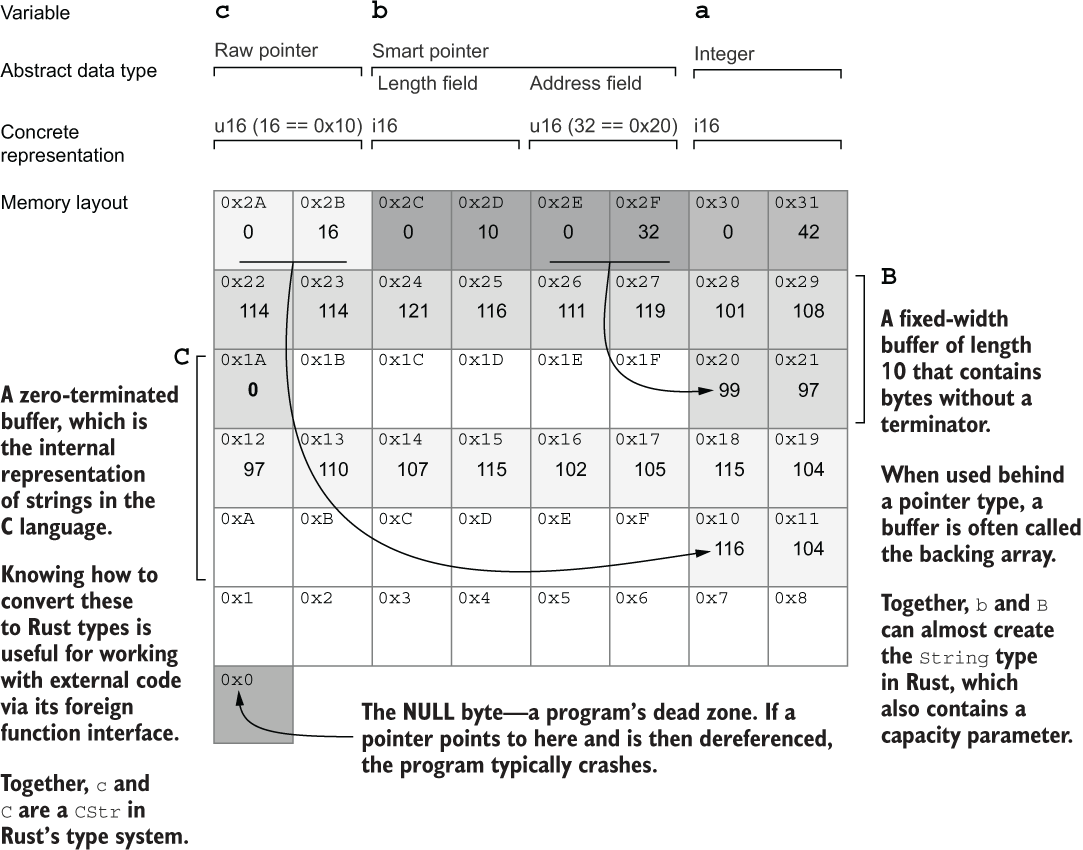
Figure 6.3 An illustrative address space of the program provided in listing 6.1. It provides an illustration of the relationship between addresses (typically written in hexadecimal) and integers (typically written in decimal). White cells represent unused memory.
As evidenced in figure 6.2, there’s one problem with portraying pointers as arrows to disconnected arrays. These tend to de-emphasize that the address space is contiguous and shared between all variables.
For a more thorough examination of what happens under the hood, listing 6.2 produces much more output. It uses more sophisticated types instead of references to demonstrate how these differ internally and to correlate more accurately what is presented in figure 6.3. The following shows the output from listing 6.2:
a  (an unsigned integer):
  location: 0x7ffe8f7ddfd0
  size:     8 bytes
  value:    42

b (a reference to B):
  location:  0x7ffe8f7ddfd8
  size:      8 bytes
  points to: 0x55876090c830

c (a "box" for C):
  location:  0x7ffe8f7ddfe0
  size:      16 bytes
  points to: 0x558762130a40

B (an array of 10 bytes):
  location: 0x55876090c830
  size:     10 bytes
  value:    [99, 97, 114, 114, 121, 116, 111, 119, 101, 108]

C (an array of 11 bytes):
  location: 0x55876090c83a
  size:     11 bytes
  value:    [116, 104, 97, 110, 107, 115, 102, 105, 115, 104, 0
Listing 6.2 Comparing references and Box<T> to several types
 1 use std::mem::size_of;
 2
 3 static B: [u8; 10] = [99, 97, 114, 114, 121, 116, 111, 119, 101, 108];
 4 static C: [u8; 11] = [116, 104, 97, 110, 107, 115, 102, 105, 115, 104, 0];
 5
 6 fn main() {
 7     let a: usize     = 42;              ①
 8
 9     let b: &[u8; 10] = &B;              ②
10
11     let c: Box<[u8]> = Box::new(C);     ③
12
13     println!("a (an unsigned integer):");
14     println!("  location: {:p}", &a);
15     println!("  size:     {:?} bytes", size_of::<usize>());
16     println!("  value:    {:?}", a);
17     println!();
18
19     println!("b (a reference to B):");
20     println!("  location:  {:p}", &b);
21     println!("  size:      {:?} bytes", size_of::<&[u8; 10]>());
22     println!("  points to: {:p}", b);
23     println!();
24
25     println!("c (a "box" for C):");
26     println!("  location:  {:p}", &c);
27     println!("  size:      {:?} bytes", size_of::<Box<[u8]>>());
28     println!("  points to: {:p}", c);
29     println!();
30
31     println!("B (an array of 10 bytes):");
32     println!("  location: {:p}",  &B);
33     println!("  size:     {:?} bytes", size_of::<[u8; 10]>());
34     println!("  value:    {:?}", B);
35     println!();
36
37     println!("C (an array of 11 bytes):");
38     println!("  location: {:p}",  &C);
39     println!("  size:     {:?} bytes", size_of::<[u8; 11]>());
40     println!("  value:    {:?}", C);
41 }
① &[u8; 10] reads as “a reference to an array of 10 bytes.” The array is located in static memory, and the reference itself (a pointer of width usize bytes) is placed on the stack.
② usize is the memory address size for the CPU the code is compiled for. That CPU is called the compile target.
③ The Box<[u8]> type is a boxed byte slice. When we place values inside a box, ownership of the value moves to the owner of the box.
For readers who are interested in decoding the text within B and C, listing 6.3 is a short program that (almost) creates a memory address layout that resembles figure 6.3 more closely. It contains a number of new Rust features and some relatively arcane syntax, both of which haven’t been introduced yet. These will be explained shortly.
Listing 6.3 Printing from strings provided by external sources
use std::borrow::Cow;                                  ①

use std::ffi::CStr;                                    ②

use std::os::raw::c_char;                              ③

static B: [u8; 10] = [99, 97, 114, 114, 121, 116, 111, 119, 101, 108];
static C: [u8; 11] = [116, 104, 97, 110, 107, 115, 102, 105, 115, 104, 0];

fn main() {
  let a = 42;                                          ④

  let b: String;                                       ⑤

  let c: Cow<str>;                                     ⑥

  unsafe {
    let b_ptr = &B as *const u8 as *mut u8;            ⑦

    b = String::from_raw_parts(b_ptr, 10, 10);         ⑧

    let c_ptr = &C as *const u8 as *const c_char;      ⑨

    c = CStr::from_ptr(c_ptr).to_string_lossy();       ⑩
  }

  println!("a: {}, b: {}, c: {}", a, b, c);
}
① A smart pointer type that reads from its pointer location without needing to copy it first
② CStr is a C-like string type that allows Rust to read in zero-terminated strings.
③ c_char, a type alias for Rust’s i8 type, presents the possibility of a platform-specific nuances.
④ Introduces each of the variables so that these are accessible from println! later. If we created b and c within the unsafe block, these would be out of scope later.
⑤ String is a smart pointer type that holds a pointer to a backing array and a field to store its size.
⑥ Cow accepts a type parameter for the data it points to; str is the type returned by CStr.to_string_lossy(), so it is appropriate here.
⑦ References cannot be cast directly to *mut T, the type required by String::from_raw_parts(). But *const T can be cast to *mut T, leading to this double cast syntax.
⑧ String::from_raw_parts() accepts a pointer (*mut T) to an array of bytes, a size, and a capacity parameter.
⑨ Converts a *const u8 to a *const i8, aliased to c_char. The conversion to i8 works because we remain under 128, following the ASCII standard.
⑩ Conceptually, CStr::from_ptr() takes responsibility for reading the pointer until it reaches 0; then it generates Cow<str> from the result
In listing 6.3, Cow stands for copy on write. This smart pointer type is handy when an external source provides a buffer. Avoiding copies increases runtime performance. std::ffi is the foreign function interface module from Rust’s standard library. use std::os::raw::c_char; is not strictly needed, but it does make the code’s intent clear. C does not define the width of its char type in its standard, although it’s one byte wide in practice. Retrieving the type alias c_char from the std::os:raw module allows for differences.
To thoroughly understand the code in listing 6.3, there is quite a bit of ground to cover. We first need to work through what raw pointers are and then discuss a number of feature-rich alternatives that have been built around them.
A raw pointer is a memory address without Rust’s standard guarantees. These are inherently unsafe. For example, unlike references (&T), raw pointers can be null.
If you’ll forgive the syntax, raw pointers are denoted as *const T and *mut T for immutable and mutable raw pointers, respectively. Even though each is a single type, these contain three tokens: *, const or mut. Their type, T, a raw pointer to a String, looks like *const String. A raw pointer to an i32 looks like *mut i32. But before we put pointers into practice, here are two other things that are useful to know:
The difference between a *mut T and a *const T is minimal. These can be freely cast between one another and tend to be used interchangeably, acting as in-source documentation.
Rust references ( &mut T and &T) compile down to raw pointers. That means that it’s possible to access the performance of raw pointers without needing to venture into unsafe blocks.
The next listing provides a small example that coerces a reference to a value (&T), creating a raw pointer from an i64 value. It then prints the value and its address in memory via the {:p} syntax.
Listing 6.4 Creating a raw pointer (*const T)
fn main() {
    let a: i64 = 42;
    let a_ptr = &a as *const i64;          ①

    println!("a: {} ({:p})", a, a_ptr);    ②
}
① Casts a reference to the variable a (&a) to a constant raw pointer i64 (*const i64)
② Prints the value of the variable a (42) and its address in memory (0x7ff...)
The terms pointer and memory address are sometimes used interchangeably. These are integers that represent a location in virtual memory. From the compiler’s point of view, though, there is one important difference. Rust’s pointer types *const T and *mut T always point to the starting byte of T, and these also know the width of type T in bytes. A memory address might refer to anywhere in memory.
An i64 is 8-bytes wide (64 bits ÷ 8 bits per byte). Therefore, if an i64 is stored at address 0x7fffd, then each of the bytes between 0x7ffd..0x8004 must be fetched from RAM to recreate the integer’s value. The process of fetching data from RAM from a pointer is known as dereferencing a pointer. The following listing identifies a value’s address by casting a reference to it as a raw pointer via std::mem::transmute.
Listing 6.5 Identifying a value’s address
fn main() {
    let a: i64 = 42;
    let a_ptr = &a as *const i64;
    let a_addr: usize = unsafe {
      std::mem::transmute(a_ptr)       ①
    };

    println!("a: {} ({:p}...0x{:x})", a, a_ptr, a_addr + 7);

}
① Interprets *const i64 as usize. Using transmute() is highly unsafe but is used here to postpone introducing more syntax.
Under the hood, references (&T and &mut T) are implemented as raw pointers. These come with extra guarantees and should always be preferred.
Warning Accessing the value of a raw pointer is always unsafe. Handle with care.
Using raw pointers in Rust code is like working with pyrotechnics. Usually the results are fantastic, sometimes they’re painful, and occasionally they’re tragic. Raw pointers are often handled in Rust code by the OS or a third-party library.
To demonstrate their volatility, let’s work through a quick example with Rust’s raw pointers. Creating a pointer of arbitrary types from any integer is perfectly legal. Dereferencing that pointer must occur within an unsafe block, as the following snippet shows. An unsafe block implies that the programmer takes full responsibility for any consequences:
fn main() {
    let ptr = 42 as *const Vec<String>;       ①

    unsafe {
        let new_addr = ptr.offset(4);
        println!("{:p} -> {:p}", ptr, new_addr);
    }
}
① You can create pointers safely from any integral value. An i32 is not a Vec<String>, but Rust is quite comfortable ignoring that here.
To reiterate, raw pointers are not safe. These have a number of properties that mean that their use is strongly discouraged within day-to-day Rust code:
Raw pointers do not own their values. The Rust compiler does not check that the referent data is still valid when these are accessed.
Multiple raw pointers to the same data are allowed. Every raw pointer can have write, read-write access to data. This means that there is no time when Rust can guarantee that shared data is valid.
Notwithstanding those warnings, there are a small number of valid reasons to make use of raw pointers:
It’s unavoidable. Perhaps some OS call or third-party code requires a raw pointer. Raw pointers are common within C code that provides an external interface.
Shared access to something is essential and runtime performance is paramount. Perhaps multiple components within your application require equal access to some expensive-to-compute variable. If you’re willing to take on the risk of one of those components poisoning every other component with some silly mistake, then raw pointers are an option of last resort.
Given that raw pointers are unsafe, what is the safer alternative? The alternative is to use smart pointers. In the Rust community, a smart pointer is a pointer type that has some kind of superpower, over and above the ability to deference a memory address. You will probably encounter the term wrapper type as well. Rust’s smart pointer types tend to wrap raw pointers and bestow them with added semantics.
A narrower definition of smart pointer is common in the C communities. There authors (generally) imply that the term smart pointer means the C equivalents of Rust’s core::ptr::Unique, core::ptr::Shared, and std::rc::Weak types. We will introduce these types shortly.
Note The term fat pointer refers to memory layout. Thin pointers, such as raw pointers, are a single usize wide. Fat pointers are usually two usize wide, and occasionally more.
Rust has an extensive set of pointer (and pointer-like) types in its standard library. Each has its own role, strengths, and weaknesses. Given their unique properties, rather than writing these out as a list, let’s model these as characters in a card-based role-playing game, as shown in figure 6.4.

Figure 6.4 A fictitious role-playing card game describing the characteristics of Rust's smart pointer types
Each of the pointer types introduced here are used extensively throughout the book. As such, we’ll give these fuller treatment when that’s needed. For now, the two novel attributes that appear within the Powers section of some of these cards are interior mutability and shared ownership. These two terms warrant some discussion.
With interior mutability, you may want to provide an argument to a method that takes immutable values, yet you need to retain mutability. If you’re willing to pay the runtime performance cost, it’s possible to fake immutability. If the method requires an owned value, wrap the argument in Cell<T>. References can also be wrapped in RefCell<T>. It is common when using the reference counted types Rc<T> and Arc<T>, which only accept immutable arguments, to also wrap those in Cell<T> or RefCell<T>. The resulting type might look like Rc<RefCell<T>>. This means that you pay the runtime cost twice but with significantly more flexibility.
With shared ownership, some objects, such as a network connection or, perhaps, access to some OS service, are difficult to mould into the pattern of having a single place with read-write access at any given time. Code might be simplified if two parts of the program can share access to that single resource. Rust allows you to do this, but again, at the expense of a runtime cost.
You might find yourself in a situation where you want to build your own smart pointer type with its own semantics. Perhaps a new research paper has been released, and you want to incorporate its results into your own work. Perhaps you’re conducting the research. Regardless, it might be useful to know that Rust’s pointer types are extensible—these are designed with extension in mind.
All of the programmer-facing pointer types like Box<T> are built from more primitive types that live deeper within Rust, often in its core or alloc modules. Additionally, the C++ smart pointer types have Rust counterparts. Here are some useful starting points for you when building your own smart pointer types:
core::ptr::Unique is the basis for types such as String, Box<T>, and the pointer field Vec<T>.
core::ptr::Shared is the basis for Rc<T> and Arc<T>, and it can handle situations where shared access is desired.
In addition, the following tools can also be handy in certain situations:
Deeply interlinked data structures can benefit from std::rc::Weak and std::arc:: Weak for single and multi-threaded programs, respectively. These allow access to data within an Rc/Arc without incrementing its reference count. This can prevent never-ending cycles of pointers.
The alloc::raw_vec::RawVec type underlies Vec<T> and VecDeq<T>. An expandable, double-ended queue that hasn’t appeared in the book so far, it understands how to allocate and deallocate memory in a smart way for any given type.
The std::cell::UnsafeCell type sits behind both Cell<T> and RefCell<T>. If you would like to provide interior mutability to your types, its implementation is worth investigating.
A full treatment of building new safe pointers touches on some of Rust’s internals. These building blocks have their own building blocks. Unfortunately, explaining every detail will diverge too far from our goals for this chapter.
Note Inquisitive readers should investigate the source code of the standard library’s pointer types. For example, the std::cell::RefCell type is documented at https://doc.rust-lang.org/std/cell/struct.RefCell.html. Clicking the [src] button on that web page directs you to the type’s definition.
This section attempts to demystify the terms the stack and the heap. These terms often appear in contexts that presuppose you already know what they mean. That isn’t the case here. We’ll cover the details of what they are, why they exist, and how to make use of that knowledge to make your programs leaner and faster.
Some people hate wading through the details, though. For those readers, here is the salient difference between the stack and the heap:
That difference leads to the following axiom: “When in doubt, prefer the stack.” To place data onto the stack, the compiler must know the type’s size at compile time. Translated to Rust, that means, “When in doubt, use types that implement Sized.” Now that you’ve got the gist of those terms, it’s time to learn when to take the slow path and how to avoid it when you want to take a faster one.
The stack is often described by analogy. Think of a stack of dinner plates waiting in the cupboard of a commercial kitchen. Cooks are taking plates off the stack to serve food, and dishwashers are placing new plates on the top.
The unit (the plate) of a computing stack is the stack frame, also known as the allocation record. You are probably used to thinking of this as a group of variables and other data. Like many descriptions in computing, the stack and the heap are analogies that only partially fit. Even though the stack is often compared by analogy to a stack of dinner plates waiting in the cupboard, unfortunately, that mental picture is inaccurate. Here are some differences:
The stack actually contains two levels of objects: stack frames and data.
The stack grants programmers access to multiple elements stored within it, rather than the top item only.
The stack can include elements of arbitrary size, where the implication of the dinner plate analogy is that all elements must be of the same size.
So why is the stack called the stack? Because of the usage pattern. Entries on the stack are made in a Last In, First Out (LIFO) manner.
The entries in the stack are called stack frames. Stack frames are created as function calls are made. As a program progresses, a cursor within the CPU updates to reflect the current address of the current stack frame. The cursor is known as the stack pointer.
As functions are called within functions, the stack pointer decreases in value as the stack grows. When a function returns, the stack pointer increases.
Stack frames contain a function’s state during the call. When a function is called within a function, the older function’s values are effectively frozen in time. Stack frames are also known as activation frames, and less commonly allocation records.1
Unlike dinner plates, every stack frame is a different size. The stack frame contains space for its function’s arguments, a pointer to the original call site, and local variables (except the data which is allocated on the heap).
Note If you are unfamiliar with what the term call site means, see the CPU emulation section in chapter 5.
To understand what is happening more fully, let’s consider a thought experiment. Imagine a diligent, yet absurdly single-minded cook in a commercial kitchen. The cook takes each table’s docket and places those in a queue. The cook has a fairly bad memory, so each current order is written down a notebook. As new orders come in, the cook updates the notebook to refer to the new order. When orders are complete, the notebook page is changed to the next item in the queue. Unfortunately, for customers in this restaurant, the book operates in a LIFO manner. Hopefully, you will not be one of the early orders during tomorrow’s lunch rush.
In this analogy, the notebook plays the role of the stack pointer. The stack itself is comprised of variable-length dockets, representing stack frames. Like stack frames, restaurant dockets contain some metadata. For example, the table number can act as the return address.
The stack’s primary role is to make space for local variables. Why is the stack fast? All of a function’s variables are side by side in memory. That speeds up access.
This section introduces the heap. The heap is an area of program memory for types that do not have known sizes at compile time.
What does it mean to have no known size at compile time? In Rust, there are two meanings. Some types grow and shrink over time as required. Obvious cases are String and Vec<T>. Other types are unable to tell the Rust compiler how much memory to allocate even though these don’t change size at runtime. These are known as dynamically sized types. Slices ([T]) are the commonly cited example. Slices have no compile-time length. Internally, these are a pointer to some part of an array. But slices actually represent some number of elements within that array.
Another example is a trait object, which we’ve not described in this book so far. Trait objects allow Rust programmers to mimic some features of dynamic languages by allowing multiple types to be wedged into the same container.
You will gain a fuller understanding of what the heap is once you work through the next section on virtual memory. For now, let’s concentrate on what it is not. Once those points are clarified, we’ll then work our way back toward some form of truth.
The word “heap” implies disorganization. A closer analogy would be warehouse space in some medium-sized business. As deliveries arrive (as variables are created), the warehouse makes space available. As the business carries out its work, those materials are used, and the warehouse space can now be made available for new deliveries. At times, there are gaps and perhaps a bit of clutter. But overall, there is a good sense of order.
Another mistake is that the heap has no relationship to the data structure that is also known as a heap. That data structure is often used to create priority queues. It’s an incredibly clever tool in its own right, but right now it’s a complete distraction. The heap is not a data structure. It’s an area of memory.
Now that those two distinctions are made, let’s inch toward an explanation. The critical difference from a usage point of view is that variables on the heap must be accessed via a pointer, whereas this is not required with variables accessed on the stack.
Although it’s a trivial example, let’s consider two variables, a and b. These both represent the integers 40 and 60, respectively. In one of those cases though, the integer happens to live on the heap, as in this example:
let a: i32 = 40;
let b: Box<i32> = Box::new(60);
Now, let’s demonstrate that critical difference. The following code won’t compile:
let result = a + b;
The boxed value assigned to b is only accessible via a pointer. To access that value, we need to dereference it. The dereference operator is a unary *, which prefixes the variable name:
let result = a + *b;
This syntax can be difficult to follow at first because the symbol is also used for multiplication. It does, however, become more natural over time. The following listing shows a complete example where creating variables on the heap implies constructing that variable via a pointer type such as Box<T>.
Listing 6.6 Creating variables on the heap
fn main() {
    let a: i32 = 40;                            ①
    let b: Box<i32> = Box::new(60);             ②

    println!("{} + {} = {}", a, b, a + *b);     ③

}
③ To access 60, we need to dereference it.
To get a feel for what the heap is and what is happening within memory as a program runs, let’s consider a tiny example. In this example, all we will do is to create some numbers on the heap and then add their values together. When run, the program in listing 6.7 produces some fairly trivial output: two 3s. Still, it’s really the internals of the program’s memory that are important here, not its results.
The code for the next listing is in the file ch6/ch6-heap-via-box/src/main.rs. A pictorial view of the program’s memory as it runs (figure 6.5) follows the code. Let’s first look at the program’s output:
3 3
Listing 6.7 Allocating and deallocating memory on the heap via Box<T>
 1 use std::mem::drop;                   ①
 2
 3 fn main() {
 4     let a = Box::new(1);              ②
 5     let b = Box::new(1);              ②
 6     let c = Box::new(1);              ②
 7
 8     let result1 = *a + *b + *c;       ③
 9
10     drop(a);                          ④
11     let d = Box::new(1);
12     let result2 = *b + *c + *d;
13
14     println!("{} {}", result1, result2);
15 }
① Brings manual drop() into local scope
② Allocates values on the heap
③ The unary *, the dereference operator, returns the value within the box, and result1 holds the value 3.
④ Invokes drop(), freeing memory for other uses
Listing 6.7 places four values on the heap and removes one. It contains some new or, at least, less familiar syntax that might be worthwhile to cover and/or recap:
Box::new(T) allocates T on the heap. Box is a term that can be deceptive if you don’t share its intuition.
Something that has been boxed lives on the heap, with a pointer to it on the stack. This is demonstrated in the first column of figure 6.5, where the number 0x100 at address 0xfff points to the value 1 at address 0x100. However, no actual box of bytes encloses a value, nor is the value hidden or concealed in some way.
std::mem::drop brings the function drop() into local scope. drop() deletes objects before their scope ends.
Types that implement Drop have a drop() method, but explicitly calling it is illegal within user code. std::mem::drop is an escape hatch from that rule.
Asterisks next to variables (*a, *b, *c, and *d) are unary operators. This is the dereference operator. Dereferencing a Box::(T) returns T. In our case, the variables a, b, c, and d are references that refer to integers.
In figure 6.5, each column illustrates what happens inside memory at 6 lines of code. The stack appears as the boxes along the top, and the heap appears along the bottom. The figure omits several details, but it should help you gain an intuition about the relationship between the stack and the heap.
Note If you have experience with a debugger and want to explore what is happening, be sure to compile your code with no optimizations. Compile your code with cargo build (or cargo run) rather than cargo build --release. Using the --release flag actually ends up optimizing all the allocations and arithmetic. If you are invoking rustc manually, use the command rustc --codegen opt-level=0.
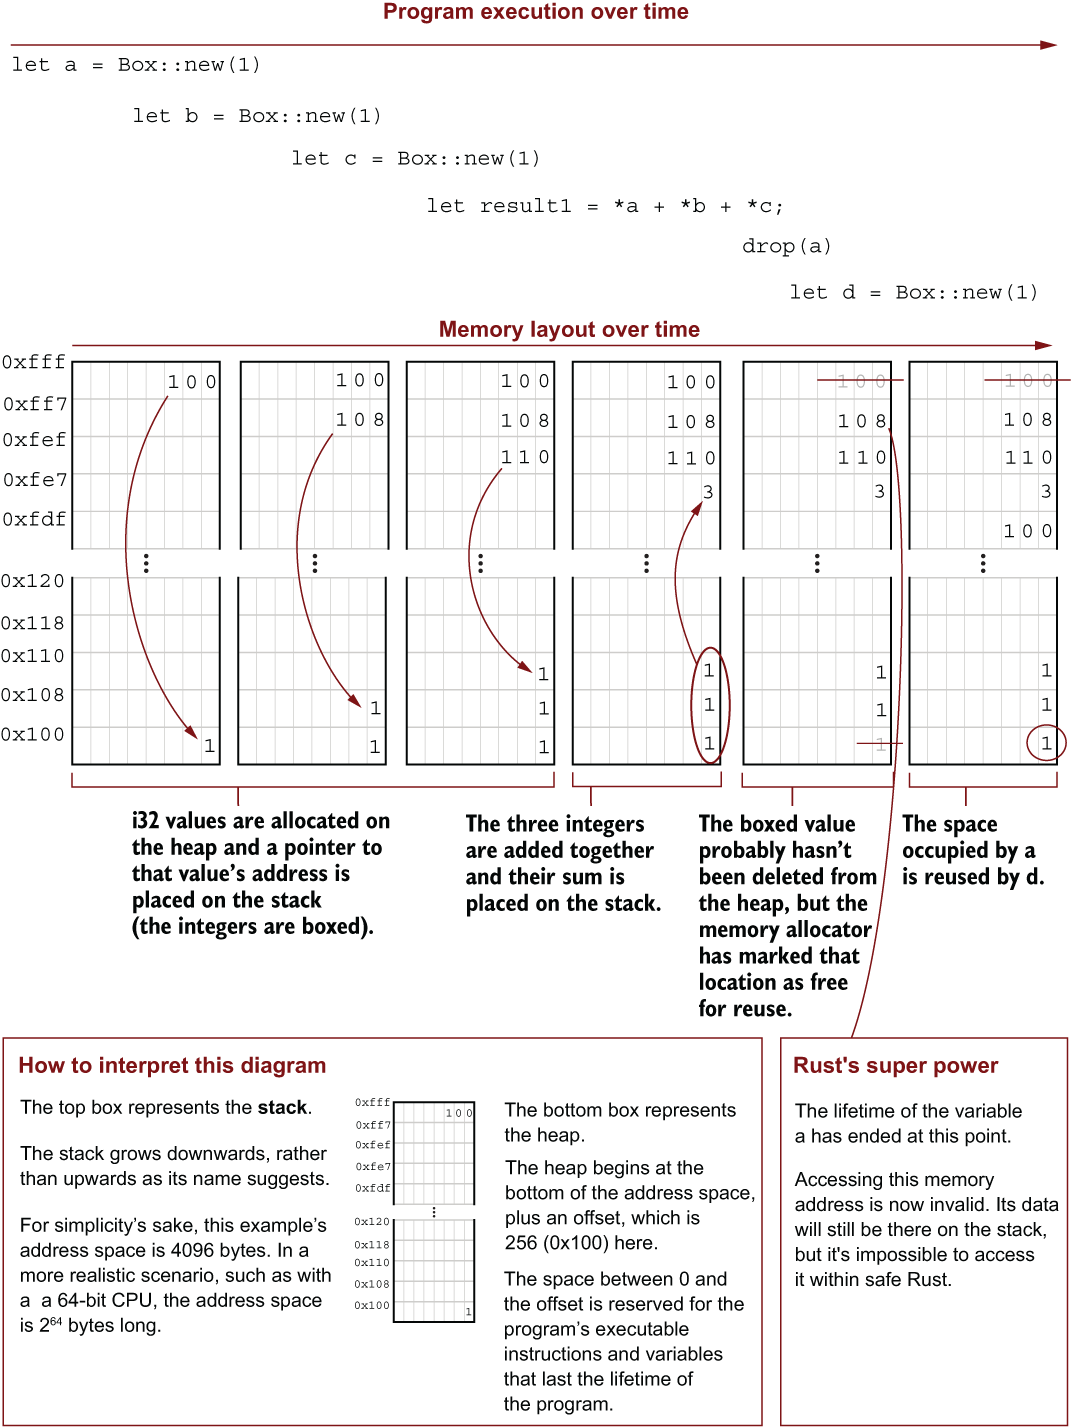
Figure 6.5 A view into a program’s memory layout during the execution of listing 6.7
At any given time, a running program has a fixed number of bytes with which to get its work done. When the program would like more memory, it needs to ask for more from the OS. This is known as dynamic memory allocation and is shown in figure 6.6. Dynamic memory allocation is a three-step process:
Request memory from the OS via a system call. In the UNIX family of operating systems, this system call is alloc(). In MS Windows, the call is HeapAlloc().
Release memory that isn’t needed back to the OS via free() for UNIX systems and HeapFree() for Windows.
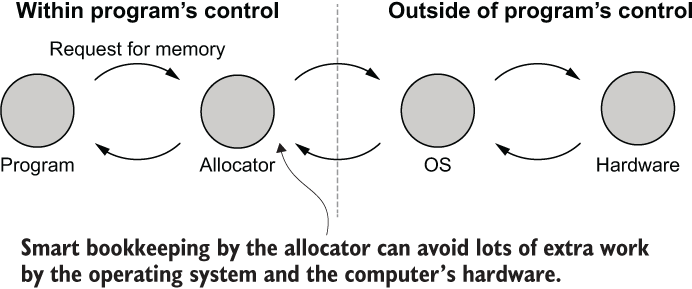
Figure 6.6 Conceptual view of dynamic memory allocation. Requests for memory originate and terminate at the program level but involve several other components. At each stage, the components may short-circuit the process and return quickly.
As it turns out, there is an intermediary between the program and the OS: the allocator, a specialist subprogram that is embedded in your program behind the scenes. It will often perform optimizations that avoid lots of work within the OS and CPU.
Let’s examine the performance impact of dynamic memory allocation and strategies to reduce that impact. Before starting, let’s recap why there’s a performance difference between the stack and the heap. Remember that the stack and the heap are conceptual abstractions only. These do not exist as physical partitions of your computer’s memory. What accounts for their different performance characteristics?
Accessing data on the stack is fast because a function’s local variables, which are allocated on the stack, reside next to each other in RAM. This is sometimes referred to as a contiguous layout.
A contiguous layout is cache-friendly. Alternatively, variables allocated on the heap are unlikely to reside next to each other. Moreover, accessing data on the heap involves dereferencing the pointer. That implies a page table lookup and a trip to main memory. Table 6.1 summarizes these differences.
Table 6.1 A simplistic, yet practical table for comparing the stack and the heap
|
Dangerous* |
|
There is a trade-off for the stack’s increased speed. Data structures on the stack must stay the same size during the lifetime of the program. Data structures allocated on the heap are more flexible. Because these are accessed via a pointer, that pointer can be changed.
To quantify this impact, we need to learn how to measure the cost. To get a large number of measurements, we need a program that creates and destroys many values. Let’s create a toy program. Figure 6.7 shows show a background element to a video game.
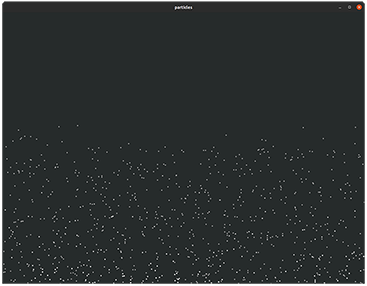
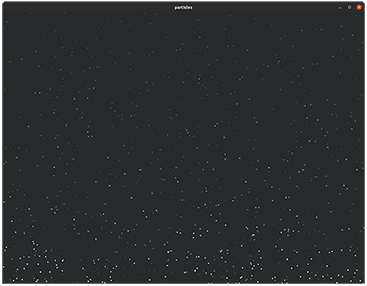
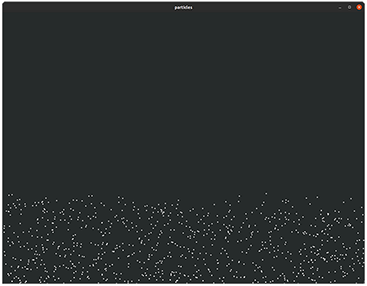
Figure 6.7 Screenshots from the result of running listing 6.9
After running listing 6.9, you should see a window appear on your screen filled with a dark grey background. White snow-like dots will start to float from the bottom and fade as they approach the top. If you check the console output, streams of numbers will appear. Their significance will be explained once we discuss the code. Listing 6.9 contains three major sections:
A memory allocator (the ReportingAllocator struct) records the time that dynamic memory allocations take.
Definitions of the structs World and Particle and how these behave over time.
The main() function deals with window creation and initialization.
The following listing shows the dependencies for our toy program (listing 6.9). The source for the following listing is in ch6/ch6-particles/Cargo.toml. The source for listing 6.9 is in ch6/ch6-particles/main.rs.
Listing 6.8 Build dependencies for listing 6.9
[package]
name = "ch6-particles"
version = "0.1.0"
authors = ["TS McNamara <author@rustinaction.com>"]
edition = "2018"

[dependencies]
piston_window = "0.117"       ①

piston2d-graphics = "0.39"    ②

rand = "0.8"                  ③
① Provides a wrapper around the core functionality of the piston game engine, letting us easily draw things onscreen; largely irrespective of the host environment
② Provides vector mathematics, which is important to simulate movement
③ Provides random number generators and associated functionality
Listing 6.9 A graphical application to create and destroy objects on the heap
  1 use graphics::math::{Vec2d, add, mul_scalar};            ①
  2
  3 use piston_window::*;                                    ②
  4
  5 use rand::prelude::*;                                    ③
  6
  7 use std::alloc::{GlobalAlloc, System, Layout};           ④
  8
  9 use std::time::Instant;                                  ⑤
 10
 11
 12 #[global_allocator]                                      ⑥
 13 static ALLOCATOR: ReportingAllocator = ReportingAllocator;
 14
 15 struct ReportingAllocator;                               ⑦
 16
 17 unsafe impl GlobalAlloc for ReportingAllocator {
 18   unsafe fn alloc(&self, layout: Layout) -> *mut u8 {
 19     let start = Instant::now();
 20     let ptr = System.alloc(layout);                      ⑧
 21     let end = Instant::now();
 22     let time_taken = end - start;
 23     let bytes_requested = layout.size();
 24
 25     eprintln!("{}\t{}", bytes_requested, time_taken.as_nanos());
 26     ptr
 27   }
 28
 29   unsafe fn dealloc(&self, ptr: *mut u8, layout: Layout) {
 30     System.dealloc(ptr, layout);
 31   }
 32 }
 33
 34 struct World {                                           ⑨
 35   current_turn: u64,                                     ⑨
 36   particles: Vec<Box<Particle>>,                         ⑨
 37   height: f64,                                           ⑨
 38   width: f64,                                            ⑨
 39   rng: ThreadRng,                                        ⑨
 40 }
 41
 42 struct Particle {                                        ⑩
 43   height: f64,                                           ⑩
 44   width: f64,                                            ⑩
 45   position: Vec2d<f64>,                                  ⑩
 46   velocity: Vec2d<f64>,                                  ⑩
 47   acceleration: Vec2d<f64>,                              ⑩
 48   color: [f32; 4],                                       ⑩
 49 }
 50
 51 impl Particle {
 52   fn new(world : &World) -> Particle {
 53     let mut rng = thread_rng();
 54     let x = rng.gen_range(0.0..=world.width);            ⑪
 55     let y = world.height;                                ⑪
 56     let x_velocity = 0.0;                                ⑫
 57     let y_velocity = rng.gen_range(-2.0..0.0);           ⑫
 58     let x_acceleration = 0.0;                            ⑬
 59     let y_acceleration = rng.gen_range(0.0..0.15);       ⑬
 60
 61     Particle {
 62       height: 4.0,
 63       width: 4.0,
 64       position: [x, y].into(),                           ⑭
 65       velocity: [x_velocity, y_velocity].into(),         ⑭
 66       acceleration: [x_acceleration,
 67                      y_acceleration].into(),             ⑭
 68       color: [1.0, 1.0, 1.0, 0.99],                      ⑮
 69     }
 70   }
 71
 72   fn update(&mut self) {
 73     self.velocity = add(self.velocity,
 74                         self.acceleration);              ⑯
 75     self.position = add(self.position,
 76                         self.velocity);                  ⑯
 77     self.acceleration = mul_scalar(                      ⑰
 78       self.acceleration,                                 ⑰
 79       0.7                                                ⑰
 80     );                                                   ⑰
 81     self.color[3] *= 0.995;                              ⑱
 82   }
 83 }
 84
 85 impl World {
 86   fn new(width: f64, height: f64) -> World {
 87     World {
 88       current_turn: 0,
 89       particles: Vec::<Box<Particle>>::new(),            ⑲
 90       height: height,
 91       width: width,
 92       rng: thread_rng(),
 93     }
 94   }
 95
 96   fn add_shapes(&mut self, n: i32) {
 97     for _ in 0..n.abs() {
 98       let particle = Particle::new(&self);               ⑳
 99       let boxed_particle = Box::new(particle);           ㉑
100       self.particles.push(boxed_particle);               ㉒
101     }
102   }
103
104   fn remove_shapes(&mut self, n: i32) {
105     for _ in 0..n.abs() {
106       let mut to_delete = None;
107
108       let particle_iter = self.particles                 ㉓
109         .iter()                                          ㉓
110         .enumerate();                                    ㉓
111
112       for (i, particle) in particle_iter {               ㉔
113         if particle.color[3] < 0.02 {                    ㉔
114           to_delete = Some(i);                           ㉔
115         }                                                ㉔
116         break;                                           ㉔
117       }                                                  ㉔
118                                                          ㉔
119       if let Some(i) = to_delete {                       ㉔
120         self.particles.remove(i);                        ㉔
121       } else {                                           ㉔
122         self.particles.remove(0);                        ㉔
123       };                                                 ㉔
124     }
125   }
126
127   fn update(&mut self) {
128     let n = self.rng.gen_range(-3..=3);                  ㉕
129
130     if n > 0 {
131       self.add_shapes(n);
132     } else {
133       self.remove_shapes(n);
134     }
135
136     self.particles.shrink_to_fit();
137     for shape in &mut self.particles {
138       shape.update();
139     }
140     self.current_turn += 1;
141   }
142 }
143
144 fn main() {
145   let (width, height) = (1280.0, 960.0);
146   let mut window: PistonWindow = WindowSettings::new(
147     "particles", [width, height]
148   )
149   .exit_on_esc(true)
150   .build()
151   .expect("Could not create a window.");
152
153   let mut world = World::new(width, height);
154   world.add_shapes(1000);
155
156   while let Some(event) = window.next() {
157     world.update();
158
159     window.draw_2d(&event, |ctx, renderer, _device| {
160       clear([0.15, 0.17, 0.17, 0.9], renderer);
161
162       for s in &mut world.particles {
163         let size = [s.position[0], s.position[1], s.width, s.height];
164         rectangle(s.color, size, ctx.transform, renderer);
165       }
166     });
167   }
168 }
① graphics::math::Vec2d provides mathematical operations and conversion functionality for 2D vectors.
② piston_window provides the tools to create a GUI program and draws shapes to it.
③ rand provides random number generators and related functionality.
④ std::alloc provides facilities for controlling memory allocation.
⑤ std::time provides access to the system’s clock.
⑥ #[global_allocator] marks the following value (ALLOCATOR) as satisfying the GlobalAlloc trait.
⑦ Prints the time taken for each allocation to STDOUT as the program runs. This provides a fairly accurate indication of the time taken for dynamic memory allocation.
⑧ Defers the actual memory allocation to the system’s default memory allocator
⑨ Contains the data that is useful for the lifetime of the program
⑲ Defines an object in 2D space
⑪ Starts at a random position along the bottom of the window
⑬ Increases the speed of the rise over time
⑭ into() converts the arrays of type [f64; 2] into Vec2d.
⑮ Inserts a fully saturated white that has a tiny amount of transparency
⑯ Moves the particle to its next position
⑰ Slows down the particle’s rate of increase as it travels across the screen
⑱ Makes the particle more transparent over time
⑲ Uses Box<Particle> rather than Particle to incur an extra memory allocation when every particle is created
⑳ Creates a Particle as a local variable on the stack
㉑ Takes ownership of particle, moving its data to the heap, and creates a reference to that data on the stack
㉒ Pushes the reference into self.shapes
㉓ particle_iter is split into its own variable to more easily fit on the page.
㉔ For n iterations, removes the first particle that’s invisible. If there are no invisible particles, then removes the oldest.
㉕ Returns a random integer between –3 and 3, inclusive
Listing 6.9 is a fairly long code example, but hopefully, it does not contain any code that’s too alien compared to what you’ve already seen. Toward the end, the code example introduces Rust’s closure syntax. If you look at the call to window.draw_2d(), it has a second argument with vertical bars surrounding two variable names (|ctx, renderer, _device| { ... }). Those vertical bars provide space for the closure’s arguments, and the curly braces are its body.
A closure is a function that is defined in line and can access variables from its surrounding scope. These are often called anonymous or lambda functions.
Closures are a common feature within idiomatic Rust code, but this book tends to avoid those where possible to keep examples approachable to programmers from an imperative or object-oriented background. Closures are explained fully in chapter 11. In the interim, it’s sufficient to say that these are a convenient shorthand for defining functions. Let’s next focus on generating some evidence that allocating variables on the heap (many millions of times) can have a performance impact on your code.
If you run listing 6.9 from a terminal window, you’ll soon see two columns of numbers filling it up. These columns represent the number of bytes allocated, and the duration in nanoseconds taken to fulfil the request. That output can be sent to a file for further analysis, as shown in the following listing, which redirects stderr from ch6-particles to a file.
Listing 6.10 Creating a report of memory allocations
$ cd ch6-particles

$ cargo run -q 2> alloc.tsv      ①

$ head alloc.tsv                 ②
4       219
5       83
48      87
9       78
9       93
19      69
15      960
16      40
14      70
16      53
① Runs ch6-particles in quiet mode
② Views the first 10 lines of output
One interesting aspect from this short extract is that memory allocation speed is not well-correlated with allocation size. When every heap allocation is plotted, this becomes even clearer as figure 6.8 shows.

Figure 6.8 Plotting heap allocation times against allocation size shows that there is no clear relationship between the two. The time taken to allocate memory is essentially unpredictable, even when requesting the same amount of memory multiple times.
To generate your own version of figure 6.8, the following listing shows a gnuplot script that can be tweaked as desired. You’ll find this source in the file ch6/alloc.plot.
Listing 6.11 Script used to generate figure 6.8 with gnuplot
set key off
set rmargin 5
set grid ytics noxtics nocbtics back
set border 3 back lw 2 lc rgbcolor "#222222"

set xlabel "Allocation size (bytes)"
set logscale x 2
set xtics nomirror out
set xrange [0 to 100000]

set ylabel "Allocation duration (ns)"
set logscale y
set yrange [10 to 10000]
set ytics nomirror out

plot "alloc.tsv" with points \
    pointtype 6 \
    pointsize 1.25 \
    linecolor rgbcolor "#22dd3131"
Although larger memory allocations do tend to take longer than shorter ones, it’s not guaranteed. The range of durations for allocating memory of the same number is over an order of magnitude. It might take 100 nanoseconds; it might take 1,000.
Does it matter? Probably not. But it might. If you have a 3 GHz CPU, then your processor is capable of performing 3 billion operations per second. If there is a 100 nanosecond delay between each of those operations, your computer can only perform 30 million operations in the same time frame. Perhaps those hundreds of microseconds really do count for your application. Some general strategies for minimizing heap allocations include
Using arrays of uninitialized objects. Instead of creating objects from scratch as required, create a bulk lot of those with zeroed values. When the time comes to activate one of those objects, set its values to non-zero. This can be a very dangerous strategy because you’re circumventing Rust’s lifetime checks.
Using an allocator that is tuned for your application’s access memory profile. Memory allocators are often sensitive to the sizes where these perform best.
Investigate arena::Arena and arena::TypedArena. These allow objects to be created on the fly, but alloc() and free() are only called when the arena is created and destroyed.
This section explains what the term virtual memory means and why it exists. You will be able to use this knowledge to speed up your programs by building software that goes with the grain. CPUs can compute faster when they’re able to access memory quickly. Understanding some of the dynamics of the computer architecture can help to provide CPUs with memory efficiently.
I have spent far too much of my life playing computer games. As enjoyable and challenging as I’ve found these, I’ve often wondered about whether I would have been better off spending my teenage years doing something more productive. Still, it’s left me with plenty of memories. But some of those memories still leave a bitter taste.
Occasionally, someone would enter the game and obliterate everyone with near perfect aim and seemingly impossibly high health ratings. Other players would decry, “Cheater!” but were more or less helpless in defeat. While waiting in in-game purgatory, I would sit wondering, “How is that possible? How are those tweaks to the game actually made?”
By working through this section’s examples, you would have built the core of a tool that’s capable of inspecting and modifying values of a running program.
Intuitively, a program’s memory is a series of bytes that starts at location 0 and ends at location n. If a program reports 100 KB of RAM usage, it would seem that n would be somewhere near 100,000. Let’s test that intuition.
We’ll create a small command-line program that looks through memory, starting at location 0 and ending at 10,000. As it’s a small program, it shouldn’t occupy more than 10,000 bytes. But when executed, the program will not perform as intended. Sadly, it will crash. You’ll learn why the crash occurs as you follow through this section.
Listing 6.12 shows the command-line program. You can find its source in ch6/ch6-memscan-1/src/main.rs. The listing scans through a running program’s memory byte by byte, starting at 0. It introduces the syntax for creating raw pointers and dereferencing (reading) those.
Listing 6.12 Attempting to scan a running program’s memory byte by byte
 1 fn main() {
 2     let mut n_nonzero = 0;
 3
 4     for i in 0..10000 {
 5         let ptr = i as *const u8;              ①
 6         let byte_at_addr = unsafe { *ptr };    ②
 7
 8         if byte_at_addr != 0 {
 9             n_nonzero += 1;
10         }
11     }
12
13     println!("non-zero bytes in memory: {}", n_nonzero);
14 }
① Converts i to a *const T, a raw pointer of type u8 to inspect raw memory addresses. We treat every address as a unit, ignoring the fact that most values span multiple bytes.
② Dereferences the pointer, it reads the value at address i. Another way of saying this is “read the value being pointed to.”
Listing 6.12 crashes because it is attempting to dereference a NULL pointer. When i equals 0, ptr can’t really be dereferenced. Incidentally, this is why all raw pointer dereferences must occur within an unsafe block.
How about we attempt to start from a non-zero memory address? Given that the program is executable code, there should be at least several thousand bytes of non-zero data to iterate through. The following listing scans the process’s memory starting from 1 to avoid dereferencing a NULL pointer.
Listing 6.13 Scanning a process’s memory
 1 fn main() {
 2     let mut n_nonzero = 0;
 3
 4     for i in 1..10000 {             ①
 5         let ptr = i as *const u8;
 6         let byte_at_addr = unsafe { *ptr };
 7
 8         if byte_at_addr != 0 {
 9             n_nonzero += 1;
10         }
11     }
12
13     println!("non-zero bytes in memory: {}", n_nonzero);
14 }
① Starts at 1 rather than 0 to avoid a NULL pointer exception
This unfortunately does not completely solve the issue. Listing 6.13 still crashes upon execution, and the number of non-zero bytes is never printed to the console. This is due to what’s known as a segmentation fault.
Segmentation faults are generated when the CPU and OS detect that your program is attempting to access memory regions that they aren’t entitled to. Memory regions are divided into segments. That explains the name.
Let’s try a different approach. Rather than attempting to scan through bytes, let’s look for the addresses of things that we know exist. We’ve spent lots of time learning about pointers, so let’s put that to use. Listing 6.14 creates several values, examining their addresses.
Every run of listing 6.14 may generate unique values. Here is the output of one run:
GLOBAL:    0x7ff6d6ec9310
local_str: 0x7ff6d6ec9314
local_int: 0x23d492f91c
boxed_int: 0x18361b78320
boxed_str: 0x18361b78070
fn_int:    0x23d492f8ec
As you can see, values appear to be scattered across a wide range. So despite your program (hopefully) only needing a few kilobytes of RAM, a few variables live in giant locations. These are virtual addresses.
As explained in the heap versus stack section, the stack starts at the top of the address space and the heap starts near the bottom. In this run, the highest value is 0x7ff6d6ec9314. That’s approximately 264 ÷ 2. That number is due to the OS reserving half of the address space for itself.
The following listing returns the address of several variables within a program to examine its address space. The source for this listing in ch6/ch6-memscan-3/src/main.rs.
Listing 6.14 Printing the address of variables within a program
static GLOBAL: i32 = 1000;             ①

fn noop() -> *const i32 {
    let noop_local = 12345;            ②
    &noop_local as *const i32          ③
}

fn main() {
    let local_str = "a";               ④
    let local_int = 123;               ④
    let boxed_str = Box::new('b');     ④
    let boxed_int = Box::new(789);     ④
    let fn_int = noop();               ④

    println!("GLOBAL:    {:p}", &GLOBAL as *const i32);
    println!("local_str: {:p}", local_str as *const str);
    println!("local_int: {:p}", &local_int as *const i32);
    println!("boxed_int: {:p}", Box::into_raw(boxed_int));
    println!("boxed_str: {:p}", Box::into_raw(boxed_str));
    println!("fn_int:    {:p}", fn_int);}
① Creates a global static, which is a global variable in Rust programs
② Creates a global static, which is a global variable in Rust programs
③ Creates a local variable within noop() so that something outside of main() has a memory address
④ Creates various values of several types including values on the heap
By now, you should be pretty good at accessing addresses of stored values. There are actually two small lessons that you may have also picked up on:
Some memory addresses are illegal. The OS will shut your program down if it attempts to access memory that is out of bounds.
Memory addresses are not arbitrary. Although values seem to be spread quite far apart within the address space, values are clustered together within pockets.
Before pressing on with the cheat program, let’s step back and look at the system that’s operating behind the scenes to translate these virtual addresses to real memory.
Accessing data in a program requires virtual addresses—the only addresses that the program itself has access to. These get translated into physical addresses. This process involves a dance between the program, the OS, the CPU, the RAM hardware, and occasionally hard drives and other devices. The CPU is responsible for performing this translation, but the OS stores the instructions.
CPUs contain a memory management unit (MMU) that is designed for this one job. For every running program, every virtual address is mapped to a physical address. Those instructions are stored at a predefined address in memory as well. That means, in the worst case, every attempt at accessing memory addresses incurs two memory lookups. But it’s possible to avoid the worst case.
The CPU maintains a cache of recently translated addresses. It has its own (fast) memory to speed up accessing memory. For historic reasons, this cache is known as the translation lookaside buffer, often abbreviated as TLB. Programmers optimizing for performance need to keep data structures lean and avoid deeply nested structures. Reaching the capacity of the TLB (typically around 100 pages for x86 processors) can be costly.
Looking into how the translation system operates reveals more, often quite complex, details. Virtual addresses are grouped into blocks called pages, which are typically 4 KB in size. This practice avoids the need to store a translation mapping for every single variable in every program. Having a uniform size for each page also assists in avoiding a phenomenon known as memory fragmentation, where pockets of empty, yet unusable, space appear within available RAM.
Note This is a general guide only. The details of how the OS and CPU cooperate to manage memory differs significantly in some environments. In particular, constrained environments such as microcontrollers can use real addressing. For those interested in learning more, the research field is known as computer architecture.
The OS and CPU can play some interesting tricks when data lives within pages of virtual memory. For example
Having a virtual address space allows the OS to overallocate. Programs that ask for more memory than the machine can physically provide are able to be accommodated.
Inactive memory pages can be swapped to disk in a byte-for-byte manner until it’s requested by the active program. Swapping is often used during periods of high contention for memory but can be used more generally, depending on an operating system’s whims.
Other size optimizations such as compression can be performed. A program sees its memory intact. Behind the scenes, the OS compresses the program’s wasteful data usage.
Programs are able to share data quickly. If your program requests a large block of zeroes, say, for a newly created array, the OS might point you towards a page filled with zeroes that is currently being used by three other programs. None of the programs are aware that the others are looking at the same physical memory, and the zeroes have different positions within their virtual address space.
Paging can speed up the loading of shared libraries. As a special case of the previous point, if a shared library is already loaded by another program, the OS can avoid loading it into memory twice by pointing the new program to the old data.
Paging adds security between programs. As you discovered earlier in this section, some parts of the address space are illegal to access. The OS has other attributes that it can add. If an attempt is made to write to a read-only page, the OS terminates the program.
Making effective use of the virtual memory system in day-to-day programs requires thinking about how data is represented in RAM. Here are some guidelines:
Keep hot working portions of your program within 4 KB of size. This maintains fast lookups.
If 4 KB is unreasonable for your application, then the next target to keep under is 4 KB * 100. That rough guide should mean that the CPU can maintain its translation cache (the TLB) in good order to support your program.
Avoid deeply nested data structures with pointer spaghetti. If a pointer points to another page, then performance suffers.
Test the ordering of your nested loops. CPUs read small blocks of bytes, known as a cache line, from the RAM hardware. When processing an array, you can take advantage of this by investigating whether you are doing column-wise or row-wise operations.
One thing to note: virtualization makes this situation worse. If you’re running an app inside a virtual machine, the hypervisor must also translate addresses for its guest operating systems. This is why many CPUs ship with virtualization support, which can reduce this extra overhead. Running containers within virtual machines adds another layer of indirection and, therefore, latency. For bare-metal performance, run apps on bare metal.
Our task is to scan our program’s memory while it’s running. As we’ve discovered, the OS maintains the instructions for mapping between a virtual address and a physical address. Can we ask the OS to tell us what is happening?
Operating systems provide an interface for programs to be able to make requests; this is known as a system call. Within Windows, the KERNEL.DLL provides the necessary functionality to inspect and manipulate the memory of a running process.
Note Why Windows? Well, many Rust programmers use MS Windows as a platform. Also, its functions are well named and don’t require as much prior knowledge as the POSIX API.
When you run listing 6.16, you should see lots of output with many sections. This may be similar to the following:
MEMORY_BASIC_INFORMATION {               ①
    BaseAddress: 0x00007ffbe8d9b000,
    AllocationBase: 0x0000000000000000,
    AllocationProtect: 0,                ②
    RegionSize: 17568124928,
    State: 65536,                        ②
    Protect: 1,                          ②
    Type: 0                              ②
}
MEMORY_BASIC_INFORMATION {
    BaseAddress: 0x00007ffffffe0000,
    AllocationBase: 0x00007ffffffe0000,
    AllocationProtect: 2,
    RegionSize: 65536,
    State: 8192,
    Protect: 1,
    Type: 131072
① This struct is defined within the Windows API.
② These fields are the integer representations of enums defined in the Windows API. It’s possible to decode these to the enum variant names, but this isn’t available without adding extra code to the listing.
The following listing shows the dependencies for listing 6.16. You can find its source in ch6/ch6-meminfo-win/Cargo.toml.
Listing 6.15 Dependencies for listing 6.16
[package]
name = "meminfo"
version = "0.1.0"
authors = ["Tim McNamara <author@rustinaction.com>"]
edition = "2018"

[dependencies]
winapi = "0.2" #           ①
kernel32-sys = "0.2" #     ②
① Defines some useful type aliases
② Provides interaction with KERNEL.DLL from the Windows API
The following listing shows how to inspect memory via the Windows API. The source code for this listing is in ch6/ch6-meminfo-win/src/main.rs.
Listing 6.16 Inspecting a program’s memory
use kernel32;
use winapi;

use winapi::{
    DWORD,                                              ①
    HANDLE,                                             ②
    LPVOID,                                             ②
    PVOID,                                              ③
    SIZE_T,                                             ④
    LPSYSTEM_INFO,                                      ⑤
    SYSTEM_INFO,                                        ⑥
    MEMORY_BASIC_INFORMATION as MEMINFO,                ⑥
};

fn main() {
    let this_pid: DWORD;                                ⑦
    let this_proc: HANDLE;                              ⑦
    let min_addr: LPVOID;                               ⑦
    let max_addr: LPVOID;                               ⑦
    let mut base_addr: PVOID;                           ⑦
    let mut proc_info: SYSTEM_INFO;                     ⑦
    let mut mem_info: MEMORY_BASIC_INFORMATION;         ⑦

    const MEMINFO_SIZE: usize = std::mem::size_of::<MEMINFO>();

    unsafe {                                            ⑧
        base_addr = std::mem::zeroed();
        proc_info = std::mem::zeroed();
        mem_info = std::mem::zeroed();
    }

    unsafe {                                            ⑨
        this_pid = kernel32::GetCurrentProcessId();
        this_proc = kernel32::GetCurrentProcess();
        kernel32::GetSystemInfo(                        ⑩
          &mut proc_info as LPSYSTEM_INFO               ⑩
        );                                              ⑩
    };

    min_addr = proc_info.lpMinimumApplicationAddress;   ⑪
    max_addr = proc_info.lpMaximumApplicationAddress;   ⑪

    println!("{:?} @ {:p}", this_pid, this_proc);
    println!("{:?}", proc_info);
    println!("min: {:p}, max: {:p}", min_addr, max_addr);


    loop {                                              ⑫
        let rc: SIZE_T = unsafe {
            kernel32::VirtualQueryEx(                   ⑬
                                    this_proc, base_addr,
                                    &mut mem_info, MEMINFO_SIZE as SIZE_T)
        };

        if rc == 0 {
            break
        }

        println!("{:#?}", mem_info);
        base_addr = ((base_addr as u64) + mem_info.RegionSize) as PVOID;
    }
}
① In Rust, this would be a u32.
② Pointer types for various internal APIs without an associated type. In Rust, std::os::raw::c_void defines void pointers; a HANDLE is a pointer to some opaque resource within Windows.
③ In Windows, data type names are often prefixed with a shorthand for their type. P stands for pointer; LP stands for long pointer (e.g., 64 bit).
④ u64 is the usize on this machine.
⑤ A pointer to a SYSTEM_INFO struct
⑥ Some structs defined by Windows internally
⑥ Initializes these variables from within unsafe blocks. To make these accessible in the outer scope, these need to be defined here.
⑧ This block guarantees that all memory is initialized.
⑨ This block of code is where system calls are made.
⑩ Rather than use a return value, this function makes use of a C idiom to provide its result to the caller. We provide a pointer to some predefined struct, then read that struct’s new values once the function returns to see the results.
⑪ Renaming these variables for convenience
⑫ This loop does the work of scanning through the address space.
⑬ Provides information about a specific segment of the running program’s memory address space, starting at base_addr
Finally, we have been able to explore an address space without the OS killing our program. Now the question remains: How do we inspect individual variables and modify those?
Operating systems provide tools to read and write memory, even in other programs. This is essential for Just-In-Time compilers (JITs), debuggers, and programs to help people “cheat” at games. On Windows, the general process looks something like this in Rust-like pseudocode:
let pid = some_process_id;
OpenProcess(pid);

loop address space {
    *call* VirtualQueryEx() to access the next memory segment

    *scan* the segment by calling ReadProcessMemory(),
    looking for a selected pattern

    *call* WriteProcessMemory() with the desired value
}
Linux provides an even simpler API via process_vm_readv() and process_vm_ writev(). These are analogous to ReadProcessMemory() and WriteProcessMemory() in Windows.
Memory management is a complicated area with many levels of abstraction to uncover. This chapter has tried to focus on those elements that are most salient to your work as a programmer. Now, when you read your next blog post on some low-level coding technique, you should be able to follow along with the terminology.
Pointers, references, and memory addresses are identical from the CPU’s perspective, but these are significantly different at the programming language level.
Strings and many other data structures are implemented with a backing array pointed to by a pointer.
The term smart pointer refers to data structures that behave like pointers but have additional capabilities. These almost always incur a space overhead. Additionally, data can include integer length and capacity fields or things that are more sophisticated, such as locks.
Rust has a rich collection of smart pointer types. Types with more features typically incur greater runtime costs.
The standard library’s smart pointer types are built from building blocks that you can also use to define your own smart pointers if required.
The heap and the stack are abstractions provided by operating systems and programming languages. These do not exist at the level of the CPU.
Operating systems often provide mechanisms such as memory allocations to inspect a program’s behavior.
1.To be precise, the activation frame is called a stack frame when allocated on the stack.