
This chapter is all about understanding how zeroes and ones can become much larger objects like text, images, and sound. We will also touch on how computers do computation.
By the end of the chapter, you will have emulated a fully functional computer with CPU, memory, and user-defined functions. You will break apart floating-point numbers to create a numeric data type of your own that only takes a single byte. The chapter introduces a number of terms, such as endianness and integer overflow, that may not be familiar to programmers who have never done systems programming.
A small but important lesson is that a single bit pattern can mean different things. The type system of a higher-level language, such as Rust, is just an artificial abstraction over reality. Understanding this becomes important as you begin to unravel some of that abstraction and to gain a deeper understanding of how computers work.
Listing 5.1 (in ch5-int-vs-int.rs) is an example that uses the same bit pattern to represent two different numbers. The type system—not the CPU—is what makes this distinction. The following shows the listing’s output:
a: 1100001111000011 50115
b: 1100001111000011 -15421
Listing 5.1 The data type determines what a sequence of bits represents
 1 fn main() {
 2   let a: u16 = 50115;
 3   let b: i16 = -15421;
 4
 5   println!("a: {:016b} {}", a, a);    ①
 6   println!("b: {:016b} {}", b, b);    ①
 7 }
① These two values have the same bit pattern but different types.
The different mapping between bit strings and numbers explains part of the distinction between binary files and text files. Text files are just binary files that happen to follow a consistent mapping between bit strings and characters. This mapping is called an encoding. Arbitrary files don’t describe their meaning to the outside world, which makes these opaque.
We can take this process one step further. What happens if we ask Rust to treat a bit pattern produced by one type as another? The following listing provides an answer. The source code for this listing is in ch5/ch5-f32-as-u32.rs.
Listing 5.2 Interpreting a float’s bit string as an integer
 1 fn main() {
 2   let a: f32 = 42.42;
 3   let frankentype: u32 = unsafe {
 4     std::mem::transmute(a)             ①
 5   };
 6
 7   println!("{}", frankentype);         ②
 8   println!("{:032b}", frankentype);    ③
 9
10   let b: f32 = unsafe {
11     std::mem::transmute(frankentype)
12   };
13   println!("{}", b);
14   assert_eq!(a, b);                    ④
15 }
① No semicolon here. We want the result of this expression to feed into the outer scope.
② Views the bits of a 42.42_f32 value as a decimal integer
③ {:032b} means to format as a binary via the std::fmt::Binary trait with 32 zeroes padded on the left.
④ Confirms that the operation is symmetrical
When compiled and run, the code from listing 5.2 produces the following output:
1110027796
01000010001010011010111000010100
42.42
Some further remarks about some of the unfamiliar Rust that listing 5.2 introduces includes the following:
Line 8 demonstrates a new directive to the println!() macro: {:032b}. The 032 reads as “left-pad with 32 zeros” and the right-hand b invokes the std::fmt::Binary trait. This contrasts with the default syntax ({}), which invokes the std::fmt ::Display trait, or the question mark syntax ({:?}), which invokes std::fmt:: Debug.
Unfortunately for us, f32 doesn’t implement std::fmt::Binary. Luckily, Rust’s integer types do. There are two integer types guaranteed to take up the same number of bits as f32—i32 and u32. The decision about which to choose is somewhat arbitrary.
Lines 3–5 perform the conversion discussed in the previous bulleted point. The std:: mem::transmute() function asks Rust to naïvely interpret an f32 as an u32 without affecting any of the underlying bits. The inverse conversion is repeated later on lines 10–12.
Mixing data types in a program is inherently chaotic, so we need to wrap these operation within unsafe blocks. unsafe tells the Rust compiler, “Stand back, I’ll take care of things from here. I’ve got this.” It’s a signal to the compiler that you have more context than it does to verify the correctness of the program.
Using the unsafe keyword does not imply that code is inherently dangerous. For example, it does not allow you to bypass Rust’s borrow checker. It indicates that the compiler is not able to guarantee that the program’s memory is safe by itself. Using unsafe means that the programmer is fully responsible for maintaining the program’s integrity.
Warning Some functionality allowed within unsafe blocks is more difficult to verify than others. For example, the std::mem::transmute() function is one of the least safe in the language. It shreds all type safety. Investigate alternatives before using it in your own code.
Needlessly using unsafe blocks is heavily frowned upon within the Rust community. It can expose your software to critical security vulnerabilities. Its primary purpose is to allow Rust to interact with external code, such as libraries written in other languages and OS interfaces. This book uses unsafe more frequently than many projects because its code examples are teaching tools, not industrial software. unsafe allows you to peek at and poke at individual bytes, which is essential knowledge for people seeking to understand how computers work.
During earlier chapters, we spent some time discussing what it means for an integer to be an i32, an u8, or an usize. Integers are like small, delicate fish. They do what they do remarkably well, but take them outside of their natural range and they die a quick, painful death.
Integers live within a fixed range. When represented inside the computer, these occupy a fixed number of bits per type. Unlike floating-point numbers, integers cannot sacrifice their precision to extend their bounds. Once those bits have been filled with 1s, the only way forward is back to all 0s.
A 16-bit integer can represent numbers between 0 and 65,535, inclusive. What happens when you want to count to 65,536? Let’s find out.
The technical term for the class of problem that we are investigating is integer overflow. One of the most innocuous ways of overflowing an integer is by incrementing forever. The following listing (ch5/ch5-to-oblivion.rs) is a trivial example of this.
Listing 5.3 Exploring the effect of incrementing an integer past its range
 1 fn main() {
 2   let mut i: u16 = 0;
 3   print!("{}..", i);
 4
 5   loop {
 6       i += 1000;
 7       print!("{}..", i);
 8       if i % 10000 == 0 {
 9           print!{"\n"}
10       }
11   }
12 }
When we try to run listing 5.3, things don’t end well for our program. Let’s look at the output:
$ rustc ch5-to-oblivion.rs && ./ch5-to-oblivion
0..1000..2000..3000..4000..5000..6000..7000..8000..9000..10000..
11000..12000..13000..14000..15000..16000..17000..18000..19000..20000..
21000..22000..23000..24000..25000..26000..27000..28000..29000..30000..
31000..32000..33000..34000..35000..36000..37000..38000..39000..40000..
41000..42000..43000..44000..45000..46000..47000..48000..49000..50000..
51000..52000..53000..54000..55000..56000..57000..58000..59000..60000..
thread 'main' panicked at 'attempt to add with overflow',
                          ch5-to-oblivion.rs:5:7
note: run with `RUST_BACKTRACE=1` environment variable
      to display a backtrace
61000..62000..63000..64000..65000..
A panicked program is a dead program. Panic means that the programmer has asked the program to do something that’s impossible. It doesn’t know what to do to proceed and shuts itself down.
To understand why this is such a critical class of bugs, let’s take a look at what’s going on under the hood. Listing 5.4 (ch5/ch5-bit-patterns.rs) prints six numbers with their bit patterns laid out in literal form. When compiled, the listing prints the following short line:
0, 1, 2, ..., 65533, 65534, 65535
Try compiling the code with optimizations enabled via rustc -O ch5-to-oblivion.rs and running the resulting executable. The behavior is quite different. The problem we’re interested in is what happens when there’s no more bits left. 65,536 cannot be represented by u16.
Listing 5.4 How u16 bit patterns translate to a fixed number of integers
fn main() {
  let zero: u16 = 0b0000_0000_0000_0000;
  let one:  u16 = 0b0000_0000_0000_0001;
  let two:  u16 = 0b0000_0000_0000_0010;
  // ...
  let sixtyfivethousand_533: u16 = 0b1111_1111_1111_1101;
  let sixtyfivethousand_534: u16 = 0b1111_1111_1111_1110;
  let sixtyfivethousand_535: u16 = 0b1111_1111_1111_1111;

  print!("{}, {}, {}, ..., ", zero, one, two);
  println!("{}, {}, {}", sixty5_533, sixty5_534, sixty5_535);
}
There is another (easy) way to kill a program using a similar technique. In listing 5.5, we ask Rust to fit 400 into an u8, which can only count up to 255 values. Look in ch5/ch5-impossible-addition.rs for the source code for this listing.
Listing 5.5 Impossible addition
#[allow(arithmetic_overflow)]      ①

fn main() {
  let (a, b) = (200, 200);
  let c: u8 = a + b;               ②
  println!("200 + 200 = {}", c);
}
① Required declaration. The Rust compiler can detect this obvious overflow situation.
② Without the type declaration, Rust won’t assume that you’re trying to create an impossible situation.
The code compiles, but one of two things happen:
thread 'main' panicked at 'attempt to add with overflow',
   5-impossible-add.rs:3:15
note: Run with `RUST_BACKTRACE=1` for a backtrace
This behavior can be invoked via executing rustc with its default options: rustc ch5-impossible-add.rs && ch5-impossible-add.
The program gives you the wrong answer:
200 + 200 = 144
This behavior can be invoked by executing rustc with the -O flag: rustc -O ch5-impossible-add.rs && ch5-impossible-add.
There are two small lessons here:
Developing strategies for preventing integer overflow is one of the ways that system programmers are distinguished from others. Programmers who only have experience with dynamic languages are extremely unlikely to encounter an integer overflow. Dynamic languages typically check to see that the results of integer expressions will fit. When these can’t, the variable that’s receiving the result is promoted to a wider integer type.
When developing performance critical code, you get to choose which parameters to adjust. If you use fixed-sized types, you gain speed, but you need to accept some risk. To mitigate the risk, you can check to see that overflow won’t occur at runtime. Imposing those checks will slow you down, however. Another, much more common option, is to sacrifice space by using a large integer type, such as i64. To go higher still, you’ll need to move to arbitrarily sized integers, which come with their own costs.
CPU vendors argue about how the individual bytes that make up integers should be laid out. Some CPUs order multibyte sequences left to right and others are right to left. This characteristic is known as a CPU’s endianness. The is one of the reasons why copying an executable file from one computer to another might not work.
Let’s consider a 32-bit integer that represents a number made up of four bytes: AA, BB, CC, and DD. Listing 5.6 (ch5/ch5-endianness.rs), with the help of our friend sys::mem::transmute(), demonstrates that byte order matters. When compiled and executed, the code from listing 5.6 prints one of two things, depending on the endianness of your machine. Most computers that people run for day-to-day work print the following:1
-573785174 vs. -1430532899
But more exotic hardware swaps the two numbers around like this:
-1430532899 vs. -573785174
Listing 5.6 Inspecting endianness
use std::mem::transmute;

fn main() {
  let big_endian: [u8; 4]    = [0xAA, 0xBB, 0xCC, 0xDD];
  let little_endian: [u8; 4] = [0xDD, 0xCC, 0xBB, 0xAA];

  let a: i32 = unsafe { transmute(big_endian)    };    ①
  let b: i32 = unsafe { transmute(little_endian) };    ①

  println!("{} vs {}", a, b);
}
① std::mem::transmute() instructs the compiler to interpret its argument as the type on the left (i32).
The terminology comes from the significance of the bytes in the sequence. To take you back to when you learned addition, we can factor the number 123 into three parts:
Summing all of these parts gets us back to our original number. The first part, 100, is labeled as the most significant. When written out in the conventional way, 123 as 123, we are writing in big endian format. Were we to invert that ordering by writing 123 as 321, we would be writing in little endian format.
Binary numbers work in a similar way. Each number part is a power of 2 (20, 21, 22,..., 2n), rather than a power of 10 (100, 101, 102,..., 10n).
Before the late-1990s, endianness was a big issue, especially in the server market. Glossing over the fact that a number of processors can support bidirectional endianness, Sun Microsystems, Cray, Motorola, and SGI went one way. ARM decided to hedge its bet and developed a bi-endian architecture. Intel went the other way. The other way won. Integers are almost certainly stored in little endian format.
In addition to multibyte sequences, there is a related problem within a byte. Should an u8 that represents 3 look like 0000_0011, or should it look like 1100_0000? The computer’s preference for layout of individual bits is known as its bit numbering or bit endianness. It’s unlikely, however, that this internal ordering will affect your day-to-day programming. To investigate further, look for your platform’s documentation to find out on which end its most significant bit lies.
Note The abbreviation MSB can be deceptive. Different authors use the same abbreviation to refer to two concepts: most significant bit and most significant byte. To avoid confusion, this text uses the term bit numbering to refer to the most significant bit and endianness to refer to most significant byte.
One of the claims made at the start of this chapter was that understanding more about bit patterns enables you to compress your data. Let’s put that into practice. In this section, you will learn how to pull bits out of a floating-point number and inject those into a single byte format of your own creation.
Here is some context for the problem at hand. Machine learning practitioners often need to store and distribute large models. A model for our purposes here is just a large array of numbers. The numbers within those models often fall within the ranges 0..=1 or -1..=1 (using Rust’s range syntax), depending on the application. Given that we don’t need the whole range that f32 or f64 supports, why use all of these bytes? Let’s see how far we can get with 1. Because there is a known limited range, it’s possible to create a decimal number format that can model that range compactly.
To start, we’re going to need to learn about how decimal numbers are represented inside today’s computers. This means learning about the internals of floating-point numbers.
Each floating-point number is laid out in memory as scientific notation. If you’re unfamiliar with scientific notation, here is a quick primer.
Scientists describe the mass of Jupiter as 1.898 × 1027 kg and the mass of an ant as 3.801 × 10⁻⁴ kg. The key insight is that the same number of characters are used to describe vastly different scales. Computer scientists have taken advantage of that insight to create a fixed-width format that encodes a wide range of numbers. Each position within a number in scientific notation is given a role:
A sign, which is implied in our two examples, would be present for negative numbers (negative infinity to 0).
The mantissa, also known as the significand, can be thought of as being the value in question (1.898 and 3.801, for example).
The radix, also known as the base, is the value that is raised to the power of the exponent (10 in both of our examples).
This crosses over to floating point quite neatly. A floating-point value is a container with three fields:
Where is the radix? The standard defines it as 2 for all floating-point types. This definition allows the radix to be omitted from the bit pattern itself.
Figure 5.1 presents the memory layout of the f32 type in Rust. The layout is called binary32 within the IEEE 754-2019 and IEEE 754-2008 standards and single by their predecessor, IEE 754-1985.
Figure 5.1 An overview of the three components encoded within the bits of a floating-point number for the f32 type in Rust
The value 42.42 is encoded as f32 with the bit pattern 01000010001010011010111000010100. That bit pattern is more compactly represented as 0x4229AE14. Table 5.1 shows the values of each of the three fields and what these represent..
Table 5.1 The components of 42.42 represented by the bit pattern 0x4229AE14 as a f32 type
Note See lines 32–38 of listing 5.10 and the explanation provided shortly in section 5.3.5 to learn how 01010011010111000010100 represents 1.325625.
The following equation decodes the fields of a floating-point number into a single number. Variables from the standard (Radix, Bias) appear in title case. Variables from the bit pattern (sign_bit, mantissa, exponent) occur as lowercase and monospace.
n = –1sign_bit × mantissa × Radix(exponent–Bias)
n = –1sign_bit × mantissa × Radix(exponent – 127)
n = –1sign_bit × mantissa × Radix(132 – 127)
n = –1sign_bit × mantissa × 2(132– 127)
n = –1sign_bit × 1.325625 × 2(132–127)
One quirk of floating-point numbers is that their sign bits allow for both 0 and –0. That is, floating-point numbers that have different bit patterns compare as equal (0 and –0) and have identical bit patterns (NAN values) that compare as unequal.
To isolate the sign bit, shift the other bits out of the way. For f32, this involves a right shift of 31 places (>> 31). The following listing is a short snippet of code that performs the right shift.
Listing 5.7 Isolating and decoding the sign bit from an f32
1 let n: f32 = 42.42;
2 let n_bits: u32 = n.to_bits();
3 let sign_bit = n_bits >> 31;
To provide you with a deeper intuition about what is happening, these steps are detailed graphically here:
1 let n: f32 = 42.42;
Interpret the bits of the f32 as a u32 to allow for bit manipulation:
2 let n_bits: u32 = n.to_bits();

Shift the bits within n 31 places to the right:
3 let sign_bit = n_bits >> 31;

To isolate the exponent, two bit manipulations are required. First, perform a right shift to overwrite the mantissa’s bits (>> 23). Then use an AND mask (& 0xff) to exclude the sign bit.
The exponent’s bits also need to go through a decoding step. To decode the exponent, interpret its 8 bits a signed integer, then subtract 127 from the result. (As discussed in section 5.3.2, 127 is known as the bias.) The following listing shows the code that describes the steps given in the last two paragraphs.
Listing 5.8 Isolating and decoding the exponent from an f32
1 let n: f32 = 42.42;
2 let n_bits: u32 = n.to_bits();
3 let exponent_ = n_bits >> 23;
4 let exponent_ = exponent_ & 0xff;
5 let exponent = (exponent_ as i32) - 127;
And to further explain the process, these steps are repeated graphically as follows:
1 let n: f32 = 42.42;
Interpret the bits of that f32 as u32 to allow for bit manipulation:
2 let n_bits: u32 = n.to_bits();

Shift the exponent’s 8 bits to the right, overwriting the mantissa:
3 let exponent_ = n_bits >> 23;

Filter the sign bit away with an AND mask. Only the 8 rightmost bits can pass through the mask:
4 let exponent_ = exponent_ & 0xff;

Interpret the remaining bits as a signed integer and subtract the bias as defined by the standard:
5 let exponent = (exponent_ as i32) - 127;
To isolate the mantissa’s 23 bits, you can use an AND mask to remove the sign bit and the exponent (& 0x7fffff). However, it’s actually not necessary to do so because the following decoding steps can simply ignore bits as irrelevant. Unfortunately, the mantissa’s decoding step is significantly more complex than the exponent’s.
To decode the mantissa’s bits, multiply each bit by its weight and sum the result. The first bit’s weight is 0.5, and each subsequent bit’s weight is half of the current weight; for example, 0.5 (2–1), 0.25 (2–2),..., 0.00000011920928955078125 (2–23). An implicit 24th bit that represents 1.0 (2–0) is always considered to be on, except when special cases are triggered. Special cases are triggered by the state of the exponent:
When the exponent’s bits are all 0s, then the treatment of mantissa’s bits changes to represent subnormal numbers (also known as “denormal numbers”). In practical terms, this change increases the number of decimal numbers near zero that can be represented. Formally, a subnormal number is one between 0 and the smallest number that the normal behavior would otherwise be able to represent.
When the exponent’s bits are all 1s, then the decimal number is infinity (∞), negative infinity (–∞), or Not a Number (NAN). NAN values indicate special cases where the numeric result is mathematically undefined (such as 0 ÷ 0) or that are otherwise invalid.
Operations involving NAN values are often counterintuitive. For example, testing whether two values are equal is always false, even when the two bit patterns are exactly the same. An interesting curiosity is that f32 has approximately 4.2 million (~222) bit patterns that represent NAN.
The following listing provides the code that implements nonspecial cases.
Listing 5.9 Isolating and decoding the mantissa from an f32
 1 let n: f32 = 42.42;
 2 let n_bits: u32 = n.to_bits();
 3 let mut mantissa: f32 = 1.0;
 4
 5 for i in 0..23 {
 6     let mask = 1 << i;
 7     let one_at_bit_i = n_bits & mask;
 8     if one_at_bit_i != 0 {
 9         let i_ = i as f32;
10         let weight = 2_f32.powf( i_ - 23.0 );
11         mantissa += weight;
12     }
13 }
Repeating that process slowly:
1 let n: f32 = 42.42;
Cast f32 as u32 to allow for bit manipulation:
2 let n_bits: u32 = n.to_bits();
Create a mutable f32 value initialized to 1.0 (2–0). This represents the weight of the implicit 24th bit:
3 let mut mantissa: f32 = 1.0;
Iterate through the fractional bits of the mantissa, adding those bit’s defined values to the mantissa variable:
 5 for i in 0..23 {
 6     let mask = 1 << i;
 7     let one_at_bit_i = n_bits & mask;
 8     if one_at_bit_i != 0 {
 9         let i_ = i as f32;
10         let weight = 2_f32.powf( i_ - 23.0 );
11         mantissa += weight;
12     }
13 }
Iterate from 0 to 23 with a temporary variable i assigned to the iteration number:
5 for i in 0..23 {
Create a bit mask with the iteration number as the bit allowed to pass through and assign the result to mask. For example, when i equals 5, the bit mask is 0b00000000_00000000_00000000_00100000:
6 let mask = 1 << i;
Use mask as a filter against the bits from the original number stored as n_bits. When the original number’s bit at position i is non-zero, one_at_ bit_i will be assigned to a non-zero value:
7 let one_at_bit_i = n_bits & mask;
If one_at_bit_i is non-zero, then proceed:
8 if one_at_bit_i != 0 {
Calculate the weight of the bit at position i, which is 2i–23:
 9 let i_ = i as f32;
10 let weight = 2_f32.powf( i_ - 23.0 );
Add the weight to mantissa in place:
11 mantissa += weight;
As mentioned at the start of section 5.4, floating-point numbers are a container format with three fields. Sections 5.4.1–5.4.3 have given us the tools that we need to extract each of these fields. Let’s put those to work.
Listing 5.10 does a round trip. It extracts the fields from the number 42.42 encoded as an f32 into individual parts, then assembles these again to create another number. To convert the bits within a floating-point number to a number, there are three tasks:
Extract the bits of those values from the container (to_parts() on lines 1–26)
Decode each value from its raw bit pattern to its actual value (decode() on lines 28–47)
Perform the arithmetic to convert from scientific notation to an ordinary number (from_parts() on lines 49–55)
When we run listing 5.10, it provides two views of the internals of the number 42.42 encoded as an f32:
42.42 -> 42.42
field    |  as bits | as real number
sign     |        0 | 1
exponent | 10000100 | 32
mantissa | 01010011010111000010100 | 1.325625
In listing 5.10, deconstruct_f32() extracts each field of a floating-point value with bit manipulation techniques. decode_f32_parts() demonstrates how to convert those fields to the relevant number. The f32_from_parts() method combines these to create a single decimal number. The source for this file is located in ch5/ch5-visualizing-f32.rs.
Listing 5.10 Deconstructing a floating-point value
 1 const BIAS: i32 = 127;                            ①
 2 const RADIX: f32 = 2.0;                           ①
 3
 4 fn main() {                                       ②
 5   let n: f32 = 42.42;
 6
 7   let (sign, exp, frac) = to_parts(n);
 8   let (sign_, exp_, mant) = decode(sign, exp, frac);
 9   let n_ = from_parts(sign_, exp_, mant);
10
11   println!("{} -> {}", n, n_);
12   println!("field    |  as bits | as real number");
13   println!("sign     |        {:01b} | {}", sign, sign_);
14   println!("exponent | {:08b} | {}", exp, exp_);
15   println!("mantissa | {:023b} | {}", frac, mant);
16 }
17
18 fn to_parts(n: f32) -> (u32, u32, u32) {
19   let bits = n.to_bits();
20
21   let sign     = (bits >> 31) & 1;                ③
22   let exponent = (bits >> 23) & 0xff;             ④
23   let fraction =  bits & 0x7fffff ;               ⑤
24
25   (sign, exponent, fraction)                      ⑥
26 }
27
28 fn decode(
29   sign: u32,
30   exponent: u32,
31   fraction: u32
32 ) -> (f32, f32, f32) {
33   let signed_1 = (-1.0_f32).powf(sign as f32);    ⑦
34
35   let exponent = (exponent as i32) - BIAS;        ⑧
36   let exponent = RADIX.powf(exponent as f32);     ⑧
37
38   for i in 0..23 {                                ⑨
39     let mask = 1 << i;                            ⑨
40     let one_at_bit_i = fraction & mask;           ⑨
41     if one_at_bit_i != 0 {                        ⑨
42       let i_ = i as f32;                          ⑨
43       let weight = 2_f32.powf( i_ - 23.0 );       ⑨
44       mantissa += weight;                         ⑨
45     }                                             ⑨
46   }                                               ⑨
47
48   (signed_1, exponent, mantissa)
49 }
50
51 fn from_parts(                                    ⑩
52   sign: f32,
53   exponent: f32,
54   mantissa: f32,
55 ) -> f32 {
56     sign *  exponent * mantissa
57 }
① Similar constants are accessible via the std::f32 module.
② main() lives happily at the beginning of a file.
③ Strips 31 unwanted bits away by shifting these nowhere, leaving only the sign bit
④ Filters out the top bit with a logical AND mask, then strips 23 unwanted bits away
⑤ Retains only the 23 least significant bits via an AND mask
⑥ The mantissa part is called a fraction here as it becomes the mantissa once it’s decoded.
⑦ Converts the sign bit to 1.0 or –1.0 (–1sign). Parentheses are required around –1.0_f32 to clarify operator precedence as method calls rank higher than a unary minus.
⑧ exponent must become an i32 in case subtracting the BIAS results in a negative number; then it needs to be cast as a f32 so that it can be used for exponentiation.
⑨ Decodes the mantissa using the logic described in section 5.4.4
⑩ Cheats a bit by using f32 values in intermediate steps. Hopefully, it is a forgivable offense.
Understanding how to unpack bits from bytes means that you’ll be in a much stronger position when you’re faced with interpreting untyped bytes flying in from the network throughout your career.
In addition to representing decimal numbers with floating-point formats, fixed point is also available. These can be useful for representing fractions and are an option for performing calculations on CPUs without a floating point unit (FPU), such as microcontrollers. Unlike floating-point numbers, the decimal place does not move to dynamically accommodate different ranges. In our case, we’ll be using a fixed-point number format to compactly represent values between –1..=1. Although it loses accuracy, it saves significant space.2
The Q format is a fixed-point number format that uses a single byte.3 It was created by Texas Instruments for embedded computing devices. The specific version of the Q format that we will implement is called Q7. This indicates that there are 7 bits available for the represented number plus 1 sign bit. We’ll disguise the decimal nature of the type by hiding the 7 bits within an i8. That means that the Rust compiler will be able to assist us in keeping track of the value’s sign. We will also be able to derive traits such as PartialEq and Eq, which provide comparison operators for our type, for free.
The following listing, an extract from listing 5.14, provides the type’s definition. You’ll find the source in ch5/ch5-q/src/lib.rs.
Listing 5.11 Definition of the Q7 format
#[derive(Debug,Clone,Copy,PartialEq,Eq)]
pub struct Q7(i8);                          ①
A struct created from unnamed fields (for example, Q7(i8)), is known as a tuple struct. It offers a concise notation when the fields are not intended to be accessed directly. While not shown in listing 5.11, tuple structs can include multiple fields by adding further types separated by commas. As a reminder, the #[derive(...)] block asks Rust to implement several traits on our behalf:
Debug—Used by the println!() macro (and others); allows Q7 to be converted to a string by the {:?} syntax.
Clone—Enables Q7 to be duplicated with a .clone() method. This can be derived because i8 implements the Clone trait.
Copy—Enables cheap and implicit duplications where ownership errors might otherwise occur. Formally, this changes Q7 from a type that uses move semantics to one that uses copy semantics.
PartialEq—Enables Q7 values to be compared with the equality operator (==).
Eq—Indicates to Rust that all possible Q7 values can be compared against any other possible Q7 value.
Q7 is intended as a compact storage and data transfer type only. Its most important role is to convert to and from floating-point types. The following listing, an extract from listing 5.14, shows the conversion to f64. The source for this listing is in ch5/ch5-q/src/lib.rs.
Listing 5.12 Converting from f64 to Q7
 4 impl From<f64> for Q7 {
 5     fn from (n: f64) -> Self {
 6         // assert!(n >= -1.0);
 7         // assert!(n <= 1.0);
 8         if n >= 1.0 {                     ①
 9             Q7(127)
10         } else if n <= -1.0 {             ①
11             Q7(-128)
12         } else {
13             Q7((n * 128.0) as i8)
14         }
15     }
16 }
17
18 impl From<Q7> for f64 {
19     fn from(n: Q7) -> f64 {
20         (n.0 as f64) * 2_f64.powf(-7.0)   ②
21     }
22 }
① Coerces any out-of-bounds input to fit
② Equivalent to the iteration approach taken in section 5.3.5.
The two impl From<T> for U blocks in listing 5.12 explain to Rust how to convert from type T to type U. In the listing
Lines 4 and 18 introduce the impl From<T> for U blocks. The std::convert ::From trait is included in local scope as From, which is part of the standard prelude. It requires type U to implement from() that takes a T value as its sole argument.
Lines 6–7 present an option for handling unexpected input data: crashes. It is not used here, but is available to you in your own projects.
Lines 13–16 truncate out-of-bounds input. For our purposes, we know that out-of-bounds input will not occur and so accept the risk of losing information.
Tip Conversions using the From trait should be mathematically equivalent. For type conversions that can fail, consider implementing the std::convert ::TryFrom trait instead.
We can also quickly implement converting from f32 to Q7 using the From<f64> implementation that we’ve just seen. The following listing, an extract from listing 5.14, shows this conversion. Its source is in ch5/ch5-q/src/lib.rs.
Listing 5.13 Converting from f32 to Q7 via f64
22 impl From<f32> for Q7 {
23     fn from (n: f32) -> Self {
24         Q7::from(n as f64)      ①
25     }
26 }
27
28 impl From<Q7> for f32 {
29     fn from(n: Q7) -> f32 {
30         f64::from(n) as f32     ②
31     }
32 }
① By design, it’s safe to convert from f32 to f64. A number that can be represented in 32 bits, it can also be represented in 64 bits.
② Generally, converting an f64 into a f32 risks a loss of precision. In this application, that risk doesn’t apply as we only have numbers between –1 and 1 to convert from.
Now, we’ve covered both floating-point types. But how do we know that the code that we’ve written actually does what we intend? And how do we test what we’ve written? As it happens, Rust has excellent support for unit testing via cargo.
The Q7 code that you’ve seen is available as a complete listing. But first, to test the code, enter the root directory of the crate and run cargo test. The following shows the output from listing 5.14 (the complete listing):
$ cargo test
   Compiling ch5-q v0.1.0 (file:///path/to/ch5/ch5-q)
    Finished dev [unoptimized + debuginfo] target(s) in 2.86 s
     Running target\debug\deps\ch5_q-013c963f84b21f92

running 3 tests
test tests::f32_to_q7 ... ok
test tests::out_of_bounds ... ok
test tests::q7_to_f32 ... ok

test result: ok. 3 passed; 0 failed; 0 ignored; 0 measured; 0 filtered out

   Doc-tests ch5-q

running 0 tests

test result: ok. 0 passed; 0 failed; 0 ignored; 0 measured; 0 filtered out
The following listing implements the Q7 format and its conversion to and from f32 and f64 types. You’ll find the source for this listing in ch5/ch5-q/src/lib.rs.
Listing 5.14 Full code implementation of the Q7 format
 1 #[derive(Debug,Clone,Copy,PartialEq,Eq)]
 2 pub struct Q7(i8);
 3
 4 impl From<f64> for Q7 {
 5     fn from (n: f64) -> Self {
 6         if n >= 1.0 {
 7             Q7(127)
 8         } else if n <= -1.0 {
 9             Q7(-128)
10         } else {
11             Q7((n * 128.0) as i8)
12         }
13     }
14 }
15
16 impl From<Q7> for f64 {
17     fn from(n: Q7) -> f64 {
18         (n.0 as f64) * 2f64.powf(-7.0)
19     }
20 }
21
22 impl From<f32> for Q7 {
23     fn from (n: f32) -> Self {
24         Q7::from(n as f64)
25     }
26 }
27
28 impl From<Q7> for f32 {
29     fn from(n: Q7) -> f32 {
30         f64::from(n) as f32
31     }
32 }
33
34 #[cfg(test)]
35 mod tests {            ①
36     use super::*;      ②
37     #[test]
38     fn out_of_bounds() {
39         assert_eq!(Q7::from(10.), Q7::from(1.));
40         assert_eq!(Q7::from(-10.), Q7::from(-1.));
41     }
42
43     #[test]
44     fn f32_to_q7() {
45         let n1: f32 = 0.7;
46         let q1 = Q7::from(n1);
47
48         let n2 = -0.4;
49*         let q2 = Q7::from(n2);
50
51         let n3 = 123.0;
52         let q3 = Q7::from(n3);
53
54         assert_eq!(q1, Q7(89));
55         assert_eq!(q2, Q7(-51));
56         assert_eq!(q3, Q7(127));
57     }
58
59     #[test]
60     fn q7_to_f32() {
61         let q1 = Q7::from(0.7);
62         let n1 = f32::from(q1);
63         assert_eq!(n1, 0.6953125);
64
65         let q2 = Q7::from(n1);
66         let n2 = f32::from(q2);
67         assert_eq!(n1, n2);
68     }
69 }
① Defines a submodule within this file
② Brings the parent module within the submodule’s local scope. Items that are marked as pub are accessible here.
Here is an interesting exercise to test the knowledge that you have developed over the preceding pages. Imagine that you have a source of random bytes (u8), and you want to convert one of those into a floating-point (f32) value between 0 and 1. Naively interpreting the incoming bytes as f32/f64 via mem::transmute results in massive variations in scale. The following listing demonstrates the division operation that generates an f32 value that lies between 0 and 1 from an arbitrary input byte.
Listing 5.15 Generating f32 values in interval [0,1] from a u8 with division
fn mock_rand(n: u8) -> f32 {
    (n as f32) / 255.0           ①
}
① 255 is the maximum value that u8 can represent.
As division is a slow operation, perhaps there is something faster than simply dividing by the largest value that a byte can represent. Perhaps it’s possible to assume a constant exponent value, then shift the incoming bits into the mantissa, such that these would form a range between 0 and 1. Listing 5.16 with bit manipulation is the best result that I could achieve.
With an exponent of –1 represented as 0b01111110 (126 in base 10), the source byte achieves a range of 0.5 to 0.998. That can be normalized to 0.0 to 0.996 with subtraction and multiplication. But is there a better way to do this?
Listing 5.16 Generating f32 values in interval [0,1] from a u8
 1 fn mock_rand(n: u8) -> f32 {
 2
 3     let base: u32 = 0b0_01111110_00000000000000000000000;
 4
 5     let large_n = (n as u32) << 15;      ①
 6
 7     let f32_bits = base | large_n;       ②
 8
 9     let m = f32::from_bits(f32_bits);    ③
10
11     2.0 * ( m - 0.5 )                    ④
12 }
① Aligns the input byte n to 32 bits, then increases its value by shifting its bits 15 places to the left
② Takes a bitwise OR, merging the base with the input byte
③ Interprets f32_bits (which is type u32) as an f32
As a complete program, you can incorporate mock_rand() from listing 5.16 into a test program fairly easily. Listing 5.17 (ch5/ch5-u8-to-mock-rand.rs) generates an f32 value that lies between 0 and 1 from an arbitrary input byte without division. Here’s its output:
max of input range: 11111111 -> 0.99609375
mid of input range: 01111111 -> 0.49609375
min of input range: 00000000 -> 0
Listing 5.17 Generating an f32 value without division
 1 fn mock_rand(n: u8) -> f32 {
 2     let base: u32 = 0b0_01111110_00000000000000000000000;
 3     let large_n =  (n as u32) << 15;
 4     let f32_bits = base | large_n;
 5     let m = f32::from_bits(f32_bits);
 6     2.0 * ( m - 0.5 )
 7 }
 8
 9 fn main() {
10     println!("max of input range: {:08b} -> {:?}", 0xff, mock_rand(0xff));
11     println!("mid of input range: {:08b} -> {:?}", 0x7f, mock_rand(0x7f));
12     println!("min of input range: {:08b} -> {:?}", 0x00, mock_rand(0x00));
13 }
One of the fairly mundane, yet utterly intriguing details about computing is that instructions are also just numbers. Operations and the data that is being operated on share the same encoding. This means that, as a general computing device, your computer can emulate other computers’ instruction sets by emulating those in software. While we cannot pull apart a CPU to see how it works, we can construct one with code.
After working through this section, you will learn how a computer operates at a fundamental level. This section shows how functions operate and what the term pointer means. We won’t have an assembly language; we’ll actually be programming directly in hex. This section also introduces you to another term you may have heard of in passing: the stack.
We’ll implement a subset of a system called CHIP-8, which was available to consumers in the 1970s. CHIP-8 was supported by a number of manufacturers, but it was fairly primitive even by the standards of that time. (It was created to write games rather than for commercial or scientific applications.)
One device that used the CHIP-8 CPU was the COSMAC VIP. It had a single-color display with a resolution of 64x32 (0.0002 megapixels), 2 KB RAM, 1.76 MHz CPU, and sold for $275 USD. Oh, and you needed to assemble the computer yourself. It also contained games programmed by the world’s first female game developer, Joyce Weisbecker.
We’ll build our understanding by starting with a minimal core. Let’s first construct an emulator that only supports a single instruction: addition. To understand what’s happening within listing 5.22 later in this section, there are three main things to learn:
Terms related to CPU emulation
Dealing with CPUs and emulation involves learning some terms. Take a moment to look at and understand the following:
An operation (often shortened to “op”) refers to procedures that are supported natively by the system. You might also encounter equivalent phrases such as implemented in hardware or intrinsic operation as you explore further.
Registers are containers for data that the CPU accesses directly. For most operations, operands must be moved to registers for an operation to function. For the CHIP-8, each register is a u8 value.
An opcode is a number that maps to an operation. On the CHIP-8 platform, opcodes include both the operation and the operands’ registers.
The first operation that we want to support is addition. The operation takes two registers (x and y) as operands and adds the value stored in y to x. To implement this, we’ll use the minimal amount of code possible, as the following listing shows. Our initial CPU contains only two registers and the space for a single opcode.
Listing 5.18 Definition of the CPU used in listing 5.22
struct CPU {

    current_operation: u16,    ①
    registers: [u8; 2],        ②

}
① All CHIP-8 opcodes are u16 values.
② These two registers are sufficient for addition.
So far, the CPU is inert. To perform addition, we’ll need to take the following steps, but there is no ability to store data in memory as yet:
The process for booting up the CPU consists of writing to the fields of the CPU struct. The following listing, an extract from listing 5.22, shows the CPU initialization process.
Listing 5.19 Initializing the CPU
32 fn main() {
33   let mut cpu = CPU {
34     current_operation: 0,           ①
35     registers: [0; 2],
36   };
37
38   cpu.current_operation = 0x8014;
39   cpu.registers[0] = 5;             ②
40   cpu.registers[1] = 10;            ②
① Initializes with a no-op (do nothing)
② Registers can only hold u8 values.
Line 38 from listing 5.19 is difficult to interpret without context. The constant 0x8014 is the opcode that the CPU will interpret. To decode it, split it into four parts:
Understanding the emulator’s main loop
Now that we’ve loaded the data, the CPU is almost able to do some work. The run() method performs the bulk of our emulator’s work. Using the following steps, it emulates CPU cycles:
The following listing, an extract from listing 5.22, shows the first functionality being added to the emulator.
Listing 5.20 Reading the opcode
 6 impl CPU {
 7   fn read_opcode(&self) -> u16 {                      ①
 8     self.current_operation                            ①
 9   }                                                   ①
10
11   fn run(&mut self) {
12     // loop {                                         ②
13       let opcode = self.read_opcode();
14
15       let c = ((opcode & 0xF000) >> 12) as u8;        ③
16       let x = ((opcode & 0x0F00) >>  8) as u8;        ③
17       let y = ((opcode & 0x00F0) >>  4) as u8;        ③
18       let d = ((opcode & 0x000F) >>  0) as u8;        ③
19
20       match (c, x, y, d) {
21           (0x8, _, _, 0x4) => self.add_xy(x, y),      ④
22           _  =>  todo!("opcode {:04x}", opcode),      ⑤
23       }
24     // }                                              ⑥
25   }
26
27   fn add_xy(&mut self, x: u8, y: u8) {
28     self.registers[x as usize] += self.registers[y as usize];
29   }
30 }
① read_opcode() becomes more complex when we introduce reading from memory.
② Avoids running this code in a loop for now
③ The opcode decoding process is explained fully in the next section.
④ Dispatches execution to the hardware circuit responsible for performing it
⑤ A full emulator contains several dozen operations.
⑥ Avoids running this code in a loop for now
How to interpret CHIP-8 opcodes
It is important for our CPU to be able to interpret its opcode (0x8014). This section provides a thorough explanation of the process used in the CHIP-8 and its naming conventions.
CHIP-8 opcodes are u16 values made up of 4 nibbles. A nibble is half of a byte. That is, a nibble is a 4-bit value. Because there isn’t a 4-bit type in Rust, splitting the u16 values into those parts is fiddly. To make matters more complicated, CHIP-8 nibbles are often recombined to form either 8-bit or 12-bit values depending on context.
To simplify talking about the parts of each opcode, let’s introduce some standard terminology. Each opcode is made up of two bytes: the high byte and the low byte. And each byte is made up of two nibbles, the high nibble and the low nibble, respectively. Figure 5.2 illustrates each term.
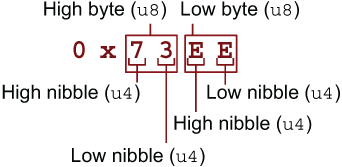
Figure 5.2 Terms used to refer to parts of CHIP-8 opcodes
Documentation manuals for the CHIP-8 introduce several variables, including kk, nnn, x, and y. Table 5.2 explains their role, location, and width.
Table 5.2 Variables used within CHIP-8 opcode descriptions
There are three main forms of opcodes, as illustrated in figure 5.3. The decoding process involves matching on the high nibble of the first byte and then applying one of three strategies.
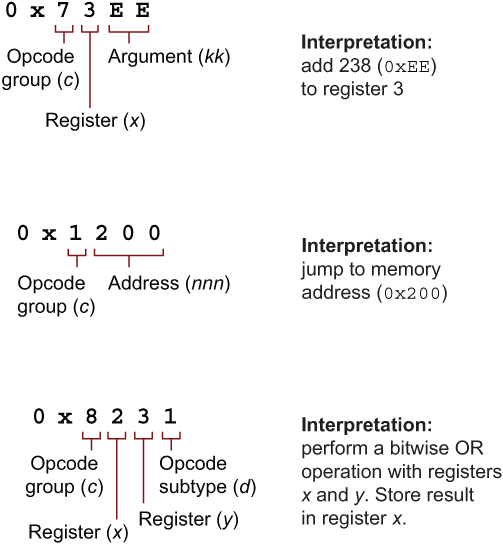
Figure 5.3 CHIP-8 opcodes are decoded in multiple ways. Which to use depends on the value of the leftmost nibble.
To extract nibbles from bytes, we’ll need to use the right shift (>>) and logical AND (&) bitwise operations. These operations were introduced in section 5.4, especially in sections 5.4.1–5.4.3. The following listing demonstrates applying these bitwise operations to the current problem.
Listing 5.21 Extracting variables from an opcode
fn main() {
  let opcode: u16 = 0x71E4;

  let c = (opcode & 0xF000) >> 12;     ①
  let x = (opcode & 0x0F00) >>  8;     ①
  let y = (opcode & 0x00F0) >>  4;     ①
  let d = (opcode & 0x000F) >>  0;     ①

  assert_eq!(c, 0x7);                  ②
  assert_eq!(x, 0x1);                  ②
  assert_eq!(y, 0xE);                  ②
  assert_eq!(d, 0x4);                  ②

  let nnn = opcode & 0x0FFF;           ③
  let kk  = opcode & 0x00FF;           ③

  assert_eq!(nnn, 0x1E4);
  assert_eq!(kk,   0xE4);
}
① Select single nibbles with the AND operator (&) to filter bits that should be retained, then shift to move the bits to the lowest significant place. Hexadecimal notation is convenient for these operations as each hexadecimal digit represents 4 bits. A 0xF value selects all bits from a nibble.
② The four nibbles from opcode are available as individual variables after processing.
③ Select multiple nibbles by increasing the width of the filter. For our purposes, shifting bits rightward is unnecessary.
We’re now able to decode the instructions. The next step is actually executing these.
The following listing is the full code for our proto-emulator, the Adder. You’ll find its source in ch5/ch5-cpu1/src/main.rs.
Listing 5.22 Implementing the beginnings of CHIP-8 emulator
 1 struct CPU {
 2   current_operation: u16,
 3   registers: [u8; 2],
 4  }
 5
 6 impl CPU {
 7   fn read_opcode(&self) -> u16 {
 8     self.current_operation
 9   }
10
11   fn run(&mut self) {
12     // loop {
13       let opcode = self.read_opcode();
14
15       let c = ((opcode & 0xF000) >> 12) as u8;
16       let x = ((opcode & 0x0F00) >>  8) as u8;
17       let y = ((opcode & 0x00F0) >>  4) as u8;
18       let d = ((opcode & 0x000F) >>  0) as u8;
19
20       match (c, x, y, d) {
21         (0x8, _, _, 0x4) => self.add_xy(x, y),
22         _  =>  todo!("opcode {:04x}", opcode),
23       }
24     // }
25   }
26
27   fn add_xy(&mut self, x: u8, y: u8) {
28     self.registers[x as usize] += self.registers[y as usize];
29   }
30 }
31
32 fn main() {
33   let mut cpu = CPU {
34     current_operation: 0,
35     registers: [0; 2],
36   };
37
38   cpu.current_operation = 0x8014;
39   cpu.registers[0] = 5;
40   cpu.registers[1] = 10;
41
42   cpu.run();
43
44   assert_eq!(cpu.registers[0], 15);
45
46   println!("5 + 10 = {}", cpu.registers[0]);
47 }
The Adder doesn’t do much. When executed, it prints the following line:
5 + 10 = 15
CPU RIA/1 can execute a single instruction: addition. CPU RIA/2, the Multiplier, can execute several instructions in sequence. The Multiplier includes RAM, a working main loop, and a variable that indicates which instruction to execute next that we’ll call position_in_memory. Listing 5.26 makes the following substantive changes to listing 5.22:
Includes a fully-fledged main loop and stopping condition (lines 14–31).
At each step in the loop, memory at position_in_memory is accessed and decoded into an opcode. position_in_memory is then incremented to the next memory address, and the opcode is executed. The CPU continues to run forever until the stopping condition (an opcode of 0x0000) is encountered.
Removes the current_instruction field of the CPU struct, which is replaced by a section of the main loop that decodes bytes from memory (lines 15–17).
Expanding the CPU to support memory
We need to implement some modifications to make our CPU more useful. To start, the computer needs memory.
Listing 5.23, an extract from listing 5.26, provides CPU RIA/2’s definition. CPU RIA/2 contains general-purpose registers for calculations (registers) and one special-purpose register (position_in_memory). For convenience, we’ll also include the system’s memory within the CPU struct itself as the memory field.
Listing 5.23 Defining a CPU struct
1 struct CPU {
2   registers: [u8; 16],
3   position_in_memory: usize,      ①
4   memory: [u8; 0x1000],
5 }
① Using usize rather that u16 diverges from the original spec, but we’ll use usize as Rust allows these to be used for indexing.
Some features of the CPU are quite novel:
Having 16 registers means that a single hexadecimal number (0 to F) can address those. That allows all opcodes to be compactly represented as u16 values.
The CHIP-8 only has 4096 bytes of RAM (0x1000 in hexadecimal). This allows CHIP-8’s equivalent of a usize type to only be 12 bits wide: 212 = 4,096. Those 12 bits become the nnn variable discussed earlier.
Rust in Action deviates from standard practice in two ways:
What we call the “position in memory” is normally referred to as the “program counter.” As a beginner, it can be difficult to remember what the program counter’s role is. So instead, this book uses a name that reflects its usage.
Within the CHIP-8 specification, the first 512 bytes (0x100) are reserved for the system, while other bytes are available for programs. This implementation relaxes that restriction.
With the addition of memory within the CPU, the read_opcode() method requires updating. The following listing, an extract from listing 5.26, does that for us. It reads an opcode from memory by combining two u8 values into a single u16 value.
Listing 5.24 Reading an opcode from memory
 8 fn read_opcode(&self) -> u16 {
 9   let p = self.position_in_memory;
10   let op_byte1 = self.memory[p] as u16;
11   let op_byte2 = self.memory[p + 1] as u16;
12
13   op_byte1 << 8 | op_byte2       ①
14 }
① To create a u16 opcode, we combine two values from memory with the logical OR operation. These need to be cast as u16 to start with; otherwise, the left shift sets all of the bits to 0.
Within the CHIP-8, we use the last register as a carry flag. When set, this flag indicates that an operation has overflowed the u8 register size. The following listing, an extract from listing 5.26, shows how to handle this overflow.
Listing 5.25 Handling overflow in CHIP-8 operations
34 fn add_xy(&mut self, x: u8, y: u8) {
35   let arg1 = self.registers[x as usize];
36   let arg2 = self.registers[y as usize];
37
38   let (val, overflow) = arg1.overflowing_add(arg2);      ①
39   self.registers[x as usize] = val;
40
41   if overflow {
42     self.registers[0xF] = 1;
43   } else {
44     self.registers[0xF] = 0;
45   }
46 }
① The overflowing_add() method for u8 returns (u8, bool). The bool is true when overflow is detected.
Full code listing for CPU RIA/2: The Multiplier
The following listing shows the complete code for our second working emulator, the Multiplier. You’ll find the source for this listing in ch5/ch5-cpu2/src/main.rs.
Listing 5.26 Enabling the emulator to process multiple instructions
 1 struct CPU {
 2   registers: [u8; 16],
 3   position_in_memory: usize,
 4   memory: [u8; 0x1000],
 5 }
 6
 7 impl CPU {
 8   fn read_opcode(&self) -> u16 {
 9     let p = self.position_in_memory;
10    let op_byte1 = self.memory[p] as u16;
11     let op_byte2 = self.memory[p + 1] as u16;
12
13     op_byte1 << 8 | op_byte2
14   }
15
16   fn run(&mut self) {
17     loop {                                                   ①
18       let opcode = self.read_opcode();
19       self.position_in_memory += 2;                          ②
20
21       let c = ((opcode & 0xF000) >> 12) as u8;
22       let x = ((opcode & 0x0F00) >>  8) as u8;
23       let y = ((opcode & 0x00F0) >>  4) as u8;
24       let d = ((opcode & 0x000F) >>  0) as u8;
25
26       match (c, x, y, d) {
27           (0, 0, 0, 0)     => { return; },                   ③
28           (0x8, _, _, 0x4) => self.add_xy(x, y),
29           _                => todo!("opcode {:04x}", opcode),
30       }
31     }
32   }
33
34   fn add_xy(&mut self, x: u8, y: u8) {
35     let arg1 = self.registers[x as usize];
36     let arg2 = self.registers[y as usize];
37
38     let (val, overflow) = arg1.overflowing_add(arg2);
39     self.registers[x as usize] = val;
40
41     if overflow {
42       self.registers[0xF] = 1;
43     } else {
44       self.registers[0xF] = 0;
45     }
46   }
47 }
48
49 fn main() {
50   let mut cpu = CPU {
51     registers: [0; 16],
52     memory: [0; 4096],
53     position_in_memory: 0,
54   };
55
56   cpu.registers[0] = 5;
57   cpu.registers[1] = 10;
58   cpu.registers[2] = 10;                                   ④
59   cpu.registers[3] = 10;                                   ④
60
61   let mem = &mut cpu.memory;
62   mem[0] = 0x80; mem[1] = 0x14;                            ⑤
63   mem[2] = 0x80; mem[3] = 0x24;                            ⑥
64   mem[4] = 0x80; mem[5] = 0x34;                            ⑦
65
66   cpu.run();
67
68   assert_eq!(cpu.registers[0], 35);
69
70   println!("5 + 10 + 10 + 10 = {}", cpu.registers[0]);
71 }
① Continues execution beyond processing a single instruction
② Increments position_in_memory to point to the next instruction
③ Short-circuits the function to terminate execution when the opcode 0x0000 is encountered
④ Initializes a few registers with values
⑤ Loads opcode 0x8014, which adds register 1 to register 0
⑥ Loads opcode 0x8024, which adds register 2 to register 0
⑦ Loads opcode 0x8034. which adds register 3 to register 0
When executed, CPU RIA/2 prints its impressive mathematical calculations:
5 + 10 + 10 + 10 = 35
We have nearly built all of the emulator machinery. This section adds the ability for you to call functions. There is no programming language support, however, so any programs still need to be written in binary. In addition to implementing functions, this section validates an assertion made at the start—functions are also data.
Expanding the CPU to include support for a stack
To build functions, we need to implement some additional opcodes. These are as follows:
The CALL opcode (0x2nnn, where nnn is a memory address) sets position_ in_memory to nnn, the address of the function.
The RETURN opcode (0x00EE) sets position_in_memory to the memory address of the previous CALL opcode.
To enable these to opcodes to work together, the CPU needs to have some specialized memory available for storing addresses. This is known as the stack. Each CALL opcode adds an address to the stack by incrementing the stack pointer and writing nnn to that position in the stack. Each RETURN opcode removes the top address by decrementing the stack pointer. The following listing, an extract from listing 5.29, provides the details to emulate the CPU.
Listing 5.27 Including a stack and stack pointer
1 struct CPU {
2   registers: [u8; 16],
3   position_in_memory: usize,
4   memory: [u8; 4096],
5   stack: [u16; 16],        ①
6   stack_pointer: usize,    ②
7 }
① The stack’s maximum height is 16. After 16 nested function calls, the program encounters a stack overflow.
② Giving the stack_pointer type usize makes it easier to index values within the stack.
Defining a function and loading it into memory
Within computer science, a function is just a sequence of bytes that can be executed by a CPU.4 CPUs start at the first opcode, then make their way to the end. The next few code snippets demonstrate how it is possible to move from a sequence of bytes, then convert that into executable code within CPU RIA/3.
Define the function. Our function performs two addition operations and then returns—modest, yet informative. It is three opcodes long. The function’s internals look like this in a notation that resembles assembly language:
add_twice:
    0x8014
    0x8014
    0x00EE
Convert opcodes into Rust data types. Translating these three opcodes into Rust’s array syntax involves wrapping them in square brackets and using a comma for each number. The function has now become a [u16;3]:
let add_twice: [u16;3] = [
  0x8014,
  0x8014,
  0x00EE,
];
We want to be able to deal with one byte in the next step, so we’ll decompose the [u16;3] array further into a [u8;6] array:
let add_twice: [u8;6] = [
  0x80, 0x14,
  0x80, 0x14,
  0x00, 0xEE,
];
Load the function into RAM. Assuming that we wish to load that function into memory address 0x100, here are two options. First, if we have our function available as a slice, we can copy it across to memory with the copy_from_slice() method:
fn main() {
  let mut memory: [u8; 4096] = [0; 4096];
  let mem = &mut memory;

  let add_twice = [
    0x80, 0x14,
    0x80, 0x14,
    0x00, 0xEE,
  ];

  mem[0x100..0x106].copy_from_slice(&add_twice);

  println!("{:?}", &mem[0x100..0x106]);     ①
}
① Prints [128, 20, 128, 20, 0, 238]
An alternative approach that achieves the same effect within memory without requiring a temporary array is to overwrite bytes directly:
fn main() {
  let mut memory: [u8; 4096] = [0; 4096];
  let mem = &mut memory;

  mem[0x100] = 0x80; mem[0x101] = 0x14;
  mem[0x102] = 0x80; mem[0x103] = 0x14;
  mem[0x104] = 0x00; mem[0x105] = 0xEE;

  println!("{:?}", &mem[0x100..0x106]);    ①
}
The approach taken in the last snippet is exactly what is used within the main() function of lines 96–98 of listing 5.29. Now that we know how to load a function into memory, it’s time to learn how to instruct a CPU to actually call it.
Implementing the CALL and RETURN opcodes
Calling a function is a three-step process:
Returning from a function involves reversing the calling process:
The following listing, an extract from listing 5.29, focuses on the call() and ret() methods.
Listing 5.28 Adding the call() and ret() methods
41 fn call(&mut self, addr: u16) {
42     let sp = self.stack_pointer;
43     let stack = &mut self.stack;
44
45     if sp > stack.len() {
46         panic!("Stack overflow!")
47     }
48
49     stack[sp] = self.position_in_memory as u16;       ①
50     self.stack_pointer += 1;                          ②
51     self.position_in_memory = addr as usize;          ③
52 }
53
54 fn ret(&mut self) {
55     if self.stack_pointer == 0 {
56         panic!("Stack underflow");
57     }
58
59     self.stack_pointer -= 1;
60     let call_addr = self.stack[self.stack_pointer];   ④
61     self.position_in_memory = call_addr as usize;     ④
62 }
① Adds the current position_in_memory to the stack. This memory address is two bytes higher than the calling location as it is incremented within the body of the run() method.
② Increments self.stack_pointer to prevent self.position_in_memory from being overwritten until it needs to be accessed again in a subsequent return
③ Modifies self.position_in_memory to affect jumping to that address
④ Jumps to the position in memory where an earlier call was made
Full code listing for CPU RIA/3: The Caller
Now that we have all of the pieces ready, let’s assemble those into a working program. Listing 5.29 is able to compute a (hard-coded) mathematical expression. Here’s its output:
5 + (10 * 2) + (10 * 2) = 45
This calculation is made without the source code that you may be used to. You will need to make do with interpreting hexadecimal numbers. To help, figure 5.4 illustrates what happens within the CPU during cpu.run(). The arrows reflect the state of the cpu.position_in_memory variable as it makes its way through the program.
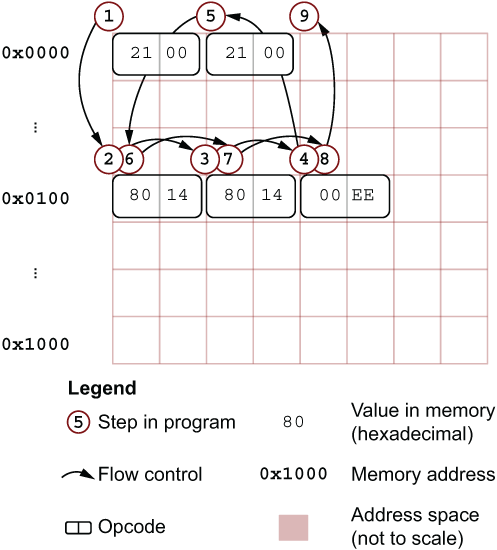
Figure 5.4 Illustrating the control flow of the function implemented within CPU RIA/3 in listing 5.29
Listing 5.29 shows our completed emulator for CPU RIA/3, the Caller. You’ll find the source code for this listing in ch5/ch5-cpu3/src/main.rs.
Listing 5.29 Emulating a CPU that incorporates user-defined functions
  1 struct CPU {
  2   registers: [u8; 16],
  3   position_in_memory: usize,
  4   memory: [u8; 4096],
  5   stack: [u16; 16],
  6   stack_pointer: usize,
  7 }
  8
  9 impl CPU {
 10   fn read_opcode(&self) -> u16 {
 11     let p = self.position_in_memory;
 12     let op_byte1 = self.memory[p] as u16;
 13     let op_byte2 = self.memory[p + 1] as u16;
 14
 15     op_byte1 << 8 | op_byte2
 16   }
 17
 18   fn run(&mut self) {
 19     loop {
 20       let opcode = self.read_opcode();
 21       self.position_in_memory += 2;
 22
 23       let c = ((opcode & 0xF000) >> 12) as u8;
 24       let x = ((opcode & 0x0F00) >>  8) as u8;
 25       let y = ((opcode & 0x00F0) >>  4) as u8;
 26       let d = ((opcode & 0x000F) >>  0) as u8;
 27
 28       let nnn = opcode & 0x0FFF;
 29       // let kk  = (opcode & 0x00FF) as u8;
 30
 31       match (c, x, y, d) {
 32           (  0,   0,   0,   0) => { return; },
 33           (  0,   0, 0xE, 0xE) => self.ret(),
 34           (0x2,   _,   _,   _) => self.call(nnn),
 35           (0x8,   _,   _, 0x4) => self.add_xy(x, y),
 36           _                    => todo!("opcode {:04x}", opcode),
 37       }
 38     }
 39   }
 40
 41   fn call(&mut self, addr: u16) {
 42     let sp = self.stack_pointer;
 43     let stack = &mut self.stack;
 44
 45     if sp > stack.len() {
 46       panic!("Stack overflow!")
 47     }
 48
 49     stack[sp] = self.position_in_memory as u16;
 50     self.stack_pointer += 1;
 51     self.position_in_memory = addr as usize;
 52   }
 53
 54   fn ret(&mut self) {
 55     if self.stack_pointer == 0 {
 56       panic!("Stack underflow");
 57     }
 58
 59     self.stack_pointer -= 1;
 60     let addr = self.stack[self.stack_pointer];
 61     self.position_in_memory = addr as usize;
 62   }
 63
 64   fn add_xy(&mut self, x: u8, y: u8) {
 65     let arg1 = self.registers[x as usize];
 66     let arg2 = self.registers[y as usize];
 67
 68     let (val, overflow_detected) = arg1.overflowing_add(arg2);
 69     self.registers[x as usize] = val;
 70
 71     if overflow_detected {
 72       self.registers[0xF] = 1;
 73     } else {
 74       self.registers[0xF] = 0;
 75     }
 76   }
 77 }
 78
 79 fn main() {
 80   let mut cpu = CPU {
 81     registers: [0; 16],
 82     memory: [0; 4096],
 83     position_in_memory: 0,
 84     stack: [0; 16],
 85     stack_pointer: 0,
 86   };
 87
 88   cpu.registers[0] = 5;
 89   cpu.registers[1] = 10;
 90
 91   let mem = &mut cpu.memory;
 92   mem[0x000] = 0x21; mem[0x001] = 0x00;     ①
 93   mem[0x002] = 0x21; mem[0x003] = 0x00;     ②
 94   mem[0x004] = 0x00; mem[0x005] = 0x00;     ③
 95
 96   mem[0x100] = 0x80; mem[0x101] = 0x14;     ④
 97   mem[0x102] = 0x80; mem[0x103] = 0x14;     ⑤
 98   mem[0x104] = 0x00; mem[0x105] = 0xEE;     ⑥
 99
100   cpu.run();
101
102   assert_eq!(cpu.registers[0], 45);
103   println!("5 + (10 * 2) + (10 * 2) = {}", cpu.registers[0]);
104 }
① Sets opcode to 0x2100: CALL the function at 0x100
② Sets opcode to 0x2100: CALL the function at 0x100
③ Sets opcode to 0x0000: HALT (not strictly necessary as cpu.memory is initialized with null bytes)
④ Sets opcode to 0x8014: ADD register 1’s value to register 0
⑤ Sets opcode to 0x8014: ADD register 1’s value to register 0
⑥ Sets opcode to 0x00EE: RETURN
As you delve into systems’ documentation, you will find that real-life functions are more complicated than simply jumping to a predefined memory location. Operating systems and CPU architectures differ in calling conventions and in their capabilities. Sometimes operands will need to be added to the stack; sometimes they’ll need to be inserted into defined registers. Still, while the specific mechanics can differ, the process is roughly similar to what you have just encountered. Congratulations on making it this far.
With a few extra opcodes, it’s possible to implement multiplication and many more functions within your inchoate CPU. Check the source code that comes along with the book, specifically the ch5/ch5-cpu4 directory at https://github.com/rust-in-action/code for a fuller implementation of the CHIP-8 specification.
The last step in learning about CPUs and data is to understand how control flow works. Within CHIP-8, control flow works by comparing values in registers, then modifying position_in_memory, depending on the outcome. There are no while or for loops within a CPU. Creating these in programming languages is the art of the compiler writer.
The same bit pattern can represent multiple values, depending on its data type.
Integer types within Rust’s standard library have a fixed width. Attempting to increment past an integer’s maximum value is an error called an integer overflow. Decrementing past its lowest value is called integer underflow.
Compiling programs with optimization enabled (for example, via cargo build --release) can expose your programs to integer overflow and underflow as run-time checks are disabled.
Endianness refers to the layout of bytes in multibyte types. Each CPU manufacturer decides the endianness of its chips. A program compiled for a little-endian CPU malfunctions if one attempts to run it on a system with a big-endian CPU.
Decimal numbers are primarily represented by floating-point number types. The standard that Rust follows for its f32 and f64 types is IEEE 754. These types are also known as single precision and double precision floating point.
Within f32 and f64 types, identical bit patterns can compare as unequal (e.g., f32::NAN != f32::NAN), and differing bit patterns can compare as equal (e.g., -0 == 0). Accordingly, f32 and f64 only satisfy a partial equivalence relation. Programmers should be mindful of this when comparing floating-point values for equality.
Bitwise operations are useful for manipulating the internals of data structures. However, doing so can often be highly unsafe.
Fixed-point number formats are also available. These represent numbers by encoding a value as the nominator and using an implicit denominator.
Implement std::convert::From when you want to support type conversions. But in cases where the conversion may fail, the std::convert::TryFrom trait is the preferred option.
A CPU opcode is a number that represents an instruction rather than data. Memory addresses are also just numbers. Function calls are just sequences of numbers.
1.In 2021, the x86-64/AMD64 CPU architecture is dominant.
2.This practice is known as quantizing the model in the machine learning community.
3.Q, often written as ℚ (this style is called blackboard bold), is the mathematical symbol for the so-called rational numbers. Rational numbers are numbers that can be represented as a fraction of two integers, such as 1/3.
4.The sequence of bytes must also be tagged as executable. The tagging process is explained in section 6.1.4.