This chapter introduces you to the fundamentals of Rust programming. By the end of the chapter, you will be able to create command-line utilities and should be able to get the gist of most Rust programs. We’ll work through most of the language’s syntax, but defer much of the detail about why things are how they are for later in the book.
Note Programmers who have experience with another programming language will benefit the most from this chapter. If you are an experienced Rust programmer, feel free to skim through it.
Beginners are welcomed. Rust’s community strives to be responsive to newcomers. At times, you may strike a mental pothole when you encounter terms such as lifetime elision, hygienic macros, move semantics, and algebraic data types without context. Don’t be afraid to ask for help. The community is much more welcoming than these helpful, yet opaque, terms might suggest.
In this chapter, we will build grep-lite, a greatly stripped-down version of the ubiquitous grep utility. Our grep-lite program looks for patterns within text and prints lines that match. This simple program allows us to focus on the unique features of Rust.
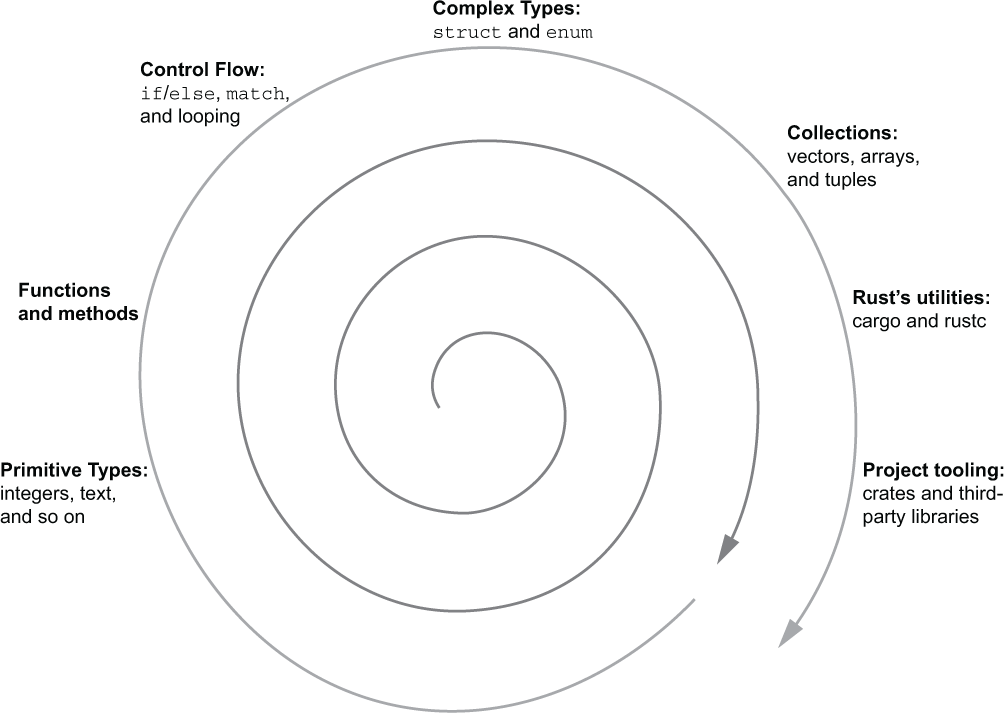
The chapter takes a spiral approach to learning. A few concepts will be discussed multiple times. With each iteration, you will find yourself learning more. Figure 2.1 shows a completely unscientific map of the chapter.
Figure 2.1 Chapter topic outline. Starting with primitive types, the chapter progresses through several concepts with increasing levels of depth.
It’s highly recommended that you follow along with the examples in this book. As a reminder, to access or download the source code for the listings, use either of these two sources:
Every plain text file has a hidden superpower: when it includes the right symbols, it can be converted into something that can be interpreted by a CPU. That is the magic of a programming language. This chapter’s aim is to allow you to become familiar with the process of converting Rust source code into a running program.
Understanding this process is more fun than it sounds! And it sets you up for an exciting learning journey. By the end of chapter 4, you will have implemented a virtual CPU that can also interpret programs that you create.
Listing 2.1 is a short, yet complete Rust program. To translate it into a working program, we use software called a compiler. The compiler’s role is to translate the source code into machine code, as well as take care of lots of bookkeeping to satisfy the operating system (OS) and CPU that it is a runnable program. The Rust compiler is called rustc. You’ll find the source code for listing 2.1 in the file ch2/ok.rs.
Listing 2.1 Almost the shortest valid Rust program
 1 fn main() {
 2   println!("OK")
 3 }
To compile a single file written in Rust into a working program
Save your source code to a file. In our case, we’ll use the filename ok.rs.
Open a shell window such as Terminal, cmd.exe, Powershell, bash, zsh, or any other.
Execute the command rustc <file>, where <file> is the file you want to compile.
When compilation succeeds, rustc sends no output to the console. Behind the scenes, rustc has dutifully created an executable, using the input filename to choose the output filename.
Assuming that you’ve saved listing 2.1 to a file called ok.rs, let’s see what that looks like. The following snippet provides a short demonstration of the process:
$ rustc ok.rs
$ ./ok           ①
OK
① For Windows, include the .exe filename extension (for example, ok.exe).
Most Rust projects are larger than a single file. These typically include dependencies. To prepare ourselves for that, we’ll use a higher-level tool than rustc, called cargo. cargo understands how to drive rustc (and much more).
Migrating from a single file workflow managed by rustc to one managed by cargo is a two-stage process. The first is to move that original file into an empty directory. Then execute the cargo init command.
Here is a detailed overview of that process, assuming that you are starting from a file called ok.rs generated by following the steps in the previous section:
Run mkdir <project> to create an empty directory (e.g., mkdir ok).
Move your source code into the <project> directory (e.g., mv ok.rs ok).
From this point on, you can issue cargo run to execute your project’s source code. One difference from rustc is that compiled executables are found in a <project>/target subdirectory. Another is that cargo provides much more output by default:
$ cargo run
    Finished dev [unoptimized + debuginfo] target(s) in 0.03s
    Running `target/debug/ok`
OK
If you’re ever curious about what cargo is doing under the hood to drive rustc, add the verbose flag (-v) to your command:
$ rm -rf target/         ①
$ cargo run -v
   Compiling ok v0.1.0 (/tmp/ok)
     Running `rustc
     --crate-name ok
     --edition=2018
     ok.rs
     --error-format=json
     --json=diagnostic-rendered-ansi
     --crate-type bin
     --emit=dep-info,link
     -C embed-bitcode=no
     -C debuginfo=2
     -C metadata=55485250d3e77978
     -C extra-filename=-55485250d3e77978
     --out-dir /tmp/ok/target/debug/deps
     -C incremental=/tmp/target/debug/incremental
     -L dependency=/tmp/ok/target/debug/deps
     -C link-arg=-fuse-ld=lld`
    Finished dev [unoptimized + debuginfo] target(s) in 0.31s
     Running `target/debug/ok`
OK
① Added here to provoke cargo into compiling the project from scratch
Rust is boring and predictable where possible. It has variables, numbers, functions, and other familiar things that you have seen in other languages. For example, it delimits blocks with curly brackets ({ and }), it uses a single equals sign as its assignment operator (=), and it is whitespace-agnostic.
Let’s look at another short listing to introduce some fundamentals: defining variables with type annotations and calling functions. Listing 2.2 prints a + b = 30 to the console. As you can see from lines 2–5 in the listing, there are multiple syntactic choices for annotating data types to integers. Use whichever feels most natural for the situation at hand. The source code for this listing is in ch2/ch2-first-steps.rs.
Listing 2.2 Adding integers using variables and declaring types
 1 fn main() {                             ①
 2   let a = 10;                           ②
 3   let b: i32 = 20;                      ③
 4   let c = 30i32;                        ④
 5   let d = 30_i32;                       ⑤
 6   let e = add(add(a, b), add(c, d));
 7
 8   println!("( a + b ) + ( c + d ) = {}", e);
 9 }
10
11 fn add(i: i32, j: i32) -> i32 {         ⑥
12   i + j                                 ⑦
13 }
① Rust is flexible with the location of the main() function.
② Types can be inferred by the compiler...
③ ...or declared by the programmer when creating variables.
④ Numeric types can include a type annotation in their literal form.
⑤ Numbers can include underscores, which are intended to increase readability and have no functional impact.
⑥ Type declarations are required when defining functions.
⑦ Functions return the last expression’s result so that return is not required.
Note In the listing, be careful about adding a semicolon to the add() function declaration. This changes the semantics, returning () (unit) rather than i32.
Although there are only 13 lines of code, there is quite a lot packed into listing 2.2. Here’s a brief description that should provide the gist of what’s going on. We will cover the details in the rest of the chapter.
In line 1 (fn main() {), the fn keyword begins a function definition. The entry point to all Rust programs is main(). It takes no arguments and returns no value.1 Code blocks, also known as lexical scopes, are defined with curly braces: { and }.
In line 2 (let a = 10;), we use let to declare variable bindings. Variables are immutable by default, meaning that they are read-only rather than read-write. And finally, statements are delimited with semicolons (;).
In line 3 (let b: i32 = 20;), you can designate a specific data type for the compiler. At times, this will be required as the compiler will be unable to deduce a unique type on your behalf.
In line 4 (let c = 30i32;), you’ll note that Rust’s numeric literals can include types annotations. This can be helpful when navigating complex numerical expressions. And in line 5 (let c = 30_i32;), you’ll see that Rust permits the use of underscores within numeric literals. These increase readability but are insignificant to the compiler. In line 6 (let e = add(add(a, b), add(c, d));), it should be easy to see that calling functions looks like what you’ve experienced in most other programming languages.
In line 8 (println!("( a + b ) + ( c + d ) = {}", e); ), println!() is a macro, which is function-like but returns code rather than values. When printing to the console, every input data type has its own way of being represented as a text string. println!() takes care of figuring out the exact methods to call on its arguments.
Strings use double quotes (") rather than single quotes ('). Rust uses single quotes for single characters, which are a distinct type, char. And with Rust, string formatting uses {} as a placeholder, rather than the C-like printf style of %s or other variants.
Finally, in line 10 (fn add(...) -> i32 {), you can see that Rust’s syntax for defining functions is similar to those programming languages that use explicit type declarations. Commas delimit parameters, and type declarations follow variable names. The dagger (->) or thin arrow syntax indicates the return type.
Computers have been associated with numbers for longer than you have been able to say “formula translator.” This section discusses how to create numeric types in Rust and how to perform operations on these.
Rust uses a relatively conventional syntax for creating integers (1, 2, ...) and floating-point numbers (1.0, 1.1, ...). Operations on numbers use infix notation, meaning that numeric expressions look like those that you’re used to seeing in most programming languages. To operate on multiple types, Rust also allows the same token (+) for addition. This is called operator overloading. Some notable differences from other languages follow:
Rust includes a large number of numeric types. You will become used to declaring the size in bytes, which affects how many numbers the type can represent and whether your type is able to represent negative numbers.
Conversions between types are always explicit. Rust does not automatically convert your 16-bit integer into a 32-bit integer.
Rust’s numbers can have methods. For example, to round 24.5 to the nearest integer, Rust programmers use 24.5_f32.round() rather than (round(24.5_f32)). Here, the type suffix is required because a concrete type is necessary.
To start, let’s consider a small example. You’ll find the code in ch2/ch2-intro-to-numbers.rs in the examples for this book. Listing 2.3 prints these few lines to the console:
20 + 21 + 22 = 63
1000000000000
42
Listing 2.3 Numeric literals and basic operations on numbers in Rust
 1 fn main() {
 2   let twenty = 20;                       ①
 3   let twenty_one: i32 = 21;              ②
 4   let twenty_two = 22i32;                ③
 5
 6   let addition = twenty + twenty_one + twenty_two;
 7   println!("{} + {} + {} = {}", twenty, twenty_one, twenty_two, addition);
 8
 9   let one_million: i64 = 1_000_000;      ④
10   println!("{}", one_million.pow(2));    ⑤
11
12   let forty_twos = [                     ⑥
13     42.0,                                ⑦
14     42f32,                               ⑧
15     42.0_f32,                            ⑨
16   ];
17
18/   println!("{:02}", forty_twos[0]);     ⑩
19 }
① Rust infers a type on your behalf if you don’t supply one...
② ...which is done by adding type annotations (i32)...
④ Underscores increase readability and are ignored by the compiler.
⑥ Creates an array of numbers, which must all be the same type, by surrounding those with square brackets
⑦ Floating-point literals without an explicit type annotation become 32-bit or 64-bit, depending on context.
⑧ Floating-point literals can also have type suffixes...
⑨ ...and optional underscores.
⑩ Elements within arrays can be indexed numerically, starting at 0.
Rust also has built-in support for numeric literals that allow you to define integers in base 2 (binary), base 8 (octal), and base 16 (hexadecimal). This notation is also available within the formatting macros like println!. Listing 2.4 demonstrates the three styles. You can find the source code for this listing in ch2/ch2-non-base2.rs. It produces the following output:
base 10: 3 30 300
base 2:  11 11110 100101100
base 8:  3 36 454
base 16: 3 1e 12c
Listing 2.4 Using base 2, base 8, and base 16 numeric literals
 1 fn main() {
 2   let three = 0b11;             ①
 3   let thirty = 0o36;            ②
 4   let three_hundred = 0x12C;    ③
 5
 6   println!("base 10: {} {} {}", three, thirty, three_hundred);
 7   println!("base 2:  {:b} {:b} {:b}", three, thirty, three_hundred);
 8   println!("base 8:  {:o} {:o} {:o}", three, thirty, three_hundred);
 9   println!("base 16: {:x} {:x} {:x}", three, thirty, three_hundred);
10 }
① The 0b prefix indicates binary (base 2) numerals.
② The 0o prefix indicates octal (base 8) numerals.
③ The 0x prefix indicates hexadecimal (base 16) numerals.
In binary (base 2) numerals, 0b11 equals 3 because 3 = 2 × 1 + 1 × 1. With octal (base 8) numerals, 0o36 equals 30 because 30 = 8 × 3 + 1 × 6. And with hexadecimal (base 16) numerals, 0x12C equals 300 because 300 = 256 × 1 + 16 × 2 + 1 × 12. Table 2.1 shows the types that represent scalar numbers.
Table 2.1 Rust types for representing scalar (single) numbers
|
Integers that assume the CPU’s “native” width. For example, in 64-bit CPUs, |
Rust contains a full complement of numeric types. The types are grouped into a few families:
Signed integers (i) represent negative as well as positive integers.
Unsigned integers (u) only represent positive integers but can go twice as high as their signed counterparts.
Floating-point types (f) represent real numbers with special bit patterns to represent infinity, negative infinity, and “not a number” values.
Integer width is the number of bits that the type uses in RAM and in the CPU. Types that take up more space, such as u32 vs. i8, can represent a wider range of numbers. But this incurs the expense of needing to store extra zeros for smaller numbers, as table 2.2 shows.
Table 2.2 Multiple bit patterns can represent the same number.
Although we’ve only touched on numbers, we nearly have enough exposure to Rust to create a prototype of our pattern-matching program. But let’s look at comparing numbers before we create our program.
Rust’s numeric types support a large suite of comparisons that you’re probably familiar with. Enabling support for these comparisons is provided by a feature that you have not encountered yet. It is called traits.2 Table 2.3 summarizes the comparison operators available to you.
Table 2.3 Mathematical operators supported by Rust’s numeric types
That support does include a few caveats. We’ll look at these conditions in the rest of this section.
Impossible to compare different types
Rust’s type safety requirements prevent comparisons between types. For example, this code does not compile:
 fn main() {
   let a: i32 = 10;
   let b: u16 = 100;

   if a < b {
     println!("Ten is less than one hundred.");
   }
 }
To appease the compiler, we need to use an as operator to cast one of the operands to the other’s type. The following code shows this type cast: b as i32:
 fn main() {
   let a: i32 = 10;
   let b: u16 = 100;

   if a < (b as i32) {
     println!("Ten is less than one hundred.");
   }
 }
It is safest to cast the smaller type to a larger one (for example, a 16-bit type to a 32-bit type). This is sometimes referred to as promotion. In this case, we could have demoted a down to a u16, but such a move is generally more risky.
Warning Using type casts carelessly will cause your program to behave unexpectedly. For example, the expression 300_i32 as i8 returns 44.
In some cases, using the as keyword is too restrictive. It’s possible to regain fuller control over the type conversion process at the cost of introducing some bureaucracy. The following listing shows a Rust method to use instead of the as keyword when the conversion might fail.
Listing 2.5 The try_into() method converts between types
 1 use std::convert::TryInto;    ①
 2
 3 fn main() {
 4   let a: i32 = 10;
 5   let b: u16 = 100;
 6
 7   let b_ = b.try_into()
 8             .unwrap();        ②
 9
10   if a < b_ {
11     println!("Ten is less than one hundred.");
12   }
13 }
① Enables try_into() to be called on those types that have implemented it (such as u16)
② try_into() returns a Result type that provides access to the conversion attempt.
Listing 2.5 introduces two new Rust concepts: traits and error handling. On line 1, the use keyword brings the std::convert::TryInto trait into local scope. This unlocks the try_into() method of the b variable. We’ll bypass a full explanation of why this occurs for now. In the meantime, consider a trait as a collection of methods. If you are from an object-oriented background, traits can be thought of as abstract classes or interfaces. If your programming experience is in functional languages, you can think of traits as type classes.
Line 7 provides a glimpse of error handling in Rust. b.try_into() returns an i32 value wrapped within a Result. Result is introduced properly in chapter 3. It can contain either a success value or an error value. The unwrap() method can handle the success value and returns the value of b as an i32 here. If the conversion between u16 and i32 were to fail, then calling unsafe() would crash the program. As the book progresses, you will learn safer ways of dealing with Result rather than risking the program’s stability!
A distinguishing characteristic of Rust is that it only allows a type’s methods to be called when the trait is within local scope. An implicit prelude enables common operations such as addition and assignment to be used without explicit imports.
Tip To understand what is included in local scope by default, you should investigate the std::prelude module. Its documentation is available online at https://doc.rust-lang.org/std/prelude/index.html.
Rust’s standard library is comparatively slim. It excludes numeric types that are often available within other languages. These include
Many mathematical objects for working with rational numbers and complex numbers
Arbitrary size integers and arbitrary precision floating-point numbers for working with very large or very small numbers
To access these specialized numeric types, you can use the num crate. Crates are Rust’s name for packages. Open source crates are shared at the https://crates.io repository, which is where cargo downloads num from.
Listing 2.6 demonstrates adding two complex numbers together. If you’re unfamiliar with the term complex numbers, these are two-dimensional, whereas numbers that you deal with day to day are one-dimensional. Complex numbers have “real” and “imaginary” parts and are denoted as <real> + <imaginary>i.3 For example, 2.1 + –1.2i is a single complex number. That’s enough mathematics. Let’s look at the code.
Here is the recommended workflow to compile and run listing 2.6:
Execute the following commands in a terminal:
git clone --depth=1 https:/ /github.com/rust-in-action/code rust-in-action
cd rust-in-action/ch2/ch2-complex
cargo run
For those readers who prefer to learn by doing everything by hand, the following instructions will achieve the same end result:
Execute the following commands in a terminal:
cargo new ch2-complex
cd ch2-complex
Add version 0.4 of the num crate into the [dependencies] section of Cargo.toml. That section will look like this:
[dependencies]
num = "0.4"
Replace src/main.rs with the source code from listing 2.6 (available at ch2/ch2-complex/src/main.rs).
After several lines of intermediate output, cargo run should produce the following output:
13.2 + 21.02i
Listing 2.6 Calculating values with complex numbers
 1 use num::complex::Complex;                     ①
 2
 3 fn main() {
 4   let a = Complex { re: 2.1, im: -1.2 };       ②
 5   let b = Complex::new(11.1, 22.2);            ③
 6   let result = a + b;
 7
 8   println!("{} + {}i", result.re, result.im)   ④
 9 }
① The use keyword brings the Complex type into local scope.
② Every Rust type has a literal syntax.
③ Most types implement a new() static method.
④ Accesses fields with the dot operator
Some points from the listing are worth pausing to consider:
The use keyword pulls crates into local scope, and the namespace operator ( ::) restricts what’s imported. In our case, only a single type is required: Complex.
Rust does not have constructors; instead, every type has a literal form. You can initialize types by using the type name (Complex) and assigning their fields (re, im) values (such as 2.1 or –1.2) within curly braces ({ }).
Many types implement a new() method for simplicity. This convention, however, is not part of the Rust language.
To access fields, Rust programmers use the dot operator ( .). For example, the num:: complex::Complex type has two fields: re represents the real part, and im represents the imaginary part. Both are accessible with the dot operator.
Listing 2.6 also introduces some new commands. It demonstrates two forms of initializing non-primitive data types.
One is a literal syntax available as part of the Rust language (line 4). The other is the new() static method, which is implemented by convention only and isn’t defined as part of the language (line 5). A static method is a function that’s available for a type, but it’s not an instance of that type.4
The second form is often preferred in real-world code because library authors use a type’s new() method to set defaults. It also involves less clutter.
We’ve now addressed how to access built-in numeric types and types available from third-party libraries. We’ll move on to discussing some more of Rust’s features.
Programs execute from top to bottom, except when you don’t want that. Rust has a useful set of flow control mechanisms to facilitate this. This section provides a brief tour of the fundamentals.
The for loop is the workhorse of iteration in Rust. Iterating through collections of things, including iterating over collections that may have infinitely many values, is easy. The basic form is
for item in container {
  // ...
}
This basic form makes each successive element in container available as item. In this way, Rust emulates many dynamic languages with an easy-to-use, high-level syntax. However, it does have some pitfalls.
Counterintuitively, once the block ends, accessing the container another time becomes invalid. Even though the container variable remains within local scope, its lifetime has ended. For reasons that are explained in chapter 4, Rust assumes that container is no longer needed once the block finishes.
When you want to reuse container later in your program, use a reference. Again, for reasons that are explained in chapter 4, when a reference is omitted, Rust assumes that container is no longer needed. To add a reference to the container, prefix it with an ampersand (&) as this example shows:
for item in &container {
  // ...
}
If you need to modify each item during the loop, you can use a mutable reference by including the mut keyword:
for item in &mut collection {
  // ...
}
As an implementation detail, Rust’s for loop construct is expanded to method calls by the compiler. As the following table shows, these three forms of for each map to a different method.
When a local variable is not used within a block, by convention, you’ll use an underscore (_). Using this pattern in conjunction with the _exclusive range syntax_ (n..m) and the inclusive range syntax (n..=m) makes it clear that the intent is to perform a loop for a fixed number of times. Here’s an example:
for _ in 0..10 {
  // ...
}
Avoid managing an index variable
In many programming languages, it’s common to loop through things by using a temporary variable that’s incremented at the end of each iteration. Conventionally, this variable is named i (for index). A Rust version of that pattern is
let collection = [1, 2, 3, 4, 5];
for i in 0..collection.len() {
  let item = collection[i];
  // ...
}
This is legal Rust. It’s also essential in cases when iterating directly over collection via for item in collection is impossible. However, it is generally discouraged. The manual approach introduces two problems with this:
Performance—Indexing values with the collection[index] syntax incurs run-time costs for bounds checking. That is, Rust checks that index currently exists within collection as valid data. Those checks are not necessary when iterating directly over collection. The compiler can use compile-time analysis to prove that illegal access is impossible.
Safety—Periodically accessing collection over time introduces the possibility that it has changed. Using a for loop over collection directly allows Rust to guarantee that the collection remains untouched by other parts of the program.
The continue keyword operates as you would expect. Here’s an example:
for n in 0..10 {
  if n % 2 == 0 {
    continue;
  }
  // ...
}
The while loop proceeds as long as a condition holds. The condition, formally known as a predicate, can be any expression that evaluates to true or false. This (non-functioning) snippet takes air quality samples, checking to avoid anomalies:
let mut samples = vec![];

while samples.len() < 10 {
  let sample = take_sample();
  if is_outlier(sample) {
    continue;
  }

  samples.push(sample);
}
Using while to stop iterating once a duration is reached
Listing 2.7 (source code available at ch2/ch2-while-true-incr-count.rs) provides a working example of while. It isn’t an ideal method for implementing benchmarks, but can be a useful tool to have in your toolbox. In the listing, while continues to execute a block when a time limit is not reached.
Listing 2.7 Testing how fast your computer can increment a counter
 1 use std::time::{Duration, Instant};                ①
 2
 3 fn main() {
 4    let mut count = 0;
 5    let time_limit = Duration::new(1,0);            ②
 6    let start = Instant::now();                     ③
 7
 8    while (Instant::now() - start) < time_limit {   ④
 9        count += 1;
10    }
11    println!("{}", count);
12 }
① This form of an import hasn’t been seen before. It brings the Duration and Instant types from std::time into local scope.
② Creates a Duration that represents 1 second
③ Accesses time from the system’s clock
④ An Instant minus an Instant returns a Duration.
Avoid while when endlessly looping
Most Rust programmers avoid the following idiom to express looping forever. The preferred alternative is to use the loop keyword, explained in the next section.
while true {
  println!("Are we there yet?");
}
Rust contains a loop keyword for providing more control than for and while. loop executes a code block again and again, never stopping for a tea (or coffee) break. loop continues to execute until a break keyword is encountered or the program is terminated from the outside. Here’s an example showing the loop syntax:
loop {
  // ...
}
loop is often seen when implementing long-running servers, as the following example shows:
loop {
  let requester, request = accept_request();
  let result = process_request(request);
  send_response(requester, result);
}
The break keyword breaks out of a loop. In this regard, Rust’s generally operates as you are used to:
for (x, y) in (0..).zip(0..) {
  if x + y > 100 {
    break;
  }
  // ...
}
You can break out of a nested loop with loop labels.5 A loop label is an identifier prefixed with an apostrophe ('), like this example shows:
'outer: for x in 0.. {
  for y in 0.. {
    for z in 0.. {
      if x + y + z > 1000 {
        break 'outer;
      }

      // ...
    }
  }
}
Rust does not include the goto keyword, which provides the ability to jump to other parts of the program. The goto keyword can make control flow confusing, and its use is generally discouraged. One place where it is still commonly used, though, is to jump to and clean up a section of a function when an error condition is detected. Use loop labels to enable that pattern.
So far, we’ve indulged in the exciting pursuit of looking for numbers within lists of numbers. Our tests have involved utilizing the if keyword. Here’s an example:
if item == 42 {
  // ...
}
if accepts any expression that evaluates to a Boolean value (e.g., true or false). When you want to test multiple expressions, it’s possible to add a chain of if else blocks. The else block matches anything that has not already been matched. For example
if item == 42 {
  // ...
} else if item == 132 {
  // ...
} else {
  // ...
}
Rust has no concept of “truthy” or “falsey” types. Other languages allow special values such as 0 or an empty string to stand in for false and for other values to represent true, but Rust doesn’t allow this. The only value that can be used for true is true, and for false, use false.
While it’s possible to use if/else blocks in Rust, match provides a safer alternative. match warns you if you haven’t considered a relevant alternative. It is also elegant and concise:
match item {
  0          => {},    ①

  10 ..= 20  => {},    ②

  40  |  80  => {},    ③

  _          => {},    ④
}
① To match a single value, provide the value. No operator is required.
② The ..= syntax matches an inclusive range.
③ The vertical bar (|) matches values on either side of it.
④ The underscore (_) matches every value.
match offers a sophisticated and concise syntax for testing multiple possible values. Some examples are
match is analogous to the switch keyword in other languages. Unlike C’s switch, however, match guarantees that all possible options for a type are explicitly handled. Failing to provide a branch for every possible value triggers a compiler error. Additionally, a match does not “fall through” to the next option by default. Instead, match returns immediately when a match is found.
Listing 2.8 demonstrates a larger example of match. The source code for this listing is in ch2/ch2-match-needles.rs. The code prints these two lines to the screen:
42: hit!
132: hit!
Listing 2.8 Using match to match multiple values
fn main() {
  let needle = 42;                ①
  let haystack = [1, 1, 2, 5, 14, 42, 132, 429, 1430, 4862];

  for item in &haystack {
    let result = match item {     ②
      42 | 132 => "hit!",         ③
      _ => "miss",                ④
    };

    if result == "hit!" {
      println!("{}: {}", item, result);
    }
  }
}
① The variable needle is now redundant.
② This match expression returns a value that can be bound to a variable.
③ Success! 42 | 132 matches both 42 and 132.
④ A wildcard pattern that matches everything
The match keyword plays an important role within the Rust language. Many control structures (like looping) are defined in terms of match under the hood. These really shine when combined with the Option type that’s discussed in depth in the next chapter.
Now that we have taken a good look at defining numbers and working with some of Rust’s flow control mechanisms, let’s move on to adding structure to programs with functions.
Looking back to where the chapter begins, the snippet in listing 2.2 contained a small function, add(). add takes two i32 values and returns their sum. The following listing repeats the function.
Listing 2.9 Defining a function (extract of listing 2.2)
10 fn add(i: i32, j: i32) -> i32 {     ①
11   i + j
12 }
① add() takes two integer parameters and returns an integer. The two arguments are bound to the local variables i and j.
For the moment, let’s concentrate on the syntax of each of the elements in listing 2.9. Figure 2.2 provides a visual picture of each of the pieces. Anyone who has programmed in a strongly-typed programming language should be able to squint their way through the diagram.
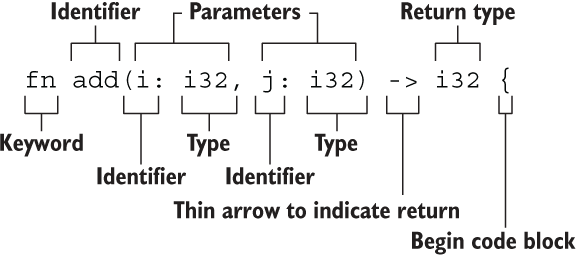
Figure 2.2 Rust’s function definition syntax
Rust’s functions require that you specify your parameter’s types and the function’s return type. This is the foundational knowledge that we’ll need for the majority of our work with Rust. Let’s put it to use with our first non-trivial program.
If you have only used a dynamic programming language so far in your career, the syntax and semantics of references can be frustrating. It can be difficult to form a mental picture of what is happening. That makes it difficult to understand which symbols to put where. Thankfully, the Rust compiler is a good coach.
A reference is a value that stands in place for another value. For example, imagine that variable a is a large array that is costly to duplicate. In some sense, a reference r is a cheap copy of a. But instead of creating a duplicate, the program stores a’s address in memory. When the data from a is required, r can be dereferenced to make a available. The following listing shows the code for this.
Listing 2.10 Creating a reference to a large array
fn main() {
  let a = 42;
  let r = &a;                   ①
  let b = a + *r;               ②

  println!("a + a = {}", b);    ③
}
② Adds a to a (via dereferencing r) and assigns it to b
References are created with the reference operator (&) and dereferencing occurs with the dereference operator (*). These operators act as unary operators, meaning that these only take one operand. One of the limitations of source code written in ASCII text is that multiplication and dereferencing use the same symbol. Let’s see these in use as part of a larger example.
Listing 2.11 searches for a number (the needle defined on line 2) within an array of numbers (the haystack defined on line 3). The code then prints 42 to the console when compiled. The code for this listing is in ch2/ch2-needle-in-haystack.rs.
Listing 2.11 Searching for an integer in an array of integers
 1 fn main() {
 2   let needle = 0o204;
 3   let haystack = [1, 1, 2, 5, 15, 52, 203, 877, 4140, 21147];
 4
 5   for item in &haystack {         ①
 6     if *item == needle {          ②
 7       println!("{}", item);
 8     }
 9   }
10 }
① Iterates over references to elements within haystack
② The syntax *item returns the item’s referent.
Each iteration changes the value of item to refer to the next item within haystack. On 2.7 the first iteration, *item returns 1, and on the last, it returns 21147.
So far, we haven’t learned much Rust, but we already have the tools to create some interesting pictures of fractals. So let’s do that now with listing 2.12. To begin
In a terminal window, execute the following commands to create a project that can render the Mandelbrot set:
cd $TMP (or cd %TMP% on MS Windows) to move to a directory that’s not critical.
cargo new mandelbrot --vcs none creates a new blank project.
cargo add num to edit Cargo.toml, adding the num crate as a dependency (see the sidebar entitled “2.2” in section 2.3.4 for instructions to enable this cargo feature).
Replace src/main.rs with the code in listing 2.12, which you’ll also find in ch2/ch2-mandelbrot/src/main.rs.
Execute cargo run. You should see the Mandelbrot set rendered in the terminal:

Listing 2.12 Rendering the Mandelbrot set
 1 use num::complex::Complex;                                      ①
 2
 3 fn calculate_mandelbrot(                                        ②
 4
 5   max_iters: usize,                                             ③
 6   x_min: f64,                                                   ④
 7   x_max: f64,                                                   ④
 8   y_min: f64,                                                   ④
 9   y_max: f64,                                                   ④
10   width: usize,                                                 ⑤
11   height: usize,                                                ⑤
12   ) -> Vec<Vec<usize>> {
13
14   let mut rows: Vec<_> = Vec::with_capacity(width);             ⑥
15   for img_y in 0..height {                                      ⑦
16
17     let mut row: Vec<usize> = Vec::with_capacity(height);
18     for img_x in 0..width {
19
20       let x_percent = (img_x as f64 / width as f64);
21       let y_percent = (img_y as f64 / height as f64);
22       let cx = x_min + (x_max - x_min) * x_percent;             ⑧
23       let cy = y_min + (y_max - y_min) * y_percent;             ⑧
24       let escaped_at = mandelbrot_at_point(cx, cy, max_iters);
25       row.push(escaped_at);
26     }
27
28     all_rows.push(row);
29   }
30   rows
31 }
32
33 fn mandelbrot_at_point(                                         ⑨
34   cx: f64,
35   cy: f64,
36   max_iters: usize,
37   ) -> usize {
38   let mut z = Complex { re: 0.0, im: 0.0 };                     ⑩
39   let c = Complex::new(cx, cy);                                 ⑪
40
41   for i in 0..=max_iters {
42     if z.norm() > 2.0 {                                         ⑫
43       return i;
44     }
45     z = z * z + c;                                              ⑬
46   }
47   max_iters                                                     ⑭
48 }
49
50 fn render_mandelbrot(escape_vals: Vec<Vec<usize>>) {
51   for row in escape_vals {
52     let mut line = String::with_capacity(row.len());
53     for column in row {
54       let val = match column {
55         0..=2 => ' ',
56         2..=5 => '.',
57         5..=10 => '•',
58         11..=30 => '*',
59         30..=100 => '+',
60         100..=200 => 'x',
61         200..=400 => '$',
62         400..=700 => '#',
63         _ => '%',
64       };
65
66       line.push(val);
67     }
68     println!("{}", line);
69   }
70 }
71
72 fn main() {
73   let mandelbrot = calculate_mandelbrot(1000, 2.0, 1.0, -1.0,
74                                         1.0, 100, 24);
75
76   render_mandelbrot(mandelbrot);
77 }
① Imports the Complex number type from num crate and its complex submodule
② Converts between the output space (a grid of rows and columns) and a range that surrounds the Mandelbrot set (a continuous region near (0,0))
③ If a value has not escaped before reaching the maximum number of iterations, it’s considered to be within the Mandelbrot set.
④ Parameters that specify the space we’re searching for to look for members of the set
⑤ Parameters that represent the size of the output in pixels
⑥ Creates a container to house the data from each row
⑦ Iterates row by row, allowing us to print the output line by line
⑧ Calculates the proportion of the space covered in our output and converts that to points within the search space
⑨ Called at every pixel (e.g., every row and column that’s printed to stdout)
⑩ Initializes a complex number at the origin with real (re) and imaginary (im) parts at 0.0
⑪ Initializes a complex number from the coordinates provided as function arguments
⑫ Checks the escape condition and calculates the distance from the origin (0, 0), an absolute value of a complex number
⑬ Repeatedly mutates z to check whether c lies within the Mandelbrot set
⑭ As i is no longer in scope, we fall back to max_iters.
So far in this section, we’ve put the basics of Rust into practice. Let’s continue our exploration by learning how to define functions and types.
Rust’s functions can get somewhat scarier than the add(i: i32, j: i32) -> i32 from listing 2.2. To assist those who are reading more Rust source code than writing it, the following sections provide some extra content.
As a bit of forewarning, allow me to introduce some more complicated notation. As you read through Rust code, you might encounter definitions that are hard to decipher because those look like hieroglyphs from an ancient civilizations. Listing 2.13 provides an extract from listing 2.14 that shows one such example.
Listing 2.13 A function signature with explicit lifetime annotations
 1 fn add_with_lifetimes<'a, 'b>(i: &'a i32, j: &'b i32) -> i32 {
 2   *i + *j
 3 }
Like all unfamiliar syntax, it can be difficult to know what’s happening at first. This improves with time. Let’s start by explaining what is happening, and then go on to discuss why it is happening. The following bullet points break line 1 of the previous snippet into its parts:
fn add_with_lifetimes(...) -> i32 should be familiar to you already. From this we can infer that add_with_lifetimes() is a function that returns an i32 value.
<'a, 'b> declares two lifetime variables, 'a and 'b, within the scope of add_with_lifetimes(). These are normally spoken as lifetime a and lifetime b.
i: &'a i32 binds lifetime variable 'a to the lifetime of i. The syntax reads as “parameter i is a reference to an i32 with lifetime a.”
j: &'b i32 binds the lifetime variable 'b to the lifetime of j. The syntax reads as “parameter j is a reference to an i32 with lifetime b.”
The significance of binding a lifetime variable to a value probably isn’t obvious. Underpinning Rust’s safety checks is a lifetime system that verifies that all attempts to access data are valid. Lifetime annotations allow programmers to declare their intent. All values bound to a given lifetime must live as long as the last access to any value bound to that lifetime.
The lifetime system usually works unaided. Although every parameter has a lifetime, these checks are typically invisible as the compiler can infer most lifetimes by itself.6 But the compiler needs assistance in difficult cases. Functions that accept multiple references as arguments or return a reference are often when the compiler will request assistance via an error message.
No lifetime annotations are required when calling a function. When used in a complete example as in the next listing, you can see lifetime annotations at the function definition (line 1), but not when it’s used (line 8). The source code for the listing is in ch2-add-with-lifetimes.rs.
Listing 2.14 Type signature of a function with lifetime explicit annotations
 1 fn add_with_lifetimes<'a, 'b>(i: &'a i32, j: &'b i32) -> i32 {
 2   *i + *j                                   ①
 3 }
 4
 5 fn main() {
 6   let a = 10;
 7   let b = 20;
 8   let res = add_with_lifetimes(&a, &b);     ②
 9
10   println!("{}", res);
11 }
① Adds the values referred to by i and j rather than adding the references directly
② &10 and &20 mean reference 10 and 20, respectively. No lifetime notation is required when calling a function.
On line 2, *i + *j adds together the referent values held by the i and j variables. It’s common to see lifetime parameters when using references. While Rust can infer lifetimes in other cases, references require the programmer to specify the intent. Using two lifetime parameters (a and b) indicates that the lifetimes of i and j are decoupled.
Note Lifetime parameters are a way of providing control to the programmer while maintaining high-level code.
Another special case of function syntax appears when programmers write Rust functions to handle many possible input types. So far, we have seen functions that accept 32-bit integers (i32). The following listing shows a function signature that can be called by many input types as long as these are all the same.
Listing 2.15 Type signature of a generic function
fn add<T>(i: T, j: T) -> T {     ①
  i + j

}
① The type variable T is introduced with angle brackets (<T>). This function takes two arguments of the same type and returns a value of that type.
Capital letters in place of a type indicate a generic type. Conventionally, the variables T, U, and V are used as placeholder values, but this is arbitrary. E is often used to denote an error type. We’ll look at error handling in detail in chapter 3.
Generics enable significant code reuse and can greatly increase the usability of a strongly-typed language. Unfortunately, listing 2.15 doesn’t compile as is. The Rust compiler complains that it cannot add two values of any type T together. The following shows the output produced when attempting to compile listing 2.15:
error[E0369]: cannot add `T` to `T`
 --> add.rs:2:5
  |
2 |   i + j
  |   - ^ - T
  |   |
  |   T
  |
help: consider restricting type parameter `T`
  |
1 | fn add<T: std::ops::Add<Output = T>>(i: T, j: T) -> T {
  |         ^^^^^^^^^^^^^^^^^^^^^^^^^^^

error: aborting due to previous error

For more information about this error, try `rustc --explain E0369`.
This issue arises because T really means any type at all, even types where addition is not supported. Figure 2.3 provides a visual representation of the problem. Listing 2.15 attempts to refer to the outer ring, whereas addition is only supported by types within the inner ring.
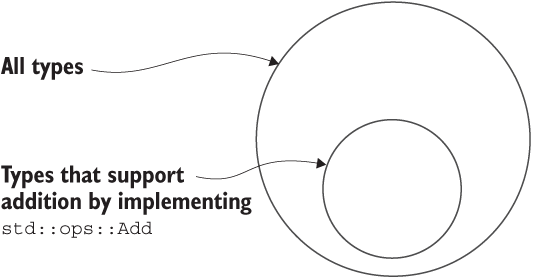
Figure 2.3 Only a subset of types have implement operators. When creating generic functions that include such an operator, that operation’s trait must be included as a trait bound.
How do we specify that type T must implement addition? Answering this requires introducing some new terminology.
All of Rust’s operators, including addition, are defined within traits. To require that type T must support addition, we include a trait bound alongside the type variable in the function’s definition. The following listing gives an example of this syntax.
Listing 2.16 Type signature of a generic function with trait bounds
fn add<T: std::ops::Add<Output = T>>(i: T, j: T) -> T  {
  i + j
}
The fragment <T: std::ops::Add<Output = T>> says that T must implement std::ops::Add. Using a single type variable T with the trait bound ensures that arguments i and j, as well as the result type, are the same type and that their type supports addition.
What is a trait? A trait is a language feature that is analogous to an interface, protocol, or contract. If you have a background in object-oriented programming, consider a trait to be an abstract base class. If you have a background in functional programming, Rust’s traits are close to Haskell’s type classes. For now, it’s enough to say that traits enable types to advertise that they are using common behavior.
All of Rust’s operations are defined with traits. For example, the addition operator (+) is defined as the std::ops::Add trait. Traits are properly introduced in chapter 3 and are progressively explained in depth during the course of the book.
To reiterate: all of Rust’s operators are syntactic sugar for a trait’s methods. Rust supports operator overloading this way. During the compilation process, a + b is converted to a.add(b).
Listing 2.17 is a full example that demonstrates that generic functions can be called by multiple types. The listing prints these three lines to the console:
4.6
30
15s
Listing 2.17 A generic function with a type variable and trait bounds
 1 use std::ops::{Add};                             ①
 2 use std::time::{Duration};                       ②
 3
 4 fn add<T: Add<Output = T>>(i: T, j: T) -> T {    ③
 5   i + j
 6 }
 7
 8 fn main() {
 9   let floats = add(1.2, 3.4);                    ④
10   let ints = add(10, 20);                        ⑤
11   let durations = add(                           ⑥
12     Duration::new(5, 0),                         ⑥
13     Duration::new(10, 0)                         ⑥
14   );
15
16   println!("{}", floats);
17   println!("{}", ints);
18   println!("{:?}", durations);                   ⑦
19
20 }
① Brings the Add trait from std::ops into local scope
② Brings the Duration type from std::time into local scope
③ The arguments to add() can accept any type that implements std::ops::Add.
④ Calls add() with floating-point values
⑤ Calls add() with integer values
⑥ Calls add() with Duration values, representing a duration between two points in time
⑦ Because std::time::Duration does not implement the std::fmt::Display trait, we can fall back to requesting std::fmt::Debug.
As you can see, function signatures can become somewhat convoluted. Interpreting these can take some patience. Hopefully, you now have the tools to break the pieces apart in case you get stuck down the track. Here are a few principles that should assist you when reading Rust code:
Terms beginning with uppercase (Add) are either traits or concrete types, such as String or Duration.
We’ve spent most of the chapter discussing numbers. It’s time for another practical example. We’ll use it to learn a little bit about how Rust handles text.
Listing 2.18 is our first iteration of grep-lite. The code for this program is in the ch2-str-simple-pattern.rs file. Its hard-coded parameters restrict flexibility somewhat, but these are useful illustrations of string literals. The code prints a line to the console:
dark square is a picture feverishly turned--in search of what?
Listing 2.18 Searching for a simple pattern within lines of a string
 1 fn main() {
 2   let search_term = "picture";
 3   let quote = "\
 4 Every face, every shop, bedroom window, public-house, and
 5 dark square is a picture feverishly turned--in search of what?
 6 It is the same with books.
 7 What do we seek through millions of pages?";     ①
 8
 9   for line in quote.lines() {                    ②
10     if line.contains(search_term) {
11       println!("{}", line);
12     }
13   }
14 }
① Multilined strings do not require special syntax. The \ character on line 3 escapes the new line.
② lines() returns an iterator over quote where each iteration is a line of text. Rust uses each operating system’s conventions on what constitutes a new line.
As you can see, Rust’s strings can do quite a lot by themselves. Some features of listing 2.18 that are worth highlighting include the following. From here, we’ll expand the functionality of our proto-application:
Line 9 (quote.lines()) demonstrates iterating line-by-line in a platform-independent manner.
Line 10 (line.contains()) demonstrates searching for text using the method syntax.
Let’s start adding functionality to grep-lite by printing the line number along with the match. This is equivalent to the -n option within the POSIX.1-2008 standard for the grep utility (http://mng.bz/ZPdZ).
Adding a few lines to our previous example, we now see the following line printed to the screen. Listing 2.19 shows the code that adds this functionality, which you’ll find in ch2/ch2-simple-with-linenums.rs:
2: dark square is a picture feverishly turned--in search of what?
Listing 2.19 Manually incrementing an index variable
 1 fn main() {
 2   let search_term = "picture";
 3   let quote = "\                              ①
 4 Every face, every shop, bedroom window, public-house, and
 5 dark square is a picture feverishly turned--in search of what?
 6 It is the same with books. What do we seek through millions of pages?";
 7   let mut line_num: usize = 1;                ②
 8
 9   for line in quote.lines() {
10     if line.contains(search_term) {
11       println!("{}: {}", line_num, line);     ③
12     }
13     line_num += 1;                            ④
14   }
15 }
① A backslash escapes the newline character in the string literal.
② Declares line_num as mutable via let mut and initializes it with 1
③ Updates the println! macro to allow for both values to be printed
④ Increments line_num in place
Listing 2.20 shows a more ergonomic approach to incrementing i. The output is the same, but here the code makes use of the enumerate() method and method chaining. enumerate() takes an iterator I, returning another (N, I), where N is a number that starts at 0 and increments by 1 each iteration. The source code for this listing can be found in ch2/ch2-simple-with-enumerate.rs.
Listing 2.20 Automatically incrementing an index variable
 1 fn main() {
 2   let search_term = "picture";
 3   let quote = "\
 4 Every face, every shop, bedroom window, public-house, and
 5 dark square is a picture feverishly turned--in search of what?
 6 It is the same with books. What do we seek through millions of pages?";
 7
 8   for (i, line) in quote.lines().enumerate() {    ①
 9     if line.contains(search_term) {
10       let line_num = i + 1;                       ②
11       println!("{}: {}", line_num, line);
12     }
13   }
14 }
① Because lines() returns an iterator, it can be chained with enumerate().
② Performs addition to calculate the line number, avoiding calculations at every step
Another feature of grep that is extremely useful is to print some context before and after the line that matches. In the GNU grep implementation, this is the -C NUM switch. To add support for that feature in grep-lite, we need to be able to create lists.
Lists of things are incredibly common. The two types that you will work with most often are arrays and vectors. Arrays are fixed-width and extremely lightweight. Vectors are growable but incur a small runtime penalty because of the extra bookkeeping that these do. To understand the underlying mechanisms with text data in Rust, it helps to have a cursory understanding of what is happening.
The goal of this section is to support printing out n lines of context that surround a match. To get there, we need to segue somewhat and explain more fully arrays, slices, and vectors. The most useful type for this exercise is the vector. To learn about vectors, though, we need to start by learning about its two simpler cousins: arrays and slices.
An array, at least as far as Rust is concerned, is a tightly-packed collection of the same thing. It’s possible to replace items within an array, but its size cannot change. Because variable-length types like String add a degree of complication, we’ll revert back to discussing numbers for a little while.
Creating arrays takes two forms. We can provide a comma-delimited list within square brackets (for example, [1, 2, 3]) or a repeat expression, where you furnish two values delimited by a semicolon (for example, [0; 100]). The value on the left (0) is repeated by the number of times on the right (100). Listing 2.21 shows each variation on lines 2–5. The source code for this listing is in the ch2-3arrays.rs file. It prints these four lines to the console:
[1, 2, 3]:     1 + 10 = 11    2 + 10 = 12    3 + 10 = 13    (Σ[1, 2, 3] = 6)
[1, 2, 3]:     1 + 10 = 11    2 + 10 = 12    3 + 10 = 13    (Σ[1, 2, 3] = 6)
[0, 0, 0]:     0 + 10 = 10    0 + 10 = 10    0 + 10 = 10    (Σ[0, 0, 0] = 0)
[0, 0, 0]:     0 + 10 = 10    0 + 10 = 10    0 + 10 = 10    (Σ[0, 0, 0] = 0)
Listing 2.21 Defining arrays and iterating over their elements
fn main() {
  let one             = [1, 2, 3];
  let two: [u8; 3]    = [1, 2, 3];
  let blank1          = [0; 3];
  let blank2: [u8; 3] = [0; 3];

  let arrays = [one, two, blank1, blank2];

  for a in &arrays {
    print!("{:?}: ", a);
    for n in a.iter() {
      print!("\t{} + 10 = {}", n, n+10);
    }

    let mut sum = 0;
    for i in 0..a.len() {
      sum += a[i];
    }
    println!("\t({:?} = {})", a, sum);
  }
}
Arrays are a simple data structure from the machine’s point of view. These are a contiguous block of memory with elements of a uniform type. The simplicity is still somewhat deceptive. Arrays can cause a few learning difficulties for newcomers:
The notation can be confusing. [T; n ] describes an array’s type, where T is the elements’ type and n is a non-negative integer. [f32; 12] denotes an array of 12 32-bit floating-point numbers. It’s easy to get confused with slices [T], which do not have a compile-time length.
[u8; 3] is a different type than [u8; 4]. The size of the array matters to the type system.
In practice, most interaction with arrays occurs via another type called a slice ( [T]). The slice is itself interacted with by reference (&[T]). And to add some linguistic confusion into the mix, both slices and references to slices are called slices.
Rust maintains its focus on safety. Array indexing is bounds checked. Requesting an item that’s out of bounds crashes (panics in Rust terminology) the program rather than returning erroneous data.
Slices are dynamically sized array-like objects. The term dynamically sized means that their size is not known at compile time. Yet, like arrays, these don’t expand or contract. The use of the word dynamic in dynamically sized is closer in meaning to dynamic typing rather than movement. The lack of compile-time knowledge explains the distinction in the type signature between an array ([T; n ]) and a slice ([T]).
Slices are important because it’s easier to implement traits for slices than arrays. Traits are how Rust programmers add methods to objects. As [T; 1], [T; 2], ..., [T; n ] are all different types, implementing traits for arrays can become unwieldy. Creating a slice from an array is easy and cheap because it doesn’t need to be tied to any specific size.
Another important use for slices is their ability to act as a view on arrays (and other slices). The term view here is taken from database technology and means that slices can gain fast, read-only access to data without needing to copy anything around.
The problem with slices is that Rust wants to know the size of every object in your program, and slices are defined as not having a compile-time size. References to the rescue. As mentioned in the discussion about the use of the term dynamically sized, slice size is fixed in memory. These are made up of two usize components (a pointer and a length). That’s why you typically see slices referred to in their referenced form, &[T] (like string slices that take the notation &str).
Note Don’t worry too much about the distinctions between arrays and slices yet. In practice, it’s not material. Each term is an artifact of implementation details. Those implementation details are important when dealing with performance-critical code but not when learning the basics of the language.
Vectors (Vec<T>) are growable lists of T. Using vectors is extremely common in Rust code. These incur a small runtime penalty compared to arrays because of the extra bookkeeping that must be done to enable their size to change over time. But vectors almost always make up for this with their added flexibility.
The task at hand is to expand the feature set of the grep-lite utility. Specifically, we want the ability to store n lines of context around a match. Naturally, there are many ways to implement such a feature.
To minimize code complexity, we’ll use a two-pass strategy. In the first pass, we’ll tag lines that match. During the second pass, we’ll collect lines that are within n lines of each of the tags.
The code in listing 2.22 (available at ch2/ch2-introducing-vec.rs) is the longest you’ve seen so far. Take your time to digest it.
The most confusing syntax in the listing is probably Vec<Vec<(usize, String)>>, which appears on line 15. Vec<Vec<(usize, String)>> is a vector of vectors (e.g., Vec<Vec<T>>), where T is a pair of values of type (usize, String). (usize, String) is a tuple that we’ll use to store line numbers along with the text that’s a near match. When the needle variable on line 3 is set to "oo", the following text is printed to the console:
1: Every face, every shop,
2: bedroom window, public-house, and
3: dark square is a picture
4: feverishly turned--in search of what?
3: dark square is a picture
4: feverishly turned--in search of what?
5: It is the same with books.
6: What do we seek
7: through millions of pages?
Listing 2.22 Enabling context lines to be printed out with a Vec<Vec<T>>
 1 fn main() {
 2   let ctx_lines = 2;
 3   let needle = "oo";
 4   let haystack = "\
 5 Every face, every shop,
 6 bedroom window, public-house, and
 7 dark square is a picture
 8 feverishly turned--in search of what?
 9 It is the same with books.
10 What do we seek
11 through millions of pages?";
12
13   let mut tags: Vec<usize> = vec![];                     ①
14   let mut ctx: Vec<Vec<(
15                usize, String)>> = vec![];                ②
16
17   for (i, line) in haystack.lines().enumerate() {        ③
18     if line.contains(needle) {
19       tags.push(i);
20
21       let v = Vec::with_capacity(2*ctx_lines + 1);       ④
22       ctx.push(v);
23     }
24   }
25
26   if tags.is_empty() {                                   ⑤
27     return;
28   }
29
30   for (i, line) in haystack.lines().enumerate() {        ⑥
31     for (j, tag) in tags.iter().enumerate() {
32       let lower_bound =
33           tag.saturating_sub(ctx_lines);                 ⑦
34       let upper_bound =
35           tag + ctx_lines;
36
37       if (i >= lower_bound) && (i <= upper_bound) {
38           let line_as_string = String::from(line);       ⑧
39           let local_ctx = (i, line_as_string);
40           ctx[j].push(local_ctx);
41       }
42     }
43   }
44
45   for local_ctx in ctx.iter() {
46     for &(i, ref line) in local_ctx.iter() {             ⑨
47      let line_num = i + 1;
48       println!("{}: {}", line_num, line);
49     }
50   }
51 }
① tags holds line numbers where matches occur.
② ctx contains a vector per match to hold the context lines.
③ Iterates through the lines, recording line numbers where matches are encountered
④ Vec::with_capacity(n) reserves space for n items. No explicit type signature is required as it can be inferred via the definition of ctx on line 15.
⑤ When there are no matches, exits early
⑥ For each tag, at every line, checks to see if we are near a match. When we are, adds that line to the relevant Vec<T> within ctx.
⑦ saturating_sub() is subtraction that returns 0 on integer underflow rather than crashing the program (CPUs don’t like attempting to send usize below zero).
⑧ Copies line into a new String and stores that locally for each match
⑨ ref line informs the compiler that we want to borrow this value rather than move it. These two terms are explained fully in later chapters.
Vec<T> performs best when you can provide it with a size hint via Vec::with_ capacity(). Providing an estimate minimizes the number of times memory will need to be allocated from the OS.
Note When considering this approach in real text files, encodings can cause issues. String is guaranteed to be UTF-8. Naively reading in a text file to a String causes errors if invalid bytes are detected. A more robust approach is to read in data as [u8] (a slice of u8 values), then decode those bytes with help from your domain knowledge.
Incorporating third-party code is essential to productive Rust programming. Rust’s standard library tends to lack many things that other languages provide, like random number generators and regular expression support. That means it’s common to incorporate third-party crates into your project. To get your feet wet, let’s start with the regex crate.
Crates are the name the Rust community uses where others use terms such as package, distribution, or library. The regex crate provides the ability to match regular expressions rather than simply looking for exact matches.
To use third-party code, we’ll rely on the cargo command-line tool. Follow these instructions:
Move to a scratch directory with cd /tmp (cd %TMP% on MS Windows).
Run cargo new grep-lite --vcs none. It produces a short confirmation message:
Created binary (application) `grep-lite` package
Execute cargo add regex@1 to add version 1 of the regex crate as a dependency. This alters the file /tmp/grep-lite/Cargo.toml. If cargo add is unavailable for you, see the sidebar, “2.2,” in section 2.3.4.
Run cargo build. You should see output fairly similar to the following begin to appear:
  Updating crates.io index
Downloaded regex v1.3.6
 Compiling lazy_static v1.4.0
 Compiling regex-syntax v0.6.17
 Compiling thread_local v1.0.1
 Compiling aho-corasick v0.7.10
 Compiling regex v1.3.6
 Compiling grep-lite v0.1.0 (/tmp/grep-lite)
  Finished dev [unoptimized + debuginfo] target(s) in 4.47s
Now that you have the crate installed and compiled, let’s put it into action. First, we’ll support searching for exact matches in listing 2.23. Later, in listing 2.26, the project grows to support regular expressions.
Regular expressions add great flexibility to the patterns that we are able to search for. The following listing is a copy of an early example that we’ll modify.
Listing 2.23 Matching on exact strings with the contains() method
fn main() {
  let search_term = "picture";
  let quote = "Every face, every shop, bedroom window, public-house, and
dark square is a picture feverishly turned--in search of what?
It is the same with books. What do we seek through millions of pages?";

  for line in quote.lines() {
    if line.contains(search_term) {     ①
      println!("{}", line);
    }
  }
}
① Implements a contains() method that searches for a substring
Make sure that you have updated grep-lite/Cargo.toml to include regex as a dependency as described in the previous section. Now, open grep-lite/src/main.rs in a text editor and fill it in with the code in the following listing. The source code for this listing is available in ch2/ch2-with-regex.rs.
Listing 2.24 Searching for patterns with regular expressions
use regex::Regex;                               ①

fn main() {
  let re = Regex::new("picture").unwrap();      ②

  let quote = "Every face, every shop, bedroom window, public-house, and
dark square is a picture feverishly turned--in search of what?
It is the same with books. What do we seek through millions of pages?";

  for line in quote.lines() {
    let contains_substring = re.find(line);
    match contains_substring {                  ③

        Some(_) => println!("{}", line),        ④
        None => (),                             ⑤
    }
  }
}
① Brings the Regex type from the regex crate into local scope
② unwrap() unwraps a Result, crashing if an error occurs. Handling errors more robustly is discussed in depth later in the book.
③ Replaces the contains() method from listing 2.23 with a match block that requires that we handle all possible cases
④ Some(T) is the positive case of an Option, meaning that re.find() was successful: it matches all values.
⑤ None is the negative case of an Option; () can be thought of as a null placeholder value here.
Open a command prompt and move to the root directory of your grep-lite project. Executing cargo run should produce output similar to the following text:
$ cargo run
   Compiling grep-lite v0.1.0 (file:/ / /tmp/grep-lite)
    Finished dev [unoptimized + debuginfo] target(s) in 0.48s
     Running `target/debug/grep-lite`
dark square is a picture feverishly turned--in search of what?
Admittedly, the code within listing 2.24 hasn’t taken significant advantage of its newfound regular expression capabilities. Hopefully, you’ll have the confidence to be able to slot those into some of the more complex examples.
Documentation for third-party crates is typically available online. Still, it can be useful to know how to generate a local copy in case the internet fails you:
Move to the root of the project directory in a terminal: /tmp/grep-lite or %TMP%\grep-lite
Execute cargo doc. It will inform you of its progress in the console:
$ cargo doc
    Checking lazy_static v1.4.0
 Documenting lazy_static v1.4.0
    Checking regex-syntax v0.6.17
 Documenting regex-syntax v0.6.17
    Checking memchr v2.3.3
 Documenting memchr v2.3.3
    Checking thread_local v1.0.1
    Checking aho-corasick v0.7.10
 Documenting thread_local v1.0.1
 Documenting aho-corasick v0.7.10
    Checking regex v1.3.6
 Documenting regex v1.3.6
 Documenting grep-lite v0.1.0 (file:/ / /tmp/grep-lite)
    Finished dev [unoptimized + debuginfo] target(s) in 3.43s
Congratulations. You have now created HTML documentation. By opening /tmp/grep-lite/target/doc/grep_lite/index.html in a web browser (also try cargo doc --open from the command line), you’ll be able to view the documentation for all the crates that yours depend on. It’s also possible to inspect the output directory to take a look at what is available to you:
$ tree -d -L 1 target/doc/
target/doc/
├── aho_corasick
├── grep_lite
├── implementors
├── memchr
├── regex
├── regex_syntax
├── src
└── thread_local
rustup is another handy command-line tool, along with cargo. Where cargo manages projects, rustup manages your Rust installation(s). rustup cares about Rust toolchains and enables you to move between versions of the compiler. This means it’s possible to compile your projects for multiple platforms and experiment with nightly features of the compiler while keeping the stable version nearby.
rustup also simplifies accessing Rust’s documentation. Typing rustup doc opens your web browser to a local copy of Rust’s standard library.
Our program is rapidly increasing its feature count. Yet, there is no way for any options to be specified. To become an actual utility, grep-lite needs to be able to interact with the world.
Sadly, though, Rust has a fairly tight standard library. As with regular expressions, another area with relatively minimalist support is handling command-line arguments. A nicer API is available through a third-party crate called clap (among others).
Now that we’ve seen how to bring in third-party code, let’s take advantage of that to enable users of grep-lite to choose their own pattern. (We’ll get to choosing their own input source in the next section.) First, add clap as a dependency in your Cargo.toml:
$ cargo add clap@2
    Updating 'https:/ /github.com/rust-lang/crates.io-index' index
      Adding clap v2 to dependencies
You can confirm that the crate has been added to your project by inspecting its Cargo.toml file.
Listing 2.25 Adding a dependency to grep-lite/Cargo.toml
[package]
name = "grep-lite"
version = "0.1.0"
authors = ["Tim McNamara <author@rustinaction.com>"]

[dependencies]
regex = "1"
clap = "2"
Listing 2.26 Editing grep-lite/src/main.rs
 1 use regex::Regex;
 2 use clap::{App,Arg};                                  ①
 3
 4 fn main() {
 5   let args = App::new("grep-lite")                    ②
 6     .version("0.1")
 7     .about("searches for patterns")
 8     .arg(Arg::with_name("pattern")
 9       .help("The pattern to search for")
10       .takes_value(true)
11       .required(true))
12     .get_matches();
13
14   let pattern = args.value_of("pattern").unwrap();    ③
15   let re = Regex::new(pattern).unwrap();
16
17   let quote = "Every face, every shop, bedroom window, public-house, and
18 dark square is a picture feverishly turned--in search of what?
19 It is the same with books. What do we seek through millions of pages?";
20
21   for line in quote.lines() {
22     match re.find(line) {
23         Some(_) => println!("{}", line),
24         None => (),
25     }
26   }
27 }
① Brings clap::App and clap::Arg objects into local scope
② Incrementally builds a command argument parser, where each argument takes an Arg. In our case, we only need one.
③ Extracts the pattern argument
With your project updated, executing cargo run should set off a few lines in your console:
$ cargo run
    Finished dev [unoptimized + debuginfo] target(s) in 2.21 secs
     Running `target/debug/grep-lite`
error: The following required arguments were not provided:
    <pattern>

USAGE:
    grep-lite <pattern>

For more information try --help
The error is due to the fact that we haven’t passed sufficient arguments through to our resulting executable. To pass arguments through, cargo supports some special syntax. Any arguments appearing after -- are sent through to the resulting executable binary:
$ cargo run -- picture
    Finished dev [unoptimized + debuginfo] target(s) in 0.0 secs
     Running `target/debug/grep-lite picture`
dark square is a picture feverishly turned--in search of what?
But clap does more than provide parsing. It also generates usage documentation on your behalf. Running grep-lite --help provides an expanded view:
$ ./target/debug/grep-lite --help
grep-lite 0.1
searches for patterns

USAGE:
    grep-lite <pattern>

FLAGS:
    -h, --help       Prints help information
    -V, --version    Prints version information

ARGS:
    <pattern>    The pattern to search for
Searching for text wouldn’t be complete without being able to search within files. File I/O can be surprisingly finicky and so has been left until last.
Before adding this functionality to grep-lite, let’s take a look at a standalone example in listing 2.27. The code for this listing is in the ch2-read-file.rs file. The general pattern is to open a File object, then wrap that in a BufReader. BufReader takes care of providing buffered I/O, which can reduce system calls to the OS if the hard disk is congested.
Listing 2.27 Reading a file manually line by line
 1 use std::fs::File;
 2 use std::io::BufReader;
 3 use std::io::prelude::*;
 4
 5 fn main() {
 6   let f = File::open("readme.md").unwrap();    ①
 7   let mut reader = BufReader::new(f);
 8
 9   let mut line = String::new();                ②
10
11   loop {
12     let len = reader.read_line(&mut line)
13                     .unwrap();                 ③
14     if len == 0 {
15       break
16     }
17
18     println!("{} ({} bytes long)", line, len);
19
20     line.truncate(0);                          ④
21   }
22 }
① Creates a File object that requires a path argument and error handling if the file does not exist. This program crashes if a readme.md is not present.
② Reuses a single String object over the lifetime of the program
③ Because reading from disk can fail, we need to explicitly handle this. In our case, errors crash the program.
④ Shrinks the String back to length 0, preventing lines from persisting into the following ones
Manually looping through a file can be cumbersome, despite its usefulness in some cases. For the common case of iterating through lines, Rust provides a helper iterator as the following listing shows. The source code for this listing is in the file ch2/ch2-bufreader-lines.rs.
Listing 2.28 Reading a file line by line via BufReader::lines()
 1 use std::fs::File;
 2 use std::io::BufReader;
 3 use std::io::prelude::*;
 4
 5 fn main() {
 6   let f = File::open("readme.md").unwrap();
 7   let reader = BufReader::new(f);
 8
 9   for line_ in reader.lines() {                        ①
10     let line = line_.unwrap();                         ②
11     println!("{} ({} bytes long)", line, line.len());
12   }
13 }
① A subtle behavior change occurs here. BufReader::lines() removes the trailing newline character from each line.
② Unwraps the Result, but at the risk of crashing the program if an error occurs
We’re now in a position to add reading from a file into grep-lite’s feature list. The following listing creates a complete program that takes a regular expression pattern and an input file as arguments.
Listing 2.29 Reading lines from a file
 1 use std::fs::File;
 2 use std::io::BufReader;
 3 use std::io::prelude::*;
 4 use regex::Regex;
 5 use clap::{App,Arg};
 6
 7 fn main() {
 8   let args = App::new("grep-lite")
 9     .version("0.1")
10     .about("searches for patterns")
11     .arg(Arg::with_name("pattern")
12       .help("The pattern to search for")
13       .takes_value(true)
14       .required(true))
15     .arg(Arg::with_name("input")
16       .help("File to search")
17       .takes_value(true)
18       .required(true))
19     .get_matches();
20
21   let pattern = args.value_of("pattern").unwrap();
22   let re = Regex::new(pattern).unwrap();
23
24   let input = args.value_of("input").unwrap();
25   let f = File::open(input).unwrap();
26   let reader = BufReader::new(f);
27
28   for line_ in reader.lines() {
29     let line = line_.unwrap();
30     match re.find(&line) {                 ①
31         Some(_) => println!("{}", line),
32         None => (),
33     }
34   }
35 }
① line is a String, but re.find() takes an &str as an argument.
A command-line utility wouldn’t be complete if it wasn’t able to read from stdin. Unfortunately for those readers who skimmed over earlier parts of this chapter, some of the syntax on line 8 might look quite unfamiliar. In short, rather than duplicate code within main(), we’ll use a generic function to abstract away the details of whether we are dealing with files or stdin:
Listing 2.30 Searching through a file or stdin
 1 use std::fs::File;
 2 use std::io;
 3 use std::io::BufReader;
 4 use std::io::prelude::*;
 5 use regex::Regex;
 6 use clap::{App,Arg};
 7
 8 fn process_lines<T: BufRead + Sized>(reader: T, re: Regex) {
 9   for line_ in reader.lines() {
10     let line = line_.unwrap();
11     match re.find(&line) {                 ①
12         Some(_) => println!("{}", line),
13         None => (),
14     }
15   }
16 }
17
18 fn main() {
19   let args = App::new("grep-lite")
20     .version("0.1")
21     .about("searches for patterns")
22     .arg(Arg::with_name("pattern")
23       .help("The pattern to search for")
24       .takes_value(true)
25       .required(true))
26     .arg(Arg::with_name("input")
27       .help("File to search")
28       .takes_value(true)
29       .required(false))
30     .get_matches();
31
32   let pattern = args.value_of("pattern").unwrap();
33   let re = Regex::new(pattern).unwrap();
34
35   let input = args.value_of("input").unwrap_or("-");
36
37   if input == "-" {
38     let stdin = io::stdin();
39     let reader = stdin.lock();
40     process_lines(reader, re);
41   } else {
42     let f = File::open(input).unwrap();
43     let reader = BufReader::new(f);
44     process_lines(reader, re);
45   }
46 }
① line is a String, but re.find() takes an &str as an argument.
Rust has full support for primitive types, such as integers and floating-point numbers.
Functions are strongly typed and require types to be specified for their parameters and return values.
Rust features, such as iteration and mathematical operations, rely on traits. The for loop is a shorthand for the std::iter::IntoIterator trait, for example.
List-like types are tailored to specific use cases. You will typically reach for Vec<T> first.
Every crate has a Cargo.toml file that specifies its metadata.
The cargo tool is able to compile your code and fetch its dependencies.
The rustup tool provides access to multiple compiler toolchains and to the language’s documentation.
1.This isn’t technically correct, but is accurate enough for now. If you’re an experienced Rust programmer skimming through this chapter, you’ll know that main() returns () (unit) by default and can also return a Result.
2.For the curious and eager, the traits involved here are std::cmp::PartialOrd and std::cmp::PartialEq.
3.Mechanical engineers use j rather than i.
4.Although Rust is not object-oriented (it’s impossible to create a subclass, for example), Rust makes use of some terminology from that domain. It’s common to hear of Rust programmers discussing instances, methods, and objects.
5.This functionality is also available with continue, but it’s less common.
6.Omitting lifetime annotations is formally referred to as lifetime elision.